* HOW TO * under fifty bux *
#71
 12-06-2007, 08:30 PM

Hey I want some details on dropping the front end. I have seen others mention they have dropped theor front ends by lowering the forks? I am not talking about getting new front springs. can someone clarify this, and let me know if this would be safe to do with a set of lowered progressive springs in the back?

#73
12-06-2007, 09:51 PM
Elite HDF Member
Join Date: Jun 2006
Location: Templeton California
Posts: 3,572
Likes: 0
Received 3 Likes
on
3 Posts
Dropping the front end is super easy if you have a good lift if not you'll have to get creative.All you need to do is loosen the triple clamp pinch bolts top and bottom and slide the forks up in the clamps about an inch or so and tighten them back up.I did mine by putting my bike on the lift and raising it till it was just barely touching, the loosening up the bolts and lowering it a a little at a time till it was where I wanted it.Mine are now flush with the top of the triples because I like cornering clearance you can adjust up or down the same way.
#75
12-07-2007, 12:11 AM

Nice job tree.
Never seen that one before.
mud
ORIGINAL: tree88
Another air cleaner "mod"- after pricing a replacement element for my bike, i decided that it was too d@mn expensive, so i stopped by the local auto parts store (twilight zone in this case), and picked up an edelbrock pro-flo air cleaner assembly meant for a 4bbl holley. upon returning home i removed the factory air filter and cut the top off of it (the mounting flange) and discarded the rest. I had to open the neck on the new filter up from 5 1/8" to 6 1/4" to get it to fit over the backing plate for the carb (not that hard, just used pliers, hammer, dolley and patience). ran the stock air filter cover screw through the top plate backwards (threads pointing out) and put a nut, as well as some loctite, on the backside to prevent it coming out. re-mounted the top plate and then secured the base for the new air filter to it. then i snapped on the top part of the pro-flo. The proflo is designed to be run dry or with a slight bit of oil in the foam element... don't worry about oiling it, the bike will do it for you. It flows 1000cfm and only needs to washed with soap and water every 2000miles. total cost 29.75 (24.95 for the pro-flo, 1.97 for loc-tite, and 1.35 for the nut... plus tax.) btw- i sealed the air filter base to the backing plate with some black rtv (not included in price total)
Another air cleaner "mod"- after pricing a replacement element for my bike, i decided that it was too d@mn expensive, so i stopped by the local auto parts store (twilight zone in this case), and picked up an edelbrock pro-flo air cleaner assembly meant for a 4bbl holley. upon returning home i removed the factory air filter and cut the top off of it (the mounting flange) and discarded the rest. I had to open the neck on the new filter up from 5 1/8" to 6 1/4" to get it to fit over the backing plate for the carb (not that hard, just used pliers, hammer, dolley and patience). ran the stock air filter cover screw through the top plate backwards (threads pointing out) and put a nut, as well as some loctite, on the backside to prevent it coming out. re-mounted the top plate and then secured the base for the new air filter to it. then i snapped on the top part of the pro-flo. The proflo is designed to be run dry or with a slight bit of oil in the foam element... don't worry about oiling it, the bike will do it for you. It flows 1000cfm and only needs to washed with soap and water every 2000miles. total cost 29.75 (24.95 for the pro-flo, 1.97 for loc-tite, and 1.35 for the nut... plus tax.) btw- i sealed the air filter base to the backing plate with some black rtv (not included in price total)
#76
12-07-2007, 12:12 AM
ORIGINAL: tree88
just ordered the ammo boxes. 42.61 for two
wwII style side opening style.
only leaves $7 to work with.
will keep ya'll updated.
just ordered the ammo boxes. 42.61 for two
wwII style side opening style.
only leaves $7 to work with.
will keep ya'll updated.
I'm real interested in seeing what you do with this one.
My cans were free from a friend,
and I doubt I put more than 7 bux into it
even including a can of paint I bought.
You ain't gonna need paint,
unless you try to change your image over to glamour boy
and I just don't see that,
even if you do get a can of paint.
mud
Last edited by mud; 02-24-2015 at 05:07 PM.
#77
12-07-2007, 10:44 AM

Banned
Join Date: Jun 2007
Location: Elizabethtown, Pa
Posts: 5,431
Likes: 0
Received 0 Likes
on
0 Posts
#79
12-07-2007, 11:11 AM
May our Moderator Rest in Peace
Not sure if a Softail guy is allowed to post over here in Dyna country but I found a nice and reasonably cheap way to get rid of some of the crappy cad plated junk hardware the factory puts our bikes together with.
I did this one on the fenderr struts on my bike.
But I'm sure that you guys can find otherplaceson your bikes to use it or a variation of it on.
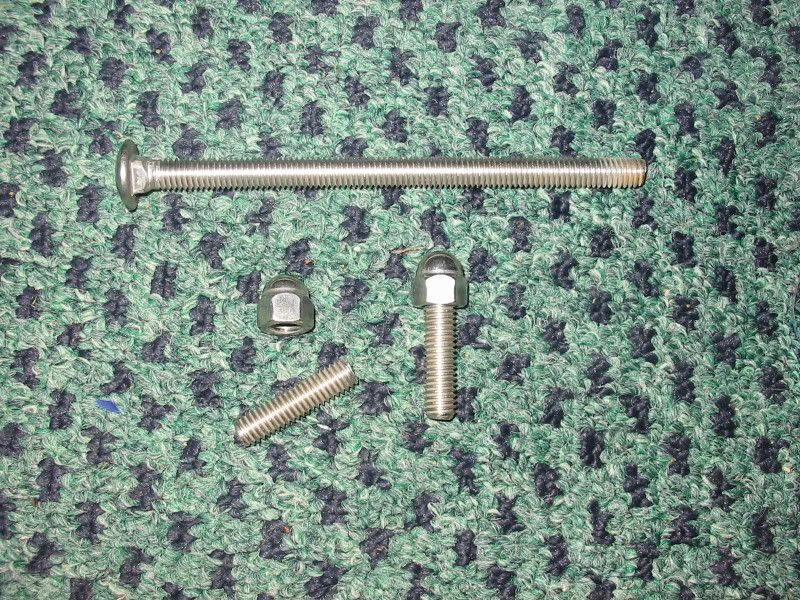
Use some SS treaded rod, I used SS carrage bolts and cut the threaded section to lengths needed. Jam acorn nuts on the ends with some JB Weld so they don't come apart. I would have used a stainless steel pin through the nut and rod but couldn't find any, and the JB seems to do the job well enough anyway.
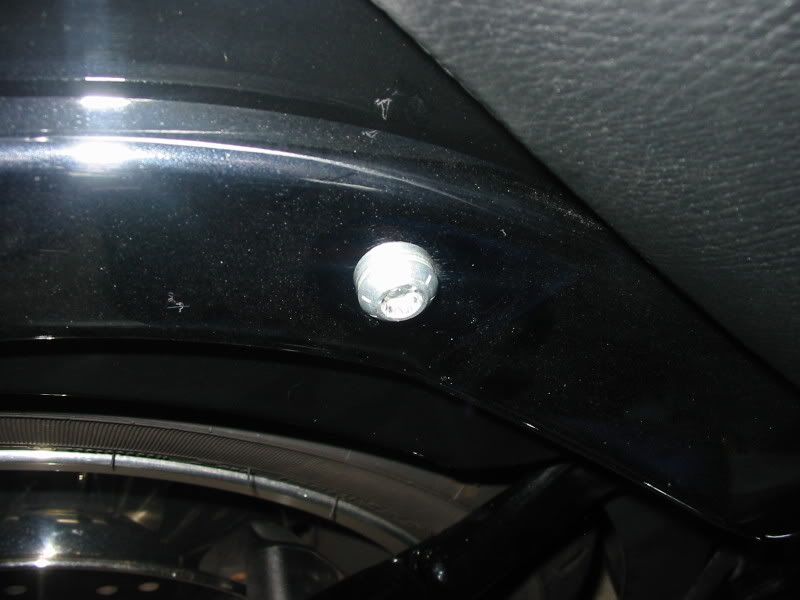
Stock Torx bolts in strut.
The parts you need.
And the finished product.

I think they look a lot better, you can remove them a lot easier than the soft Torx headed bolts andI don't have to worry about them rusting.
Here's avery easy and cheap way to get the "Harley" sound a bike should have had from the factory that doesn't needto have the Delphi FI system remapped if youleave the intake alone.I spent under $5 for the parts I used to do it right.
Heres' the tools I used to take it 'out';
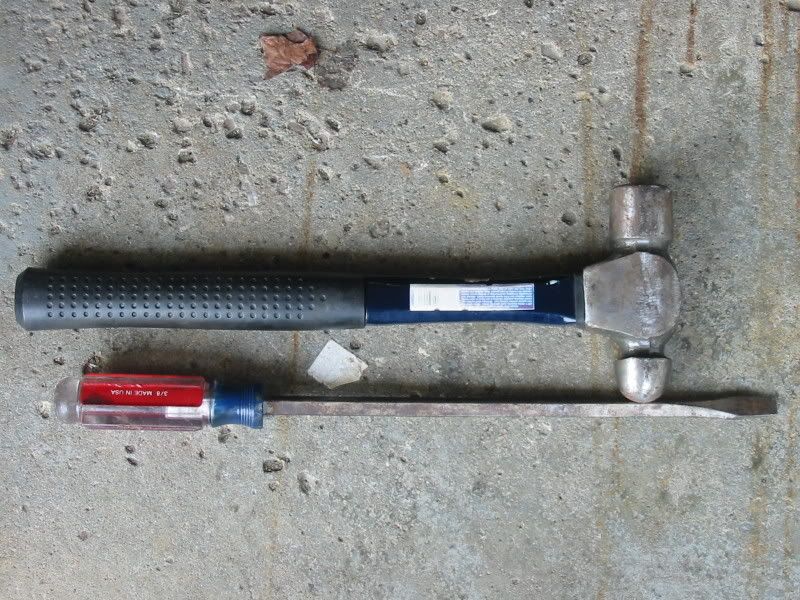
I didn't have a hole saw that would fit all the way down to the plate so I used a hammer and screwdriver, unfortunatly it leaves a bunch of ragged edges. So I came upwith these parts, under $5 at the local Lowes plus a 21mm socket to clean things up.
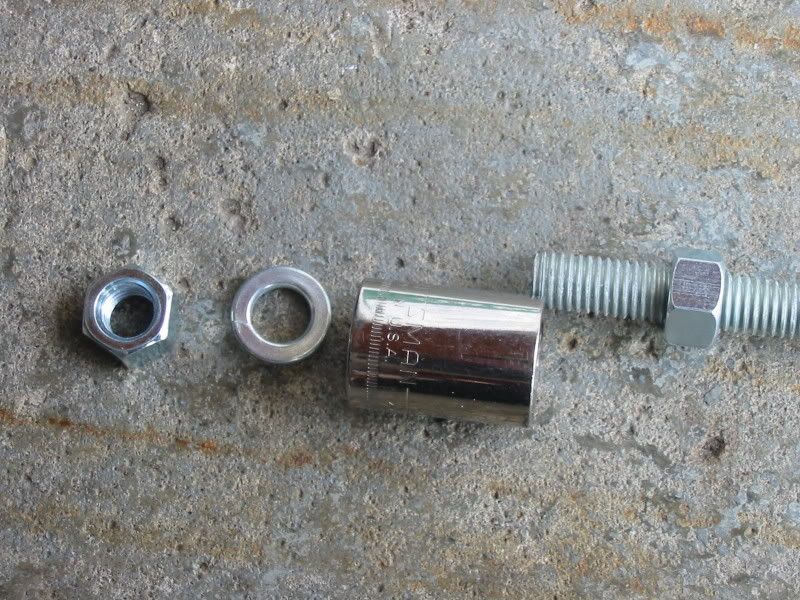
1 piece of 1/2" X 3' long threaded rod, three nuts to fit and four washers.
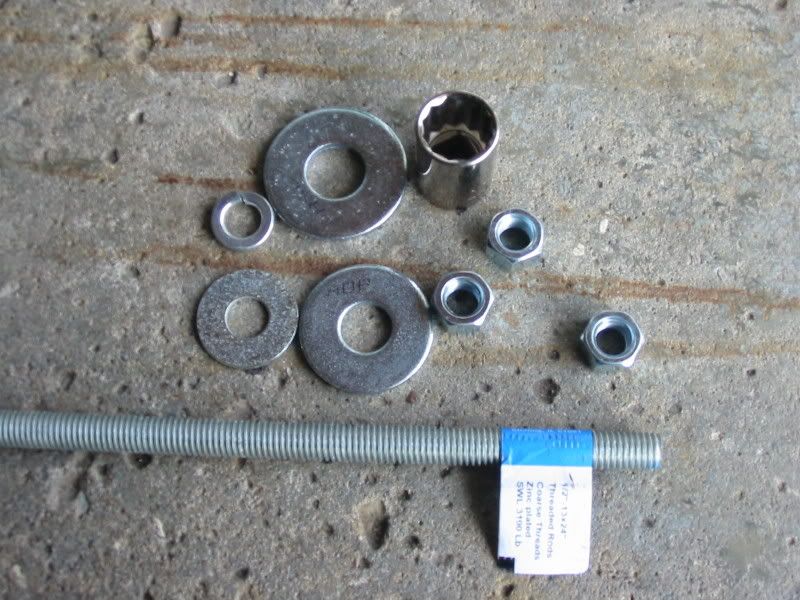
Put two nuts the socket and a lock washer together like this at one end.
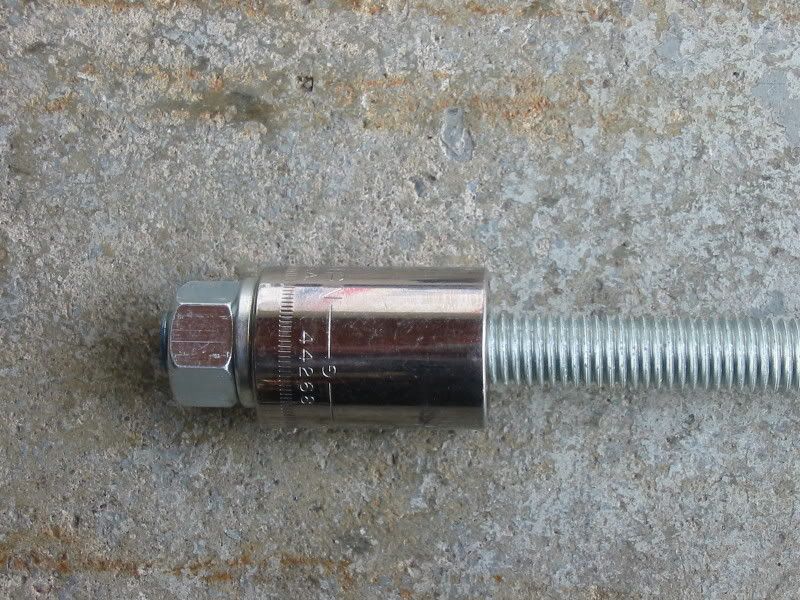
As the socket is certain to get jammed in there when you hammer it through, don't go in too far. It only has to go in about 1/2 to 3/4" to work. If you go in too far you might have trouble getting it out without removing the muffler from the bike.
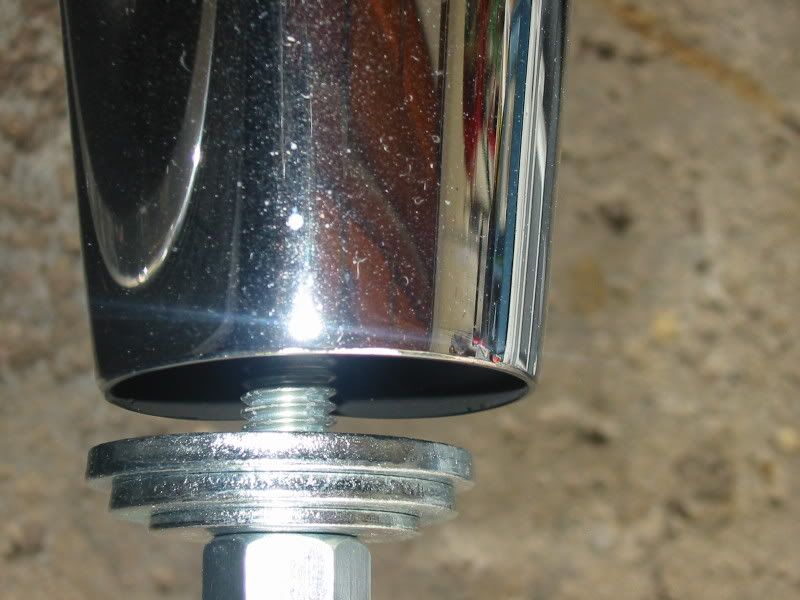
Anyway you can use the rest of the washers and the last nut to prevent it from going in too far, and as a bonus it can be used to "jack" the piece back out. Cause you will almost certainly not be able to pull it out by hand.
Have fun playing.
I did this one on the fenderr struts on my bike.
But I'm sure that you guys can find otherplaceson your bikes to use it or a variation of it on.
Use some SS treaded rod, I used SS carrage bolts and cut the threaded section to lengths needed. Jam acorn nuts on the ends with some JB Weld so they don't come apart. I would have used a stainless steel pin through the nut and rod but couldn't find any, and the JB seems to do the job well enough anyway.
Stock Torx bolts in strut.
The parts you need.
And the finished product.
I think they look a lot better, you can remove them a lot easier than the soft Torx headed bolts andI don't have to worry about them rusting.
Here's avery easy and cheap way to get the "Harley" sound a bike should have had from the factory that doesn't needto have the Delphi FI system remapped if youleave the intake alone.I spent under $5 for the parts I used to do it right.
Heres' the tools I used to take it 'out';
I didn't have a hole saw that would fit all the way down to the plate so I used a hammer and screwdriver, unfortunatly it leaves a bunch of ragged edges. So I came upwith these parts, under $5 at the local Lowes plus a 21mm socket to clean things up.
1 piece of 1/2" X 3' long threaded rod, three nuts to fit and four washers.
Put two nuts the socket and a lock washer together like this at one end.
As the socket is certain to get jammed in there when you hammer it through, don't go in too far. It only has to go in about 1/2 to 3/4" to work. If you go in too far you might have trouble getting it out without removing the muffler from the bike.
Anyway you can use the rest of the washers and the last nut to prevent it from going in too far, and as a bonus it can be used to "jack" the piece back out. Cause you will almost certainly not be able to pull it out by hand.
Have fun playing.
#80
12-07-2007, 11:43 AM