How to change the Rocker Boxes on your Dyna - How To
#21
 06-04-2014, 09:57 PM


Stage I
Join Date: Jun 2014
Location: mississippi
Posts: 1
Likes: 0
Received 0 Likes
on
0 Posts
#22
06-05-2014, 10:45 AM
Road Captain
Firstly, thanks to all who contributed on the "got some chrome rocker boxes... now what?" thread. I learned a lot and was able to change my own boxes as a result of the direction of supportive members! I even had an indy shop who specializes in Vtwins check it out because I was paranoid - and they said it was perfect - so I have confidence in sharing this info with you all. So I thought I'd share what I learned - for anyone out there who has some questions about this installation. If I miss anything... let me know.
Away we go:
STEP 1 - BUY A MANUAL - USE IT... LOVE IT.. YOU NEED TO HAVE IT
take off air intake assembly to give you access to your rocker boxes (including backing plate)
take your pos & negs off the battery
1) Firstly, you should really consider removing your tank if you're comfortable.. There are how to's on that here... use a search. as you can see it is a very tight fit from the tank to the top rocker box, and the frame gets in the way as well. It was way easier for me to take off the gas tank. You could also just take off the rear mounting bolt (by the seat) of the gas tank and place a 2x4 under there. It will give you a bit more clearance - but still best to take off the tank in my opinion. You could use some dogbone wrenches to, but to each his own.

2) Secondly, I would encourage you to get your bike on a lift. It is pretty convenient during this installation and will help us when looking for TDC (more on that later).. But first and foremost and MOST important.... have a beer, it's going to be awhile.

3) WE WILL START ON THE REAR ROCKER BOX. ok first remove the top six bolts on the rear rocker box in the following order. I will present these simple diagrams throughout, hope they make sense:
(left/clutch side of bike) (right/throttle side of bike)
3. .6
1. .2
5. .4
(so in this diagram, loosen left middle bolt, then right middle bolt, then left forwardmost bolt, then right rearmost bolt, etc....)
loosen each a little then go to the next one. a little at a time goes a long way. After you have removed these bolts, take off the top rocker box and the gasket underneath. the top box will probably be a bit tight, so you can give it a few taps with a rubber mallet or something to break it free. You will be presented with the breather assembly & the rocker arms & support plate:
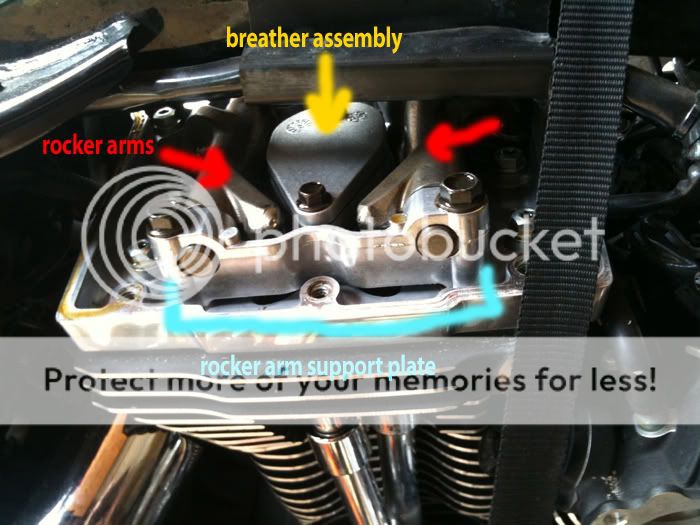
3) Now feel free to remove the 2 bolts holding the breather assembly in. and take it out. make sure you get both gaskets and the filter (they can fall out of the assembly)... breather assembly:

4) now before we remove the rocker arm support plate - we have to make sure that both lifters of the cylinder being worked on are on the base circle (lowest position) of the cam. In other words, you need to find Top Dead Center (TDC) of the piston on the compression stroke. This is how I did it. There are other ways, but this seemed pretty easy to me. To do this remove the spark plug from the rear cylinder, put your bike in 5th gear. Now place your finger over the spark plug hole with your left hand and turn the rear wheel with your right. It will be slow going, but as the wheel slowly turns you will feel air being sucked (intake) into the hole, and then being pushed out (compression). You will need to stop the wheel directly after the compression stroke has ended, or when you no longer feel air being pushed out against your finger. At this point, get a flashlight and look down the spark plug hole - you should be able to see the top of the cylinder and can verify that you are now at TDC.
spark plug:

oh yeah.. you will get dirty doing it this way.

5) Now that you have verified that we are at TDC on the rear cylinder, we are no longer in danger of bending a push rod, or damaging bushings or warping the support plate, and of just giving ourselves a headache. P.S. if headache ensues, please drink one of these:
6) Now remove the 4 bolts holding the rocker arm support plate in place. Do this alternatively as the following, loosening a little at a time, then onto next bolt:
(clutch side) (throttle side)
4. 2.
1. 3.
Be careful when removing the rocker arm support plate so as not to damage the heads of the lifters, pushrods, etc.
You will see this:

Aint she purty.
7) Remove the six bolts holding the lower rocker box in place. Do this alternatively as the following, loosening a little at a time, then onto the next bolt:
(clutch side) (throttle side)
3. 5. 1.
2. 6. 4.
Remove the gasket
Now to put it all back together....
1) put on a new gasket below the NEW lower rocker box. ENSURE THAT THE GASKET IS PLACED THE RIGHT WAY, WITH BREATHER CHANNEL COVERED!!!
2) put NEW lower rocker box on top of gasket, add some blue locktite to the six bolts and tighten to 120-168 in-lbs in the following sequence:
.3 .5 .1 (throttle side of bike)
.2 .6 .4
Tighten a little at a time then alternate to next bolt.
Also, ensure there are no problems with your breather baffle hole O-ring. we don't want any pinches or wear... go ahead and put some new oil on that bad boy and let it seep in like sin.
3) Next place the rocker arm support plate in the rocker housing.. ENSURE that it seats nicely on the push rods. Install the four bolts for the rocker arm support plate, tightening to 18-22 ft lbs, alternating bolts a couple of turns in the following order:
4. 2. (throttle side)
1. 3.
Some users have suggested tightening the four bolts alternatively to about half-way - then wait 15 minutes, then to about 3/4 of the way, then wait 15 mins, then all the way and wait 15 mins. This is to ensure that the lifters are given ample time to bleed down. What I did was install the rocker arm support plate and then just waited an hour or so to ensure they had time. DO NOT MOVE ONTO THE FRONT CYLINDER UNTIL YOU HAVE GIVEN AMPLE TIME FOR THE LIFTERS TO BLEED DOWN - AND CHECK THEM VIA THE FOLLOWING!!!
So have a few beers!
4) Now we are going to verify that our pushrods spin freely, WHICH THEY SHOULD. Remove the spring cap retainer on your upper push rod cover with a flat head screwdriver. (don't have a pic, but look at your push rod covers and see the top where you can put a screwdriver under and push to the left to remove). Now push up on the lower pushrod cover to reveal the pushrod below:

spin the pushrod with your fingers. It should be able to spin freely, both pushrods on the cylinder (exhaust & intake). CHECK THEM BOTH. If they do not spin a) wait longer - you may have not given enough time for lifters to bleed down(this is what I did first time around).. and if you wait longer and still nothing - you may have not tightened rocker arm support plate to above specs & must do again. If still nothing... you got me.. try some adjustable pushrods or something I didn't have this problem, so ask users what to do next...
5) If both pushrods spin freely - then you can then install the breather assembly with its 2 bolts. Of course you should have thrown away the old breather assembly gaskets and gotten new ones, as well as a new filter for it... duh.. tighten to 90-120 in lbs.
6) Lastly, place a new gasket under the top rocker box correctly, and place the top rocker box onto the gasket tightening with its 6 to 15-18 ft lbs. Use blue locktite on these bolts and tighten alternatively in the following pattern - a few turns at a time:
3. 6. (throttle side)
1. 2.
5. 4.
Install your spark plug back in the hole, put back on both spring cap retainers on your push rod covers(ensure that the o rings are sitting nicely both on top and on bottom of the push rod covers & that your spring cap retainer is firmly seated against the upper push rod cover) - sit back and have one of these, because you just installed one of your boxes and are halfway done.
The process is the same for the front cylinder.. so follow the steps.
REMEMBER:
1) you need to find TDC of the front cylinder now using the same method
2) use all new gaskets and filters
3) make sure gasket beneath the lower rocker box covers the breather channel.
4) lower rocker box bolt tightening pattern on front cylinder(use loctite):
2. 6. 4. (throttle side)
3. 5. 1.
5) rocker arm support plate bolt tightening pattern on front cylinder:
1. 3. (throttle side)
4. 2.
6) upper rocker box bolt tightening pattern on front cylinder (use loctite):
5. 4 (throttle side)
1. 2.
3. 6.
7)MAKE SURE that you allow time for lifters to bleed down, and that all push rods spin freely!
put on your tank, reassemble your air intake, reattach battery.. have a beer...
Notes: be patient and ensure that all is done to torque specs.
Also, note when you first start her up, the lifters may need to pump up.. this was what ocurred with me and there was a weird sound for about a few minutes (not so weird, but it just didn't sound like I remembered). This was because my bike was sitting for quite a while while I was trying to figure this process out & do my research.. So if you don't get any obvious clanking or metal on metal sounds, wait a few mins, to see if this may be what it is..
However, if you get some weird & loud metal on metal sounds - it could mean a # of things. perhaps you did not tighten to spec? perhaps you did not use HD replacement boxes & the aftermarket boxes are not a perfect fit? Perhaps they are a good fit but have some machining flaws which need to be grinded out? I would start by...
1) trying to pinpoint which cylinder the sound is coming from.
2) take it apart and see if you can see any obvious signs of metal on metal grinding.
You will need to do the research on those issues.
I hope this was helpful, I hope I didn't forget anything, and I hope this guide will assist you with this project as it has been gathered from many members as I was going through it. Thanks again to all who contributed, and here is a pic of her all shiny & purty:

J.
Away we go:
STEP 1 - BUY A MANUAL - USE IT... LOVE IT.. YOU NEED TO HAVE IT
take off air intake assembly to give you access to your rocker boxes (including backing plate)
take your pos & negs off the battery
1) Firstly, you should really consider removing your tank if you're comfortable.. There are how to's on that here... use a search. as you can see it is a very tight fit from the tank to the top rocker box, and the frame gets in the way as well. It was way easier for me to take off the gas tank. You could also just take off the rear mounting bolt (by the seat) of the gas tank and place a 2x4 under there. It will give you a bit more clearance - but still best to take off the tank in my opinion. You could use some dogbone wrenches to, but to each his own.
2) Secondly, I would encourage you to get your bike on a lift. It is pretty convenient during this installation and will help us when looking for TDC (more on that later).. But first and foremost and MOST important.... have a beer, it's going to be awhile.
3) WE WILL START ON THE REAR ROCKER BOX. ok first remove the top six bolts on the rear rocker box in the following order. I will present these simple diagrams throughout, hope they make sense:
(left/clutch side of bike) (right/throttle side of bike)
3. .6
1. .2
5. .4
(so in this diagram, loosen left middle bolt, then right middle bolt, then left forwardmost bolt, then right rearmost bolt, etc....)
loosen each a little then go to the next one. a little at a time goes a long way. After you have removed these bolts, take off the top rocker box and the gasket underneath. the top box will probably be a bit tight, so you can give it a few taps with a rubber mallet or something to break it free. You will be presented with the breather assembly & the rocker arms & support plate:
3) Now feel free to remove the 2 bolts holding the breather assembly in. and take it out. make sure you get both gaskets and the filter (they can fall out of the assembly)... breather assembly:
4) now before we remove the rocker arm support plate - we have to make sure that both lifters of the cylinder being worked on are on the base circle (lowest position) of the cam. In other words, you need to find Top Dead Center (TDC) of the piston on the compression stroke. This is how I did it. There are other ways, but this seemed pretty easy to me. To do this remove the spark plug from the rear cylinder, put your bike in 5th gear. Now place your finger over the spark plug hole with your left hand and turn the rear wheel with your right. It will be slow going, but as the wheel slowly turns you will feel air being sucked (intake) into the hole, and then being pushed out (compression). You will need to stop the wheel directly after the compression stroke has ended, or when you no longer feel air being pushed out against your finger. At this point, get a flashlight and look down the spark plug hole - you should be able to see the top of the cylinder and can verify that you are now at TDC.
spark plug:
oh yeah.. you will get dirty doing it this way.
5) Now that you have verified that we are at TDC on the rear cylinder, we are no longer in danger of bending a push rod, or damaging bushings or warping the support plate, and of just giving ourselves a headache. P.S. if headache ensues, please drink one of these:
6) Now remove the 4 bolts holding the rocker arm support plate in place. Do this alternatively as the following, loosening a little at a time, then onto next bolt:
(clutch side) (throttle side)
4. 2.
1. 3.
Be careful when removing the rocker arm support plate so as not to damage the heads of the lifters, pushrods, etc.
You will see this:
Aint she purty.
7) Remove the six bolts holding the lower rocker box in place. Do this alternatively as the following, loosening a little at a time, then onto the next bolt:
(clutch side) (throttle side)
3. 5. 1.
2. 6. 4.
Remove the gasket
Now to put it all back together....
1) put on a new gasket below the NEW lower rocker box. ENSURE THAT THE GASKET IS PLACED THE RIGHT WAY, WITH BREATHER CHANNEL COVERED!!!
2) put NEW lower rocker box on top of gasket, add some blue locktite to the six bolts and tighten to 120-168 in-lbs in the following sequence:
.3 .5 .1 (throttle side of bike)
.2 .6 .4
Tighten a little at a time then alternate to next bolt.
Also, ensure there are no problems with your breather baffle hole O-ring. we don't want any pinches or wear... go ahead and put some new oil on that bad boy and let it seep in like sin.
3) Next place the rocker arm support plate in the rocker housing.. ENSURE that it seats nicely on the push rods. Install the four bolts for the rocker arm support plate, tightening to 18-22 ft lbs, alternating bolts a couple of turns in the following order:
4. 2. (throttle side)
1. 3.
Some users have suggested tightening the four bolts alternatively to about half-way - then wait 15 minutes, then to about 3/4 of the way, then wait 15 mins, then all the way and wait 15 mins. This is to ensure that the lifters are given ample time to bleed down. What I did was install the rocker arm support plate and then just waited an hour or so to ensure they had time. DO NOT MOVE ONTO THE FRONT CYLINDER UNTIL YOU HAVE GIVEN AMPLE TIME FOR THE LIFTERS TO BLEED DOWN - AND CHECK THEM VIA THE FOLLOWING!!!
So have a few beers!
4) Now we are going to verify that our pushrods spin freely, WHICH THEY SHOULD. Remove the spring cap retainer on your upper push rod cover with a flat head screwdriver. (don't have a pic, but look at your push rod covers and see the top where you can put a screwdriver under and push to the left to remove). Now push up on the lower pushrod cover to reveal the pushrod below:
spin the pushrod with your fingers. It should be able to spin freely, both pushrods on the cylinder (exhaust & intake). CHECK THEM BOTH. If they do not spin a) wait longer - you may have not given enough time for lifters to bleed down(this is what I did first time around).. and if you wait longer and still nothing - you may have not tightened rocker arm support plate to above specs & must do again. If still nothing... you got me.. try some adjustable pushrods or something
I didn't have this problem, so ask users what to do next...5) If both pushrods spin freely - then you can then install the breather assembly with its 2 bolts. Of course you should have thrown away the old breather assembly gaskets and gotten new ones, as well as a new filter for it... duh.. tighten to 90-120 in lbs.
6) Lastly, place a new gasket under the top rocker box correctly, and place the top rocker box onto the gasket tightening with its 6 to 15-18 ft lbs. Use blue locktite on these bolts and tighten alternatively in the following pattern - a few turns at a time:
3. 6. (throttle side)
1. 2.
5. 4.
Install your spark plug back in the hole, put back on both spring cap retainers on your push rod covers(ensure that the o rings are sitting nicely both on top and on bottom of the push rod covers & that your spring cap retainer is firmly seated against the upper push rod cover) - sit back and have one of these, because you just installed one of your boxes and are halfway done.
The process is the same for the front cylinder.. so follow the steps.
REMEMBER:
1) you need to find TDC of the front cylinder now using the same method
2) use all new gaskets and filters
3) make sure gasket beneath the lower rocker box covers the breather channel.
4) lower rocker box bolt tightening pattern on front cylinder(use loctite):
2. 6. 4. (throttle side)
3. 5. 1.
5) rocker arm support plate bolt tightening pattern on front cylinder:
1. 3. (throttle side)
4. 2.
6) upper rocker box bolt tightening pattern on front cylinder (use loctite):
5. 4 (throttle side)
1. 2.
3. 6.
7)MAKE SURE that you allow time for lifters to bleed down, and that all push rods spin freely!
put on your tank, reassemble your air intake, reattach battery.. have a beer...
Notes: be patient and ensure that all is done to torque specs.
Also, note when you first start her up, the lifters may need to pump up.. this was what ocurred with me and there was a weird sound for about a few minutes (not so weird, but it just didn't sound like I remembered). This was because my bike was sitting for quite a while while I was trying to figure this process out & do my research.. So if you don't get any obvious clanking or metal on metal sounds, wait a few mins, to see if this may be what it is..
However, if you get some weird & loud metal on metal sounds - it could mean a # of things. perhaps you did not tighten to spec? perhaps you did not use HD replacement boxes & the aftermarket boxes are not a perfect fit? Perhaps they are a good fit but have some machining flaws which need to be grinded out? I would start by...
1) trying to pinpoint which cylinder the sound is coming from.
2) take it apart and see if you can see any obvious signs of metal on metal grinding.
You will need to do the research on those issues.
I hope this was helpful, I hope I didn't forget anything, and I hope this guide will assist you with this project as it has been gathered from many members as I was going through it. Thanks again to all who contributed, and here is a pic of her all shiny & purty:
J.
I do have a question though, did you take any pic's of the other side of you breather assemblies ?????
Just curious, I am going to replace mine I have a lot of oil blow by.....
So I was wondering what the condition was on the umbrella valve once you removed them ???????
Would be nice to see a pic to see if they were warped or disfigured at all from the heat......
Let me know if you have any pic's of those part's or what you observed once they were disassembled..........
Any help would be great........
Thanks ans again great write up...........
Live Free = Ride Free............
#23
06-05-2014, 11:22 AM
Doing a 106 BB, Got the TB on, got the rocker housing on. Dropped teh push rods in, put the piston to to top dead center and started putting the rocker arm support plate, got to final bolt and snap. I was using the tq sequence, was able to get the bolt out whole, looks like they are designed to snap, Tqing to 22 ft lbs in quarter turns in tq sequence, what am I doing wrong? Did I damage anything?
the bolt that snapped was the forward valve side on front cyl.
the bolt that snapped was the forward valve side on front cyl.
#24
06-05-2014, 11:37 AM
**** Dang this is an old Thread, just realized! ****
Great write up jousley, nice to get threads like this!
I would like to one recommendation:
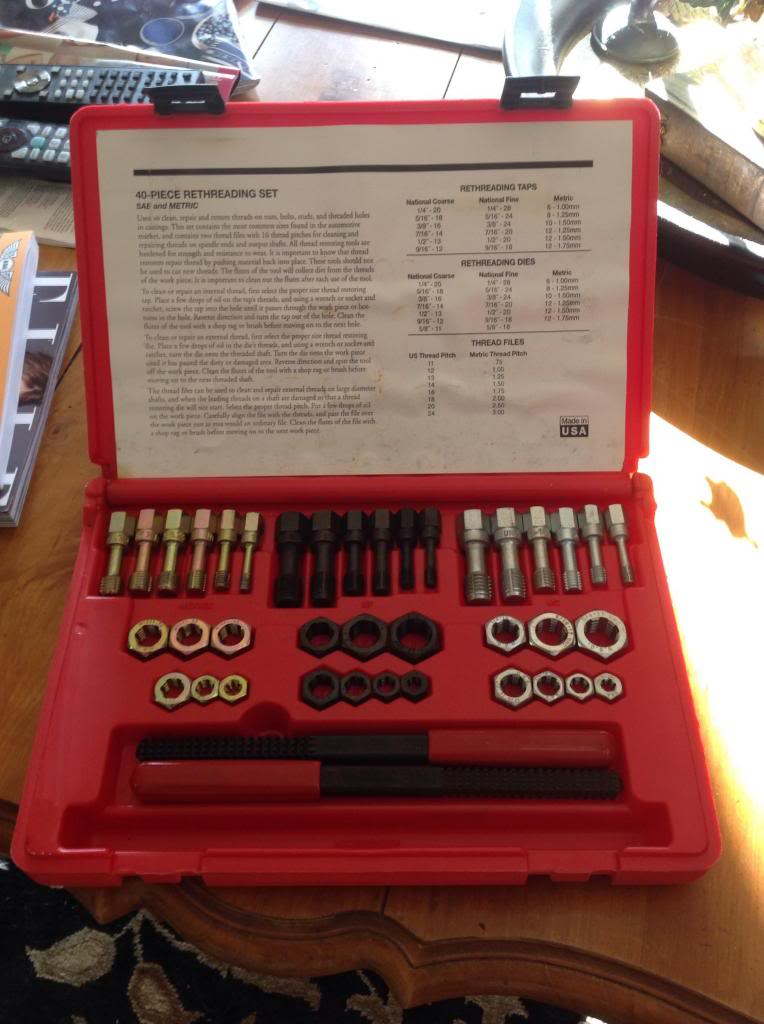
1) Make sure you clean all the fastener threads and the fastener holes and use Loctite. I bought this Craftsman set for about $50 on Ebay:
Great write up jousley, nice to get threads like this!
I would like to one recommendation:
1) Make sure you clean all the fastener threads and the fastener holes and use Loctite. I bought this Craftsman set for about $50 on Ebay:
Last edited by HD Pilot; 06-05-2014 at 11:41 AM.
#25
07-22-2014, 02:55 PM

6th Gear
Join Date: Feb 2014
Location: Canada
Posts: 14
Likes: 0
Received 0 Likes
on
0 Posts

#27
03-12-2015, 07:24 PM

#28
03-19-2015, 11:56 PM
Amen. I used this guide last weekend to swap my lowers to black ones. Was perfect and easy to follow.
#29
03-20-2015, 10:33 AM
While everything is apart it would be a good time to use some Q-tips to get as much oil as possible out of the bolt holes. If there is very much oil in the bottom of a blind bolt hole and you try to run a bolt down the hole and torque it there is a chance of hydro-locking the bolt and stripping out the hole before the bolt head even seats. I found out the hard way.