Homemade Heel Rests
#1
 07-05-2010, 02:13 PM

Join Date: Dec 2006
Location: Western New York
Posts: 99
Likes: 0
Received 0 Likes
on
0 Posts
I don't post a lot of threads but I read this forum almost everyday. Been reading a lot of posts lately about floorboards and heel rests for comfort. Here is what I came up with. I first purchased a 12 inch piece of 9/16" hexagon 304 stainless steel from McMaster Carr. (12 bucks + shipping)

Next I cut two pieces 4-1/2 long. Drilled and tapped a 3/8-16 hole in the one end about 1 inch deep. The other end I drilled and tapped a 5/16-24 hole through the piece about half a inch from the end. The 3/8 hole is for mounting to the existing footpeg bolt. (You might want to get a slightly longer bolt for extra strength. The 5/16 through hole is for mounting a stock shifter peg. you will need to purchase an extra peg.

My legs are a little short so I had to heat and bend the stainless a little for the comfort level I needed. (Bent about 27 degrees) Once completed a little sanding and a couple coats of Rustoleum Textured black paint. (looks pretty close to Harleys black wrinkle)
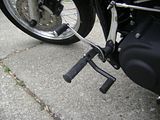
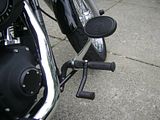
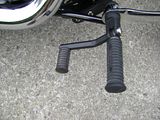
Once mounted and tightened down, the heel rests are secure and the footpegs will still move up and down providing you use those spring clips between the footpegs and the peg mounts.
You can go out and purchase some real fancy footpegs and shifter pegs, but I found that at 65 or 70 mph my feet tend to slide off those fancy pegs. Thats why I stuck with the stock Harley stuff. My feet hardly move and I can't describe how much more comfortable it is.
One more thing. I does help to have a lathe and small drill press in the basement, but I don't think any machine shop would rape you for a couple of drilled and tapped holes. So get out there and start fabbing up your own parts.
Next I cut two pieces 4-1/2 long. Drilled and tapped a 3/8-16 hole in the one end about 1 inch deep. The other end I drilled and tapped a 5/16-24 hole through the piece about half a inch from the end. The 3/8 hole is for mounting to the existing footpeg bolt. (You might want to get a slightly longer bolt for extra strength. The 5/16 through hole is for mounting a stock shifter peg. you will need to purchase an extra peg.
My legs are a little short so I had to heat and bend the stainless a little for the comfort level I needed. (Bent about 27 degrees) Once completed a little sanding and a couple coats of Rustoleum Textured black paint. (looks pretty close to Harleys black wrinkle)
Once mounted and tightened down, the heel rests are secure and the footpegs will still move up and down providing you use those spring clips between the footpegs and the peg mounts.
You can go out and purchase some real fancy footpegs and shifter pegs, but I found that at 65 or 70 mph my feet tend to slide off those fancy pegs. Thats why I stuck with the stock Harley stuff. My feet hardly move and I can't describe how much more comfortable it is.
One more thing. I does help to have a lathe and small drill press in the basement, but I don't think any machine shop would rape you for a couple of drilled and tapped holes. So get out there and start fabbing up your own parts.


#4
07-05-2010, 04:10 PM

Great job! A tip on the paint - if you pick up a rattle can of Rustoleum Bright Coat Metallic Finish in chrome/silver and very lightly "dust" over the textured black you can get even closer to matching the HD wrinkle. It gives it that little sparkle highlight look.
In fact, I have parts on my bike done that way and they look better (as in closer to the original parts) than the derby cover I recently did with the HD Wrinkle Finish.
In fact, I have parts on my bike done that way and they look better (as in closer to the original parts) than the derby cover I recently did with the HD Wrinkle Finish.
#5
07-05-2010, 04:53 PM

Banned

Thread
Thread Starter
Forum
Replies
Last Post
pgarbac
Multi-Fit Parts and Accessories
2
05-07-2017 08:47 AM
antman27
Dyna Glide Models
12
08-29-2010 09:27 PM