Back yard mods and paint complete
#1
 06-19-2011, 04:03 PM

The blacked out bike thing is probably got some people bored to tears, but this is a project I did about two years ago. Some of this has been posted long ago deep in the middle of other threads, but I've been getting asked about it by a couple of people recently so I thought I'd compile it into it's own thread so it's easier to find.
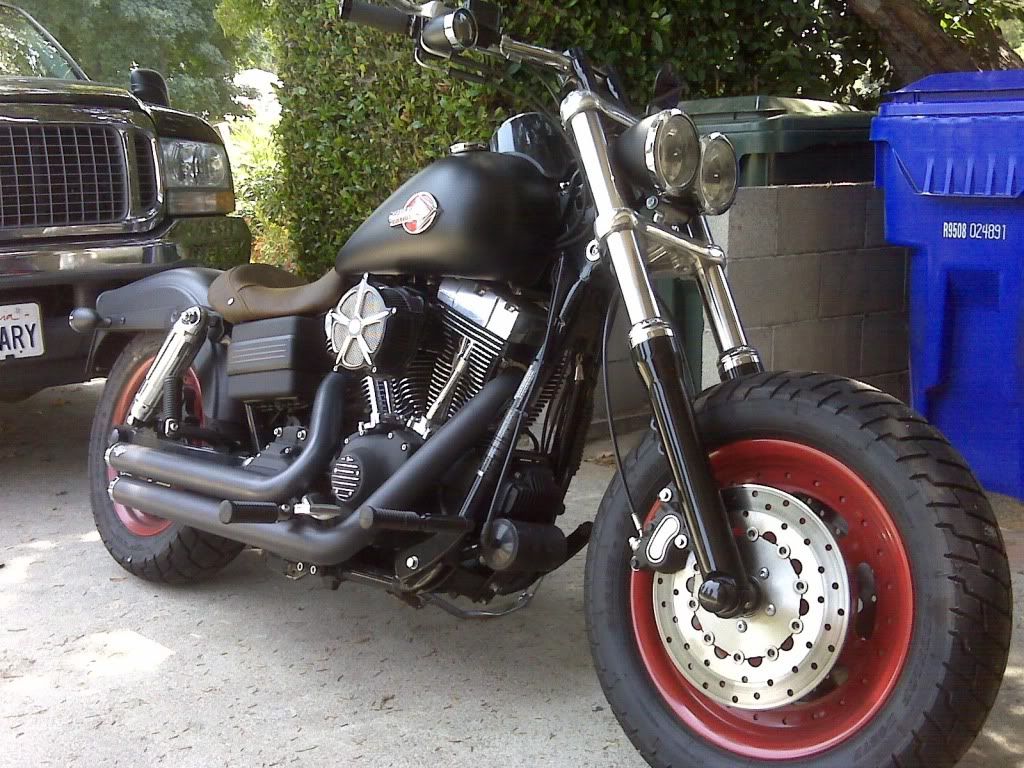
Here's some pics after it was completed:

Here's how it was done:
Without removal, I painted the strut covers, turn signals, headlight (removed trim ring first, easy), rear shocks (not shown in picture - see pics added to bottom of post, but came out great), highway pegs...and the big one - I am embarrassed to say....the wheels. Okay, the wheels took about 1/2 a day (and you need to raise the bike on a jack) - but they came out great and most people who see them think they were powder coated. They have also lasted over two years without chipping so far. Had my dealer put on a new rear tire last service and no damage to the paint either. I've since also had the front replaced, also with zero issues. I went with paint because the red was an experiment and I didn't want to invest in powder coating until I was sure. *I never expected to leave it this long, but it has held up great so I'm in no rush to change it. I'd be happy to go into more detail about the wheels if your interested. I have pics of the process too.
Items that are easy to remove and paint are...the battery box band, the rear belt guard, stock air cleaner cover, and the console (although I would buy the service manual for that one). The console scarred the crap out of me since I am not mechanically inclined, but it worked out fine. It's very step by step in the manual. I'd be happy to go into more detail on that too if your interested.
I've had a blast and know that I can always get it done right by a pro if I screw it up too badly. Also be aware that "flat" finish paints are much more forgiving of amature technique and quick drying then "gloss" finish. Be sure to scuff any surface you are going to paint with a Scotch Brite pad first. I use blue painters tape and painters paper (plastic coated on one side) to mask the parts I am not painting. Good luck and let me know if you want any more info.
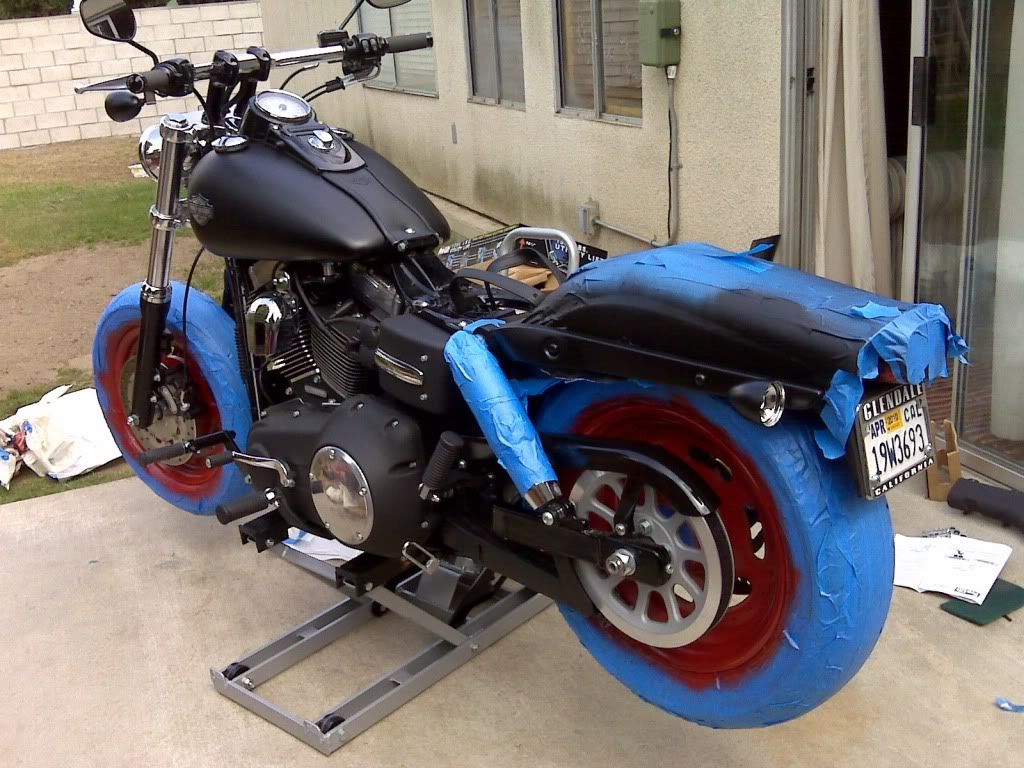
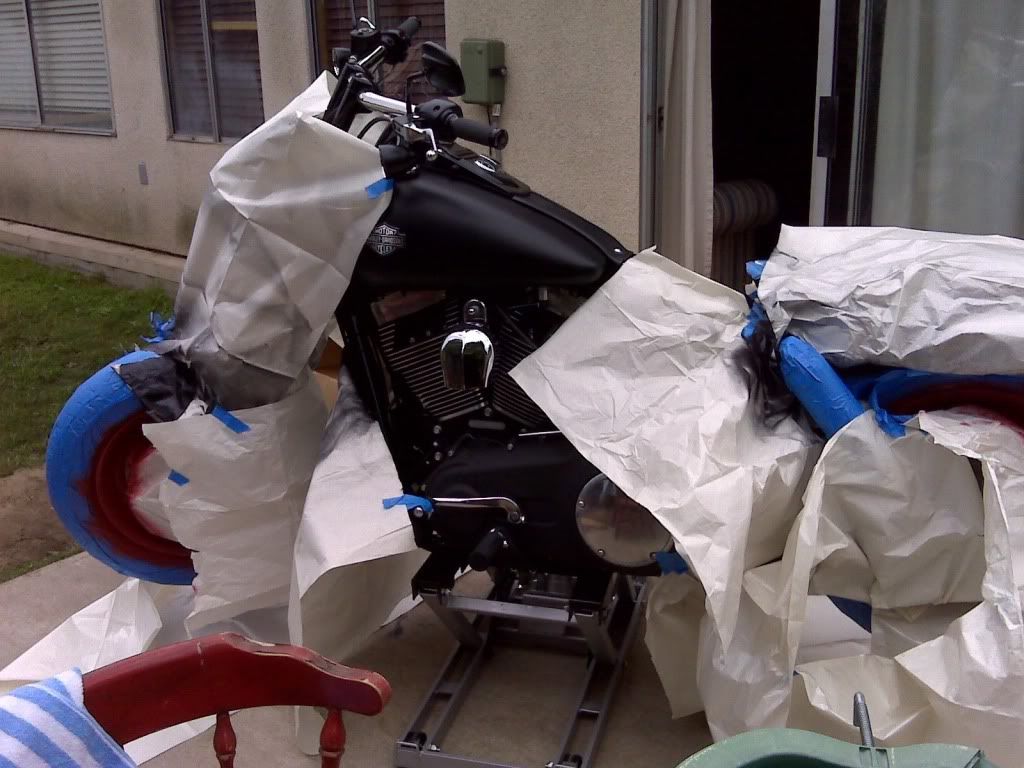
The first trick is to get the bike up on the lift, then tape the hell out of it to protect it from overspray. This is the most time consuming part of the whole thing. *These first pictures were taken after I started to unwrap the bike already, but they show how I taped the tires best (over-taped a bit, but better safe then sorry). *You can also see the rear fender is completely taped as i had painted the struts the night before.
First, take your scotch brite pad and scuff the entire surface you are going to paint. This is the point of no return as your nicely polished rims are going bye-bye. Takes about 15 minutes to do both sides of both wheels. Blow all the pad dust off when you are done. Compressed can of air would be great...I just blew really hard. Now you are ready to start taping.
The trick here is to tuck the tape between the tire and the rim as much as you can all round the edge. Due to the curve you will only be able to use tape pieces about 3-4 inches at a time. Once you have the edge where they meet nicely taped to protect the rubber (but leaving the rim edge exposed for paint) the rest of the tire tapes up fairly quickly. I used the 14 day painters tape - about $10 total. Sorry to say but this took me about 2 hours, easily the most labor intensive part of the whole thing.
Nest comes the paper. *I used a cheap painters paper that is plastic coated on one side (about $3 per package - two packages should be plenty). *The plastic side faces the surface you are protecting - the paper side should face the spray to help absorb it better to prevent running and dripping.
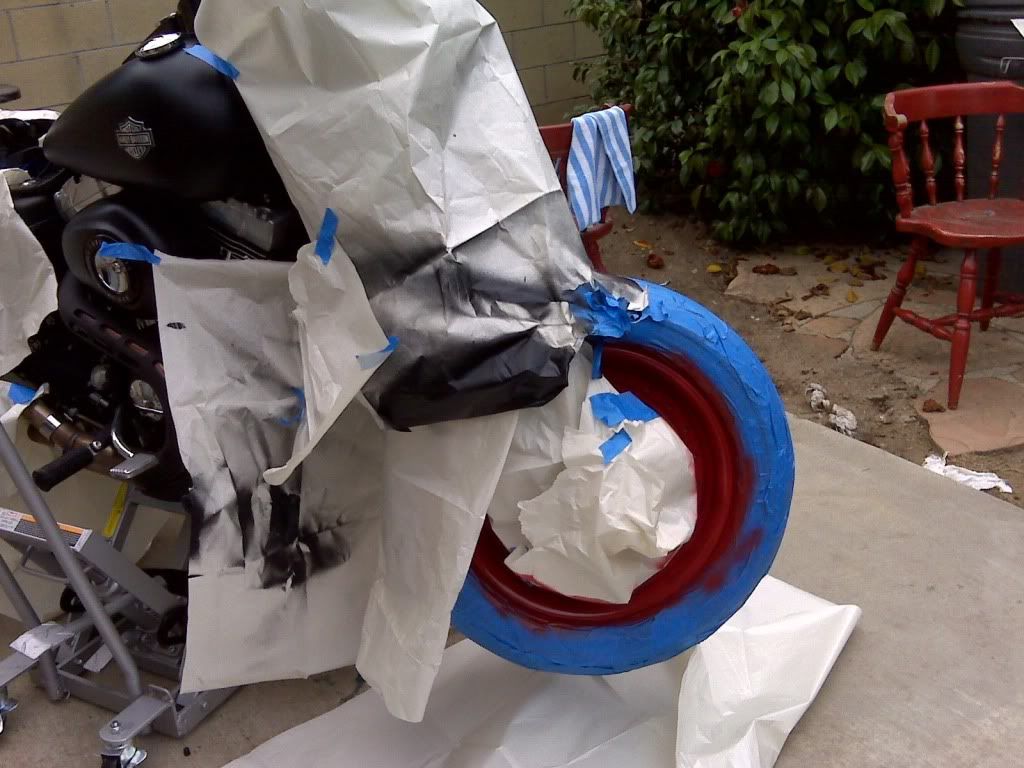
This is spray paint so I protect the bike as much as possible because that fine mist is pretty insidious at getting through seams. I use the painters tape to hold it down at connect the edges. *I think I even wrapped the forks with tape under the paper. The biggest PITA here is wrapping the disc brakes and rotor. *You need to protect them, but they still need to be able to spin freely so you can rotate the wheel for coverage. I did it all with paper and tape - the hard part being it also can't touch the wheel or it will drag in the paint when you rotate it. You could try a draw string bag underneath - that is basically the same design concept for how I ran the paper. Making a tight collar to keep the paint out, but not rub. All this takes about another 40 minutes.
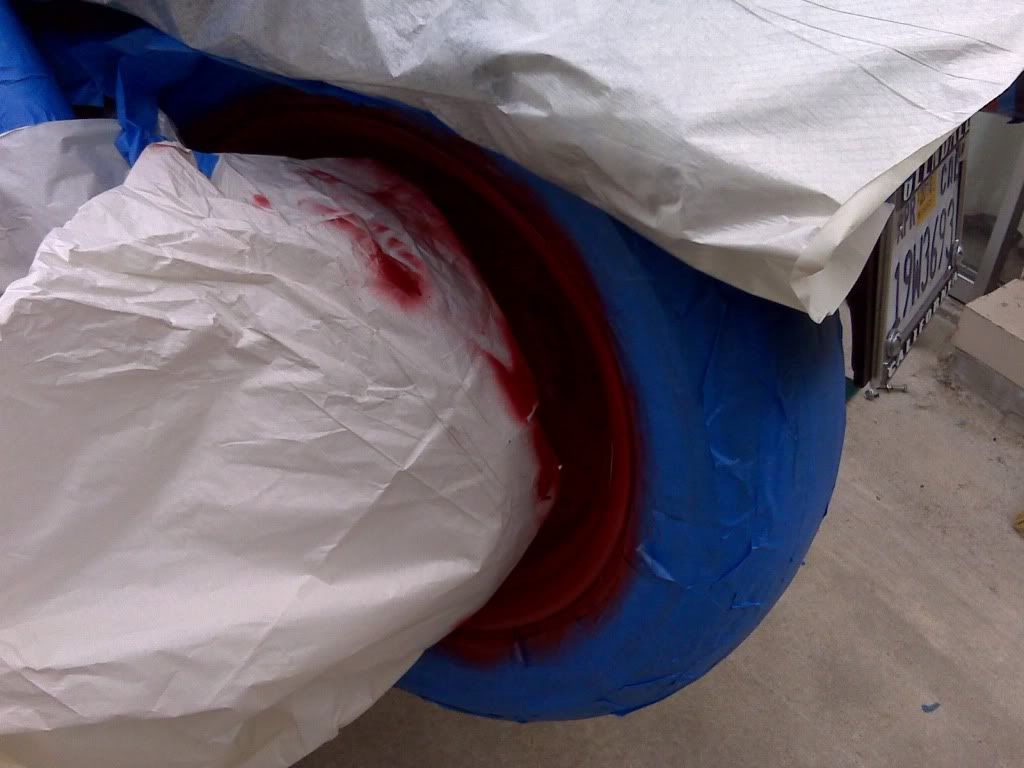
Point of honesty here...there is a portion of the outer hub, the last inch or so before the fork that is not painted as that fell under the protective cover for the brakes and belt rotor. This is only visible when standing at an extreme angle up close in order to see under the brake discs where they mount on the hub.
Here's another pic of how much I paper the bike.
Once prepped, all you do is paint. I used a gloss which is less forgiving of technique, but it still came out great. I'm no expert, but light even coats are better then heavy spray that runs and drips. If it does get too heavy in spots - no problem, just be lighter in that area with the next coats and it should eventually even out. If you use gloss, I'd wait about 40 minutes between coats and try to do about 6 coats. When you're done let it sit over night - do not touch it even if it looks dry - it may be soft and you will end up with finger prints. You can always do more coats to cover them up if needed. I'd buy 2 or 3 cans to have on hand while doing this.
Once it's dry, unwrap it. take it off the jack and ride! If you don't like the color you chose - do it again! Overall the prep take about 4 hours. The rest is just time between coats and drying.
One more thing here. *Before i got my V&H pipes, I used barbeque paint to paint my stock exhaust matte black. Not for everyone, but I liked it. *It was easy to remove the heat shields and remove the canisters. The header pipes remained on the bike and I did not paint them. they had a cool brass look under the heat shield. Here's a pic if anyone's interested. I am NOT mechanically inclined so believe me when I say this was all pretty easy. This pic also shows the stock air cleaner cover I painted. You do have to remove it, but it is literally just one bolt to get it off. I taped off the center so I kept the chrome ring and out trim unpainted. Again, i like it.
Black wheels would look good too.
Some have commented that removing the wheels and doing it "right" would be easier...
*I didn't pull the wheels off because I have no tools or skills to do so. I also didn't want alignment issues when I re-mounted them (see comment about no skills...) since it is my only mode of transportation. With three kids I don't like taking mechanical risks with my bikes performance. Labor with removal and tire removal/re-mounting I think would have been around the same anyway. Hopefully in the future I'll have a chance to learn the rest, but for now I feel it's worked out. Everyone I spoke to told me it wouldn't work, but two years *later it's still going strong and unless I fess up no one has a clue that I didn't have it done the "right" way. Cost was about $30 and half a Saturday. I couldn't do it any cheaper (and couldn't afford more at the time). It was also a lot of fun.

Here's the latest paint addition. I painted the shock covers black, but left the mounts chrome which kinda goes with my lamp and exhaust trim rings that I left chrome. pics are from my phone camera - so not the best.


As for the turn signals and headlight bucket...
I painted the turn signals on the bike and the headlight I unmounted, but did not disconnect any of the wires for them.
For the turn signals I just removed the lenses and taped off or shielded the rest of the bike with painters tape and painters paper. If you are doing the rear signals you might as well do the strut covers (if you want them blacked out) since you will already be taping off a lot of the area any way. I painted my strut covers on the bike and they came out great. Just remember to scuff the surface real good with a scotch brite pad first. If you haven't done a lot of spray painting just remember to do light coats to avoid drips. Since you are doing gloss you might want to finish it all up with a good clear coat to protect it from rocks more. Mine have held up well so far and it's been about two years.
For the headlight I did not disconnect ANY wires. The service manual says that to remove the wires you have to access the wiring harness under the gas tank - which involves disconnecting the fuel line and unbolting the tank, etc. and since I needed to ride the bike to work the next day I didn't want to mess with anything that serious. So here are the steps for mechanical chickens like me...
First I unscrewed and removed the chrome trim ring and lens, then I unbolted the headlight housing from the bike (the one long bolt that runs under the headlight). You will need two wrenches for this, one for the bolt head and the other for the nut end - otherwise they will just turn together. Once unbolted, I rested it face down on a little shelf I rigged up by tucking a couple of 2X4s through the forks. The attached wires give you enough space to work, but keep the unit fairly close to the bike. Then I taped up all the wires coming off the back of the housing and also protected the rest of the bike from overspray with more paper and tape. Doing this at the same time as you paint the front turn signals will save you some duplicated work. Then I just sprayed the lamp housing face down on the wood "shelf". When it was all done and dry I just re-bolted it to it's mount and re-attached the lens and trim ring. Before tightening the mount bolt all the way down (again with the two wrenches) I adjusted the aim of the headlight on my garage door. Whole thing took maybe an hour (not including drying time - which should be over night).
Powder coat would probably be more permanent, but this turned out really great. It has held up perfectly and people who see it up close think it is a pro job. In the end it only cost a few bucks and even if I had screwed it up I wouldn't have "hurt" anything on the bike that a better painter couldn't fix.
For all you back yard modders...good luck and have fun.
Here's some pics after it was completed:
Here's how it was done:
Without removal, I painted the strut covers, turn signals, headlight (removed trim ring first, easy), rear shocks (not shown in picture - see pics added to bottom of post, but came out great), highway pegs...and the big one - I am embarrassed to say....the wheels. Okay, the wheels took about 1/2 a day (and you need to raise the bike on a jack) - but they came out great and most people who see them think they were powder coated. They have also lasted over two years without chipping so far. Had my dealer put on a new rear tire last service and no damage to the paint either. I've since also had the front replaced, also with zero issues. I went with paint because the red was an experiment and I didn't want to invest in powder coating until I was sure. *I never expected to leave it this long, but it has held up great so I'm in no rush to change it. I'd be happy to go into more detail about the wheels if your interested. I have pics of the process too.
Items that are easy to remove and paint are...the battery box band, the rear belt guard, stock air cleaner cover, and the console (although I would buy the service manual for that one). The console scarred the crap out of me since I am not mechanically inclined, but it worked out fine. It's very step by step in the manual. I'd be happy to go into more detail on that too if your interested.
I've had a blast and know that I can always get it done right by a pro if I screw it up too badly. Also be aware that "flat" finish paints are much more forgiving of amature technique and quick drying then "gloss" finish. Be sure to scuff any surface you are going to paint with a Scotch Brite pad first. I use blue painters tape and painters paper (plastic coated on one side) to mask the parts I am not painting. Good luck and let me know if you want any more info.
The first trick is to get the bike up on the lift, then tape the hell out of it to protect it from overspray. This is the most time consuming part of the whole thing. *These first pictures were taken after I started to unwrap the bike already, but they show how I taped the tires best (over-taped a bit, but better safe then sorry). *You can also see the rear fender is completely taped as i had painted the struts the night before.
First, take your scotch brite pad and scuff the entire surface you are going to paint. This is the point of no return as your nicely polished rims are going bye-bye. Takes about 15 minutes to do both sides of both wheels. Blow all the pad dust off when you are done. Compressed can of air would be great...I just blew really hard. Now you are ready to start taping.
The trick here is to tuck the tape between the tire and the rim as much as you can all round the edge. Due to the curve you will only be able to use tape pieces about 3-4 inches at a time. Once you have the edge where they meet nicely taped to protect the rubber (but leaving the rim edge exposed for paint) the rest of the tire tapes up fairly quickly. I used the 14 day painters tape - about $10 total. Sorry to say but this took me about 2 hours, easily the most labor intensive part of the whole thing.
Nest comes the paper. *I used a cheap painters paper that is plastic coated on one side (about $3 per package - two packages should be plenty). *The plastic side faces the surface you are protecting - the paper side should face the spray to help absorb it better to prevent running and dripping.
This is spray paint so I protect the bike as much as possible because that fine mist is pretty insidious at getting through seams. I use the painters tape to hold it down at connect the edges. *I think I even wrapped the forks with tape under the paper. The biggest PITA here is wrapping the disc brakes and rotor. *You need to protect them, but they still need to be able to spin freely so you can rotate the wheel for coverage. I did it all with paper and tape - the hard part being it also can't touch the wheel or it will drag in the paint when you rotate it. You could try a draw string bag underneath - that is basically the same design concept for how I ran the paper. Making a tight collar to keep the paint out, but not rub. All this takes about another 40 minutes.
Point of honesty here...there is a portion of the outer hub, the last inch or so before the fork that is not painted as that fell under the protective cover for the brakes and belt rotor. This is only visible when standing at an extreme angle up close in order to see under the brake discs where they mount on the hub.
Here's another pic of how much I paper the bike.
Once prepped, all you do is paint. I used a gloss which is less forgiving of technique, but it still came out great. I'm no expert, but light even coats are better then heavy spray that runs and drips. If it does get too heavy in spots - no problem, just be lighter in that area with the next coats and it should eventually even out. If you use gloss, I'd wait about 40 minutes between coats and try to do about 6 coats. When you're done let it sit over night - do not touch it even if it looks dry - it may be soft and you will end up with finger prints. You can always do more coats to cover them up if needed. I'd buy 2 or 3 cans to have on hand while doing this.
Once it's dry, unwrap it. take it off the jack and ride! If you don't like the color you chose - do it again! Overall the prep take about 4 hours. The rest is just time between coats and drying.
One more thing here. *Before i got my V&H pipes, I used barbeque paint to paint my stock exhaust matte black. Not for everyone, but I liked it. *It was easy to remove the heat shields and remove the canisters. The header pipes remained on the bike and I did not paint them. they had a cool brass look under the heat shield. Here's a pic if anyone's interested. I am NOT mechanically inclined so believe me when I say this was all pretty easy. This pic also shows the stock air cleaner cover I painted. You do have to remove it, but it is literally just one bolt to get it off. I taped off the center so I kept the chrome ring and out trim unpainted. Again, i like it.
Black wheels would look good too.
Some have commented that removing the wheels and doing it "right" would be easier...
*I didn't pull the wheels off because I have no tools or skills to do so. I also didn't want alignment issues when I re-mounted them (see comment about no skills...) since it is my only mode of transportation. With three kids I don't like taking mechanical risks with my bikes performance. Labor with removal and tire removal/re-mounting I think would have been around the same anyway. Hopefully in the future I'll have a chance to learn the rest, but for now I feel it's worked out. Everyone I spoke to told me it wouldn't work, but two years *later it's still going strong and unless I fess up no one has a clue that I didn't have it done the "right" way. Cost was about $30 and half a Saturday. I couldn't do it any cheaper (and couldn't afford more at the time). It was also a lot of fun.
Here's the latest paint addition. I painted the shock covers black, but left the mounts chrome which kinda goes with my lamp and exhaust trim rings that I left chrome. pics are from my phone camera - so not the best.
As for the turn signals and headlight bucket...
I painted the turn signals on the bike and the headlight I unmounted, but did not disconnect any of the wires for them.
For the turn signals I just removed the lenses and taped off or shielded the rest of the bike with painters tape and painters paper. If you are doing the rear signals you might as well do the strut covers (if you want them blacked out) since you will already be taping off a lot of the area any way. I painted my strut covers on the bike and they came out great. Just remember to scuff the surface real good with a scotch brite pad first. If you haven't done a lot of spray painting just remember to do light coats to avoid drips. Since you are doing gloss you might want to finish it all up with a good clear coat to protect it from rocks more. Mine have held up well so far and it's been about two years.
For the headlight I did not disconnect ANY wires. The service manual says that to remove the wires you have to access the wiring harness under the gas tank - which involves disconnecting the fuel line and unbolting the tank, etc. and since I needed to ride the bike to work the next day I didn't want to mess with anything that serious. So here are the steps for mechanical chickens like me...
First I unscrewed and removed the chrome trim ring and lens, then I unbolted the headlight housing from the bike (the one long bolt that runs under the headlight). You will need two wrenches for this, one for the bolt head and the other for the nut end - otherwise they will just turn together. Once unbolted, I rested it face down on a little shelf I rigged up by tucking a couple of 2X4s through the forks. The attached wires give you enough space to work, but keep the unit fairly close to the bike. Then I taped up all the wires coming off the back of the housing and also protected the rest of the bike from overspray with more paper and tape. Doing this at the same time as you paint the front turn signals will save you some duplicated work. Then I just sprayed the lamp housing face down on the wood "shelf". When it was all done and dry I just re-bolted it to it's mount and re-attached the lens and trim ring. Before tightening the mount bolt all the way down (again with the two wrenches) I adjusted the aim of the headlight on my garage door. Whole thing took maybe an hour (not including drying time - which should be over night).
Powder coat would probably be more permanent, but this turned out really great. It has held up perfectly and people who see it up close think it is a pro job. In the end it only cost a few bucks and even if I had screwed it up I wouldn't have "hurt" anything on the bike that a better painter couldn't fix.
For all you back yard modders...good luck and have fun.
#3
06-19-2011, 04:38 PM
Cruiser


#7
06-19-2011, 06:54 PM
Club Member
Join Date: Feb 2008
Location: Passaic County, NJ
Posts: 11,474
Likes: 0
Received 23 Likes
on
18 Posts
Trending Topics
#8
06-19-2011, 07:31 PM
Thanks for the compliments guys. As for wheel removal, no question that if you can remove them it would be easier. I have neither the tools nor the know how to do this and I wasn't ready to risk any mechanical failure to the bike due to my inexperience and knowledge. Many told me this would not work or last. That it would chip or flake off in a matter of months, But two years later it still looks great.
Last edited by Thingfish; 06-19-2011 at 07:33 PM. Reason: Fix
#9
06-19-2011, 07:36 PM
Club Member
Join Date: Feb 2008
Location: Passaic County, NJ
Posts: 11,474
Likes: 0
Received 23 Likes
on
18 Posts
Thanks for the compliments guys. As for wheel removal, no question that if you can remove them it would be easier. I have neither the tools nor the know how to do this and I wasn't ready to risk any mechanical failure to the bike due to my inexperience and knowledge. For my level of ability I'd say it was the smart way to work, even if it was hard (not that hard) and safe. My reason for sharing this is for those here in the same boat as I was. Many told me this would not work or last. That it would chip or flake off in a matter of months, But two years later it still looks great.
Also, you'll need a 10mm 12pt socket to remove the calipers as they will keep the front tire from dropping. Again, not special.
The rear does take a little longer but again no special tools are necessary.
A service manual would help you a lot.
#10
06-19-2011, 11:18 PM
I have one which I used to disconnect and remove the console, but the wheels just gave me the ******* when I looked at the diagrams. Plus I didn't want to have to mess with the alignment afterwards. I also wouldn't want to mess with anything that requires careful re-torquing and fastening. I would like to learn about it, i just haven't managed that yet. If it wasn't my daily driver I'd probably experiment a bit more. As it is I have to know I can ride it to work on Los Angeles freeways when I wake up in the morning so whatever I start has to be finished with confidence in a few hours usually. I haven't seen a lot of posts of people painting their own wheels. A lot of posts about having it done and sent out to professionals or powder coating. I know a lot of members here really know how to swing a wrench, but plenty don't. I figured some on the forum would benefit from knowing there was a way to do it yourself without a lot of experience or mechanical confidence, or competence in my case.