Idea for removing/installing rigid backrest side rails less painful
#1
 02-17-2012, 03:05 PM


Probably not a new idea but searching for detachable side plates and the mounting hardware got me thinking........
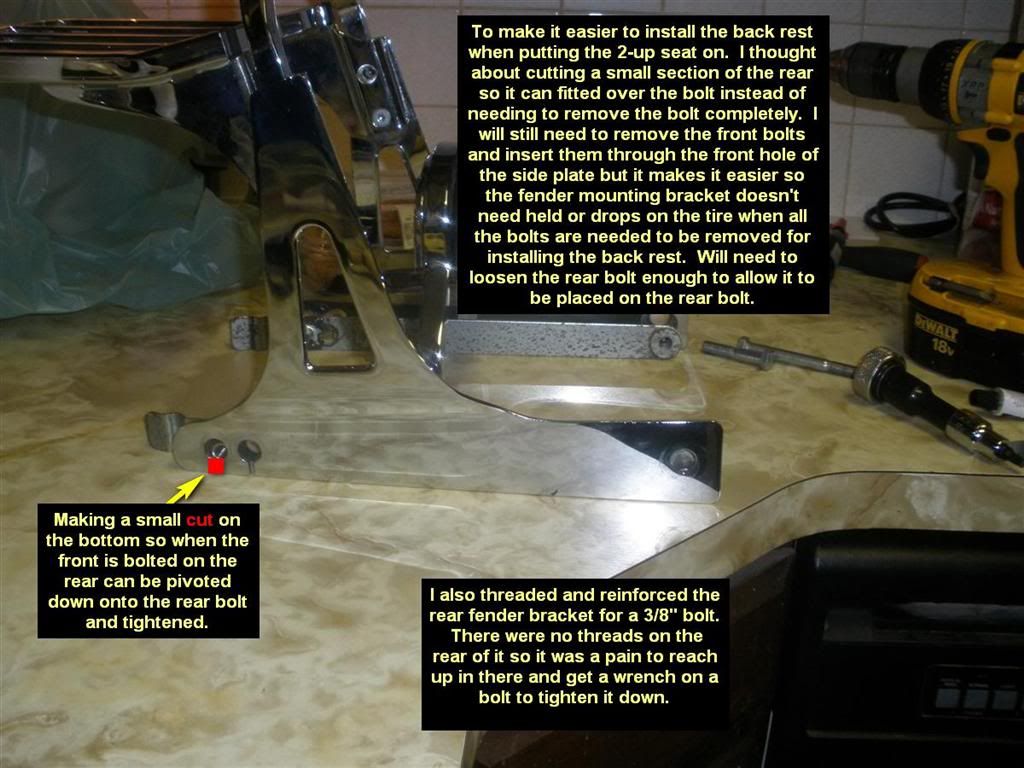
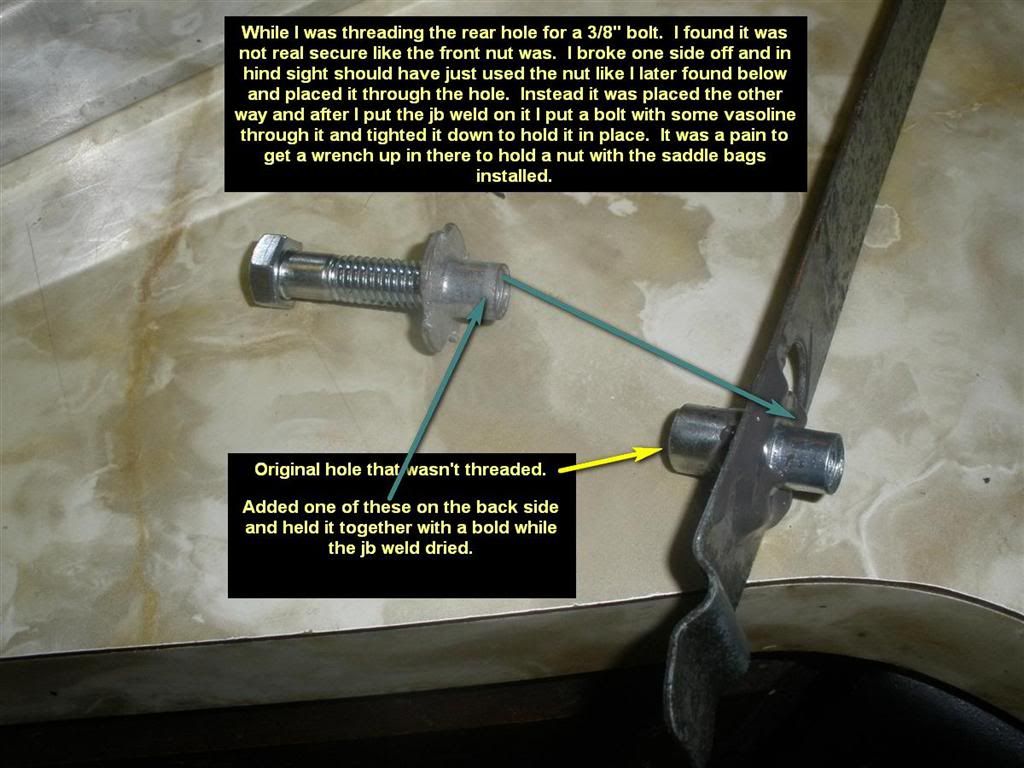
Okay, have and idea and just looking for input. Like most of you there is a solo seat that is mostly installed but there is the time that you need to put on the 2-up seat with her backrest onto the bike for just because the sun came out for a couple minute. I was going to get a detachable solo luggage rack for the rear fender but I bought the kind that connects to the fender using the seat mounting nuts. That solved one of my problems or concerns. Maybe I don't need a detachable backrest.......... What the second easiest way to do the back rest with out getting the detachable hardware kit, and the detachable side plates? The biggest pain I found when removing the saddle bag stand offs, or the back rest side plates was the rear fender mounting bracket that was on the inside of the fender. With or with out my saddle bags installed it was awkward getting a wrench on the rear bolt for it. Why the front was threaded and the rear was not I am not sure but I threaded the rear hole to take a 3/8" bolt and reinforced it a bit. So that should help speed things up (and lower the amout of curse words that come from the garage) when I need to remove anything back there. The second thought was it would be easier if I didn�t have to remove both of the bolts on each side. Then fight with holding the fender mounting bracket in place while holding the saddle bags, supports, and rails in place and inserting a bolt through it all and getting the thread started right.
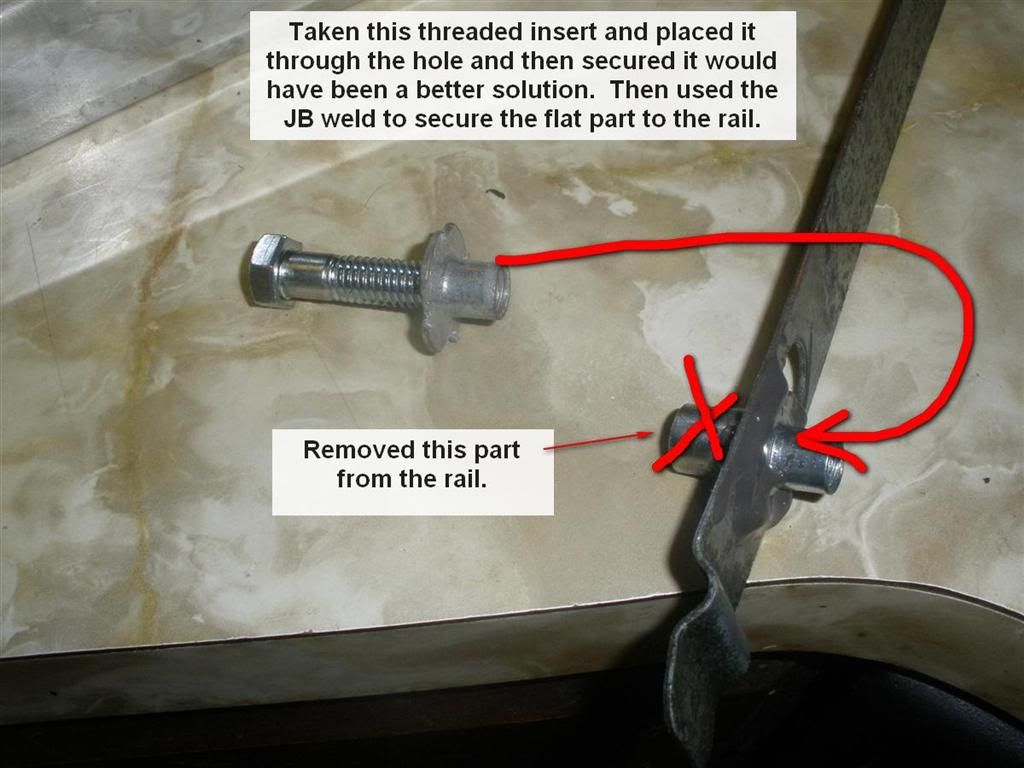
After looking at the detachable side plates I figured why not. Make an opening on either the front or back hole of the rigid side rail. Just large enough that I could fit a 3/8� bolt through. This way I would only need to loosen that bolt up a little and not remove it completely. Removing only two out of four isn�t to bad or time consuming.
Now where cut�. the front or rear of the plate. I was thinking of removing a small amount of metal right below the rear mounting hole of the side plate. It would be the least amount of material that would need to me removed. The front would be secured with a bolt through the hole. It seem the backrest is getting pressed back against so leaving front hole alone and placing a bolt through it seemed the safest. If so I can sit the back rest rear side plate onto the rear mounting bolts and just need to line up the front hole and reinsert the bolt I removed. Not as fast as a detachable backrest but it should be pretty quick if I don�t have to mess with any nuts inside the fender or mounting bracket popping out of the holes.
Just looking for any input on something I might miss or improve on. There are a lot of you out there that have swapped seats and backrest a thousand more times then I have so would appreciate any input or ideas on it. Thanks
Alright my solo luggage rack just showed up so have to go install it and see how it looks on there.
Okay, have and idea and just looking for input. Like most of you there is a solo seat that is mostly installed but there is the time that you need to put on the 2-up seat with her backrest onto the bike for just because the sun came out for a couple minute. I was going to get a detachable solo luggage rack for the rear fender but I bought the kind that connects to the fender using the seat mounting nuts. That solved one of my problems or concerns. Maybe I don't need a detachable backrest.......... What the second easiest way to do the back rest with out getting the detachable hardware kit, and the detachable side plates? The biggest pain I found when removing the saddle bag stand offs, or the back rest side plates was the rear fender mounting bracket that was on the inside of the fender. With or with out my saddle bags installed it was awkward getting a wrench on the rear bolt for it. Why the front was threaded and the rear was not I am not sure but I threaded the rear hole to take a 3/8" bolt and reinforced it a bit. So that should help speed things up (and lower the amout of curse words that come from the garage) when I need to remove anything back there. The second thought was it would be easier if I didn�t have to remove both of the bolts on each side. Then fight with holding the fender mounting bracket in place while holding the saddle bags, supports, and rails in place and inserting a bolt through it all and getting the thread started right.
After looking at the detachable side plates I figured why not. Make an opening on either the front or back hole of the rigid side rail. Just large enough that I could fit a 3/8� bolt through. This way I would only need to loosen that bolt up a little and not remove it completely. Removing only two out of four isn�t to bad or time consuming.
Now where cut�. the front or rear of the plate. I was thinking of removing a small amount of metal right below the rear mounting hole of the side plate. It would be the least amount of material that would need to me removed. The front would be secured with a bolt through the hole. It seem the backrest is getting pressed back against so leaving front hole alone and placing a bolt through it seemed the safest. If so I can sit the back rest rear side plate onto the rear mounting bolts and just need to line up the front hole and reinsert the bolt I removed. Not as fast as a detachable backrest but it should be pretty quick if I don�t have to mess with any nuts inside the fender or mounting bracket popping out of the holes.
Just looking for any input on something I might miss or improve on. There are a lot of you out there that have swapped seats and backrest a thousand more times then I have so would appreciate any input or ideas on it. Thanks
Alright my solo luggage rack just showed up so have to go install it and see how it looks on there.
#2
02-17-2012, 04:16 PM

Road Captain
Why dont you go the same route with the backrest as you did the luggage rack? Use a mount that only bolts to the fender, under the seat. I have this setup and it works well. It also doesnt interfere with my Easy brackets and hard bags.
you can get them at: http://www.kuryakyn.com/Products/772...issy-Bar-Mount
you can get them at: http://www.kuryakyn.com/Products/772...issy-Bar-Mount
Last edited by DesertDyna; 02-17-2012 at 04:17 PM. Reason: more info
#3
02-17-2012, 05:55 PM
It is amazing the amount of aftermarket items made for Harley. I couldn't even find a custom shifter for my Yamaha, had to use a HD shifter. lol Looks like that would be easy to take on and off also. The bonus also like you said is no additional spacers for the quick detachable rail. If I can I am going to try and make what I have right now work. Putting money away for a trip to Europe this summer so I am (actually she is) counting my pennies right now. Thanks again, I book marked that product for later on this year and will consider it when the money is back in the wallet.
#5
02-18-2012, 02:45 AM
Tourer
Join Date: Mar 2010
Location: Albuquerque, NM (USAF)
Posts: 327
Likes: 0
Received 0 Likes
on
0 Posts
Just letting you know that I have one for sale and I am at a base in Germany, maybe you can pic it up on vacation, LOL.
It is amazing the amount of aftermarket items made for Harley. I couldn't even find a custom shifter for my Yamaha, had to use a HD shifter. lol Looks like that would be easy to take on and off also. The bonus also like you said is no additional spacers for the quick detachable rail. If I can I am going to try and make what I have right now work. Putting money away for a trip to Europe this summer so I am (actually she is) counting my pennies right now. Thanks again, I book marked that product for later on this year and will consider it when the money is back in the wallet.
#6
03-14-2012, 10:06 AM
I haven't gotten to this project yet but your post has inspired me to not remove any of the bolts. After looking at pictures of the detachable rails it sould like you cut your slots similair. I haven't cut this heavy of metal before. Only thing I have that is capable of making the cut is a 4" angle grinder. I picked up a metal cut-off wheel for it the other day. What did you use to cut the slots in yours?
#7
03-14-2012, 02:38 PM

Trending Topics
#8
03-14-2012, 08:35 PM
#9
03-14-2012, 09:01 PM
#10
03-15-2012, 01:12 PM
Thanks for the advice on how to cut it. I appreciate it.