DIY air ride done
#1
 07-14-2014, 01:01 PM


So i finsihed up my air ride on my bike. still have a few things to do to get it 100% road ready, but i got about 15 miles on it so far... Used the 101 how to from choppedbaggers and ran with it
http://choppedbaggers.com/forums/sho...ide+parts+list
The best place to get the compressor and dump valve is at http://www.hornblasters.com/products...ir-compressors. Monroe MA785 shocks from http://www.streetsideauto.com/search.asp?keywords=MA785, just ask for black shocks. Check out http://choppedbaggers.com/forums/sho...-101&highlight for the fittings which show ace hardware part numbers.
or
Just search Amazon for these items.
1/4" Stainless Steel Electric Solenoid Valve 12VDC Normally Closed VITON (US SOLID)
Energy Suspension 9.9105G 4-Bar Bushing (2 sets)
Viair 90087 2.0" White Face Illuminated Single Needle Gauge
Monroe MA785 Max-Air Air Shock Absorber
VIAIR 92 Viair 92C 12 Volt Air Compressor Kit
I use push lock fittings on mine and used 1/4 from compressor to the dump valve to store more air and go up/down a bit faster
now for the fun stuff... the shocks come stock in some cheap flat black paint, i hated it, so stripped and shot them in gloss black after i removed the bushings stock

from there i turned my attention where to mount the compressor... so i made a mount:


this let me use the stock motor mount location for a mount.


reason i wanted to mount it here is i could use a Dev Fabrication chin spoiler to cover it

for the guage i wanted something i could read and easily access so I made this mount


powder coated and switch added


for the wiring i did everything on duchen plugs and wrapped all the cable in braided line to help it blend/vanish

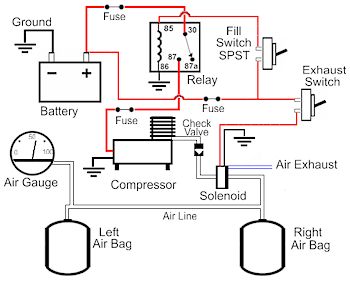
for the wiring i did a relay set up, i know some guys do not but i used a small two way switch and did not want the full load to go though that. worked out nicely this way and pulled the battery box to tuck it in nice and tight behind it
to adjust for the new lean i did have to shave the tang on my kick stand a bit


http://choppedbaggers.com/forums/sho...ide+parts+list
The best place to get the compressor and dump valve is at http://www.hornblasters.com/products...ir-compressors. Monroe MA785 shocks from http://www.streetsideauto.com/search.asp?keywords=MA785, just ask for black shocks. Check out http://choppedbaggers.com/forums/sho...-101&highlight for the fittings which show ace hardware part numbers.
or
Just search Amazon for these items.
1/4" Stainless Steel Electric Solenoid Valve 12VDC Normally Closed VITON (US SOLID)
Energy Suspension 9.9105G 4-Bar Bushing (2 sets)
Viair 90087 2.0" White Face Illuminated Single Needle Gauge
Monroe MA785 Max-Air Air Shock Absorber
VIAIR 92 Viair 92C 12 Volt Air Compressor Kit
I use push lock fittings on mine and used 1/4 from compressor to the dump valve to store more air and go up/down a bit faster
now for the fun stuff... the shocks come stock in some cheap flat black paint, i hated it, so stripped and shot them in gloss black after i removed the bushings stock
from there i turned my attention where to mount the compressor... so i made a mount:
this let me use the stock motor mount location for a mount.
reason i wanted to mount it here is i could use a Dev Fabrication chin spoiler to cover it
for the guage i wanted something i could read and easily access so I made this mount
powder coated and switch added
for the wiring i did everything on duchen plugs and wrapped all the cable in braided line to help it blend/vanish
for the wiring i did a relay set up, i know some guys do not but i used a small two way switch and did not want the full load to go though that. worked out nicely this way and pulled the battery box to tuck it in nice and tight behind it
to adjust for the new lean i did have to shave the tang on my kick stand a bit


#4
07-14-2014, 01:11 PM
Grand HDF Member
#6
07-14-2014, 01:14 PM
#7
07-14-2014, 01:16 PM
Trending Topics
#8
07-14-2014, 01:21 PM
i have a few more things to install still, and do fluids on the bike so since this was the shake down i waited to install that, ill have it on soon though
#10
07-14-2014, 01:23 PM