How To: Tuning a Keihin Butterfly Carb
#1
 04-11-2009, 02:11 PM

I started riding motorcycles in 1973 and Harley’s the next year when I bought a new 1974 Harley Sportster (XLH) from Harley of Atlanta. Soon afterward I joined the military and found I couldn’t afford insurance on the bike anymore (required by my bank where I had the loan from) and had to sell it in 1978. When I reenlisted I received a reenlistment bonus I bought a new 1979 Harley Lowrider (FXS) from Harley of Beaumont (Texas) that was equipped with the Keihin butterfly carb. Although I eventually put new exhausts and air filter on it, I didn’t have to rejet it as I could make the necessary adjustments with the air/fuel (air/fuel) mixture screw (Back then they didn’t have the seal covering the screw.). Eventually, due to salt corrosion (I used to take the bike on deck of the ship when we sailed to a different port for an extended time) the air/fuel mixture screw seized and I couldn’t get it free so I changed out the Keihin with a Mikuni carb. The Mikuni was easy to rejet and adjust and I kept that carb until I sold the bike in late 1999. In 2007 I bought a 1987 Harley FXR equipped with the Keihin butterfly carb that had less than 20,000 miles on it. The previous owner chromed it up some and put a new exhaust system on it, but had done nothing to the carb. After I bought it I realized that it was running very lean (white plugs, deceleration popping, hard starting, etc). So in the spring I decided to rebuild and re-jet the carb.
I found out real quick that there’s not a lot of info out there for a Keihin butterfly carb. When I asked for advice online, I mostly heard “trash it and buy a Keihin CV/S&S/Mikuni, etc”. I didn’t want to trash what I had; I'm not part of the "throwaway society" mentality, I would rather fix it. I’m sure there are others out there that feel the same way. I’m not trying to pretend that I’m an expert on these carbs (I’m not). What follows is a culmination of what I’ve read on forums, some pages from Easyrider, the factory service manual and from trial and error on my part. Some of the changes are strictly cosmetic, some functional and some a combination of both. Most of the internal parts (jets and o-rings) and gaskets are still available from Harley and/or aftermarket companies. I ordered new pilot jets from stock size (my bike came with a .50mm pilot screw) to two sizes bigger (a .52mm and a .54mm); I ordered one size up main jet (stock is .165mm. so I ordered a .175mm). I also ordered a less restrictive air filter, an Andrews accelerator pump upgrade kit (also available OEM as Harley part number 27364-76), and a rebuild kit (contains o-rings, gaskets, accelerator pump diaphragm and spring, and two float bowl needles). Keep in mind that my bike is an Evolution engine equipped FXR; other models (FLT’s, Shovel’s, etc) may not have the same size jets, etc. Check your service manual.
The first thing to be done, after removing the air filter (with the fuel petcock open and the engine off) is to look into the throat of the carb and twist the throttle to see where the fuel stream from the accelerator pump shoots. You want it to shoot in the middle of the carb, but typically it shoots toward the back cylinder. Note how much you need to turn the jet when you have the bowl off to get the jet of fuel to hit the throat in the middle. Next, remove the carb and clean it up with carb cleaner. Then use a small (3/32” or so) drill bit to drill through the “SMALL!” (Note the exclamation mark, quotation marks and capital letters!) plug on top of the carb. Wrap some electrical tap about 1/8” up the drill bit to guide you so that you don’t drill too deep and into the needle. DO NOT DRILL THE LARGER SEAL!!! Screw a sheet metal screw into the drilled hole of the SMALL seal and pry out the seal and trash it, you won’t need to replace it. You’ll see the air/fuel mixture screw inside.
With a small screwdriver gently turn the air/fuel mixture screw in until it GENTLY bottoms out. Back it out about one full turn. I had wanted to buy a air/fuel mixture screw that had a knurled thumbscrew for easier adjustments, but it’s no longer available for the butterfly carb (it’s still available for the Keihin CV carb, however); more on that later on how I resolved this issue. Turn the carb upside down and take off the accelerator pump housing (note that there are two short screws and one long screw). Then take off the remainder three screws for the float bowl. Remove the float bowl and see what you got. Turn the accelerator pump jet mounted on the float bowl (it’s a press fit in the bowl) with a small adjustable wrench the amount that you think so that the stream will hit the throat of the carb about mid-point. Check it again and if it’s still off, you’ll want to take the float bowl back off later and try it again until the fuel stream hits in the middle. Next, in the carb body, the pilot jet is covered by a rubber plug so remove the plug. Using a small screwdriver remove the pilot jet and install the next size up (for my bike it was a .52mm). Following your service manual check/set the float level (my bike’s float level is set to between 0.63” – 0.68” with the carb on its side and the float dangling, but check the service manual for your carb.). The float level is checked from the bottom of the float bowl mounting flange to the bottom of the float. This would also be a good time to shoot some carb cleaner through all the jets to make sure they are clean. Make sure you replace the rubber plug over the pilot jet (otherwise it will run like its being choked).
The accelerator pump housing is being replaced because Harley quit putting a check valve in the stock carb’s accelerator pump housing in 1980 models due to EPA pollution restriction regulations; the factory leaned out the idle in order to pass the regulations at the time. It seems EPA wasn’t concerned with the emissions above idle so the main jet was not set lean. So with the newer pumps (from 1980 to 1988) some of the fuel was pumped back into the fuel bowl when you hit the accelerator lessening the amount that actually is forced into the carb throat; the replacement pump housing puts back the check valve. To install the replacement pump, remove the float bowl up and turn it upside down and (following the instructions that came with the Andrews accelerator pump housing) drill a 1/16” hole in the dimpled hole and clean everything up with carb cleaner and blow out with air to get rid of any metal shavings. The dimpled area is the one that has an area for an o-ring to sit. Carefully reinstall the new accelerator pump housing (make sure you use two o-rings on the housing) onto the float bowl and then install the float bowl on the carb. The gasket kit I bought included new gaskets, o-rings, pump diaphragm, diaphragm spring, rubber plug for the pilot jet and two different needle valves (I didn’t replace my needle valve). I also bought an Allen head float bowl screw kit so I also went ahead and replaced all the screws on top of the carb (cable guide screw, choke cable screw and choke cable pinch screw) with Allen heads (from Home Depot). You’ll need two 4mm-0.7 and one 5mm-0.8 screws (the shortest I could find was 10mm long so they all had to be shortened). I built an extended idle screw and fast idle screw that I’ll explain later. Put the carb back on the bike using new intake gaskets on each side of the insulator block and hook everything up except for the fuel overflow hose. Turn on the fuel and check for leaks. When I did the first time (and every time I took off and replaced the float bowl) I quickly found the fuel coming out of that overflow. I turned off the gas and tapped the carb with my hand a few times, and it took care of that problem (I don’t think the float bowl needle valve was seated properly). Now I give the carb a couple of taps before I even turn the gas on for the first time after having the float bowl off which has eliminated the overflow problem.
I checked where the accelerator pump jet shot fuel (after I had adjusted it), and it shot it right in the middle of the throat. I started the bike and let it warm up. According to the factory service manual, the idle is set between 1000 and 1050 rpm, and the fast idle at 1500 rpm. I have an automotive digital tachometer that I hooked up to the bike and started it. I had to figure out that since the tach was designed for 4, 5, 6, and 8 cylinder cars that I had to divide the readout by 4 to get the proper RPM reading on the four cylinder scale since the coil fires both plugs at the same time. Using the 8 cylinder scale and dividing by 8 slowed the RPM variation to make it easier to set. I slowly opened the air/fuel mixture screw (counter-clockwise) until the idle stopped rising as I turned it and stopped at that point. I then set the regular and fast idle to factory specs.
I found trying to set the idle with the OEM Phillips head idle screw was difficult because the fuel tank was in the way and I had to be real careful not to damage the paint. The fast idle was likewise hard to adjust not only for the same reason, but also because when you put pressure on the Phillips head screw to turn it, it would race the engine as it controls the butterfly through the choke fast idle cam. I have a small lathe (South Bend 9” Model A), so I took a two inch � inch diameter stainless Allen head bolt and turned the shank down to �” and knurled the ****. I then drilled and tapped what was the thread end with 4mm-0.70 threads. I cut the head off a 4mm-0.70 screw about 1�” long and red Loctited the screw in place leaving 7/8 inch of the screw protruding. On my bike, for cosmetic reasons, I recessed the other end of the bolt to fit a brass button off of my military service jacket pocket and RTV’d it in place (nothing to do with this project, but I did a similar upgrade to replace the choke **** using 316 stainless steel rod and a brass button off my service hat). I’ve made idle screws for other bikes and bored out the Allen head recess so that it was round, and drilled three small holes 120 degrees apart inside the recess to allow for water drainage (as a side note these holes looked good esthetically also.). Now I can easily adjust the engine idle without even looking.
You can buy a commercially available extended idle adjustment screw (fits both the butterfly and CV carb), but although it’s functional I think its butt ugly.
Likewise for the fast idle I turned off the male threads off a stainless Allen head bolt, this time � inch diameter and 3/8 inch long, then drilled and threaded the end to 4mm-0.70 screw. A 4mm-0.70 machine screw was threaded into the end leaving �” (19mm) of the metric screw protruding (no decoration on top of fast idle adjustment screw) and then cut off the head of the metric machine screw and cleaned up the threads. The fast idle doesn’t usually need tweaking after being set and now can be done with an Allen head wrench (a ball headed Allen wrench makes it even easier) without putting pressure on the mechanism.
Earlier I mentioned wanting a knurled air/fuel adjusting screw (commercially called an “EZ-Just”) due to the extremely confining space between the fuel tank and frame to make it easier to adjust. I found that although they are still advertised for the butterfly carb at various vendors, they are obsolete and no longer available at any of them. So I made my own by modifying the OEM needle using the lathe. I did this by drilling into the slotted end of the needle to a depth of about 0.25” and turned a knurled **** and shaft on the lathe. The needle drilled hole and **** (still mounted in the lathe) is fluxed and soldered in place using a propane torch with the lathe headstock and tailstock holding both parts in alignment. Also as a side note, the thread on the air/fuel mixture screw is 6mmx0.75.
Up to this point in early spring I hadn't rode the bike as the weather has been crappy. Several days after working on the carb it warmed up to 40 degrees I took it for a test ride. WHAT A DIFFERENCE! The bike starts right up (I didn’t even have to use the choke to start it!). No deceleration popping and it runs smooth. No hesitation or stumble, and it accelerates incredibly. I found that I didn’t even have to touch my main jet. Total cost of all modifications and the rebuild was about $40.00 and using parts I had on hand. I can't get over how easy it starts now; it used to have to turn over a few times and maybe, just maybe it would start. Or I'd have to go through the same routine again. And then again I might flood it (it was real touchy). Now, when its cold - half choke and three twists of the throttle, it starts right up, even better when it's warmed up; one twist of the throttle and the starter just barely starts to turn the engine and it fires up. No hesitation, no stumbling, no smoking, no deceleration popping, no excessively hot pipes (etc). The new idle adjustment screw and modified air/fuel mixture needle made all the difference in the world in adjusting the idle and air/fuel mixture. I can even adjust either sitting on the bike. I really can't imagine any other carb making the bike run any better...I have absolutely no complaints. I think I'm done.
Other carb upgrades I’ve done:
• If the plastic fuel inlet is broken or cracked, you can buy a brass replacement inlet (Harley part number 27371-76A; also available aftermarket). Mine eventually cracked so I replaced it. It’s easy to do; remove the carb from the bike and look at the direction the ****** plastic inlet is facing (to install the replacement in the same direction). Break off the rest of the plastic inlet and using a �”-20 tap, thread the brass portion that is still in the carb. Find a piece of tubing that will go over the broken fitting and using a �”-20 bolt and a washer, screw the bolt into the tapped brass portion still in the carb to act as a puller to remove it. After the old brass fitting has been removed, use a vise or press to install the new fitting, making sure the inlet is facing the correct direction. It’s that easy.
• To dress up the carb I picked up a 5/32” ID double-braided stainless steel vacuum line kit for the gas overflow from Autozone that included two dress-up clamp ends (they don’t really clamp, just dress up the ends). It’s made by Spectre Performance and is part number 19190. I measured the hose to match the OEM hose, used shrink tubing where I decided to cut it, and used a Dremel tool with cut-off wheel to cut. It fit perfectly, but unfortunately my air filter housing covered up the majority of the hose. I’ve also bought and installed a �” double braided stainless steel fuel line, again for cosmetics. If you do this, route the hose(s) to not go near any exposed electronic connections (such as the coil) as it WILL cause problems if you get an arc. Don’t ask me how I know….
Dave Young
EDIT: CV Performance is again manufacturing the Keihin butterfly EZ-Just a/f mixture screw. See bottom right hand side at http://www.harley-performance.com/cv...nce-parts.html
Last edited by chengdave2003; 01-27-2012 at 07:56 PM.
#2
04-13-2009, 03:07 PM

Hey, not sure if this would help you out or not, but I have a brand new Carb that I had bought for my old bike. I just needed the float bowl off the carb. $700 later I had a new float bowl and the rest of the new carb sitting on the shelf. Never been installed. If you want more info on it I can get you all the numbers and model of the unit. E-mail me back at edge2edge@comcast.net. Bill
#4
04-14-2009, 06:12 AM
Sponsor
Best way we have seen to repair a Keihin butterfly is to install an S&S E.
Clients are much happier in the long run.
Clients are much happier in the long run.
__________________
HILLSIDE MOTORCYCLE & MACHINE, INC.
HARLEY-DAVIDSON SPEED & SERVICE CENTER
5225 SOUTH MAIN ST., MUNNSVILLE, N.Y. 13409
Sales/Support 315-495-6650
www.hillsidecycle.com
Walk-in Retail Showroom
Complete H-D Machine Shop
Case & cylinder boring
Complete Cylinder Head Shop
High-Performance Engine Kits
Crank Rebuilding
Direct Link & PowerVision Tuning
Goodson HD Tooling Manufacturer
Maxton Mile World Record
4500 sq ft. facility
OVER 35 YEARS OF H-D ENGINE BUILDING.
See us on Facebook.
#5
04-14-2009, 07:32 AM
Consider the difference in price and application. A bike who's engine is totally stock (abet chrome), what would it cost me to install an aftermarket carb. I've got less than $40 in the rebuild, including a high efficiency air filter and extra various sized jets that I probably will never use). You're right, I would be much happier with an aftermarket carb (probably would go Mikuni like I put on my old shovel), but cannot justify the hundreds of dollars to do so with this carb running the way it is.
The following users liked this post:
hw3tnt3 (04-24-2018)
#6
07-23-2009, 09:46 PM
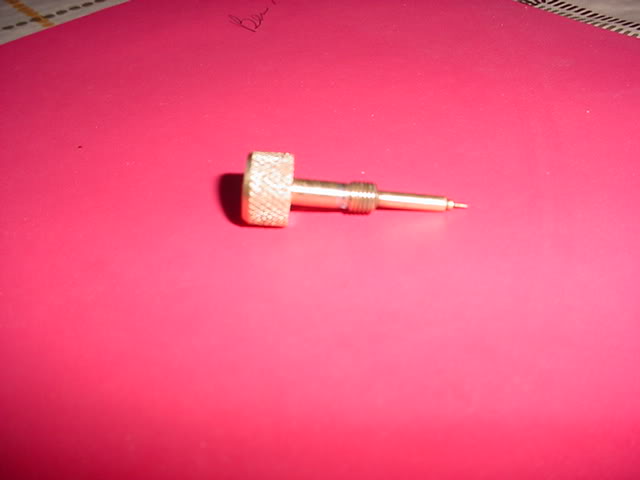
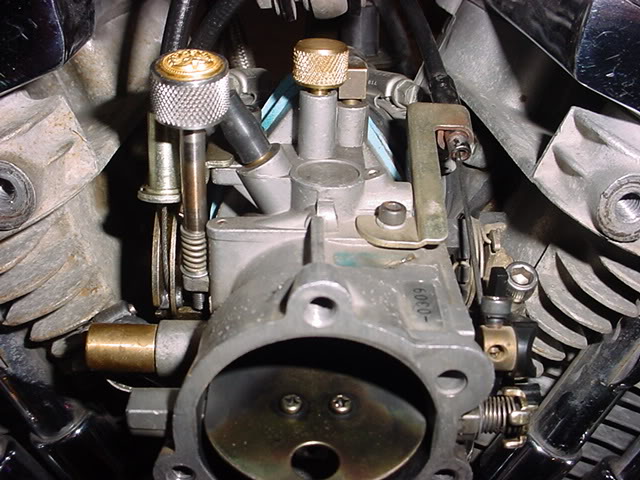
I ended up making a homemade EZ-Just air/fuel needle utilizing the OEM needle. Using a 9" South Bend lathe I made a knurled **** and drilled out the original needle. I soft-soldered the two pieces together. Works perfectly.....
In the lower photo you can see the extended idle adjustment screw I also made (on the left), the a/f needle installed in the middle, and the fast idle screw on the right....
Dave
In the lower photo you can see the extended idle adjustment screw I also made (on the left), the a/f needle installed in the middle, and the fast idle screw on the right....
Dave
Last edited by chengdave2003; 10-07-2009 at 09:02 PM.
#7
01-19-2010, 04:42 AM

Stage I
Join Date: Jan 2010
Location: Bavaria, Germany
Posts: 1
Likes: 0
Received 0 Likes
on
0 Posts
@ Dave
Hi, thanks for Your article about the Keihin non-CV. I was desperately looking for information on this carb as I don't get a lot of info here in Germany about a Keihin butterfly either, I can assure You.
I would like to try and replace the somewhat worn out Bendix on my 1971 FLH (74 c.i.) with a Keihin butterfly I got my hands on recently. Is there anybody out there who can provide me with an idea for initial setting on a 1200cc Shovel?
Right now the carb is fitted with standard 165 main and 52 slow jet. The bike sports an aftermarket air filter and the fishtail exhausts seem to be aftermarket items too, loud as they are.
Thanks for answering, Martin
Trending Topics
#8
04-03-2011, 05:28 AM

The following users liked this post:
BikerTrash75 (05-01-2020)
#9
07-31-2011, 08:29 PM

6th Gear
Join Date: Jul 2011
Location: pittsburgh
Posts: 11
Likes: 0
Received 0 Likes
on
0 Posts
I just ordered the Andrews pump kit for my 80 FLH. I'm going to do all your mods also. I too have a small lathe so I can do the same on the air/fuel screw.
Are there any other mods you have done to your shovel to make it run better?
Thanks for posting your mods on the carb I'm sure you have helped countless people.
Terry
Are there any other mods you have done to your shovel to make it run better?
Thanks for posting your mods on the carb I'm sure you have helped countless people.
Terry
#10
06-30-2012, 10:25 PM

Stage IV
Join Date: Jun 2012
Location: Montreal, Quebec, Canada
Posts: 4
Likes: 0
Received 0 Likes
on
0 Posts
Good day, I followed wath you mark to drill the SMALL screw on the carb, but it seem I'd ruin my carb! The small screw hide a flow chamber for the gas... To tell you my story, I bought a Harley xl 1982 1000cc. with the keihin carb non cv. I open it and change the gaskets. The accelerator pump was broke, so I change it and to do the same as you mention it for a better adjustment. So, now, I tried to fix it with a product call water weld from J-B Welb, and I put back the part. The bike start but as soon of it's hot it doesn't keep the idle and stall. If you have any idea to save my carb, it will be apreciate ? Sorry if my english is poor, but I'm french canadian.
Thank's for any help,
Benoit
Thank's for any help,
Benoit