Buying a properly equipped enclosed trailer for multiple uses is not easy!
#21
 02-27-2015, 11:29 AM


I ordered the trailer. Here are the specs:
- 6x12plus V-nose (For better mpg. V-nose only. Slope nose not offered by this manufacturer)
- Single axle
- 78" (i.e. 6' 6") interior height ( to allow for insulating & paneling ceiling in future)
- Ramp rear door (the 6'6" interior height means no banging head on ramp header)
- 30" Side door (could have gone wider, but then front tire of bike would have encountered door passageway)
- Recessed RV lock in side door (to enable locking and unlocking from inside)
- Torsion axle (independent suspension, better ride, real shock absorbing)
- Electric brakes (for emergency stopping, reduced tow vehicle brake wear, and
- EZ Lube so that keeping the axle bearings greased is easy
- Radial tires (better mpg, better ride, higher quality tires)
- Alloy wheels (appearance, no corrosion)
- 16" floor joist spacing (since carrying KTM, or Harley, or both)
- 16" wall stud spacing
- 3/4" plywood floor
- 3/8" plywood walls (with a new upgraded "cabinet-like" finish, good enough to clear coat and call it done. VERY nice)
- 24" ATP stone guard front
- 24" bright anodized stone guard on sides
- 2-tone paint, black & yellow with diagonal scheme on each side
- 3" bright anodized strip along where yellow and black paint meet diagonally
- 7-pin tow connector (which includes dedicated 12 volt power supply wire from tow vehicle)
- Roof vent framed & pre-wired for RV air conditioner
- Tongue jack
- Rear fold-down adjustable jacks (to stabilize trailer and keep it from tipping backward when the Harley is loaded)
- 1 12volt light with wall switch (our "starter" lighting. Will add 120V AC shore power myself, as I have wired complete houses before)
- 100% LED external lighting (for zero bulb maintenance)
- Undercoated to protect against corrosion
- 2 of 15"H x 30" W slider windows (centered on axles, and bottom 48" above floor of trailer, and 66 to 68" above ground, so people can't just "look inside". provide cores-ventilation and sunlight)
- 2 side wall vents (1 at riverside front near floor, 1 at curb side rear near floor, for bike gasoline fumes safety, and to help prevent /humidity moisture buildup inside the trailer)
The trailer was ordered from a full service trailer dealership that actually does any warranty work right on-site unless the work required is "major". In that case, the trailer gets sent to the factory, which is under 75 miles away.
Now remember my trailer is single axle, not tandem, and has the V-nose but not the slope nose, and the paint diagonal positioning will be slightly different, but here is the closest photo I could find to what I ordered:
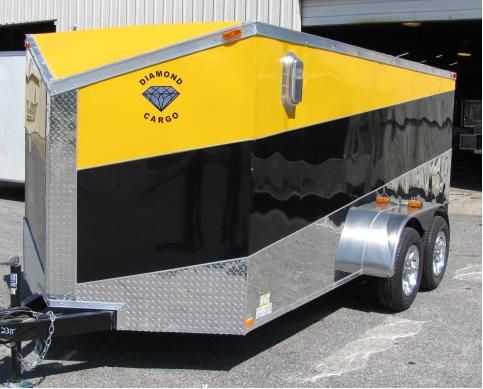
This color scheme not only pretty much entirely removes the "boxiness" of the trailer, but also (a) is easy to find even at a crowded dirt bike / Harley / hot rod meet, and (b) is a real bitch for a thief since it is highly visible and recognizable and would require a complete repaint in order to disguise, and that would be hard to given all the brightwork on the trailer.
The trailer cost me just under $3900 before sales tax, title, and fees.
It will take 6 to 8 weeks to build and deliver to the dealership.
My wife is all excited and already looking at things that can easily be added for sleeping, light meal preparation, and entertainment. She has already found some really interesting products on Amazon!
This is going to be fun.
Jim G
#23
02-27-2015, 12:10 PM
No, Diamond Cargo just happened to have a photo on their website that inspired me! Diamond Cargo sells factory direct and has good prices and allows you "build" the trailer yourself on their website and then order it. BUT, their factory is located 1000 miles from my home, so the cost of driving 2000 miles there and back, with extra fuel hauling the trailer home, lodging, and meals, makes it tough for them to compete with the dealers near me who get their trailers from more nearby factories.
The factory that will produce my trailer is in Waco Texas, under 75 miles from the dealer. The factory is one within the "Lark" corporate family, and the dealer is "Big Tex". I think Big Tex sells more "hard core" trailers for commercial use than these cargo trailers (dump trailers, heavy equipment trailers, etc). My salesperson had never put a package like mine together before (which is why it took a couple of in-person tries and lots of emails to get him "on board", and then he was surprised at how much trailer I got for relatively little money.
Jim G
#24
02-27-2015, 05:30 PM
Tourer
Join Date: Jan 2014
Location: Montana, USA
Posts: 250
Likes: 0
Received 0 Likes
on
0 Posts
@ Jim,
O.K. now I'm all excited too!
I think you got a hell ofa good deal there. If you are buying new it pays to do your homework! I think we can learn from your approach.
In my case I bought the trailer used, for business use about 5yrs ago. I hadn't thought of modifying till recently, but I can see a lot of possibilities.
I tow with a conversion van so I don't really need much, but would like a private shower/toilet with Hot water. Once you get into that, you need plumbing, fresh and black tanks, pump, heater, 12v and propane, vents, lights etc.... At some point you might as well go full custom and have it all.
I only paid 1000.00 for the trailer and have used it daily for business. I figure if I put 2-3k into a conversion I can have a nice rig. 110v/12v, A/C, heat, insulation, propane, fridge, TV/Stereo, flooring, awning, etc... so for 4k I'd have something pretty cool.... but, I live in Montana and our riding season can be short 4-5mo... that's the same season we have to do everything else, work, home repair, fishing, BBQs, weddings, rodeo, etc. etc. We usually do about 6 rallies and poker runs a year including Sturgis, and have always rode and stayed in motels. So if I spend 3k, it would take a few years to pay off vs motels. On the other hand, when it gets too cold/snowy here I could just load up and head south to warmer weather.
Plus, it looks like it could be a fun project.
Still thinking on it...
#25
03-06-2015, 07:18 PM
I had to wait an extra day because of freezing rain on the roads yesterday, but today I did do the visit and plant tour at the factory that is producing my trailer!
This Lark United plant is located in McGregor, Texas, just southwest of Waco, Texas.
I got a HUGELY warm welcome from both "Pam", who arranged the visit, and her husband "Jamie" who runs the entire operation.
The plant is located in a former Stinger Missile facility, where the missiles were assembled and armed. It still has numerous buildings on the property related to that role, that cannot be demolished because engineers fear that rocket fuel and other flammables/explosives have saturated some of the walls!
Jamie and his wife, plus a couple of other employees, are originally from Georgia. Jamie had worked for Pace Trailers before that company went bankrupt (the new Pace company just bought the rights to the name only), and then went to work for Lark United. He and the couple of other employees were asked to come to Texas for a few years, to restore, re-equip, and recommission the McGregor facility, which had already been used for trailer manufacturing by Pace, after the Stinger factory role ended.
This effort has been hugely successful. Now, about 3 years into the effort, the number of employees has zoomed from an initial 40 to about 80! The plant produces about 25 to 30 trailers per DAY. Jamie says the company is now the 4th largest trailer manufacturing company in The U.S., and growing very rapidly.
Jamie and Pam told me my timing was excellent, as they juggle production schedules daily in response to component availability or shortages, and my trailer COULD be started as early as early next week! So, today was about my last chance to make changes.
Jamie showed me the entire operation except for welding and painting, which are off limits to visitors for safety reasons. I saw exactly how these trailers are built, and the "innards" of them. Jamie was very generous with his time,spending almost 2 hours with me, and answered all of my many questions. In addition, he looked over my option list and suggested 5 new additions that have an excellent cost versus benefit ratio. We then added those 5 to my order:
- Insulated walls: The price for insulated walls was relatively low - not a whole lot more than the insulation material itself would cost me at retail - and will provide both thermal and sound absorption benefits. I did NOT get the ceiling insulation option though, as it requires a finished ceiling, and I am nowhere near knowing where and what lighting and other features I will be adding in my own buildout after delivery. Insulating the walls cost a little more than $200.
- Triple tube 60" extended tongue: This apparently allows much sharper backing up turns, and improves the tracking and ride on a single axle trailer, and it cost under $100.
- 12 volt cigarette plug-in located inside V-nose, driver side, 12" Above Finished Floor: This will provide a place for me to plug in a medical device that can run on either 12V or 120V, before I get around to installing the 120 V system and converter. Jamie said this will add only about $30 to my order, making it super bang for the buck.
- Aluminum one-piece roof upgrade: The standard roof is Galvalume (steel coated with an anti-corrosion layer) and is multiple pieces. The one-piece aluminum upgrade changes the material to aluminum, which can't rust to begin with, and to one-piece which means no opportunity for seam water leakage. It also looks tremendously better (I saw the two materials side by side in the roofing section of the plant) and should also reflect the heat of The Suneven better than the Galvalume. I'm sure it's also lighter weight than the coated steel, but the weight of the roof as a whole is not huge. This is about a $180 upgrade.
- 12" OnCenter walls (versus 16" OC): We are adding this to strengthen the walls throughout, as I don't yet have a floorplan that shows where the walls will have items attached to them (e.g. cabinets), and this is an inexpensive way of making the walls stronger everywhere so that the exact location of attached items becomes far less important to know. This was an under $100 upgrade as I recall.
Jamie confirmed that with my torsion axle and electric brakes, I get the 7-pin electrical tow connector, which enables that constant 12V power wire from the tow vehicle. Jamie said to just remember to shut down any 12 volt accessory in the trailer when not actually using it, as a 12 volt load in the trailer can and will discharge the tow vehicle battery since it is an unswitched connection.
Jamie also confirmed that I will be getting an onboard battery on the tongue to activate the electric brakes in the event of disconnection of the trailer on the highway.
My black / yellow / anodized / diamond plate color scheme apparently attracted Jamie and Pam's attention, as they knew exactly which trailer I had ordered as soon as I mentioned the color scheme! Jamie says it is going to be a real looker!
He showed me built trailers awaiting delivery that showed many of the features I ordered, including 2-tone paint, alloy wheels, anodized stone guard sides, etc. He also showed me the 30"wide x 15" high windows I would be getting.
He confirmed that the trailer floor is 3/4" TREATED plywood, which is also painted on its underside with an undercoating sealant. The frame itself, once welded, is "painted' with a VERY thick and very viscous "paint". I saw lots of the frames today, and that coating is indeed THICK!!
The wall studs are "Z" shaped versus "tubular"and have a depth of about 1 5/8" and wide flanges. The interior plywood walls are indeed the "new" appearance, which is MUCH nicer than the former appearance - MUCH finer grain pattern and "cabinet finish like". The screws securing the plywood to the studs appeared to be about 12" spacing or less for all the trailers I saw under construction. So, with my 12" OC stud spacing, there will likely be something like 40 screws holding each 4 foot wide sheet of plywood to the studs.
I measured a couple of the trailers for floor height, and Jamie confirmed I should expect the floor surface to be about 17 to 18" above ground.
The current alloy wheels being used are gorgeous 5-spoke wheels in which the 5 spokes are THE prominent visible feature.
Jamie confirmed that I will get BOTH the recessed RV lock and the normal cam lock on the side door, since I did not specify to delete the cam lock (I want it for better security when the trailer is not being actively used).
It took me 2 1/4 hours to get to the plant and 2 1/4 to get home, so coupled with the 2 hours on site, I spent much of the day on this visit, but it was really worth it!!
Jim G
#26
03-07-2015, 09:29 AM
Jim,
Sounds like a good way to spend a day. Also sounds like you are going to have a well thought out custom design.
AS the weather breaks here I'm looking forward to picking up my new bike next week. I don't know if the conversions to my "sleeper" will happen this year but I do know I'll be adding the thick undercoating and I'm adding an epoxy (with traction grit) floor and ramp before my new trailer gets many more miles on it.
The roofing material change sounds like a great approach to roofing issues as the trailer ages.
Even with the inside side door latch you need to put a lock on the outside of the side door when using the inside so no-one can latch it and lock you in.
Can't wait to see some photos of your project!
#27
03-19-2015, 11:54 AM
For those following this thread because they too are outfitting an enclosed trailer to haul their bike:
Here's a neat insulation product for walls and ceiling: Rmax rigid foam insulation.
This insulation comes in 4' x 8' panels, and is currently available at both Lowes and Home Depot, although Lowes apparently is dropping it (no longer on their website, but still in some stores).
The big deal with this insulation is its relatively high R value. One inch of this stuff is almost R7.
It comes in different thicknesses, but the 3/4" thickness, which is R5, is the one I chose. The reason I picked this thickness is that while it is "rigid", it can still bend a bit without fracturing. This should make it ideal for insulating the ceiling, using TWO layers of it, for a total R value of 10. That R value is about equivalent to the stud walls in most southern states homes.
It can be glued into position with a few dabs of industrial adhesive, like PL400, squirted from a caulking gun.
This insulation comes with a foil silver layer on each side, and one of those sides is brighter and absolutely unmarked in any way, so looks decent even if you decide not to immediately cover it with 1/4" plywood.
Most trailer roofs are 24" on center, so you just cut each 4x8 sheet down to 2x8, and then cut the 8' dimension down to whoever is needed for your width of trailer.
Since I don't yet have my trailer (it's due to be delivered soon), I can't actually install it yet and describe how to do it, but I'll do that after the trailer arrives.
The advantages of insulating the walls and ceiling are less temperature swings inside even an unheated trailer, quieter interior (especially when it is raining outside!), and the practical ability to heat or cool the interior as needed.
Here is what the insulation looks like at Lowes:
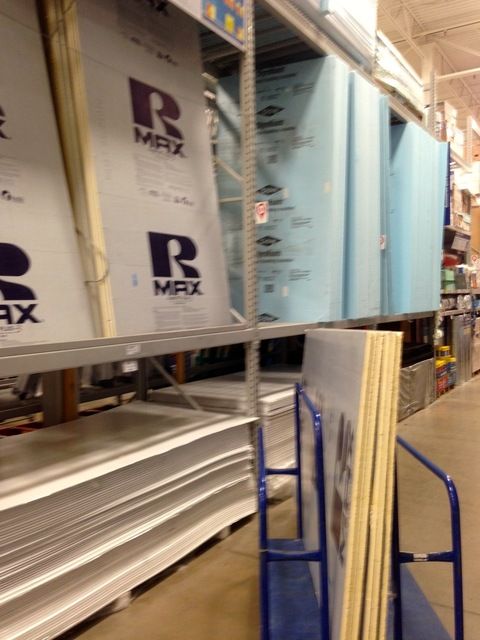
The side you are seeing on the rack is the "ugly" side with the matte finish and all the printed stuff. The other side is very nice.
I'm pretty sure this is the stuff that the RV manufacturers are using in their latest "all weather" RVs, a sit allows you to get R10 with just 1.5" of insulation.
Jim G
#28
03-19-2015, 12:44 PM
For those interested in trailer locks for an enclosed trailer:
"Trimax trailer locks" are designed specifically to improve the security of trailer locking. They are often referred to as "hockey puck locks" or "puck locks". There are other brands of puck locks too.
Here is what the Trimax locks look like:
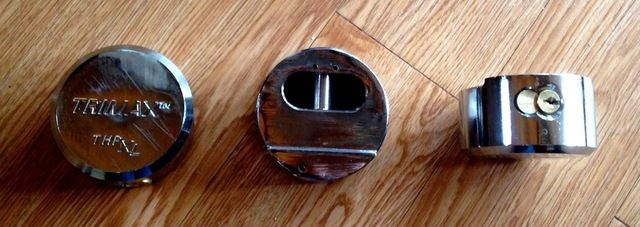
The leftmost lock in the photo shows how the lock looks when locked in position on a trailer door hasp. Notice that there is NO visible shackle, and the hasp would be completely covered.
The center lock in the photo shows what the BACK of the lock looks like. Notice that the shackle, although already invisible from the "front" of the lock, is also deeply recessed within the lock body, making it virtually impossible to get at it with a pair of bolt cutters. Notice also that the lock itself also causes the hasp on the trailer to be recessed into the lock, so bolt cutters cannot be used on the hasp either.
The rightmost photo shows the BOTTOM of the lock. This is where the key gets inserted. Because (a) the keyhole is on the bottom of the lock and the lock is immobile when locked, and (b) the keyhole is right up beside the trailer door wall, picking this keyhole or otherwise attacking it will be difficult.
The combination of features makes the lock unattractive for a professional thief to attack because it's a lot more work to defeat it than an ordinary padlock. An amateur thief would probably be totally stumped by its appearance. It also looks far better than most other locks.
These locks cost $20 to $25 or so, depending no where you buy them. I paid $25 each because I ordered from a source that offers a "key alike" option, that guarantees that all of the locks you order in one order will be keyed to use the same key. If you order these from a source that does not offer "keyed alike", you might or might not get keyed alike, depending on the source's internal shipping processes.
You get 3 keys with each lock, so I have a total of 9 keys for my 3 locks.
These trailer locks are supposedly sized to fit ALL cargo trailers. Note that these will almost certainly NOT work on a trailer COUPLER, because they are specifically made to fit the door hasps.
Jim G
#30
03-19-2015, 06:35 PM
Tourer
Join Date: Jan 2014
Location: Montana, USA
Posts: 250
Likes: 0
Received 0 Likes
on
0 Posts
Good to see you are thinking ahead. The insulation seems to be a MUST for most of the country, either hot or cold and will make life a lot better at minimal cost/effort. Now would the time to plan out any 12v or 110v wiring that you may want/need in the future since you will have the walls and ceiling apart anyway. Good luck and keep posting, I'll be following.