Mikuni VM38 Questions
#1
 11-15-2011, 02:46 PM

Join Date: Oct 2011
Location: Bellmawr NJ
Posts: 153
Likes: 0
Received 0 Likes
on
0 Posts
I just received my sudco kit for the ironhead and am stumped at the beginning. How do I get the new throttle cable in the carburetor and attached to the slide?
It does not have an instruction manual, I found one online that piniongear had posted but it doesn't match mine 100%. Is the idle screw brass with a spring to the right of the air screw, or a little stainless steel one set in the body with a small slothead groove that is on the same side as the fuel inlet?
Also, do I need to use a gasket when installing the adaptor to the manifold? There does not seem to be a provision to support the carb on the bike either but I'm sure one of you guys have found a way to get this done.
EDIT: Also, the bolts that held the keihin to the manifold don't have heads, they have a peened end but are more like studs (they don't mushroom out to make a head at all). Should I just replace these with proper size hex bolts?
Last edited by Krazyshark; 11-15-2011 at 03:08 PM.
#2
11-15-2011, 03:26 PM
Outstanding HDF Member
I just received my sudco kit for the ironhead and am stumped at the beginning. How do I get the new throttle cable in the carburetor and attached to the slide?
It does not have an instruction manual, I found one online that piniongear had posted but it doesn't match mine 100%. Is the idle screw brass with a spring to the right of the air screw, or a little stainless steel one set in the body with a small slothead groove that is on the same side as the fuel inlet?
Also, do I need to use a gasket when installing the adaptor to the manifold? There does not seem to be a provision to support the carb on the bike either but I'm sure one of you guys have found a way to get this done.
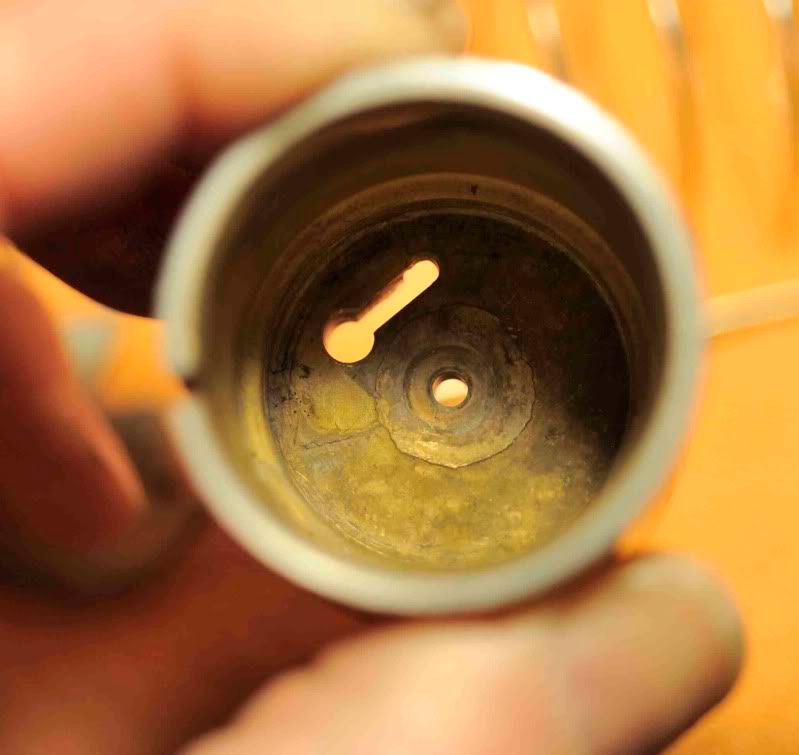
First attaching the cable to the slide......
Remove the slide. With it is the jet needle in the center of the slide and the needle tapered end sticks down below the slide.
There is a round metal plate with a hole in the center and oddly shaped edge on one side, located under the coil spring. The top of the needle sticks through the small center hole. Remove the plate but leave the needle in the slide.
Thread your throttle cable through the top of the carb.
Place the coil spring over the end of the cable.
Compress the spring back against the carb top.
Looking at the inside of the slide you will see a slot with a hole at each end of the slot.
Place the end of the cable through the larger of the two holes at the slot end, then move the cable end along the slot until the lead end of the cable sits in the smaller of the two holes.
Now place the metal plate you removed back inside the slide. (You are still holding the spring compressed aren't you?)
See how the metal plate acts as a cable retainer? The odd shaped edge fits into the slide with the center hole going over the needle top in the center of this plate.
Now let the spring go and see how the spring pressure keeps the round plate in place.
It also keeps the needle seated as it should be.
pg
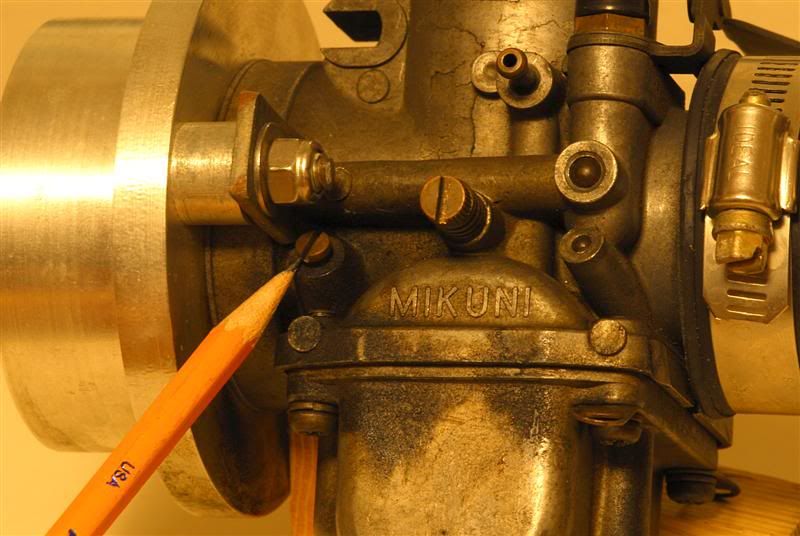
Regarding the screws........
The idle screw is a fairly large screw located on the centerline of the slide, and is on the opposite side from the fuel inlet.
The idle screw does have the coil spring under it's head.
To the left of the idle screw is a small screw located back by the edge of the intake end of the carb. This is the air screw.
Take note: Turning the air screw inward enriches the mixture and turning the air screw outward leans the mixture.
On the opposite side of the carb body you will have two fittings. The larger one is the fuel inlet to the float bowl and the smaller fitting is located higher up and is the overflow from the bowl.
I have no knowledge of any stainless screw on this side of the carb.
pg
Regarding the adapter needing a gasket........
If the adapter flange is the same as the flange on the manifold......yes, you do need a gasket there.
pg
Regarding the carb brace......
Yes indeed, you MUST have this. Otherwise, the weight of the carb sticking out unsupported will soon cause the manifold O rings to leak.
All the brace amounts to is a piece of 3/4 inch wide by 1/8 inch thick strap of metal.
Shape it as needed and bolt the top end to the air cleaner backing plate and the lower end to a lifter base. One of your lifter bases should have a threaded stud sticking up. Thiss is where the brace goes.
Now let me see if I can find some pics..........
The plate..........
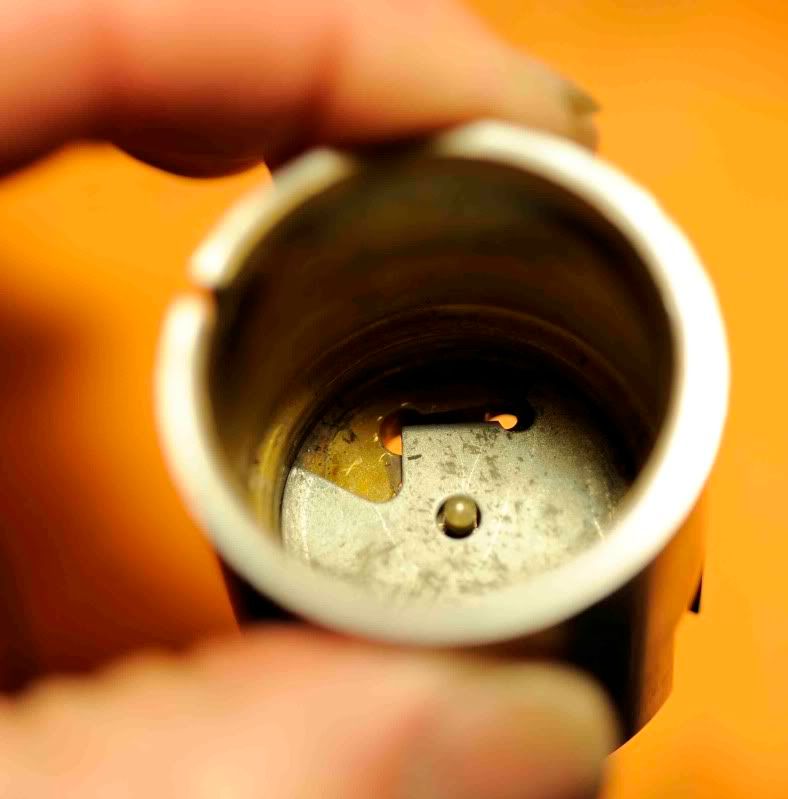
The slot with two holes in the slide.......
The air screw is where I point the pencil on the left and the screw to the right is the idle screw.........
That should take care of the questions. If not just make a post about it.
pg
#3
11-15-2011, 03:32 PM
Outstanding HDF Member
Opps! Forgot the carb brace pic.......
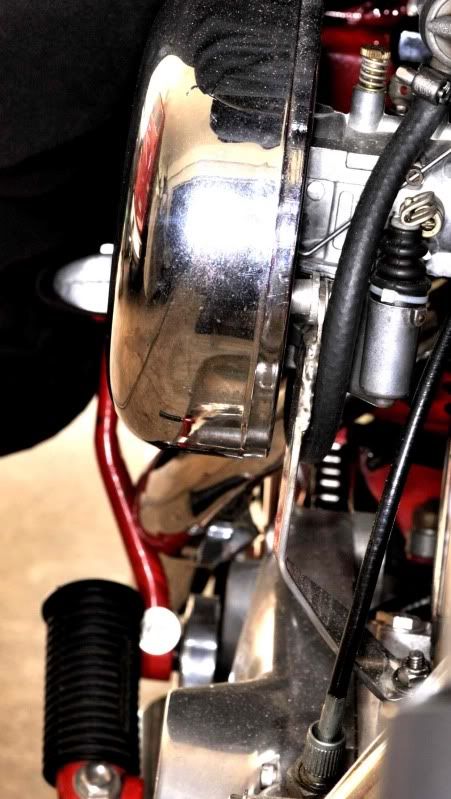
The brace attaches to the base stud on a lifter base just behind the tach cable.
You can follow the edge of the brace up to the backing plate.
You will have to bend the brace in a couple of directions to make it fit, but this is easy to do.
pg
PS: And yes, this pic was taken with the Bendix carb, but I use the same brace for both the Benny and the Mic.
Last edited by piniongear; 11-15-2011 at 03:34 PM. Reason: added PS
#4
11-15-2011, 06:17 PM
Join Date: Oct 2011
Location: Bellmawr NJ
Posts: 153
Likes: 0
Received 0 Likes
on
0 Posts
Thanks Piniongear, the photos really helped. However I still can't understand how to get my throttle cable threaded through the top. It looks like this:

It doesn't seem to fit through the top of the carb, even with the metal "nipple" and boot removed. Is this the wrong kind of cable or am I not using enough imagination?
Would I be able to use wire to hold the carb to the engine? I would run it under the air inlet on the carb and twist it under the nut of the ignition switch holder.
#5
11-15-2011, 06:54 PM
Outstanding HDF Member
It doesn't seem to fit through the top of the carb, even with the metal "nipple" and boot removed. Is this the wrong kind of cable or am I not using enough imagination?
Would I be able to use wire to hold the carb to the engine? I would run it under the air inlet on the carb and twist it under the nut of the ignition switch holder.
I think you have an incorrect cable.
I pulled mine apart and measured the diameter of the lead ball on the end of the cable going into the carb.
It is .132 inch diameter.
That is .007 larger than 1/8 inch. Quite small, and this end goes through the carb top.
Your lead end in the pic looks to be much larger.
You need to buy a cable that has an end on it .132 diameter. This will go through the top of the carb and seat correctly in the slide.
I also suggest (rather strongly too) that you buy a throttle cable with the Mikuni 90� elbow included.
The elbow is a necessity for routing the cable under the gas tank on a Sportster.
Would I be able to use wire to hold the carb to the engine? I would run it under the air inlet on the carb and twist it under the nut of the ignition switch holder.
Are you talking about a carb brace here?
If so, the answer is no. Wire will not work.
Just go to Lowe's or a hardware store and buy a 3/4 X 1/8 inch thick metal strip. It is sold in lengths of 12 inches, 1 foot, 2 ft, 3 ft and 4 ft long. bend it up to the shape you need and drill a hole in each end then bolt it in place.
That is what you need to use for a brace.
pg
Would I be able to use wire to hold the carb to the engine? I would run it under the air inlet on the carb and twist it under the nut of the ignition switch holder.
I think you have an incorrect cable.
I pulled mine apart and measured the diameter of the lead ball on the end of the cable going into the carb.
It is .132 inch diameter.
That is .007 larger than 1/8 inch. Quite small, and this end goes through the carb top.
Your lead end in the pic looks to be much larger.
You need to buy a cable that has an end on it .132 diameter. This will go through the top of the carb and seat correctly in the slide.
I also suggest (rather strongly too) that you buy a throttle cable with the Mikuni 90� elbow included.
The elbow is a necessity for routing the cable under the gas tank on a Sportster.
Would I be able to use wire to hold the carb to the engine? I would run it under the air inlet on the carb and twist it under the nut of the ignition switch holder.
Are you talking about a carb brace here?
If so, the answer is no. Wire will not work.
Just go to Lowe's or a hardware store and buy a 3/4 X 1/8 inch thick metal strip. It is sold in lengths of 12 inches, 1 foot, 2 ft, 3 ft and 4 ft long. bend it up to the shape you need and drill a hole in each end then bolt it in place.
That is what you need to use for a brace.
pg
#6
11-15-2011, 07:01 PM
Join Date: Oct 2011
Location: Bellmawr NJ
Posts: 153
Likes: 0
Received 0 Likes
on
0 Posts
Sounds good. Is it possible that I have the throttle cable reversed? I tried the 90 degree bend side and the end piece fits right in, though it is not a ball its a cylinder (don't have my caliper present for measurement). Could the piece that I have in the picture with the ball be the grip side of the equation? I figured since the stock cable bends at 90 degrees at the handle, this would be the same but it makes sense that it would bend at the carb to clear the tank. This is the cable that came with the kit from Scooters performance based out of FL. I think they just resell the sudco kit.
Also, the adaptor mimics the stock carb's o-ring by having a raised ring around the bore where the o-ring would be. I will use a gasket.
Also, the adaptor mimics the stock carb's o-ring by having a raised ring around the bore where the o-ring would be. I will use a gasket.
Last edited by Krazyshark; 11-15-2011 at 07:04 PM.
#7
11-15-2011, 07:28 PM
Outstanding HDF Member
Sounds good. Is it possible that I have the throttle cable reversed? I tried the 90 degree bend side and the end piece fits right in, though it is not a ball its a cylinder (don't have my caliper present for measurement). Could the piece that I have in the picture with the ball be the grip side of the equation? I figured since the stock cable bends at 90 degrees at the handle, this would be the same but it makes sense that it would bend at the carb to clear the tank. This is the cable that came with the kit from Scooters performance based out of FL. I think they just resell the sudco kit.
Also, the adaptor mimics the stock carb's o-ring by having a raised ring around the bore where the o-ring would be. I will use a gasket.
Also, the adaptor mimics the stock carb's o-ring by having a raised ring around the bore where the o-ring would be. I will use a gasket.
In fact when I saw your pic I immediately thought.... He is showing me the throttle (handlebar) end of the cable.
My cable comes out of the twist grip and runs straight down.
Many newer bikes have a 90� elbow in the cable at the twist grip.
This is done to gain clearance over the gas tank I believe.
But let's talk about the inner cable.......
The cable usually has a different size bead on each end.
The larger bead fits into the twist grip barrel.
This end nipple is sometimes round, sometimes banjo shaped.
The other end of the cable going into or connecting to the carb has a much smaller nipple.
Mine measures .132 diameter and that is what you need to fit into the Mikuni.
On a Mikuni it helps to have a 90� elbow at the carb top to route the cable under the gas tank.
These cables are somewhat hard to find. I am talking about a cable with the elbow installed.
Back in 1973 when I first used a Mikuni you had to buy a cable with the elbow included. With mine, I cannot pull the small nipple through the elbow. It is a unit made piece form the manufacturer.
Today, I see where Sudco sells this elbow as an accessory, so that tells me the more modern cable made today must be able to go through the elbow.
I would guess the elbow of today has a larger hole in it than the one I bought back in 1973.
The Sudco part number for the elbow is #007-731 and sells for a few bucks.
Hope this is not too confusing.
pg
Trending Topics
#8
11-16-2011, 09:00 AM
Join Date: Oct 2011
Location: Bellmawr NJ
Posts: 153
Likes: 0
Received 0 Likes
on
0 Posts
Thank you for the walkthrough again. I got the cable in a few moments ago very easily. I could not find a way to make the brass nipple and the boot to work, and it seemed the cable and elbow were meant for the carb, is this correct in the photo? The slide moves up and down easily when I pull the end (still not on bike yet, raining here and no garage) and the free length at the end seems perfect.

Will hit the Home depot today for some metal. Just need to find a friend with a drill. Can I drill a hole in the plastic back of the K&N air filter / cleaner assembly and use a 1/4" bolt?
Will hit the Home depot today for some metal. Just need to find a friend with a drill. Can I drill a hole in the plastic back of the K&N air filter / cleaner assembly and use a 1/4" bolt?
#9
11-16-2011, 10:02 AM
Seasoned HDF Member
#10
11-16-2011, 03:42 PM
Outstanding HDF Member
Thank you for the walkthrough again. I got the cable in a few moments ago very easily. I could not find a way to make the brass nipple and the boot to work, and it seemed the cable and elbow were meant for the carb, is this correct in the photo? The slide moves up and down easily when I pull the end (still not on bike yet, raining here and no garage) and the free length at the end seems perfect.
Will hit the Home depot today for some metal. Just need to find a friend with a drill. Can I drill a hole in the plastic back of the K&N air filter / cleaner assembly and use a 1/4" bolt?
Will hit the Home depot today for some metal. Just need to find a friend with a drill. Can I drill a hole in the plastic back of the K&N air filter / cleaner assembly and use a 1/4" bolt?
On the other side of the slide (the engine side) is the slide all the way to the bottom?
There may be a tiny crack at the very bottom, and that is OK.
Make sure the idle screw is not holding the slide off the true fully closed position.
Regarding the carb brace........
I was not aware the K&N filter has a plastic backing.
So here is what I recommend you do.......
Since the hole is only going to be 1/4 inch, it is OK to drill it.
But when you drill any plastic the drill bit will grab as it breaks through the material. This results in sometimes ripping the plastic or making a far larger hole than you want.
So this is what you do to take care of that..... Place a piece of wood under the spot you are drilling.
Make sure the plastic is in full contact with the wood.
Hold the plastic tightly down against the wood as you drill and the result will be a clean hole.
The drill bit breaks through the plastic but there is wood there so it does not know it has broken through and then begins to drill the wood. No rips in the plastic!
Now I have a question for you....... Did the throttle cable come with the elbow?
I would sure like to know where you bought that so I can pass it on to others. The elbowed cable at on time was difficult to find.
Thanks.....
pg
Last edited by piniongear; 11-16-2011 at 03:49 PM.