Need Advice: Removing Inner Primary Housing 08-LATER ONLY
#11
 10-07-2014, 09:22 PM

Cruiser
I have a 2005 I just did this too 2 weeks ago and just helped my buddy on his 2012. This sh*t drove me nuts. It's the same on both bikes. Just get the starter bolts off. That rear one stripped on mine so I was screwed. I drove to about 12 different hardware stores to find a 1/4" ball hex that was long enough and couldnt find that or an extension. Finally gave up and had one overnighted because of the frustration. I hammered the ball hex into the bolt and luckily I was able to get it off. I did loosen the 2 bolts on the back of the oil tank and the 3 bolts on the front to give me some wiggle room. What a PITA. Good luck!
#12
10-29-2014, 01:53 PM
Thanks everyone!
So to update on my situation:
I was finally able to remove the inner primary housing and moving forward, I think I can do this process again with far less of a headache. The magic trick was a combination of things.
For starters, I drove to my local harbor freight and bout a set of 1/4 inch ratchet extensions. LONG ONES! The shortest one in the set I think is 8 inches long. The starter bolt closer the the rear cylinder was pretty easy since I did remove the seat post. The one towards the rear of the bike was more of a challenge because there was not a real direct line towards it from the right side. Trying to use a wobbly adapter was difficult because it had to be on the end of the extension in order for me to get the angle I needed but this made it hard to get the bit into the bolt head. For some reason I still had my battery installed and decided to remove it in order to loosen the tank. When I did I decided to see if the plastic caddy would come out since I could see that there were opening in the bottom of the batter compartment portion of the oil tank. To my relief that plastic piece just pulled out revealing a nice opening just above the starter. The bolt I needed to get to was over to one side so I could not remove it through the battery compartment but I could reach in there and install the wobbly adapter and bit into the bolt. Then I just need to feed the extension through and connect it to the adapter and viola!
Once I had the inner primary off and saw that the starter was basically just sitting under the oil tank I decided to remove it in order to give it a good cleaning. I loosened the oil tank and since I had removed the tranny top cover for coating, I had all the clearance I needed to remove it from the left side. I've been prepping parts for coating and making a bracket for the coil relocation and giving everything a good cleaning before I start with the re-assembly.
Thanks for all the advice and encouragement! I have all the confidence now that I could re-do this job in the future within a few hours.
#13
10-30-2014, 05:54 AM

#14
10-30-2014, 06:40 AM

Skeez, I know what you're talking about on the inner primary lip. You do not have to remove the primary to get the rotor out. You grind the lip off the primary with a die grinder. make sure you cover the everything up with a rag and stuff rags in between the rotor and inner primary to keep the metal shavings out. you'll start about the 10:00 position and continue down the housing to about the 6:00 position. you'll be taking approx. 1/8" of material out and you will still have plenty of flange left for the gasket to seal to. I did this a few yrs ago on my 07 fatboy with the 96"/6spd and its the same as an 08. I have yet to have a leak from the grinding process. just make sure you cover everything and when its all apart clean-clean-clean everything.
#15
10-30-2014, 08:17 AM
Thanks again everyone.
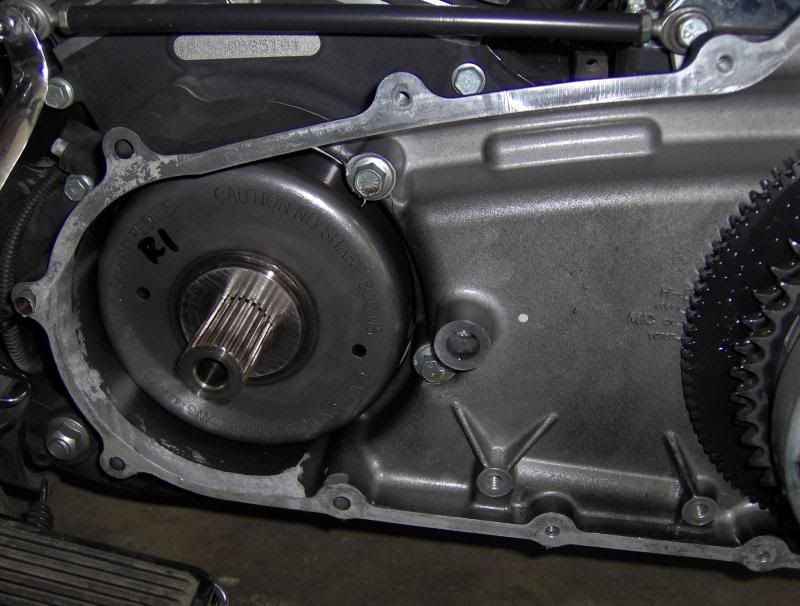
Looking at the photo above I thought to mention another detail just to compare notes with the rest of you guys.
When I first researched this job I looked at some videos online and at least one person used some sort of tool to remove the rotor. When I read my service manual, it mentioned no use of tools and simple stated that bolts could be threaded in to the holes on the face of the rotor to ASSIST in removal but the manual made no mention of tools or gave any warnings beyond maybe mentioning not letting the rotor snap back into place and potentially break a magnet.
When I was talking to the parts guys the fella helping me asked if I had a rotor removal tool. When I said no he gave me his number and said to call him when he got off work and he would let me borrow his. He said I HAD to have if I wanted to get my rotor off and to install it without losing the ends of my fingers. He made every effort to make me feel like pulling off the rotor was very challenging.
Before I got the inner primary off and tried pulling the rotor out with just my hands it seemed to move with little effort. When I got the inner primary off my brother and I thought to use the two bolts in the holes suggestion that's in my manual but discovered two things: The holes are not threaded and my rotor (unlike the one pictured above) has some sort of dish on the face that obstructed one of the holes. So I just grabbed it with my hands and just pulled the rotor out. Besides a little extra resistance just before it came completely free, it was not hard at all.
Do any of you guys tend to use some sort of tool to remove your rotor or did you find it as easy as I did to just use your hands?
#16
10-30-2014, 09:42 AM
Outstanding HDF Member
Join Date: Aug 2009
Location: Columbus, Ohio, USA
Posts: 3,212
Likes: 0
Received 207 Likes
on
169 Posts
+1 to the dremel/grinder method. Takes a lot less time and less parts. Once it's done, if you ever have to go back there again it is also much easier.
The rotor should just come out by hand. They can get a little sticky sometimes, but it's rare since these bikes are late model. The picture above has the primary chain/compensator removed and that rotor does not have the "spring cover" affixed to it, which I think is the disk you're referring to.
Did yours look something like this:
Last edited by Scuba10jdl; 10-30-2014 at 10:10 AM.
#17
10-30-2014, 03:29 PM
THAT'S what my rotor looks like. And yes, it came out by hand quite easily which was contrary to what I heard from a number of folks including my parts guy who claimed to be unable to pull his without a removal tool.
I'm still debating the idea of grinding down the lip to avoid removal for consequent repairs. Now that I have done this job once and have the tools needed to get to the hard to reach bolts, I believe I can repeat the process with far less of a headache then what I was experiencing the first time around.
#18
10-31-2014, 03:46 AM
THAT'S what my rotor looks like. And yes, it came out by hand quite easily which was contrary to what I heard from a number of folks including my parts guy who claimed to be unable to pull his without a removal tool.
I'm still debating the idea of grinding down the lip to avoid removal for consequent repairs. Now that I have done this job once and have the tools needed to get to the hard to reach bolts, I believe I can repeat the process with far less of a headache then what I was experiencing the first time around.
I'm still debating the idea of grinding down the lip to avoid removal for consequent repairs. Now that I have done this job once and have the tools needed to get to the hard to reach bolts, I believe I can repeat the process with far less of a headache then what I was experiencing the first time around.
#19
10-31-2014, 05:42 AM

Glad this worked out and passed around alot of good info.