Need Advice: Removing Inner Primary Housing 08-LATER ONLY
#1
 10-06-2014, 10:06 AM

Hey Gang,
Please reply ONLY IF YOU HAVE A 2008 OR LATER SOFTAIL...OR IF YOU'VE DONE THIS ON A 2008 OR LATER SOFTAIL!
The reason I ask the above is because this is a followup to a thread I started asking for advice on changing out my stator on my 2008 Crossbones. My main concern was that according to my manual, I need to remove the inner primary case which requires the removal of the starter...which requires the removal of the oil tank...!!!!
So I posted a question asking if all the above was necessary and I got a bunch of responses saying that I didn't have to remove the inner primary. However it seems that there was a lot of clarification after the fact that older Softail were being referenced for the answers I was getting.
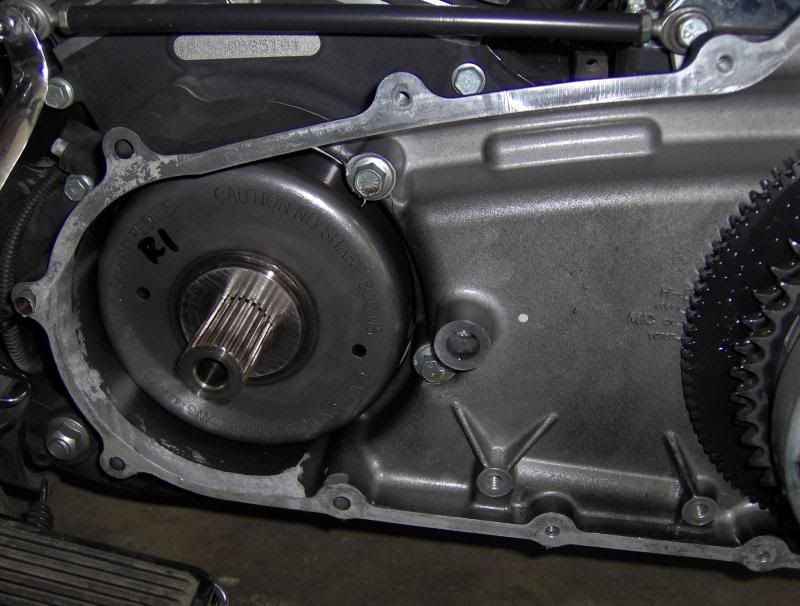
So this weekend I finally had a chance to tear into the repair. Before I did I stopped and the local Harley to pick up a few odds and ends I was going to need. The parts guys both told me I WOULD have to take the inner primary off. They said that the reason being was that it had an inner lip which the rotor would not pass through. When I took it all apart I confirmed this. The rotor pulls out easily enough but it won't come out all the way because of this inner lip in the inner primary housing. WHAT A **** DESIGN BY THE MOCO! There seems to be absolutely no reason for this inner lip other than to impede making this repair any easier!
ANYWAY...
The parts guys stated that it's not necessary to REMOVE the starter and that it's a matter or just removing the two mounting bolts that thread into the inner primary. Their suggestion was using a long extension and going through the right side of the bike. However, my brother and I tried this and it was hard to find the clearance necessary to do this. I think I can get one of the bolts out from the left side with some sort of low profile wrench and bit. However, the one that's towards the rear of the bike is under the oil tank and much harder to reach.
Has anyone done this sort of repair and if so, do you have any techniques that you used to remove these two bolts? Again, I don't necessarily need to pull the started off the bike. I just need to be able to back the mounting bolts out in order to free the inner primary so I can remove it and replace my stator.
Thanks,
Skeez
Please reply ONLY IF YOU HAVE A 2008 OR LATER SOFTAIL...OR IF YOU'VE DONE THIS ON A 2008 OR LATER SOFTAIL!
The reason I ask the above is because this is a followup to a thread I started asking for advice on changing out my stator on my 2008 Crossbones. My main concern was that according to my manual, I need to remove the inner primary case which requires the removal of the starter...which requires the removal of the oil tank...!!!!
So I posted a question asking if all the above was necessary and I got a bunch of responses saying that I didn't have to remove the inner primary. However it seems that there was a lot of clarification after the fact that older Softail were being referenced for the answers I was getting.
So this weekend I finally had a chance to tear into the repair. Before I did I stopped and the local Harley to pick up a few odds and ends I was going to need. The parts guys both told me I WOULD have to take the inner primary off. They said that the reason being was that it had an inner lip which the rotor would not pass through. When I took it all apart I confirmed this. The rotor pulls out easily enough but it won't come out all the way because of this inner lip in the inner primary housing. WHAT A **** DESIGN BY THE MOCO! There seems to be absolutely no reason for this inner lip other than to impede making this repair any easier!
ANYWAY...
The parts guys stated that it's not necessary to REMOVE the starter and that it's a matter or just removing the two mounting bolts that thread into the inner primary. Their suggestion was using a long extension and going through the right side of the bike. However, my brother and I tried this and it was hard to find the clearance necessary to do this. I think I can get one of the bolts out from the left side with some sort of low profile wrench and bit. However, the one that's towards the rear of the bike is under the oil tank and much harder to reach.
Has anyone done this sort of repair and if so, do you have any techniques that you used to remove these two bolts? Again, I don't necessarily need to pull the started off the bike. I just need to be able to back the mounting bolts out in order to free the inner primary so I can remove it and replace my stator.
Thanks,
Skeez
#2
10-06-2014, 12:18 PM


Hey Skeez....
If you get a ball-end hex wrench that attaches to a ratchet drive, you can get it done. I removed my oil tank mounting bolts when I removed my inner primary on my 2003 Heritage Springer. This allowed me to move the oil tank just enough to get the clearance I needed to come in with the ball-end hex wrench and remove the starter bolts. No need to pull the bolts out of the bike, just back them all the way out, and let them be in the starter body. That way you don't have to try to get them back into place during installation.
You'll want a longer extension for this project. I believe I used an 8" and 3" extension together, and everything was 3/8" drive. I believe the starter mounting bolts are either 3/16" or 1/4".
Removing the oil tank is not necessary for the inner primary to be removed. It can be done.
#3
10-06-2014, 05:25 PM
Doing a 124 build I removed the inner primary on my 11 Fatboy without removing the oil tank the first time. What I screwed up was one of the dowels between the starter and the inner primary went somewhere that lost items go on a rebuild. Over the next 3k miles I developed a oil leak on top of the tranny and couldn't seem to find where it was coming from(I had done a Baker 7speed at the same time). I finally removed the oil bag(wasn't near as tough as I envisioned) and found the starter was bolted up just fine but the dowels that keep it aligned to the inner primary hadn't found their way home. It was allowing the starter to move enough that primary fluid was leaking there. Replaced the dowels and no leak. Next time I'll go ahead and remove the oil bag cause it was not that big a job.
#4
10-06-2014, 07:08 PM
Hey Skeez....
If you get a ball-end hex wrench that attaches to a ratchet drive, you can get it done. I removed my oil tank mounting bolts when I removed my inner primary on my 2003 Heritage Springer. This allowed me to move the oil tank just enough to get the clearance I needed to come in with the ball-end hex wrench and remove the starter bolts. No need to pull the bolts out of the bike, just back them all the way out, and let them be in the starter body. That way you don't have to try to get them back into place during installation.
You'll want a longer extension for this project. I believe I used an 8" and 3" extension together, and everything was 3/8" drive. I believe the starter mounting bolts are either 3/16" or 1/4".
Removing the oil tank is not necessary for the inner primary to be removed. It can be done.
If you get a ball-end hex wrench that attaches to a ratchet drive, you can get it done. I removed my oil tank mounting bolts when I removed my inner primary on my 2003 Heritage Springer. This allowed me to move the oil tank just enough to get the clearance I needed to come in with the ball-end hex wrench and remove the starter bolts. No need to pull the bolts out of the bike, just back them all the way out, and let them be in the starter body. That way you don't have to try to get them back into place during installation.
You'll want a longer extension for this project. I believe I used an 8" and 3" extension together, and everything was 3/8" drive. I believe the starter mounting bolts are either 3/16" or 1/4".
Removing the oil tank is not necessary for the inner primary to be removed. It can be done.
Doing a 124 build I removed the inner primary on my 11 Fatboy without removing the oil tank the first time. What I screwed up was one of the dowels between the starter and the inner primary went somewhere that lost items go on a rebuild. Over the next 3k miles I developed a oil leak on top of the tranny and couldn't seem to find where it was coming from(I had done a Baker 7speed at the same time). I finally removed the oil bag(wasn't near as tough as I envisioned) and found the starter was bolted up just fine but the dowels that keep it aligned to the inner primary hadn't found their way home. It was allowing the starter to move enough that primary fluid was leaking there. Replaced the dowels and no leak. Next time I'll go ahead and remove the oil bag cause it was not that big a job.
My brother and I looked into it a for a bit and weren't getting anywhere fast. We had been at it for a while getting the bike ready for my next list of mods and to try and make this repair and I felt like we were reaching that point where we just had to step away and regroup. It didn't help that between the two of us we had tools and parts all over the place and it was taking longer just to re-locate a socket or wrench then it took to do a certain task. I told him that I was planning on removing the transmission top cover for powder-coating. That said I also mentioned that I wanted to relocate the coil and lose the fake seat post. We both figured that if we jumped to those steps it would give us much more clearance to get an extension through to the starter bolts. We took care of those two steps and finished off the day by removing the exhaust. We spent the next half hour organizing all my tools and finding a home for all the parts that had been stripped. We finished our evening at the local wing joint eating a basket of hot wings, drinking some cold brews and watching some football.
I have a feeling that it's probably not as big of a head scratcher as it felt like. But we were both pretty beat from being in the garage all day.
One of the wins I did have was making my own drive chain locking tool. I was going to break down and buy it just to save the time ($35 or so) but the dealer had none in stock. I asked him if he could show me one of the techs' tools so I could get some dimensions and make my own. He only managed to find one for touring bikes which is much shorter but otherwise its the same tool. We took some measurements and traced it on paper. On the way home I bought some flat stock and after about 20 minutes of cutting and grinding I had a perfectly working drive lock tool that cost me $7 bucks. It made getting the clutch and compensator off a snap!
I'll give it another go soon and see how it goes.
I was planning to loosen the oil tank in order to run the ECM plug behind it in order to mount my ECM behind the tank in order to run my new fender. Hopefully this will facilitate getting to those starter bolts.
#5
10-06-2014, 07:31 PM
I'll tell you that I had to remove my inner primary last summer to get it powder coated. I know exactly what your talking about.
With the help of my neighbor I didn't have to remove the oil tank on my 08 rocker to get to those starter bolts. I wouldn't use a 3/8 drive wrench. Do it with a 1/4 wrench and 1/4 extensions and bit. That will make a difference in giving you more clearance. That's what we used.
My neighbor was on the right side of the bike working the wrench, I was on the left side guiding the bit to the bolts and holding it there while he loosened them. Worked perfectly for us.
If the bolts do come off its no biggie, I think they were hex socket heads. We used a little painters tape on the end of the bit to hold the bolt on thre while we were putting it back together to keep the bolt on the bit.
Stay organized while you're working bro. I learned that the hard way. Leaving your **** laying around while you're working will only make your job harder.
Good luck to you bruh
#6
10-06-2014, 08:02 PM
I used a few extensions and a u-joint when I had to remove the inner primary for a belt replacement on my 2009 Fatboy. The rear bolt can be guided in and gotten to easier with the rear tire & splash guard removed. I had to remove my tire anyway since I was replacing the belt, but surely it's easier than removing the oil tank!!
#7
10-06-2014, 10:57 PM
I used a few extensions and a u-joint when I had to remove the inner primary for a belt replacement on my 2009 Fatboy. The rear bolt can be guided in and gotten to easier with the rear tire & splash guard removed. I had to remove my tire anyway since I was replacing the belt, but surely it's easier than removing the oil tank!!
Trending Topics
#8
10-07-2014, 03:36 AM
Outstanding HDF Member
Skeez, I know what you're talking about on the inner primary lip. You do not have to remove the primary to get the rotor out. You grind the lip off the primary with a die grinder. make sure you cover the everything up with a rag and stuff rags in between the rotor and inner primary to keep the metal shavings out. you'll start about the 10:00 position and continue down the housing to about the 6:00 position. you'll be taking approx. 1/8" of material out and you will still have plenty of flange left for the gasket to seal to. I did this a few yrs ago on my 07 fatboy with the 96"/6spd and its the same as an 08. I have yet to have a leak from the grinding process. just make sure you cover everything and when its all apart clean-clean-clean everything.
Last edited by FroggyFatBoy; 10-07-2014 at 03:42 AM.
#9
10-07-2014, 06:33 AM
#10
10-07-2014, 08:34 AM
Skeez, I know what you're talking about on the inner primary lip. You do not have to remove the primary to get the rotor out. You grind the lip off the primary with a die grinder. make sure you cover the everything up with a rag and stuff rags in between the rotor and inner primary to keep the metal shavings out. you'll start about the 10:00 position and continue down the housing to about the 6:00 position. you'll be taking approx. 1/8" of material out and you will still have plenty of flange left for the gasket to seal to. I did this a few yrs ago on my 07 fatboy with the 96"/6spd and its the same as an 08. I have yet to have a leak from the grinding process. just make sure you cover everything and when its all apart clean-clean-clean everything.
I think for this repair I am going to go ahead and try to remove the housing. From all the responses so far, it seems like I just need to get the correct clearance and combination of tools.
That said, I may consider doing this modification but with the housing off the motorcycle. It would be much easier and less concern about the metal shavings and clean up as you pointed out. I'd be able to give it a better finish and I can just do test fittings as I go to make sure I can get it to where it needs to be in order to clear the rotor for any future repairs. I'm sure it can be done properly and without consequences as you say. Especially given the amount of material that needs to come off. I'm not near my bike at the moment but if I remember correctly, I wouldn't even need to grind the metal near the gasket surface. From what I recall, the lip that is in the way tapers up from the outside in. In other words, it ramps up towards the inside facing the rotor. Like I said in my original post, it's such a crap design and seems to serve no purpose other than insuring that a tech can charge more labor hours than necessary and more in parts since you have to replace the gaskets and sealing bolts every time you pull these covers off! I plan on riding this motorcycle into the ground (or until I'm in the ground) so I imagine that this won't be the last time that I make this repair and it would be nice to cut down on the amount of time and cost of any future work.

