Heartland 180 install=start to finish.
#1
 01-14-2009, 08:43 PM

Hello all. I’ve gotten many great tips and advice from this site including the discovery of heartland biker fender kits. So I’d like to share my winter project on my ‘05 night train. I thought I’d show the process of doing the 180-heartland kit from start to the end of mock up. Also since this is a long post with the pics, anyone responding to this thread DON’T use the QUOTE option when replying or it will copy everything and make each response as long as this one. Thanks.
For starters this is best done on a jack just to have the bike supported overall and so at you can get to the shocks. You’ll need to unhook them so you can push the swing arm to the end of its travel at the rubber bumpers.
First step is strip it all down to just the horns and get all your wiring out of the way. Clip all the zip ties that hold it all in place so you can get it out of the way and be able to work with it all later.

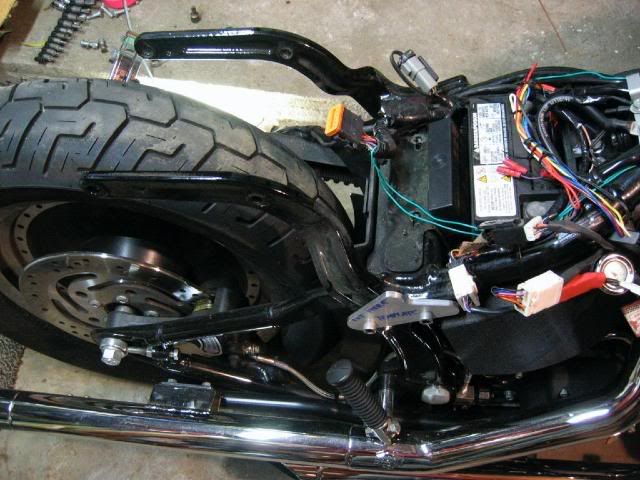
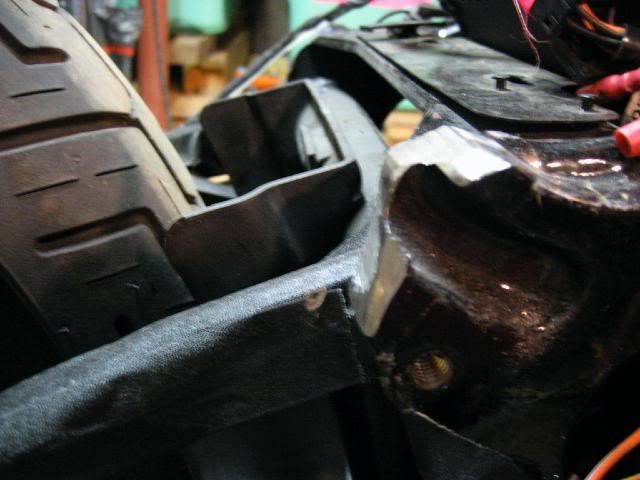
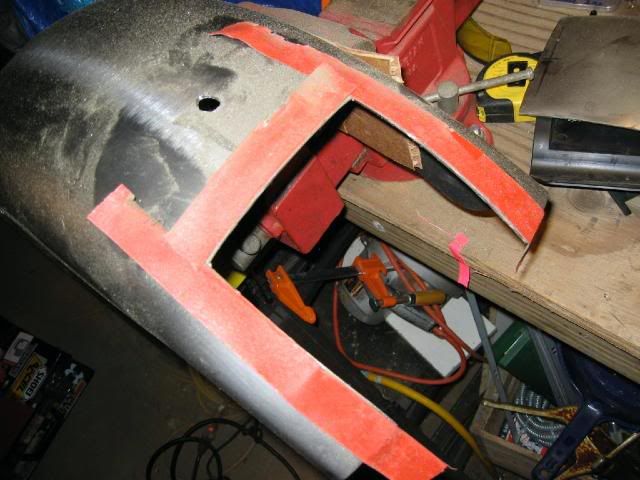
Mask off any areas your not working with to protect them. I taped off the upper areas of the swing arm to protect the finish.
Also on Heartlands advice in the instructions, I used a plastic drop cloth, covering the whole bike and just poked the horns through and then taped the area around them down to keep the plastic out of my way. Basically like a surgeon doing an operation.
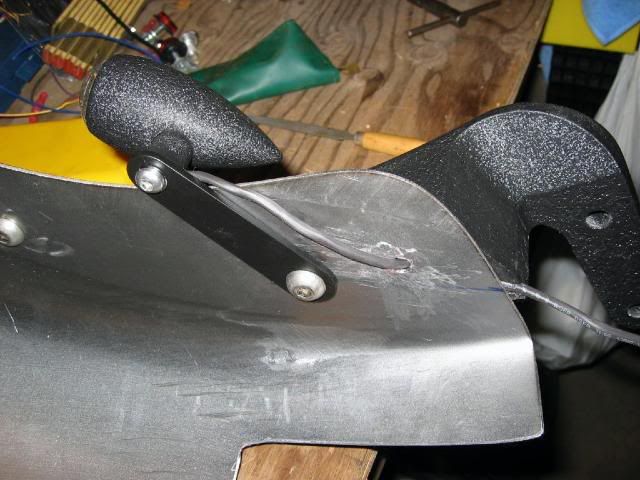
I used their cutting template but as you can see in the pics, you can’t follow it exactly if you have your swing arm in place or you’d saw right into it.
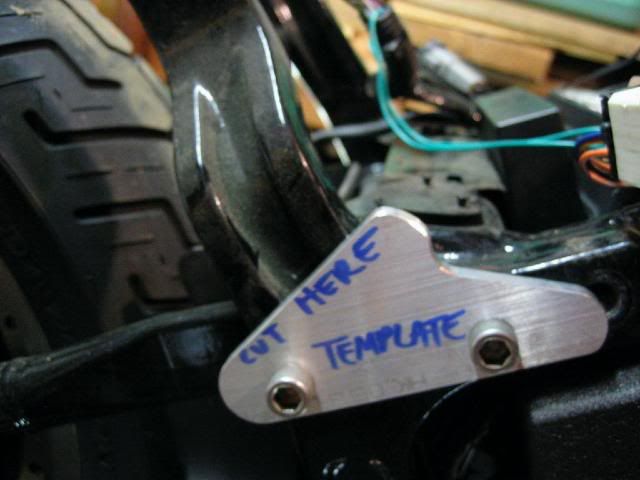
So now the fun begins. Using a short metal blade in a saws-all. I cut off both horns as close as I could without damaging anything else. This is where the tape on swing arm came in very handy, as once the blade just nicked the tape. It’s not hard to cut and a new blade will go right through the horns. I used one blade on each horn.
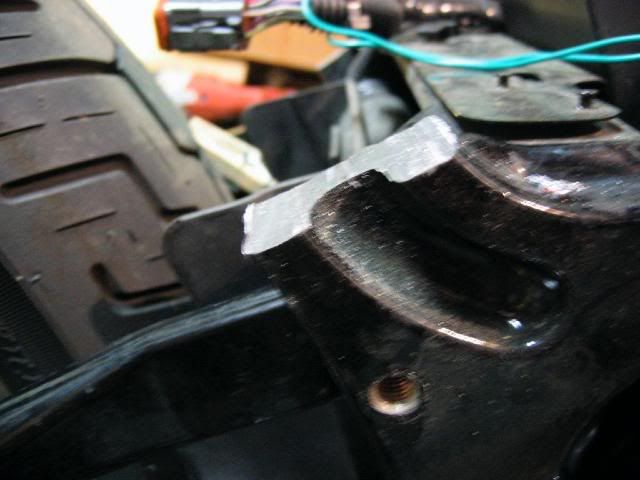
Once they’re gone, use a hand grinder and grind down the nubs so that your seat will sit correct and the new struts will fit in. Once you have them the way you want, clean up the area and paint it over with auto touch up paint.
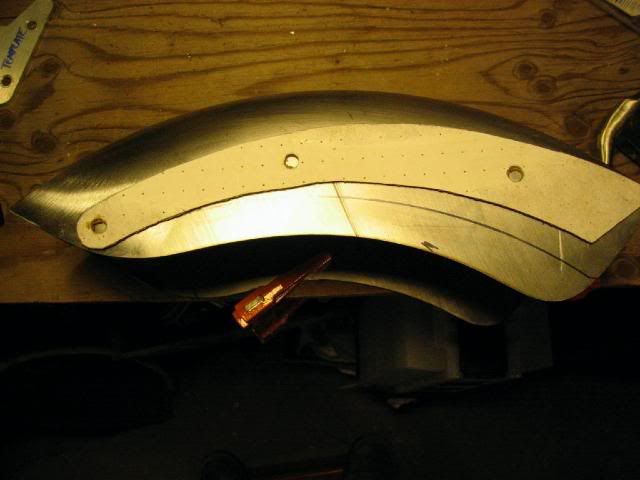
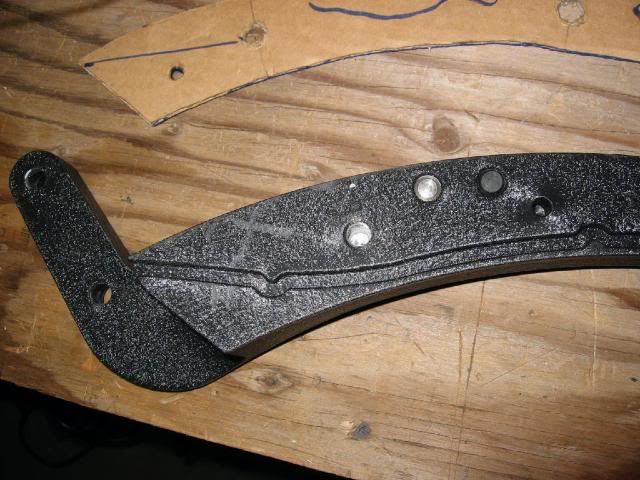
Now, you need to make a template to drill your holes in fender for the struts to bolt through. Take one of your new struts and trace it out onto cardboard. I used the packaging they came on. Cut it out and match it up to one of the struts and make the boltholes in it. I should be a perfect fit-template to strut.
Next-the new struts are bolted in, you’ll need to fit your fender and seat in. You’ll want to wipe down the fender with some cleaner for this as it’s been sprayed with some type of oil to keep it from rusting till is gets shipped.
This is where the jack comes in. I used a second jack under the rear tire and removed both bolts off the rear shocks. It took a bit of playing with the second jack to get them both off, as you need just enough pressure to hold the tire up and take off pressure on the shock bolts. Once the swing arm is loose I jacked it up till it bottomed out on the stop.
Heartland then says to use 1/2 inch tubing on center of tire to use as a spacer between the fender and tire. I used a 1/2 inch electrical cord and taped it in place.
*NOTE* 2.2.09 CORRECTION use 1/2 inch tubing not 1/4- My mistake. Heartland says 1/2 inch in instructions
Put your seat on and make sure it’s as far forward and locked under tank as it can go.
Take the fender and place it in and fit it to were you want it to be. NOTE: the seat will have a small gap in the very back; this seems normal as once you put the bolt through the fender to the seat it pulls it down nicely. Once the fender is fitted to your liking use a fine pointed marker and trace the struts on to the fender.
Now pull the fender and take your template, match it up to what you traced on the fender and mark and drill your boltholes. (It’s a 3/8 hole but ream them out a bit for fender bolts go in clean and don’t hang up on the fender.) Once you’ve got that done install the whole thing.
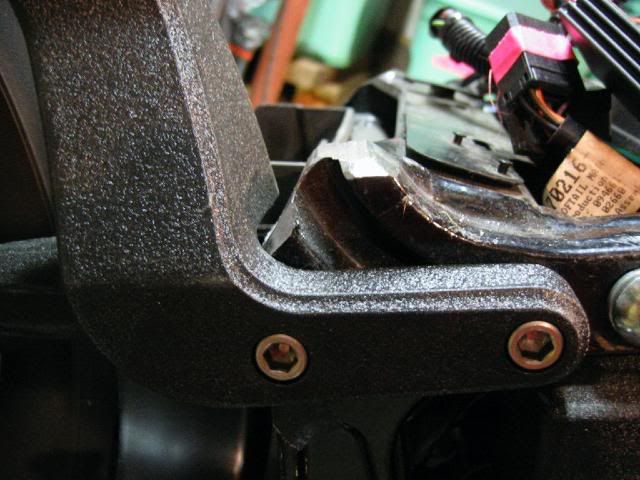
I found it easier to install struts on to the fender, and then just bolt the whole thing to the frame of the bike.

Once you’ve got it all bolted down you need to mark the hole where the seat is getting bolted through the fender. I used another bolt, cut the head off so I just had threads as long as the actual bolt (which is a hex/mushroom head bolt) and screwed it into the back of the seat just enough to hold it. I put a spot of paint on the end of the bolt and pushed the seat down into the fender leaving just a spot of paint to mark the hole.
I put a block of wood between the fender and tire to protect it and drilled it on the bike. I ended up making the hole slightly oval since you have to push the seat back down to meet the fender to get the bolt started from under the fender. The oval hole gives you a little play to line it up to get it started.
Heartland says you might need to loosen the bolts on the struts, pull the rear bolts of both the struts so it can pivot on the front two bolts to get more room between the tire and fender to get to seat bolt. I guess it depends on how slammed you have the rear.
Now from here on I move off from what Heartland says in their instructions. They say pull the fuse panel out and remove a bracket back there. This is to make space for your ECM. I wanted to keep it in the stock location so following the lead from another rider here on the boards –Andy aka SuperAhcmed
( follow his build here: https://www.hdforums.com/forum/softa...-makeover.html)
I went this route.
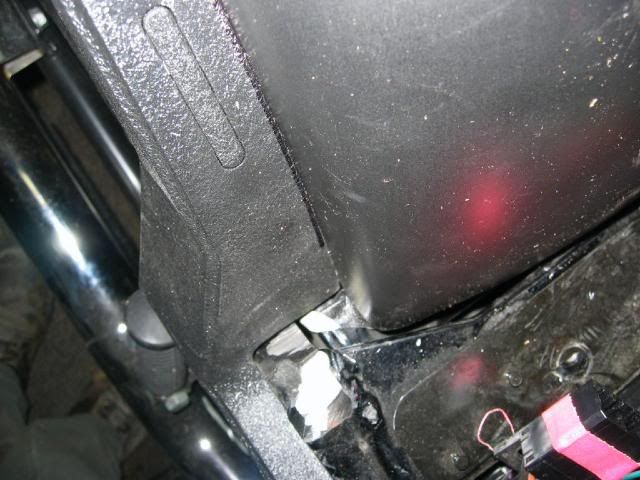
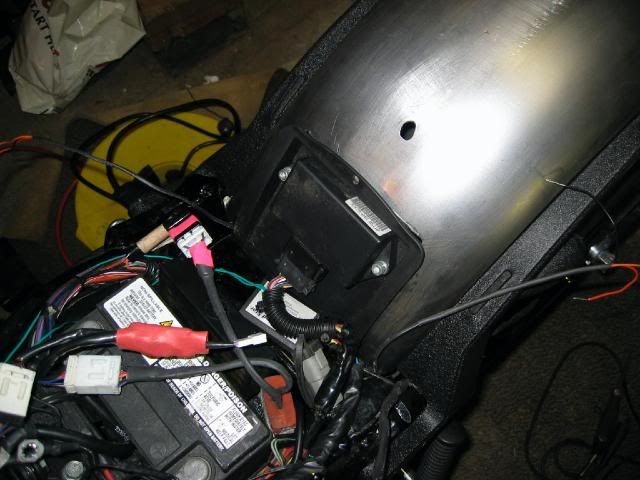
First I measured and cut out the rear area of the fender to drop in the ECM housing tray as it was before. This was a bit of trial and error to get the size right. With it on the bench, the tray fit fine, nice and snug. BUT once you bolt the fender in and tighten the struts down all the way, it squeezes it all together and narrows the gap of the new cut out. I then re-measure with it all on the bike and then grind out the opening about 1/8 inch more on both sides.
Now it took a bit of fitting since it needs to be low enough to fit under new heartland seat that does not have as much space as a stock seat. I ended up cutting off the bottom of the tray so it fit into the space better. No need to bolt it as it’s a snug fit and the seat keeps it all in place.
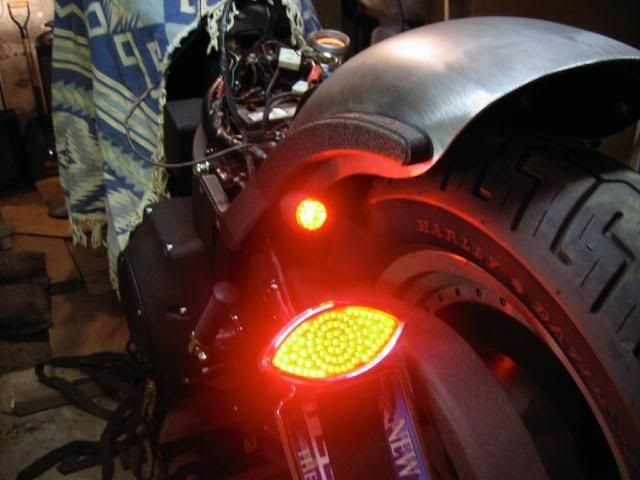
Now for the rear turns I’m using Heartlands small bullets with red led’s. There’s a nice channel under the struts machined into them to run wires nice and neat. I had already been running led’s so I already have the load EQ and hot flash box Etc and had spliced it all into my harness. I still pulled the bracket that held the fuse boxes in to make room so I can get all the plugs and load eq etc in under seat.

Now for anyone else using Heartland’s bullet LEDS they are three wires. Black is ground. Red and Orange are spliced together and plugged into the run/brake wire in the harness.
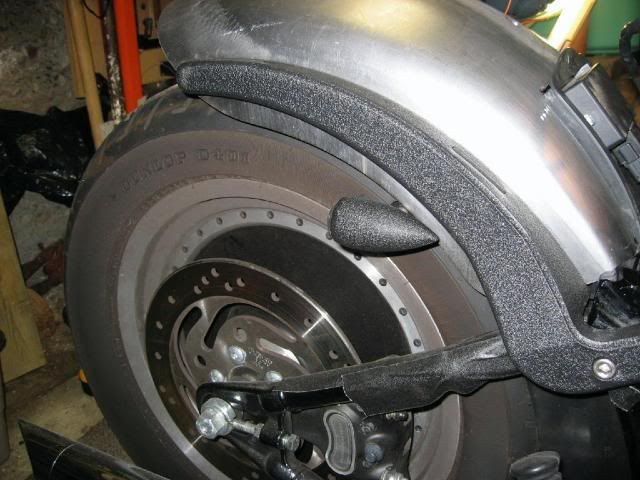

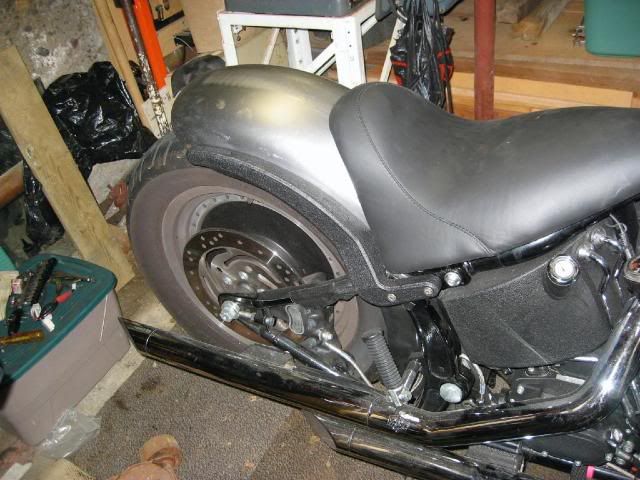
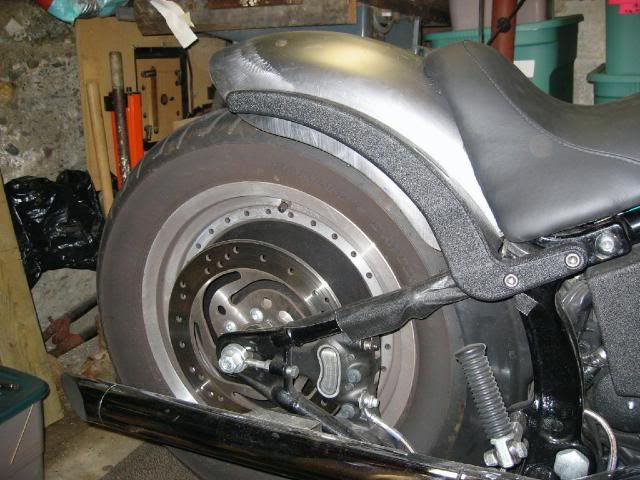
That’s it for now. Once the fender’s painted I’ll get all the wiring neatened up and zip tied in so it all fits nice under seat. I ordered paint from HD just to make sure I got a match but from what I hear you can match very well with PPG paints. I hope to get it painted end of Feb beginning of March. No rush with the cold weather. And before anyone brings it up, the big gap between fender and wheel is because the bike is still up on the jack.;-)
I’ve lowered 1-1/2 inches so far. I’ll adjust once I get it all on the ground. I have a feeling it will be just right with me on it-least that’s the plan.
Thanks for reading.
Rob
2005 nightrain
Carbed.
Stage I
Roland Sands Design VENTURI AIR CLEANER
Arlen Ness forward control extension kit.
V&H Straight shots
Radiant Side mount license plate light with LED cats-eye (discontinued)
Progessive 422’s
For starters this is best done on a jack just to have the bike supported overall and so at you can get to the shocks. You’ll need to unhook them so you can push the swing arm to the end of its travel at the rubber bumpers.
First step is strip it all down to just the horns and get all your wiring out of the way. Clip all the zip ties that hold it all in place so you can get it out of the way and be able to work with it all later.
Mask off any areas your not working with to protect them. I taped off the upper areas of the swing arm to protect the finish.
Also on Heartlands advice in the instructions, I used a plastic drop cloth, covering the whole bike and just poked the horns through and then taped the area around them down to keep the plastic out of my way. Basically like a surgeon doing an operation.
I used their cutting template but as you can see in the pics, you can’t follow it exactly if you have your swing arm in place or you’d saw right into it.
So now the fun begins. Using a short metal blade in a saws-all. I cut off both horns as close as I could without damaging anything else. This is where the tape on swing arm came in very handy, as once the blade just nicked the tape. It’s not hard to cut and a new blade will go right through the horns. I used one blade on each horn.
Once they’re gone, use a hand grinder and grind down the nubs so that your seat will sit correct and the new struts will fit in. Once you have them the way you want, clean up the area and paint it over with auto touch up paint.
Now, you need to make a template to drill your holes in fender for the struts to bolt through. Take one of your new struts and trace it out onto cardboard. I used the packaging they came on. Cut it out and match it up to one of the struts and make the boltholes in it. I should be a perfect fit-template to strut.
Next-the new struts are bolted in, you’ll need to fit your fender and seat in. You’ll want to wipe down the fender with some cleaner for this as it’s been sprayed with some type of oil to keep it from rusting till is gets shipped.
This is where the jack comes in. I used a second jack under the rear tire and removed both bolts off the rear shocks. It took a bit of playing with the second jack to get them both off, as you need just enough pressure to hold the tire up and take off pressure on the shock bolts. Once the swing arm is loose I jacked it up till it bottomed out on the stop.
Heartland then says to use 1/2 inch tubing on center of tire to use as a spacer between the fender and tire. I used a 1/2 inch electrical cord and taped it in place.
*NOTE* 2.2.09 CORRECTION use 1/2 inch tubing not 1/4- My mistake. Heartland says 1/2 inch in instructions
Put your seat on and make sure it’s as far forward and locked under tank as it can go.
Take the fender and place it in and fit it to were you want it to be. NOTE: the seat will have a small gap in the very back; this seems normal as once you put the bolt through the fender to the seat it pulls it down nicely. Once the fender is fitted to your liking use a fine pointed marker and trace the struts on to the fender.
Now pull the fender and take your template, match it up to what you traced on the fender and mark and drill your boltholes. (It’s a 3/8 hole but ream them out a bit for fender bolts go in clean and don’t hang up on the fender.) Once you’ve got that done install the whole thing.
I found it easier to install struts on to the fender, and then just bolt the whole thing to the frame of the bike.
Once you’ve got it all bolted down you need to mark the hole where the seat is getting bolted through the fender. I used another bolt, cut the head off so I just had threads as long as the actual bolt (which is a hex/mushroom head bolt) and screwed it into the back of the seat just enough to hold it. I put a spot of paint on the end of the bolt and pushed the seat down into the fender leaving just a spot of paint to mark the hole.
I put a block of wood between the fender and tire to protect it and drilled it on the bike. I ended up making the hole slightly oval since you have to push the seat back down to meet the fender to get the bolt started from under the fender. The oval hole gives you a little play to line it up to get it started.
Heartland says you might need to loosen the bolts on the struts, pull the rear bolts of both the struts so it can pivot on the front two bolts to get more room between the tire and fender to get to seat bolt. I guess it depends on how slammed you have the rear.
Now from here on I move off from what Heartland says in their instructions. They say pull the fuse panel out and remove a bracket back there. This is to make space for your ECM. I wanted to keep it in the stock location so following the lead from another rider here on the boards –Andy aka SuperAhcmed
( follow his build here: https://www.hdforums.com/forum/softa...-makeover.html)
I went this route.
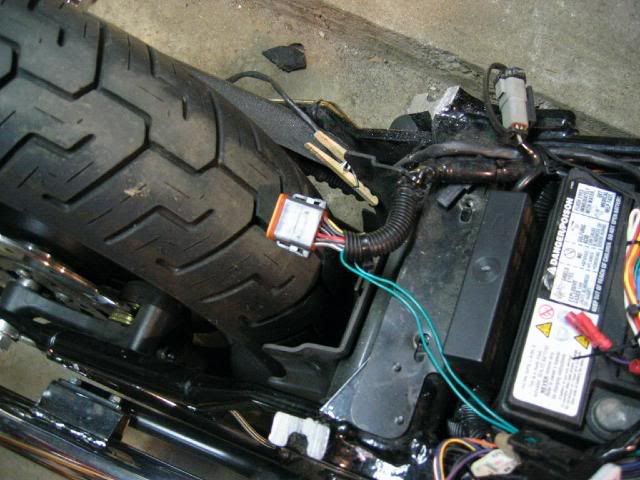
First I measured and cut out the rear area of the fender to drop in the ECM housing tray as it was before. This was a bit of trial and error to get the size right. With it on the bench, the tray fit fine, nice and snug. BUT once you bolt the fender in and tighten the struts down all the way, it squeezes it all together and narrows the gap of the new cut out. I then re-measure with it all on the bike and then grind out the opening about 1/8 inch more on both sides.
Now it took a bit of fitting since it needs to be low enough to fit under new heartland seat that does not have as much space as a stock seat. I ended up cutting off the bottom of the tray so it fit into the space better. No need to bolt it as it’s a snug fit and the seat keeps it all in place.
Now for the rear turns I’m using Heartlands small bullets with red led’s. There’s a nice channel under the struts machined into them to run wires nice and neat. I had already been running led’s so I already have the load EQ and hot flash box Etc and had spliced it all into my harness. I still pulled the bracket that held the fuse boxes in to make room so I can get all the plugs and load eq etc in under seat.
Now for anyone else using Heartland’s bullet LEDS they are three wires. Black is ground. Red and Orange are spliced together and plugged into the run/brake wire in the harness.
That’s it for now. Once the fender’s painted I’ll get all the wiring neatened up and zip tied in so it all fits nice under seat. I ordered paint from HD just to make sure I got a match but from what I hear you can match very well with PPG paints. I hope to get it painted end of Feb beginning of March. No rush with the cold weather. And before anyone brings it up, the big gap between fender and wheel is because the bike is still up on the jack.;-)
I’ve lowered 1-1/2 inches so far. I’ll adjust once I get it all on the ground. I have a feeling it will be just right with me on it-least that’s the plan.
Thanks for reading.
Rob
2005 nightrain
Carbed.
Stage I
Roland Sands Design VENTURI AIR CLEANER
Arlen Ness forward control extension kit.
V&H Straight shots
Radiant Side mount license plate light with LED cats-eye (discontinued)
Progessive 422’s
Last edited by CANTDR55; 02-02-2009 at 06:36 PM.
The following users liked this post:
NT2020 (08-27-2020)
#2
01-14-2009, 09:01 PM
i just did the heartland kit also but im kinda stuck on the wiring.............i have the same led plug n play thing you have bikertronics or something like that............my ? is how do you splice everything together..............my plug under my seat has six wires.............do i take both blinkers and tie them together....................im lost nevermind
#3
01-14-2009, 09:42 PM
i just did the heartland kit also but im kinda stuck on the wiring.............i have the same led plug n play thing you have bikertronics or something like that............my ? is how do you splice everything together..............my plug under my seat has six wires.............do i take both blinkers and tie them together....................im lost nevermind
According to my notes harness wires colors on my 05 are as follows
Orange/white=Hot lead
Purple=Left
Brown=right
red/yellow= Brake
Black- ground
Blue = hot lead not used
Now It's hard to remember but I believe
I had spliced into the OEM harness new pig tail connectors for quick disconnect. If I remember right with my new pigtails I spliced a run/blinker/brake into a one wire pigtail for left & one for right. this would make my blinkers become running/brake lights. To do this with the Heartland lights, red and orange on each light get spliced together and spliced into the OEM harness with new pig tail connectors as described above. Al works great.
Rob
#7
01-15-2009, 07:37 AM

Cruiser
Join Date: Nov 2008
Location: Vandalia il
Posts: 205
Likes: 0
Received 0 Likes
on
0 Posts
Trending Topics
#9
01-15-2009, 09:46 AM
#10
01-15-2009, 10:01 AM

Ultimate HDF Member