New heads, rocker box covers and more goodies.
#1
 09-23-2011, 12:34 AM


Since my threads are continually being closed without reason or explanation I will attribute it to the vast power and forces of the universe. Cheers!
First up was disassembly of the bike to put the new heads on. Remove tank console, speedo, tank bolts, fuel line, tank, etc...
Remove upper rocker box covers

Remove breathers and lower rocker box covers
Remove push rods and push rod tubes.
Remove intake manifold, temp sensor, etc.
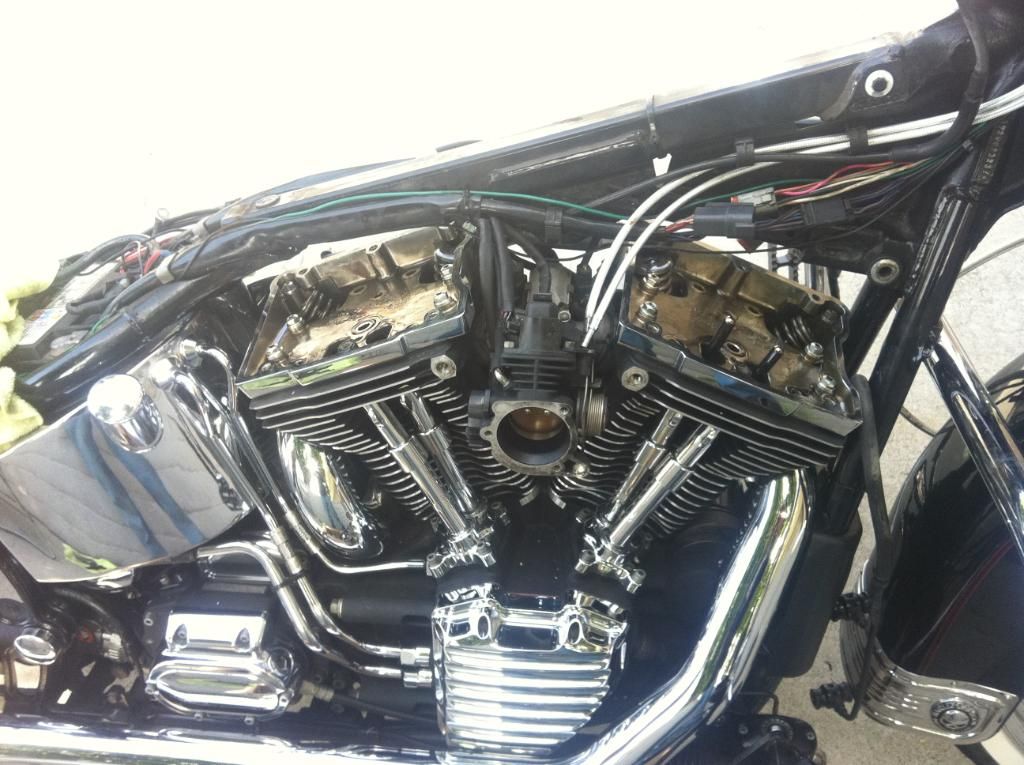
Remove head bolts and heads

Remove old head gasket, scrape and replace with new head gasket.
Reassemble push rod tubes and replace all push rod tube gaskets which include on the lefter block (brown) in the head (yellow) and under the spring and washer (small brown)
Place tubes in place and put head on on top. Replace head bolts with copper anti seize and torque to spec.

Do the same for front and rear heads.
Replace gasket and lower rocker box covers and torque

Replace rockers and torque.
Assemble and repalce breathers and torque. The newer breathers (07 and up softails) use shorter bolts than the older breathers so use the right ones.

Replace gasket and upper rocker box covers. Torque to spec.

You are done with the heads. This portion of the project took about 2 hours and the RSD Rocker Box covers look sick! I am not sure how visible they will be once the tank is back on, but without the tank they gleam!
Next I moved on to the handlebar portion of the project. I disassembled the plugs for the hand control wiring, making not of where each color wire goes so that when I reassemble I do not have to refer to the manual.
Once both sides were disassembled I stuck a shim in the brake lever and undid the switch housings. These are going bye bye. I pulled the wires through the bars and put them aside.
The next chore to tackle was the length of the bars with the new Exile grips and the lack of switch housings. I chopped a few inches off the left side of the bars. The right is getting an Exile internal throttle so I had to chop a bit more off as the internal throttle acts as the end of teh bar. It slips isnide the bar and protrudes about 4 or 5 inches. You can see in the pics.
The Carlin bars proved to be double walled as Fireman1501 has stated and had to be reamed out with a dremel so that the internal throttle would slide in to the bars so that it could be secured with the set screws. This reaming took a good 3 or 4 hours and destroyed all my good dremel bits...LOL.
Once I removed the 4 broken dremel stones from the inside of the bars that were jamming them up and not allowing the throttle cable to slide through I slide the thottle cable in from the bottom to the top. The Exile throttle cables comes with an adjuster on the bottom of the cable (by the throttle body) to allow for easy adjustment.
The throttle cables gets a copper sleeve on the end of it (no ball on it) and it slides into the internal portion of the throttle and is held in place buy a set screw. This internal piece slides indie the outer body and a double bearing goes into a hole the hold that piece in place and allow for smooth movement. Kinda of hard for me to explain with my lack of engineering experience. I am, yet to grease the bearings in the throttle but will before I take it for a ride.
All in all the throttle is a really nice design although it was a bit trickier of an install than I expected. This wehre I stopped for the day. Tomorrow I will wire in my Grip Ace, and get everything put back together.
I'll get more pics up tomorrow.
Drew
First up was disassembly of the bike to put the new heads on. Remove tank console, speedo, tank bolts, fuel line, tank, etc...
Remove upper rocker box covers
Remove breathers and lower rocker box covers
Remove push rods and push rod tubes.
Remove intake manifold, temp sensor, etc.
Remove head bolts and heads
Remove old head gasket, scrape and replace with new head gasket.
Reassemble push rod tubes and replace all push rod tube gaskets which include on the lefter block (brown) in the head (yellow) and under the spring and washer (small brown)
Place tubes in place and put head on on top. Replace head bolts with copper anti seize and torque to spec.
Do the same for front and rear heads.
Replace gasket and lower rocker box covers and torque
Replace rockers and torque.
Assemble and repalce breathers and torque. The newer breathers (07 and up softails) use shorter bolts than the older breathers so use the right ones.
Replace gasket and upper rocker box covers. Torque to spec.
You are done with the heads. This portion of the project took about 2 hours and the RSD Rocker Box covers look sick! I am not sure how visible they will be once the tank is back on, but without the tank they gleam!
Next I moved on to the handlebar portion of the project. I disassembled the plugs for the hand control wiring, making not of where each color wire goes so that when I reassemble I do not have to refer to the manual.
Once both sides were disassembled I stuck a shim in the brake lever and undid the switch housings. These are going bye bye. I pulled the wires through the bars and put them aside.
The next chore to tackle was the length of the bars with the new Exile grips and the lack of switch housings. I chopped a few inches off the left side of the bars. The right is getting an Exile internal throttle so I had to chop a bit more off as the internal throttle acts as the end of teh bar. It slips isnide the bar and protrudes about 4 or 5 inches. You can see in the pics.
The Carlin bars proved to be double walled as Fireman1501 has stated and had to be reamed out with a dremel so that the internal throttle would slide in to the bars so that it could be secured with the set screws. This reaming took a good 3 or 4 hours and destroyed all my good dremel bits...LOL.
Once I removed the 4 broken dremel stones from the inside of the bars that were jamming them up and not allowing the throttle cable to slide through I slide the thottle cable in from the bottom to the top. The Exile throttle cables comes with an adjuster on the bottom of the cable (by the throttle body) to allow for easy adjustment.
The throttle cables gets a copper sleeve on the end of it (no ball on it) and it slides into the internal portion of the throttle and is held in place buy a set screw. This internal piece slides indie the outer body and a double bearing goes into a hole the hold that piece in place and allow for smooth movement. Kinda of hard for me to explain with my lack of engineering experience. I am, yet to grease the bearings in the throttle but will before I take it for a ride.
All in all the throttle is a really nice design although it was a bit trickier of an install than I expected. This wehre I stopped for the day. Tomorrow I will wire in my Grip Ace, and get everything put back together.
I'll get more pics up tomorrow.
Drew
#2
09-23-2011, 04:13 AM
Seasoned HDF Member
#3
09-23-2011, 04:33 AM

Drew .... See you finally got around to it when was it i sent the pics to you? .... it's going to look like it belong's ... Are you doing the derby cover as well for the complete look? ... also i cant remember if they came with the small cover's for the bolt's at the top of the cover's but i have them fitted and it does stop the water laying in them ......
#5
09-23-2011, 07:39 AM
Drew .... See you finally got around to it when was it i sent the pics to you? .... it's going to look like it belong's ... Are you doing the derby cover as well for the complete look? ... also i cant remember if they came with the small cover's for the bolt's at the top of the cover's but i have them fitted and it does stop the water laying in them ......
Drew
#6
09-23-2011, 08:56 AM
Drew ... Best way i can describe them is like small curved discs with little retaining clips around the inside you just push into the bolt hole .... cleans the look up real good and stops the water getting in the bolt hole ....Forget you are 8 hours behind us ... How about the derby cover? .... Just had a thought have you considered the retro handlebar kit by Ness i am still thinking about it sure does pull it all together ....
#7
09-23-2011, 10:17 AM
I already have the derby cover. My bars will be all cleaned up today without switch housings and an internal throttle. They will be looking slick. I am going to need top get some spacers so the bars match up nicely. Have yet to order them. As far as teh boilts for the RSD rocker box covers, not an issue. I use a blaster to dry my bike when it gets washed. I did the inspection cover too but it is not in in this pic.

Drew
Drew