HOW TO: Xbones To FLSTS/SC Front Fender Swap
#1
 07-01-2012, 02:49 AM

With the Crossbones having come and gone from the Softail line-up and the fact that most people who own them have already modded them to their liking, I wasn't sure if there was any point to posting this info at this juncture. I had been asked numerous times for a write up like this based on the one I did for the rear fender swap but that was some time ago. My circumstances held me up from taking on this swap and by the time I did, almost anyone else who had talked about doing the same mod had already done so with great results. Having some spare time and being bored, I decided "what the heck" and went about starting the thread. Unfortunately, it is not as detailed as my rear fender swap thread which you can read here: https://www.hdforums.com/forum/softa...nder-swap.html
On the other hand, as I refresh myself with the info I will update the thread. This includes part numbers and prices. This is a relatively easy swap and the hardest part is confirming what parts you will need and what parts from your stock Crossbones are kept. Most of you won't get any help from a dealership. Most of those guys only know what the H-D Parts and Accessories book tells them. If you are not sure of a part or method, just post your questions here. I will do my best to answer them and I am sure there will be a number of other forum members who can also offer advice.
Anyway...here it is.
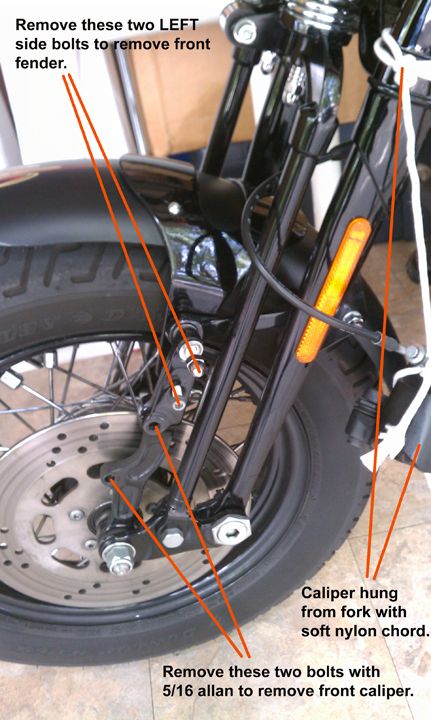
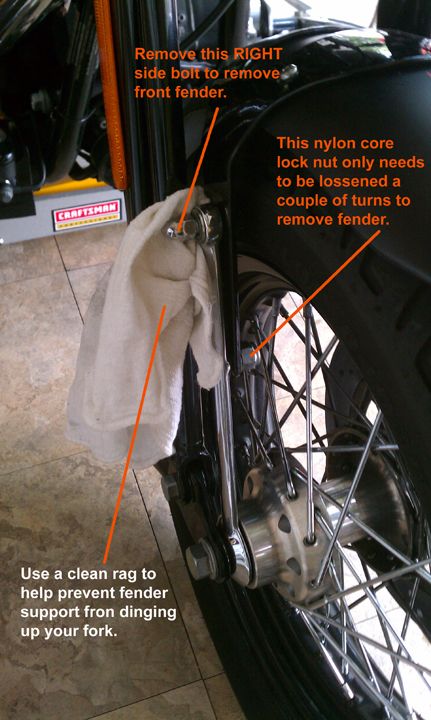
Have a length of soft, nylon chord ready. Remove the caliper via two allan bolts and use the chord to hang it from the forks. Make the chord short enough to move the caliper well out of the way. Start removing the stock fender by loosening the acorn stud on the left and the smaller allan bolt that is recessed into the mounting bracket. On the right you remove the acorn stud at the top part of the chrome bracket and by loosening the nylon lock nut that is half way down the bracket facing the wheel. Be careful not to let the fender or the mounting brackets get away from you. Once you remove the bolts the mounting brackets will rotate feely around the axle so remove bolts carefully while holding the fender. Gently lift the fender up and out.
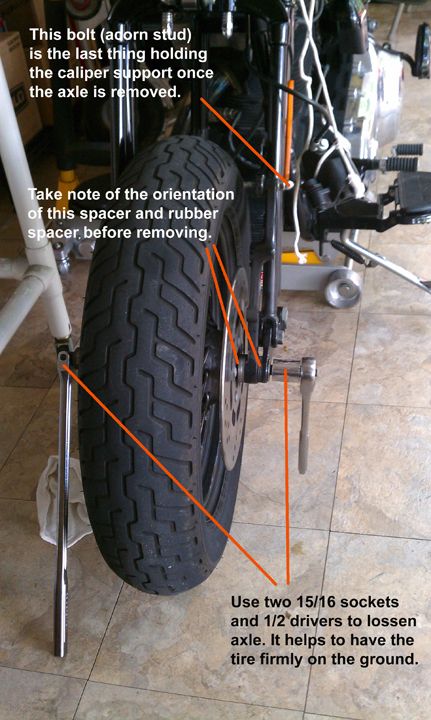
Using two 15/16 sockets or other appropriate tool of the same size, loosen the axle. I used my � ratchet and breaker bar. Remove the lock nut and washer from the left side of the axle. At this point I lifted the bike just a bit more. Still not enough to lift the tire off the ground but just enough to take some of the weight off of it. This made it easier to pull the axle free with a twisting motion. When I knew the axle was about half way out, clearing the left side wheel spacer, I had pushed the tire from the left side against the right rocker. There is a wave washer just inside the right rocker that will compress and allow the wheel to move towards the right rocker which then gives you a bit more clearance to remove the left side wheel spacer which in turn, makes it easier to remove other components to free the wheel. Finish pulling the axle out. Push the tire towards the left rocker to remove the right side chrome spacer/fender bracket. At this point the wheel just rolled out from between the forks.
(Now is a good time to clean and check your rockers.)

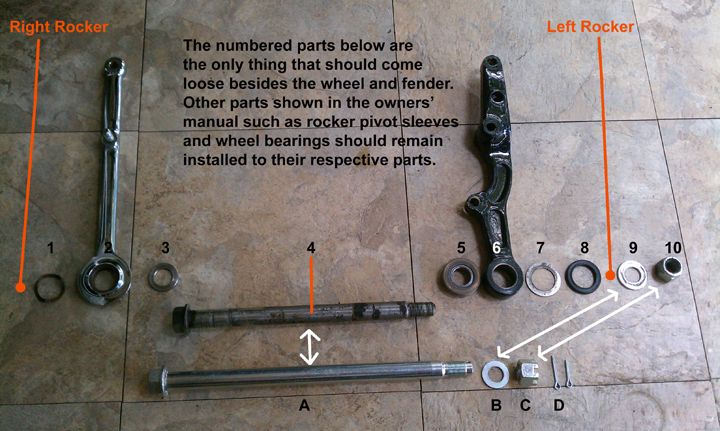
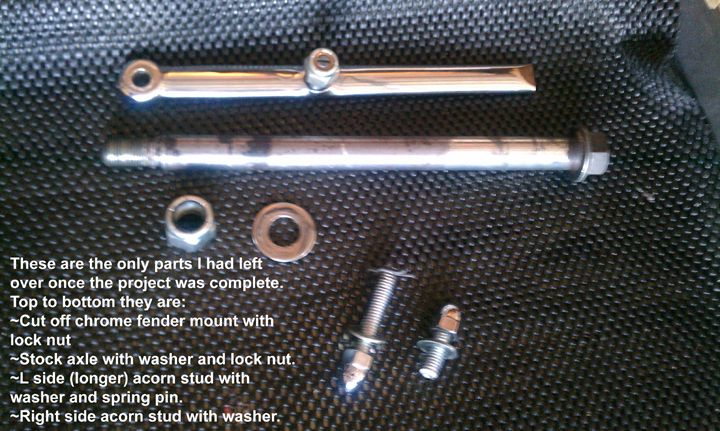
You should see the following components besides the wheel. The picture shows them in order if you are facing the front of your forks.
1. Wave washer
2. Chrome right side spacer/fender mount
3. Small right side wheel spacer (this fits inside a groove in the chrome spacer fender and may be stuck in there.
4. Stock axle
5. Left side wheel spacer (Note the copper color on one side of this spacer. Make sure you install this spacer back with this same copper colored side facing the wheel.)
6. Left side fender/caliper mount
7. Washer (May be stuck to #8)
8. Rubber spacer
9. Stock washer
10. Stock lock nut
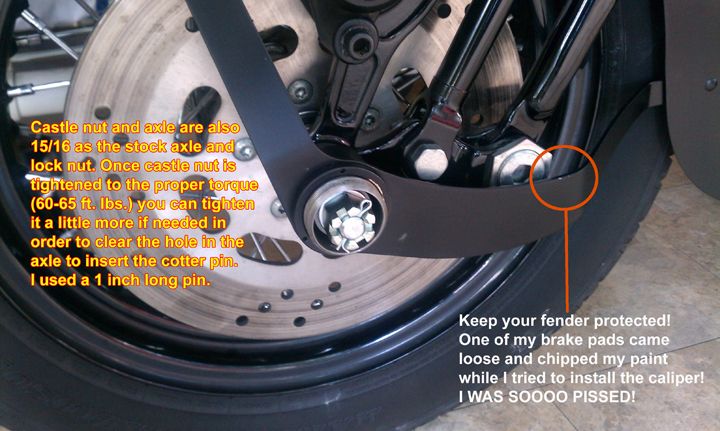
The lettered parts are new parts that you will use to replace stock stuff. This should be self explanatory. Harley did not provide a part number for the cotter pin so I just took my axle to the hardware store and tried cotter pins till I found one that fit in the hole. 1 inch length works good (There are two in the photo because I bought a couple different lengths to see which would work best). Now that I have done this work, I have a feeling that a new lock nut and washer would work just fine and eliminate the need to look for and install a cotter pin but since I had the castle nut and pin, I just went with that.
Now to cut that chrome bracket. I am sure there a plenty of different tools and methods to do this but all I had at my disposal was my small cut off tool and compressor. This actually ended up working just fine. Essentially, you want to cut off the spacer part of the bracket to reuse as your right side wheel spacer. The reason you want to do this is because as I understand it, the spacer that other FL springers use has a smaller inner diameter because the pivot sleeves in the rockers are different. It is easier to modify this part to reuse then to try to modify the rocker in order to use an actual wheel spacer from a Heritage/Classic Springer.
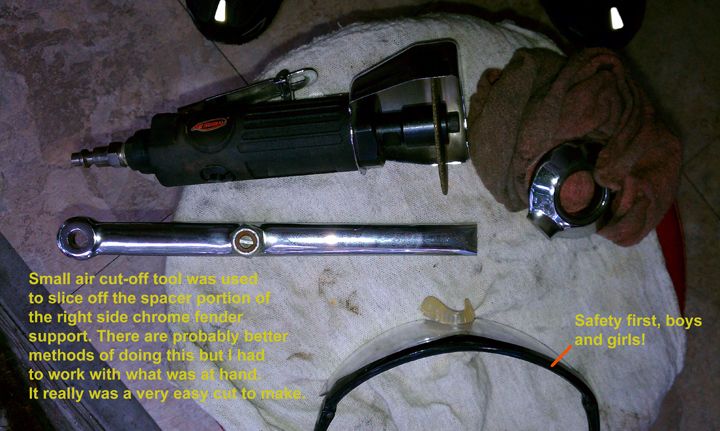
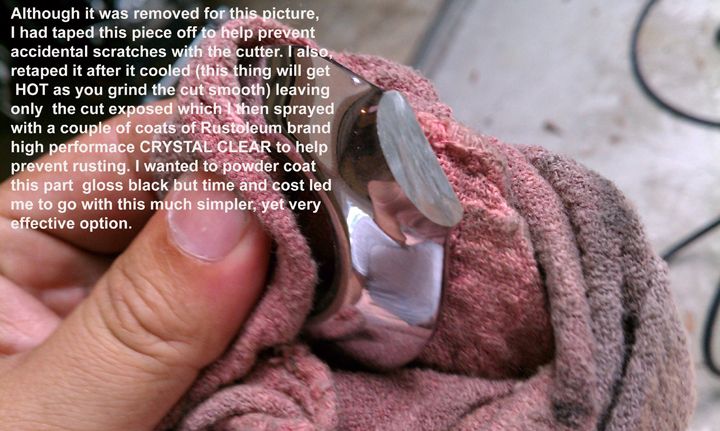
I taped the spacer part off to help protect if from scratches and to mark the line to make the cut. I had a set of helping hands hold the bracket from the opposite end while I made the cut slowly. Once the spacer part was off I used the flat side of the cutting wheel as a grinder to smooth out the cut. Once smooth, I allowed the part to cool and sprayed the cut with a couple of good coats of Rustoleum crystal clear to keep the cut from rusting. Setting the new spacer aside to dry I turned my attention to getting the fender ready.
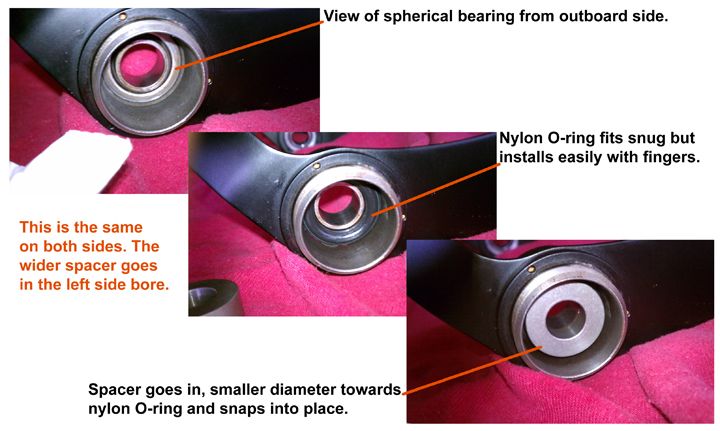
If your fender did not have the spherical bearings already pressed into the bores then you will need to have this done. I tried inventing a system that would use had tools to press them in myself and although it might have worked, I was having to muscle my freshly painted fender too much and I worried that I was going to cause some damage. I called around several shops that would have a press as well as three different Harley dealerships. I got three different quotes from the dealers; 2 � hours, 1 hour and � hour labor to do this. In the end the decision was obvious. I went with the HD dealer that charged me half hour. Not just because this was cheaper than any other, but the tech actually had experience doing these (which is why he could do it faster than the rest) but I knew he would know how to handle my fender. I ended up spending $45 for the job but the peace of mind and speed of the job was worth it. NOTE: The spherical bearings should protrude past the bore on the inboard side. The allows the bearing to rest against the outside of the rocker. This gives the parts the movement they need for the suspension to work properly. If the bearings do not protrude your bearing hub will be tightened against the rocker and the suspension will not work right because the two metal parts will be grinding together due to lack of articulation.
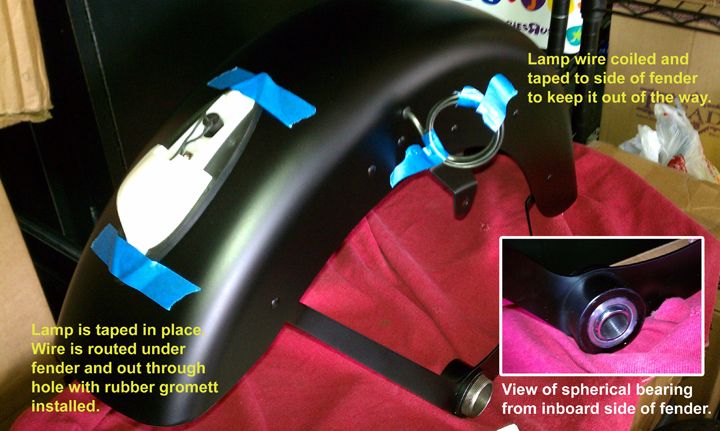
The lamp is straight forward to mount. The wire feeds into the biggest hole in the top front of the fender. Underneath and on the left side of the fender there is a wire retainer clip on which you hang your wire before feeding it through the hole in the side of the fender. The rear of the lamp uses a longer screw that threads into the crimp nut already installed on the fender. The front screw is a bit shorter and requires a washer and nut. I bought all stainless screws and lock nuts to install my lamp. I left the lamp housing off because it was powder coated black and I did not want to scratch it while installing the fender. I then installed a small rubber grommet in the hole on the side of the fender before feeding the lamp wire through it. I sprayed the wire with some soapy water to help it through. Using some painters tape, I coiled the wire and taped it out of the way.
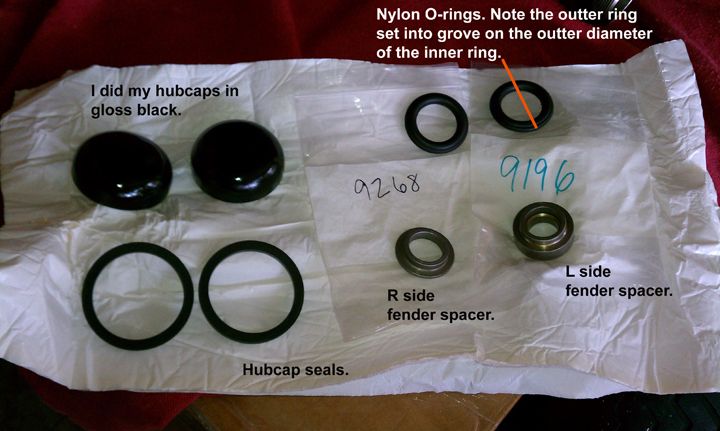
The nylon O-ring/Spacer fit snuggly into each bore. You can use a little grease to make installing them easier but they should go in fine. Once they are seated inside against the bearings, place the fender spacers in. The smaller diameter side of each spacer faces the O-ring and the spacer �snap� snuggly into place. The thicker spacer goes in the left bore. The only reason I can come up with as to why one is thicker than the other is so that the castle nut will sit out of the bore, allowing you to be able to install the cotter pin without trying to reach inside the bore where it would be tight. Just my hunch.
I am sad to say that for the fender install, there are no photos. That�s because it is pretty tricky and both myself and my nephew helping me had our hands full. First off, before I tried moving the fender into place, I had pre-installed the left side caliper/fender mount as stated in the 2007 manual. Unfortunately this reduced the clearance for the fender far more than I was comfortable with. I then opted to remove it, move the fender into place, then install this left side mount. The reason this left side mount is important is because unlike the stock Bones fender which has a mount on each side, this fender only bolts to the left side and is otherwise held in place by the axle. So with everything removed again and facing the front of the bike, I turned the fender on its left side. I then raised it up slowly allowing the right forks to pass through the right side fender struts. I continued to lift the fender and then slowly turned it upright as space allowed. This automatically allows the left forks to pass through the left fender struts. So now the fender is in place, although it is not held or supported by anything but my helper�s hands. In order to now install the left mount, I had my nephew raise the fender up high enough so that I could place the mount in place on the left rocker pivot sleeve (don�t forget to first install the rubber spacer and washer onto the pivot sleeve) and then insert the 3/8-16 x 1 �� bolt through the shift linkage and then the upper hole of the mount from the inside out. I installed the washer and acorn nut on the outside and tightened to 30-35 ft. lbs. Now the fender is lowered back down and the smaller allan bolt is installed through the mount and through the tab on the left side of the fender. I used a nylon core lock nut and washer on this bolt and reinserted the spring pin just for good measure. At this time I went ahead and installed the axle to help support the fender.
NOTE: It is very important that you install the fender lamp housing on at this time before you install the wheel. The front bolt for the fender lamp requires the use of a nut and washer on the underside of the fender. If you install the tire first, it will be pretty near impossible to install this nut and washer.
From here it was just a matter or re-installing the wheel and brake caliper according to the service manual. Since I was using my axle to help hold my fender in place it was necessary for me to back it out. Before I did, I used some painter's tape and looped it around the fork and the fender brace. This was just to make sure that the fender didn't move to much since at that point it would only be held in place but a single bolt on the left side. I lifted the bike up, rolled the wheel under the fender and then lowered the bike back down slowly until the holes in the rockers and through the center of the wheel all lined up. After coating the axle with a good amount of anti seize I began to pass it through while adding the spacers along the way. Once all the way through I installed the castle nut and tightened it to specs and added the cotter pin. After testing that the wheel turned freely I added the hub caps and seals. Slide one hubcap seal over the threaded portion of the hub until it sits flush then just thread the hub cap on. You can use a strap wrench for removing oil filters to tighten the hub caps down sufficiently.
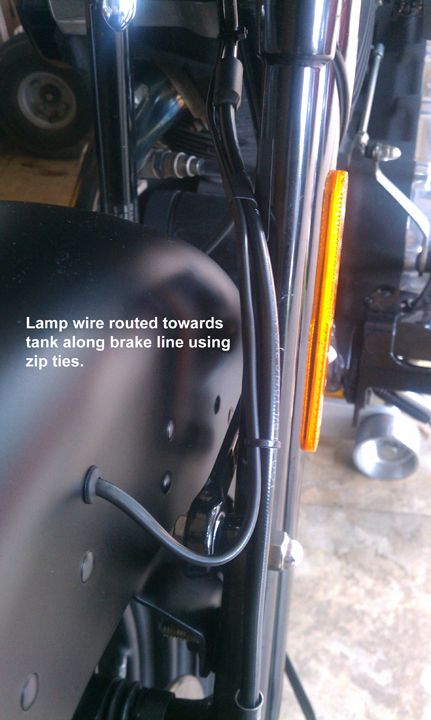
Lastly, I routed the fender lamp wire along the break line using black zip ties. Once near the neck I fed the wires under the tank and into the battery area where I plugged them in. I plugged my fender lamp into the same relay that operates my passing lamps. However, I later found out that there is a spare plug underneath my tank that seemed to have no use. I read in another thread that this plug is used on other Softails that come with fender lamps such as the FLSTC. I have not tried to plug the fender lamp into this plug or to even test it to see if it has a current when the bike is on. Some of you may know better as to what is the best way to wire a fender lamp. If so, please chime in.
Once everything is secure, take your new Bones out for a test ride. If everything was done correctly then the ride should feel the same as stock. If you feel like there is binding and stiffness when the suspension articulates then you make need to check to make sure that everything was mounted correctly. Check to see that the spherical bearings in the fender are touching the outboard side of your rocker and not the hub.
Once you are completed with you swap there shouldn't be much left over.
I�m sure there are going to be lots of questions since I didn�t do such a good job of documenting everything. Just ask away and I will do my best to answer. Also, lots of other members have done this same mod so they may be able to chime in where I have left stuff out. Hope yall find this useful�
Ride safe,
Skeez.
On the other hand, as I refresh myself with the info I will update the thread. This includes part numbers and prices. This is a relatively easy swap and the hardest part is confirming what parts you will need and what parts from your stock Crossbones are kept. Most of you won't get any help from a dealership. Most of those guys only know what the H-D Parts and Accessories book tells them. If you are not sure of a part or method, just post your questions here. I will do my best to answer them and I am sure there will be a number of other forum members who can also offer advice.
Anyway...here it is.
Have a length of soft, nylon chord ready. Remove the caliper via two allan bolts and use the chord to hang it from the forks. Make the chord short enough to move the caliper well out of the way. Start removing the stock fender by loosening the acorn stud on the left and the smaller allan bolt that is recessed into the mounting bracket. On the right you remove the acorn stud at the top part of the chrome bracket and by loosening the nylon lock nut that is half way down the bracket facing the wheel. Be careful not to let the fender or the mounting brackets get away from you. Once you remove the bolts the mounting brackets will rotate feely around the axle so remove bolts carefully while holding the fender. Gently lift the fender up and out.
Using two 15/16 sockets or other appropriate tool of the same size, loosen the axle. I used my � ratchet and breaker bar. Remove the lock nut and washer from the left side of the axle. At this point I lifted the bike just a bit more. Still not enough to lift the tire off the ground but just enough to take some of the weight off of it. This made it easier to pull the axle free with a twisting motion. When I knew the axle was about half way out, clearing the left side wheel spacer, I had pushed the tire from the left side against the right rocker. There is a wave washer just inside the right rocker that will compress and allow the wheel to move towards the right rocker which then gives you a bit more clearance to remove the left side wheel spacer which in turn, makes it easier to remove other components to free the wheel. Finish pulling the axle out. Push the tire towards the left rocker to remove the right side chrome spacer/fender bracket. At this point the wheel just rolled out from between the forks.
(Now is a good time to clean and check your rockers.)
You should see the following components besides the wheel. The picture shows them in order if you are facing the front of your forks.
1. Wave washer
2. Chrome right side spacer/fender mount
3. Small right side wheel spacer (this fits inside a groove in the chrome spacer fender and may be stuck in there.
4. Stock axle
5. Left side wheel spacer (Note the copper color on one side of this spacer. Make sure you install this spacer back with this same copper colored side facing the wheel.)
6. Left side fender/caliper mount
7. Washer (May be stuck to #8)
8. Rubber spacer
9. Stock washer
10. Stock lock nut
The lettered parts are new parts that you will use to replace stock stuff. This should be self explanatory. Harley did not provide a part number for the cotter pin so I just took my axle to the hardware store and tried cotter pins till I found one that fit in the hole. 1 inch length works good (There are two in the photo because I bought a couple different lengths to see which would work best). Now that I have done this work, I have a feeling that a new lock nut and washer would work just fine and eliminate the need to look for and install a cotter pin but since I had the castle nut and pin, I just went with that.
Now to cut that chrome bracket. I am sure there a plenty of different tools and methods to do this but all I had at my disposal was my small cut off tool and compressor. This actually ended up working just fine. Essentially, you want to cut off the spacer part of the bracket to reuse as your right side wheel spacer. The reason you want to do this is because as I understand it, the spacer that other FL springers use has a smaller inner diameter because the pivot sleeves in the rockers are different. It is easier to modify this part to reuse then to try to modify the rocker in order to use an actual wheel spacer from a Heritage/Classic Springer.
I taped the spacer part off to help protect if from scratches and to mark the line to make the cut. I had a set of helping hands hold the bracket from the opposite end while I made the cut slowly. Once the spacer part was off I used the flat side of the cutting wheel as a grinder to smooth out the cut. Once smooth, I allowed the part to cool and sprayed the cut with a couple of good coats of Rustoleum crystal clear to keep the cut from rusting. Setting the new spacer aside to dry I turned my attention to getting the fender ready.
If your fender did not have the spherical bearings already pressed into the bores then you will need to have this done. I tried inventing a system that would use had tools to press them in myself and although it might have worked, I was having to muscle my freshly painted fender too much and I worried that I was going to cause some damage. I called around several shops that would have a press as well as three different Harley dealerships. I got three different quotes from the dealers; 2 � hours, 1 hour and � hour labor to do this. In the end the decision was obvious. I went with the HD dealer that charged me half hour. Not just because this was cheaper than any other, but the tech actually had experience doing these (which is why he could do it faster than the rest) but I knew he would know how to handle my fender. I ended up spending $45 for the job but the peace of mind and speed of the job was worth it. NOTE: The spherical bearings should protrude past the bore on the inboard side. The allows the bearing to rest against the outside of the rocker. This gives the parts the movement they need for the suspension to work properly. If the bearings do not protrude your bearing hub will be tightened against the rocker and the suspension will not work right because the two metal parts will be grinding together due to lack of articulation.
The lamp is straight forward to mount. The wire feeds into the biggest hole in the top front of the fender. Underneath and on the left side of the fender there is a wire retainer clip on which you hang your wire before feeding it through the hole in the side of the fender. The rear of the lamp uses a longer screw that threads into the crimp nut already installed on the fender. The front screw is a bit shorter and requires a washer and nut. I bought all stainless screws and lock nuts to install my lamp. I left the lamp housing off because it was powder coated black and I did not want to scratch it while installing the fender. I then installed a small rubber grommet in the hole on the side of the fender before feeding the lamp wire through it. I sprayed the wire with some soapy water to help it through. Using some painters tape, I coiled the wire and taped it out of the way.
The nylon O-ring/Spacer fit snuggly into each bore. You can use a little grease to make installing them easier but they should go in fine. Once they are seated inside against the bearings, place the fender spacers in. The smaller diameter side of each spacer faces the O-ring and the spacer �snap� snuggly into place. The thicker spacer goes in the left bore. The only reason I can come up with as to why one is thicker than the other is so that the castle nut will sit out of the bore, allowing you to be able to install the cotter pin without trying to reach inside the bore where it would be tight. Just my hunch.
I am sad to say that for the fender install, there are no photos. That�s because it is pretty tricky and both myself and my nephew helping me had our hands full. First off, before I tried moving the fender into place, I had pre-installed the left side caliper/fender mount as stated in the 2007 manual. Unfortunately this reduced the clearance for the fender far more than I was comfortable with. I then opted to remove it, move the fender into place, then install this left side mount. The reason this left side mount is important is because unlike the stock Bones fender which has a mount on each side, this fender only bolts to the left side and is otherwise held in place by the axle. So with everything removed again and facing the front of the bike, I turned the fender on its left side. I then raised it up slowly allowing the right forks to pass through the right side fender struts. I continued to lift the fender and then slowly turned it upright as space allowed. This automatically allows the left forks to pass through the left fender struts. So now the fender is in place, although it is not held or supported by anything but my helper�s hands. In order to now install the left mount, I had my nephew raise the fender up high enough so that I could place the mount in place on the left rocker pivot sleeve (don�t forget to first install the rubber spacer and washer onto the pivot sleeve) and then insert the 3/8-16 x 1 �� bolt through the shift linkage and then the upper hole of the mount from the inside out. I installed the washer and acorn nut on the outside and tightened to 30-35 ft. lbs. Now the fender is lowered back down and the smaller allan bolt is installed through the mount and through the tab on the left side of the fender. I used a nylon core lock nut and washer on this bolt and reinserted the spring pin just for good measure. At this time I went ahead and installed the axle to help support the fender.
NOTE: It is very important that you install the fender lamp housing on at this time before you install the wheel. The front bolt for the fender lamp requires the use of a nut and washer on the underside of the fender. If you install the tire first, it will be pretty near impossible to install this nut and washer.
From here it was just a matter or re-installing the wheel and brake caliper according to the service manual. Since I was using my axle to help hold my fender in place it was necessary for me to back it out. Before I did, I used some painter's tape and looped it around the fork and the fender brace. This was just to make sure that the fender didn't move to much since at that point it would only be held in place but a single bolt on the left side. I lifted the bike up, rolled the wheel under the fender and then lowered the bike back down slowly until the holes in the rockers and through the center of the wheel all lined up. After coating the axle with a good amount of anti seize I began to pass it through while adding the spacers along the way. Once all the way through I installed the castle nut and tightened it to specs and added the cotter pin. After testing that the wheel turned freely I added the hub caps and seals. Slide one hubcap seal over the threaded portion of the hub until it sits flush then just thread the hub cap on. You can use a strap wrench for removing oil filters to tighten the hub caps down sufficiently.
Lastly, I routed the fender lamp wire along the break line using black zip ties. Once near the neck I fed the wires under the tank and into the battery area where I plugged them in. I plugged my fender lamp into the same relay that operates my passing lamps. However, I later found out that there is a spare plug underneath my tank that seemed to have no use. I read in another thread that this plug is used on other Softails that come with fender lamps such as the FLSTC. I have not tried to plug the fender lamp into this plug or to even test it to see if it has a current when the bike is on. Some of you may know better as to what is the best way to wire a fender lamp. If so, please chime in.
Once everything is secure, take your new Bones out for a test ride. If everything was done correctly then the ride should feel the same as stock. If you feel like there is binding and stiffness when the suspension articulates then you make need to check to make sure that everything was mounted correctly. Check to see that the spherical bearings in the fender are touching the outboard side of your rocker and not the hub.
Once you are completed with you swap there shouldn't be much left over.
I�m sure there are going to be lots of questions since I didn�t do such a good job of documenting everything. Just ask away and I will do my best to answer. Also, lots of other members have done this same mod so they may be able to chime in where I have left stuff out. Hope yall find this useful�
Ride safe,
Skeez.
The following 2 users liked this post by Skeezmachine:
Metalbender64 (04-07-2020),
Peggers (10-12-2021)
#2
07-01-2012, 06:54 AM

Cruiser
Join Date: May 2012
Location: North Dakota
Posts: 134
Likes: 0
Received 0 Likes
on
0 Posts
#4
07-01-2012, 11:30 AM
Seasoned HDF Member
The only i would have done different was not cut that bracket...simply measure it and buy a spacer that thickness...then you could go back, or sell the complete assembly on ebay ...I'm sure that's a high dollar bracket to cut up to make a $5 spacer....just saying.
#5
07-01-2012, 11:46 AM
Besides it is not just a round spacer with an inner and outer diameter and a certain thickness. The inboard side has a groove in which a smaller spacer fits into. The trouble to find a spacer that is going to have all these characteristics is not worth the extra $30 bucks I might get trying to sell the bracket on eBay. Trust me. When you have to go through the trouble of tracking down all the obsolete parts necessary to make this change, the last thing you want holding up the show is some silly spacer that you in fact already have in your possession if you just cut the bracket. I think it's safe to say that most people who have done this mode have gone this same route.
#6
07-01-2012, 12:18 PM

5th Gear
Join Date: Apr 2012
Location: baltimore
Posts: 9
Likes: 0
Received 0 Likes
on
0 Posts
Not worth the time and effort to save it.
Besides it is not just a round spacer with an inner and outer diameter and a certain thickness. The inboard side has a groove in which a smaller spacer fits into. The trouble to find a spacer that is going to have all these characteristics is not worth the extra $30 bucks I might get trying to sell the bracket on eBay. Trust me. When you have to go through the trouble of tracking down all the obsolete parts necessary to make this change, the last thing you want holding up the show is some silly spacer that you in fact already have in your possession if you just cut the bracket. I think it's safe to say that most people who have done this mode have gone this same route.
Besides it is not just a round spacer with an inner and outer diameter and a certain thickness. The inboard side has a groove in which a smaller spacer fits into. The trouble to find a spacer that is going to have all these characteristics is not worth the extra $30 bucks I might get trying to sell the bracket on eBay. Trust me. When you have to go through the trouble of tracking down all the obsolete parts necessary to make this change, the last thing you want holding up the show is some silly spacer that you in fact already have in your possession if you just cut the bracket. I think it's safe to say that most people who have done this mode have gone this same route.
#7
07-01-2012, 01:03 PM
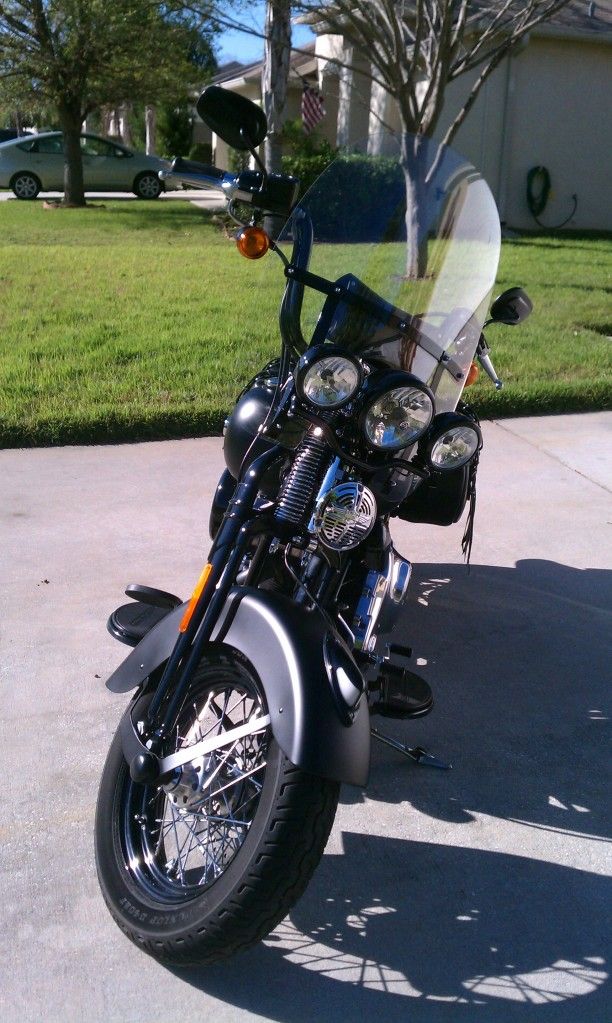
Here you are:
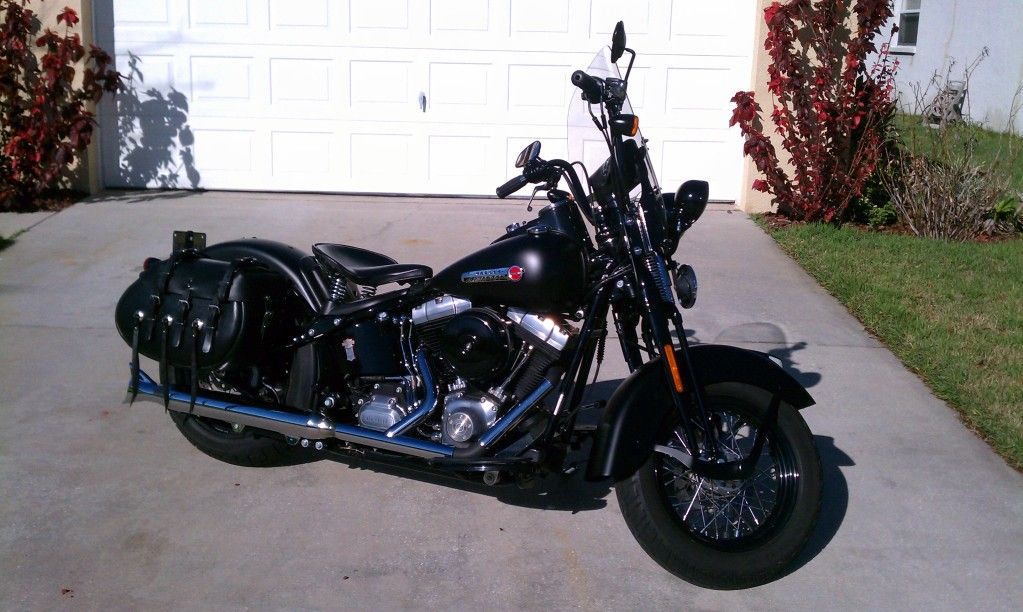
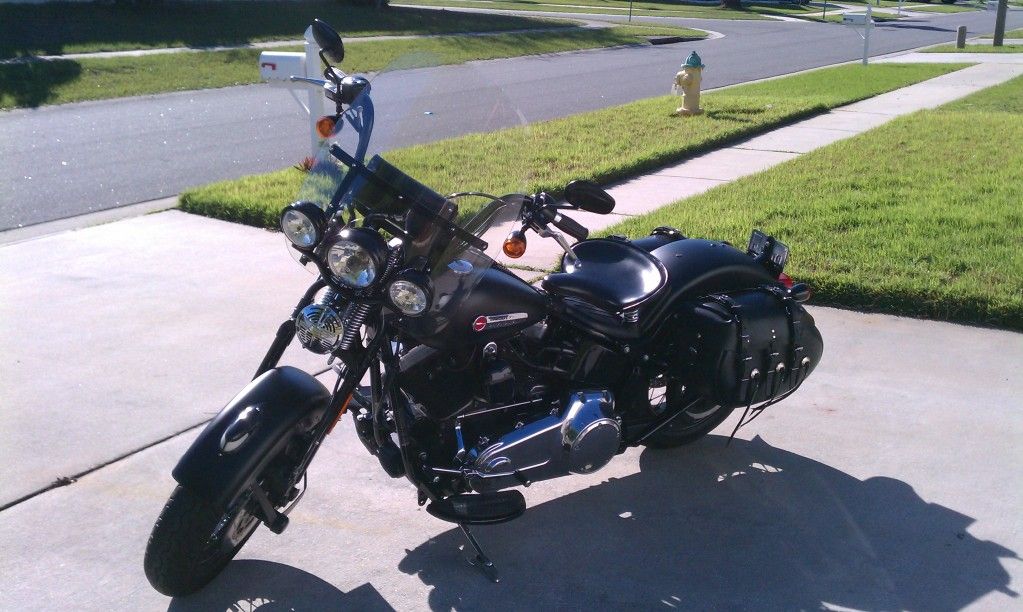
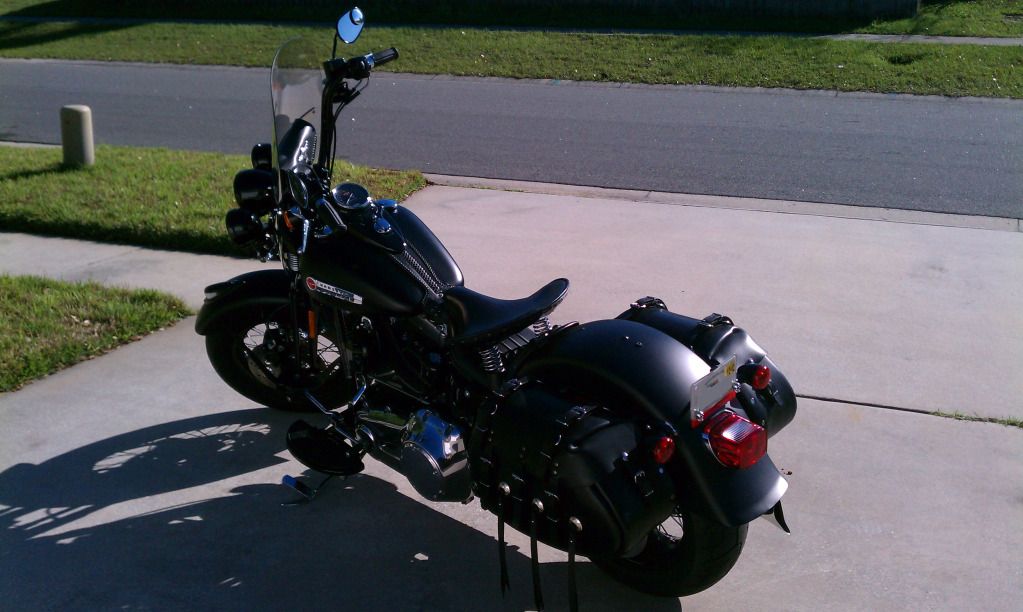
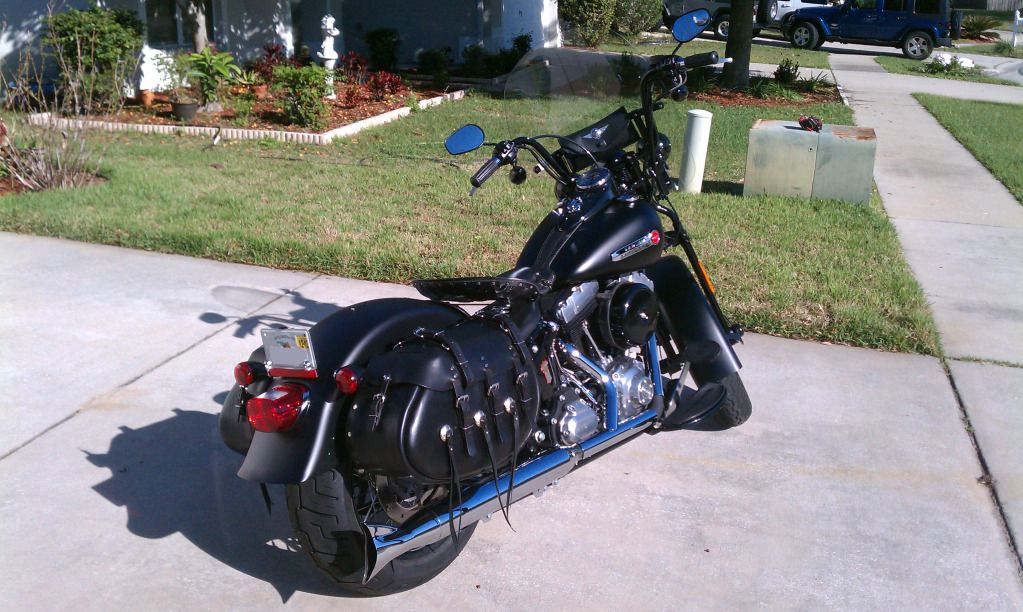
These two photos were taken shortly after I completed the front fender and before I switched out the exhaust and saddlebags.
Trending Topics
#8
08-14-2012, 09:31 AM
#9
08-14-2012, 11:17 AM
Here's the list I've compiled from looking at diagrams for FLSTS: (Prices from Cycle Parts for Less)
COTTER PIN 509 $0.12
COTTER CLIP 508 $1.04
SCREW, SOCKET HEAD CAP 3268 $1.24
WASHER 6109 $0.41
NUT, HEX LOCK 7739 1 $0.83 $0.83
BEARING, SPHERICAL 9194 2@$56.94=$113.88 <---- These may come already inserted with the newer fenders so you may not need to buy them (the price went from $25 each to $60 each!
SPACER, INSERT 9196 $12.60
AXLE NUT SPACER 9268 $19.48
INSERT FENDER 9207 2@$3.73=$7.46 <--- Includes SPACER, OVAL RUBBER 11261
HUB CAP 43466-97 2@$33.12= $66.24
SEAL, AXLE COVER 43467-97 2@$0.50=$1.00
FRONT FENDER LIGHT 59118-00 $47.25 <--- Don't buy on eBay for hundreds of dollars, they are still available from the MoCo brand new!
SCREW 2447 $0.41 (FENDER LIGHT)
NUT W/LOCKWASHER, FXDS 7838 $0.41(FENDER LIGHT)
SCREW 2448 $0.83 (FENDER LIGHT)
GROMMET 11437 $0.41 (FENDER LIGHT WIRE)
NUT, HEX, THICK SLOTTED 7987 $1.66
FRONT AXLE 41116-97 $29.08
SCREW, HEX HEAD 4165 $3.32 (Replaces the Screw, Washer and Acorn Nut from the Cross Bones Fender assembly which will not fit with the FLSTS Fender)
WASHER 6812 $0.83
NUT, ACORN 7862 $2.07
Last edited by Covenant; 09-04-2012 at 07:21 PM. Reason: UPDATING LIST
#10
01-11-2013, 02:58 PM
2nd Gear
Join Date: Dec 2012
Location: Baltimore, MD
Posts: 6
Likes: 0
Received 0 Likes
on
0 Posts
I'm getting ready to do this install, and I appreciate this great writeup. The only part I cannot find is the 6109 washer. It does not come up on partsforless.com. Can you please check the part number and confirm it is correct? I would really appreciate it.
Once again, thanks again for the great write up.
Once again, thanks again for the great write up.