as promised, my shotgun shock install w/ pics.
#1
 08-11-2013, 07:02 PM


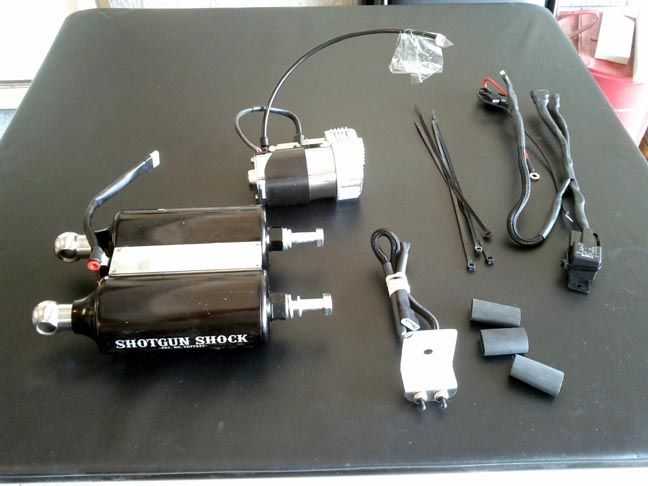
Ok, to start with, what comes in the box...
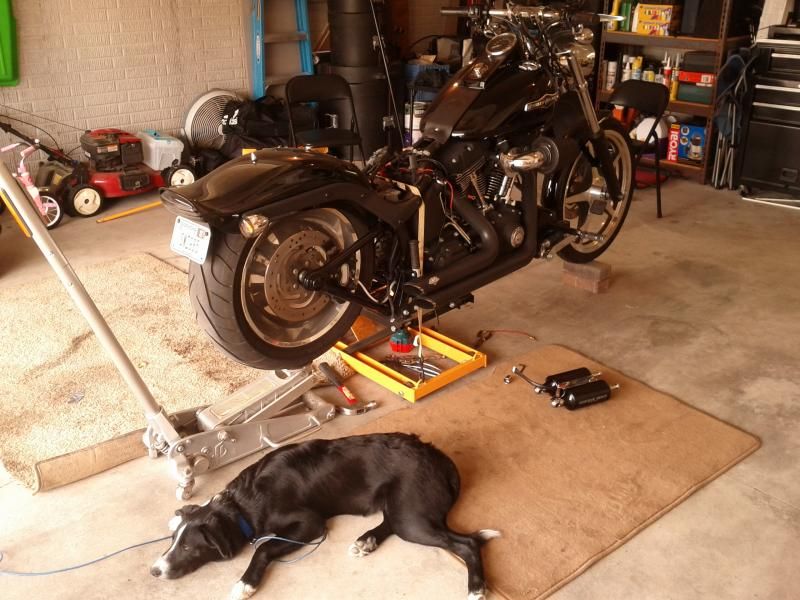
Because the lift was so far back I had to place a couple of bricks under the front tire to keep the bike from tipping forward. But the way the lift sat under the bike, I had complete access to everything I needed. Make sure you get some help from your pooch too.
Next, I removed the seat, battery, splash guard, and then the original shocks. The splash guard comes off really easy. One allen screw, pull the bottom out first, then the top just pops off.
The original shocks proved to be a real pain in the *** to get out. Make sure you have access to a good floor jack to move the rear tire up and down. This will get you a little more access to the rear shoulder bolts. You'll need it later also. Those rear shoulder bolts are REALLY tight, it took some real torque to get them sucka's broke loose. A 3/4" ratcheting wrench comes in real handy on the left side, but it was to tight to use on the right side, so I used an open ended 3/4". It took some time, but eventually they gave in and let me win.
After the original shocks are removed, you'll get access to 2 screw holes on the bottom of the transmission that will anchor the compressor.
Mounting the compressor isn't that hard. Getting the compressor in the correct position is what everyone seems to be having a problem with.
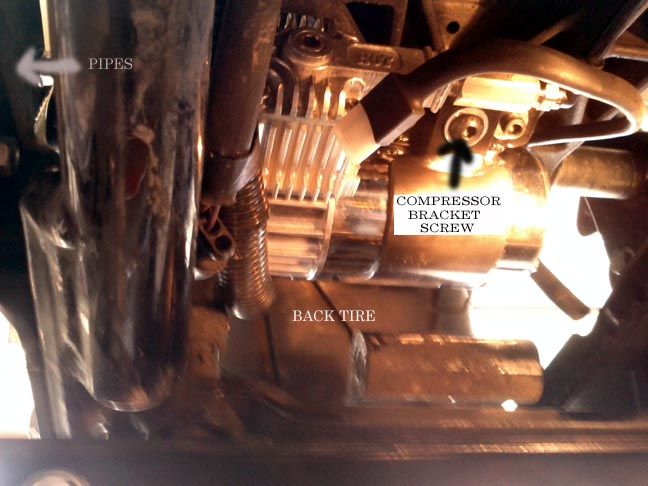
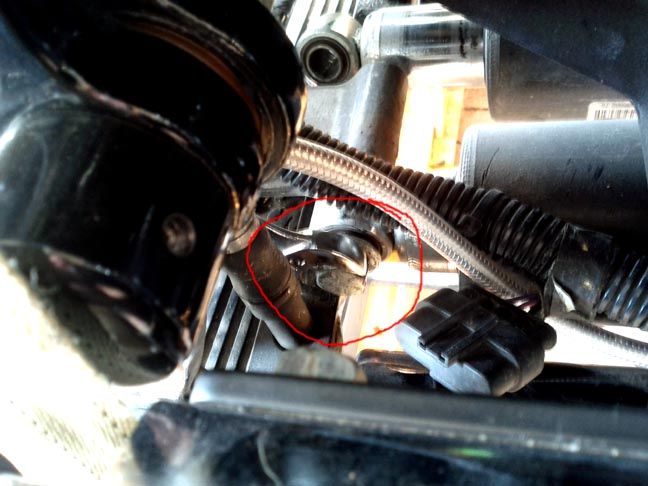
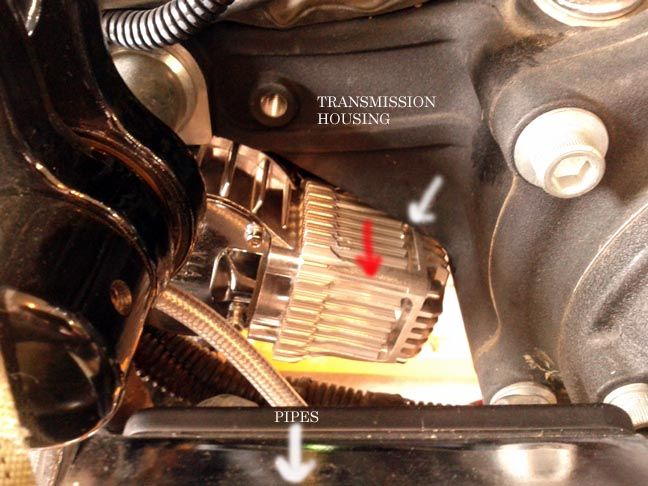
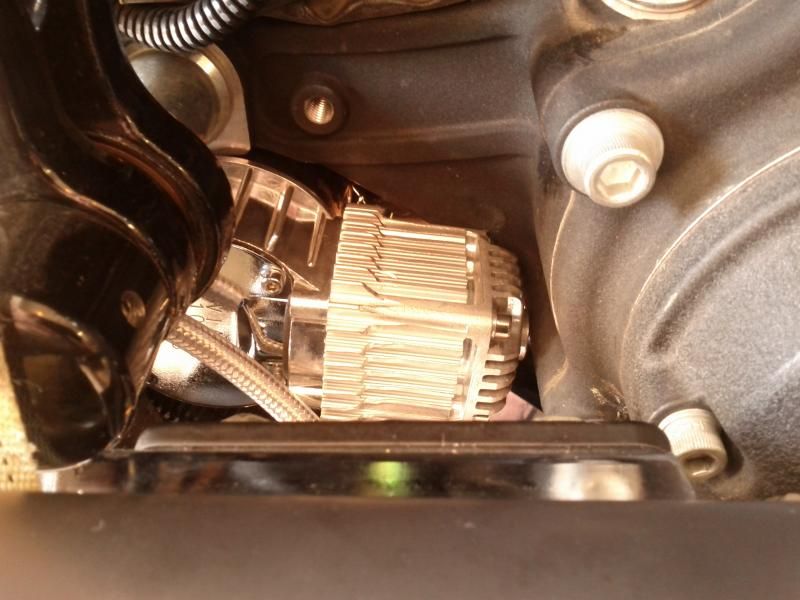
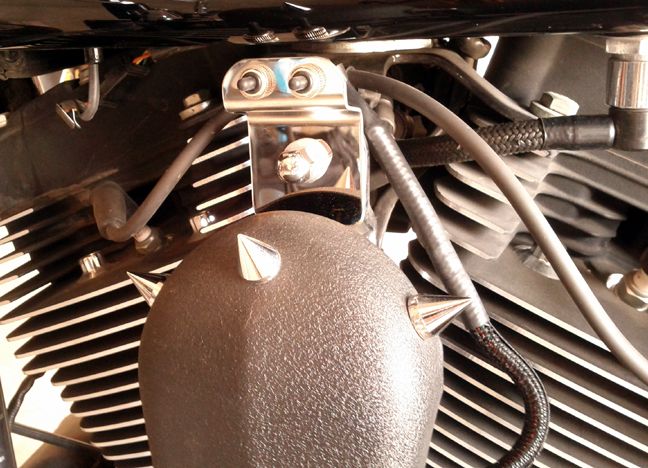
The compressor has a bracket that is held in place with a pan head allen screw. Loosen this screw so that the bracket rotates around the solenoid freely. Mount the compressor with the compressor head (chrome piece with fins) on the right side, or pipe side, of the bike. The head will point towards the front of the bike. Rotate the bracket around the solenoid and screw in the 2 screws provided. Make sure you use a red, heavy duty, lock tight. Next, before you tighten the screw on the bracket, rotate the compressor head all the way up till it hits the bottom of the transmission.
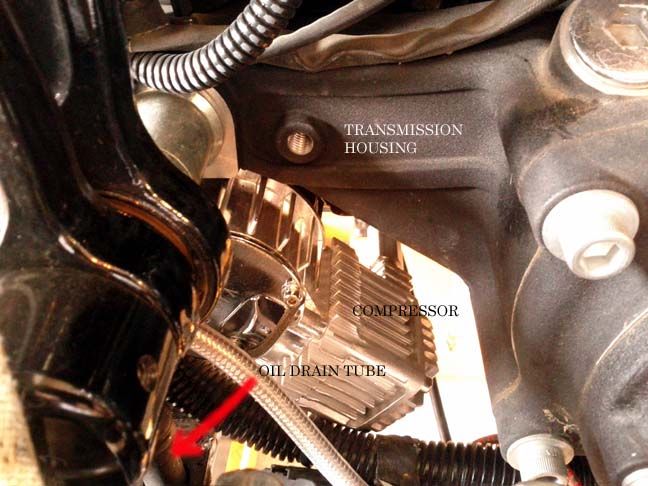
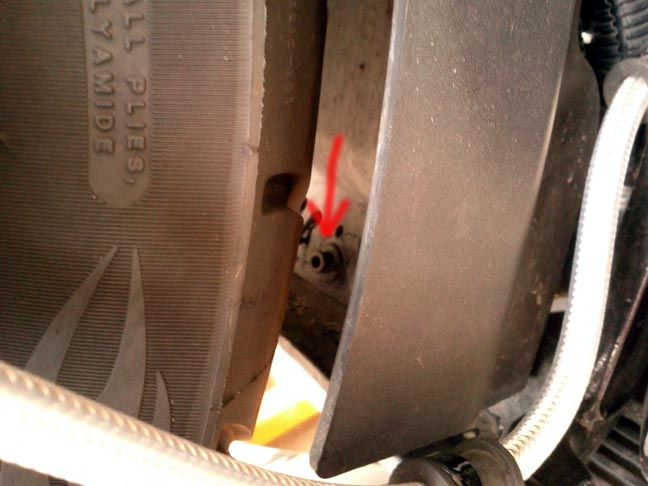
Finally, you need to push the compressor all the way to right. There is a group of wires that'll need to be pushed down under the compressor, out of the way. Push the compressor all the way to the right up against the oil drain tube. It needs to be really tight against this tube in order to push the head of the compressor up past the transmission housing.
I was having a hard time with this, so I used a short piece of 1x2, slid it in from the left side, and butted it up against the solenoid. I used a hammer and lightly tapped the compressor over far enough for the head of the compressor to pass by the transmission housing. Then pushed the head farther up, and out of the way. Finally, tighten the screw on the bracket.
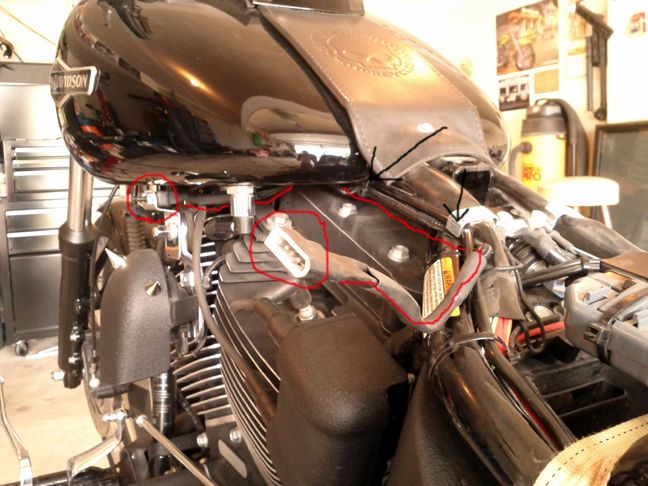
After the head of the compressor is up and out of the way, I installed the switches. These are pretty simple to install. Here's a picture of how I ran the wires back to the battery box. I used a zip tie under the gas tank, and the factory bracket under the seat.
Next I ran the wire harness up and through the battery box. Don't forget to slide the heat shrink tubes over all 3 ends of the connectors. I ran the wires up through the right front corner of the battery box. There is a nice little clip that the harness can snap into just like the positive battery cable.
Install the battery and connect all the cables.
Lastly install the shock assembly. The flat side faces down, chrome side up. Install the rear shoulder bolts first. DON'T FORGET TO USE THE LOCK TIGHT ON THESE!! Use the floor jack again to move the swing arm into position for easy access to the bolts. Remove the red plug in the shock tube connector and push in the tube from the compressor in to the shock. Once you push it in, give it a little tug to make sure it doesn't come back out. (that's what she said) Rotate the tube out of the way of the primary belt and push the shock up into position. After this, put some locktite on the front bolts, and they should go in real easy. DON'T OVER TIGHTEN THE FRONT BOLTS. Just get em nice n snug.
Make all the electrical connections in the back. Use a propane torch to melt the heat shrink tubes around the connections. Zip tie the wires out of the way, reinstall the splash guard, and you are done!!!
Total time it took me: 3.5 hours.
I did make a call to JD for some help on the compressor positioning, Thnx again JD!!!
check this out.... I called JD and had to leave him a voice mail. I thought, great, I won't hear back from him till Monday. I kid-you-not, he called back in 5 minutes!!!
Just like everybody said "fantastic customer service" !!!!
Over all degree of difficulty, I give it a 6 out of 10.
Over all satisfaction, 12 out of 10!!!
I never realized how crappy my factory suspension really was. Granted, I had the HD lowering bolts as low as they would go. But even with the Shotgun Shock lowered all the way down, it still rides better!!!
Hope this post helps anyone interested in the Shotgun shock. If you have any other questions let me know.
Good luck, and safe riding!!

- Compressor
- Shock Assembly
- Switches with bracket & wires
- Wire harness with relay
- Zip ties
- 3 Heat shrink tubes
- Instructions
- Business cards with JD's personal cell phone #
Because the lift was so far back I had to place a couple of bricks under the front tire to keep the bike from tipping forward. But the way the lift sat under the bike, I had complete access to everything I needed. Make sure you get some help from your pooch too.

Next, I removed the seat, battery, splash guard, and then the original shocks. The splash guard comes off really easy. One allen screw, pull the bottom out first, then the top just pops off.

The original shocks proved to be a real pain in the *** to get out. Make sure you have access to a good floor jack to move the rear tire up and down. This will get you a little more access to the rear shoulder bolts. You'll need it later also. Those rear shoulder bolts are REALLY tight, it took some real torque to get them sucka's broke loose. A 3/4" ratcheting wrench comes in real handy on the left side, but it was to tight to use on the right side, so I used an open ended 3/4". It took some time, but eventually they gave in and let me win.

After the original shocks are removed, you'll get access to 2 screw holes on the bottom of the transmission that will anchor the compressor.
Mounting the compressor isn't that hard. Getting the compressor in the correct position is what everyone seems to be having a problem with.

The compressor has a bracket that is held in place with a pan head allen screw. Loosen this screw so that the bracket rotates around the solenoid freely. Mount the compressor with the compressor head (chrome piece with fins) on the right side, or pipe side, of the bike. The head will point towards the front of the bike. Rotate the bracket around the solenoid and screw in the 2 screws provided. Make sure you use a red, heavy duty, lock tight. Next, before you tighten the screw on the bracket, rotate the compressor head all the way up till it hits the bottom of the transmission.

Finally, you need to push the compressor all the way to right. There is a group of wires that'll need to be pushed down under the compressor, out of the way. Push the compressor all the way to the right up against the oil drain tube. It needs to be really tight against this tube in order to push the head of the compressor up past the transmission housing.

I was having a hard time with this, so I used a short piece of 1x2, slid it in from the left side, and butted it up against the solenoid. I used a hammer and lightly tapped the compressor over far enough for the head of the compressor to pass by the transmission housing. Then pushed the head farther up, and out of the way. Finally, tighten the screw on the bracket.

After the head of the compressor is up and out of the way, I installed the switches. These are pretty simple to install. Here's a picture of how I ran the wires back to the battery box. I used a zip tie under the gas tank, and the factory bracket under the seat.


Next I ran the wire harness up and through the battery box. Don't forget to slide the heat shrink tubes over all 3 ends of the connectors. I ran the wires up through the right front corner of the battery box. There is a nice little clip that the harness can snap into just like the positive battery cable.
Install the battery and connect all the cables.
Lastly install the shock assembly. The flat side faces down, chrome side up. Install the rear shoulder bolts first. DON'T FORGET TO USE THE LOCK TIGHT ON THESE!! Use the floor jack again to move the swing arm into position for easy access to the bolts. Remove the red plug in the shock tube connector and push in the tube from the compressor in to the shock. Once you push it in, give it a little tug to make sure it doesn't come back out. (that's what she said) Rotate the tube out of the way of the primary belt and push the shock up into position. After this, put some locktite on the front bolts, and they should go in real easy. DON'T OVER TIGHTEN THE FRONT BOLTS. Just get em nice n snug.
Make all the electrical connections in the back. Use a propane torch to melt the heat shrink tubes around the connections. Zip tie the wires out of the way, reinstall the splash guard, and you are done!!!
Total time it took me: 3.5 hours.
I did make a call to JD for some help on the compressor positioning, Thnx again JD!!!
check this out.... I called JD and had to leave him a voice mail. I thought, great, I won't hear back from him till Monday. I kid-you-not, he called back in 5 minutes!!!
Just like everybody said "fantastic customer service" !!!!
Over all degree of difficulty, I give it a 6 out of 10.
Over all satisfaction, 12 out of 10!!!
I never realized how crappy my factory suspension really was. Granted, I had the HD lowering bolts as low as they would go. But even with the Shotgun Shock lowered all the way down, it still rides better!!!
Hope this post helps anyone interested in the Shotgun shock. If you have any other questions let me know.
Good luck, and safe riding!!
The following users liked this post:
Johnny Goodlife (12-10-2016)


#4
08-11-2013, 07:16 PM
Outstanding HDF Member
Join Date: Feb 2012
Location: BC
Posts: 2,298
Likes: 0
Received 0 Likes
on
0 Posts
#5
08-11-2013, 07:32 PM
#7
08-12-2013, 09:03 AM
Trending Topics
#8
08-12-2013, 10:24 AM
Tourer
#9
08-12-2013, 10:37 AM
Great write up!
For me, I was not willing to put that much force in jamming that pump head against the oil drain line (mine really hit solid against that oil line and didn't seem like it would budge at all). I filed the corner fins off the pump head and it just snugged up there that way. If I ever dig into this again, I may give it another go, now that I've seem it can be done.
For me, I was not willing to put that much force in jamming that pump head against the oil drain line (mine really hit solid against that oil line and didn't seem like it would budge at all). I filed the corner fins off the pump head and it just snugged up there that way. If I ever dig into this again, I may give it another go, now that I've seem it can be done.
The following users liked this post:
DaddyDoeBucks (03-16-2019)

 makes me want to go broke faster.

