Simple shifter rod change with unexpected benefit
#1
 08-16-2014, 01:17 PM


This is one of those simple mods that over-delivered compared to what I expected.
I have never liked the appearance of the stock plated shifter rod on my 2014 Breakout. I disliked the plated finish, and I disliked the external "Heim rod spherical bearing"joints and their related threaded sections and nuts.
Heim joints were developed by the Germans for military use in aircraft in World War 2, and after the British shot down one of the German planes, they discovered, and copied, the design. The name "Heim" comes from the first North American company licensed to produce the joint.
This type of rod end joint is used where a rod is used to move a lever, and where binding of the rod-to-lever joint would be a problem. The use of the spherical bearing alleviates binding.
Harley uses TWO of these joints to connect the transmission shift lever to the gear shift foot pedal lever. There are two joints because the alignment of the rod varies from HD model to HD model, and because the transmission can vibrate relative to the foot control. Binding would make gear shifting unpleasant and unreliable. But naturally, HD chose a level of quality in both design and execution that works with its vehicle budgeted cost, but sacrifices some appearance, and as it turns out, also performance.
I found a bargain price on a really nice Arlen Ness "Beveled" billet shifter rod, in black and alloy finish, that nicely complements other pieces on my bike.
The Ness design is entirely different than the HD design. Ness machines a cavity at each end of the billet rod, into which it presses a spherical bearing. So, the bearing itself is hidden entirely, and there is no external rod thread. Ness then provides a wave washer, flat washer, and nice hardened plated bolt for each end of the rod, plus, for use on Softails, a spacer for the end of the rod that interfaces with the shift pedal lever (the alignment of the shift pedal lever with the transmission lever on the Softail differs from the alignment on the touring models). The final appearance of the Ness product is much nicer than the stock one.
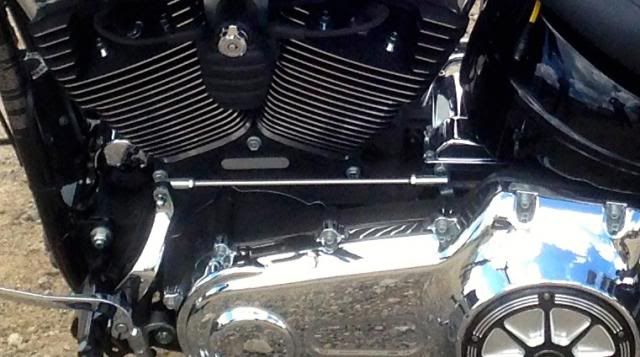
Here is the plated stock shifter rod with its external heim joints:
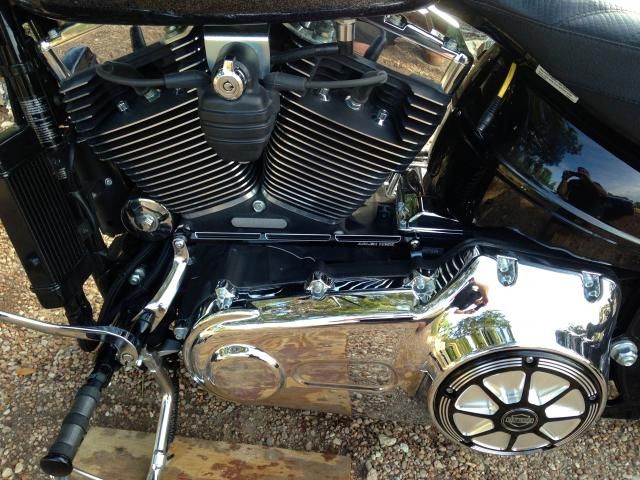
and here is the billet Arlen Ness shifter rod with its internal joints:
and a close-up:
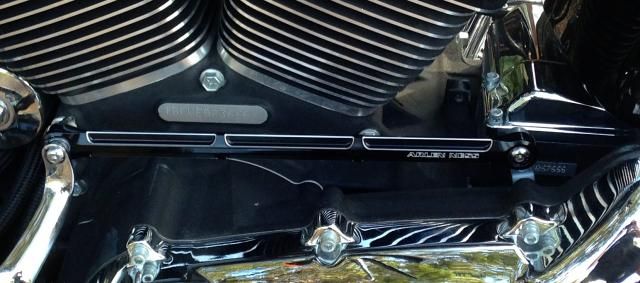
Definitely an improvement in appearance (even before discovering the performance benefit).
Installation is reasonably straightforward, with just a couple of wrinkles. The following instructions assume a Softail installation:
- Place the bike where you will not disturb it until the job is done
- Measure the distance from the floor (or lift surface) to the bottom of the rubber on the shift pedal lever. Record this measurement, as you will want to ensure that when you are done, the lever remains at the same vertical height from the foot peg as with the stock rod!
- Remove the stock rod by removing the bullet lock nut at the front end of the rod, and by loosening the nut built into the rear end of the rod
- When you disconnect the front end of the rod, the shift pedal crank and shift pedal will flop forward. Doesn't matter - no need to control it. Retain the stock bullet locknut, as you will need it.
For the installation, remember the following:
The "inside" surface of the rod is the surface that faces the right or engine side after installation.
The "outside" surface of the rod is the surface that faces outward away from the engine.
The "rear" end of the rod is the end that says "Arlen Ness" on it.
So, the REAR OUTSIDE end of the rod is the portion of the rod that says "Arlen Ness" on it, and faces AWAY from the engine.
The REAR INSIDE end of the rod is "the other side" of the rod.
The significance is that not only does the inside surface of the rod lack the Arlen Ness printing, but more importantly, the machined hole in the end of the rod is LARGER on the INSIDE end of the rod. This larger hole makes it possible to insert a wave washer and a flat washer into the hole.
For the rear end of the Ness shifter rod:
- Put a generous blob of white lithium grease inside the spherical bearing at the rear end of the rod (this will provide the lubrication between the spherical bearing and the bolt you will later insert, so don't forget to do the grease!
- Put plenty of white lithium grease onto one wave washer, and place that wave washer into the machined hole on the INSIDE surface of the REAR end of the rod. The purpose of the grease is to HOLD the wave washer in the machined hole, so that it does not fall behind the primary cover, and get lost forever, so do not try to skip the grease!
- Put plenty of while lithium grease onto one flat washer, and stack that on top of the wave washer, in the machined hole, on the INSIDE surface of the REAR of the rod.
- With your right hand hold the transmission lever FORWARD (it will move a fraction of an inch forward when you push it forward)
- While still holding the transmission lever forward against its return spring pressure, take the SHORTER of the 2 bolts provided by Ness, apply some BLUE lactate to the bolt, and thread it into the threaded hole in the transmission lever. You'll need to keep that lever forward in order to gain access to the threaded hole without running into the primary case cover.
- You'll need a 3/16" allen wrench to thread that bolt in beyond the first few threads
- The Ness instructions say to torque that bolt to 15 foot pounds (180 inch pounds), but at least on my Breakout, you'll never get a socket with allen head to clear the primary case cover, so just tighten until you hit very sudden harder resistance (when the bolt head contacts the rod surface) and tighten just a BIT more. Don't overdo it - that bolt isn't going to unthread anytime soon, and you do not want to strip the threads in the transmission lever. If you use a small 3" allen wrench like I did, you won't be tempted to over torque.
For the FRONT end of the Ness rod:
- Put a generous blob of white lithium grease inside the spherical bearing at the front end of the rod (this will provide the lubrication between the spherical bearing and the bolt you will later insert, so don't forget to do the grease!)
- Put plenty of white lithium grease onto one wave washer, and place that wave washer into the machined hole on the INSIDE surface of the FRONT end of the rod. The purpose of the grease is to HOLD the wave washer in the machined hole, so that it does not fall behind the primary cover, and get lost forever, so do not try to skip the grease!
- Put plenty of while lithium grease onto one flat washer, and stack that on top of the wave washer, in the machined hole, on the INSIDE surface of the FRONT end of the rod.
- Now, put a generous blob of white lithium grease onto the plated spacer that Ness provides, and "stick" it (via the grease) to the OUTSIDE surface of the hole at the FRONT end of the rod.
- Apply BLUE lactate to the LONGER bolt provided by Ness.
- Align the freely movable shift pedal crank arm with the front end of the rod. Unlike the rear of the rod, which is outside of the transmission lever, the FRONT of the Ness rod is INSIDE the crank arm.
- From the outside of the rod, insert the Ness bolt through the crank arm, and then through the spacer, spherical bearing, wave washer, and flat washer until it protrudes nicely on the INSIDE surface of the rod
- Start the bullet locknut you kept from the stock setup, by hand, onto the end of the Ness bolt
- You'll need a 1/2" wrench to thread that bullet locknut beyond the first few threads.
- The Ness instructions again say to torque that bolt to 15 foot pounds (180 inch pounds). If you don't have a torque wrench, just tighten the bolt to the nut with REASONABLE torque.
- Wipe all the excess grease off the entire exterior of the rod, outside and inside surfaces, so that it does not attract and hold grit that will then wear the spherical joints!
The Ness rod was, at least on my Breakout, slightly shorter center-to-center between the 2 spherical bearings than my stock rod was, so the gear shift pedal got raised about 1/4 inch from where it used to be. This turned out to be a blessing, as, while the bike has always shifted very nicely, the extra 1/4 inch seems to work better with my foot, and it's even better now in terms of ergonomics.
The new setup obviously looks better than the tock setup, but the big surprise was the improvement in shifting precision. It appears that the tolerances on the ness rod are much closer than on the stock rod, so there is less "play". That has the dual benefit of (a) reducing the play and (b) further reducing the friction in the mechanism. That dual effect makes shifting an absolute dream now. The motion is now non-sloppy, shorter stroke (because less play) and you can FEEL when you hit the next gear or neutral, very precisely. Nice!
HD itself does offer optional shifter rods. However . . . the Ness rod is similar in list price to the optional rods offered by HD, but is in my opinion, greatly superior in terms of design and execution. No comparison. a technician at my local dealer
says the staff does not recommend the HD rods because they get very noisy very soon (because the design is inferior, and their tolerances are too loose, and so they wear).
I waited a long time until a suitable bargain popped up on eBay, and then I grabbed the rod for about 25% off list. Expensive, but the appearance improvement is immense, and the unexpected performance benefits are a superb plus.
Jim G
I have never liked the appearance of the stock plated shifter rod on my 2014 Breakout. I disliked the plated finish, and I disliked the external "Heim rod spherical bearing"joints and their related threaded sections and nuts.
Heim joints were developed by the Germans for military use in aircraft in World War 2, and after the British shot down one of the German planes, they discovered, and copied, the design. The name "Heim" comes from the first North American company licensed to produce the joint.
This type of rod end joint is used where a rod is used to move a lever, and where binding of the rod-to-lever joint would be a problem. The use of the spherical bearing alleviates binding.
Harley uses TWO of these joints to connect the transmission shift lever to the gear shift foot pedal lever. There are two joints because the alignment of the rod varies from HD model to HD model, and because the transmission can vibrate relative to the foot control. Binding would make gear shifting unpleasant and unreliable. But naturally, HD chose a level of quality in both design and execution that works with its vehicle budgeted cost, but sacrifices some appearance, and as it turns out, also performance.
I found a bargain price on a really nice Arlen Ness "Beveled" billet shifter rod, in black and alloy finish, that nicely complements other pieces on my bike.
The Ness design is entirely different than the HD design. Ness machines a cavity at each end of the billet rod, into which it presses a spherical bearing. So, the bearing itself is hidden entirely, and there is no external rod thread. Ness then provides a wave washer, flat washer, and nice hardened plated bolt for each end of the rod, plus, for use on Softails, a spacer for the end of the rod that interfaces with the shift pedal lever (the alignment of the shift pedal lever with the transmission lever on the Softail differs from the alignment on the touring models). The final appearance of the Ness product is much nicer than the stock one.
Here is the plated stock shifter rod with its external heim joints:

and here is the billet Arlen Ness shifter rod with its internal joints:

and a close-up:

Definitely an improvement in appearance (even before discovering the performance benefit).
Installation is reasonably straightforward, with just a couple of wrinkles. The following instructions assume a Softail installation:
- Place the bike where you will not disturb it until the job is done
- Measure the distance from the floor (or lift surface) to the bottom of the rubber on the shift pedal lever. Record this measurement, as you will want to ensure that when you are done, the lever remains at the same vertical height from the foot peg as with the stock rod!
- Remove the stock rod by removing the bullet lock nut at the front end of the rod, and by loosening the nut built into the rear end of the rod
- When you disconnect the front end of the rod, the shift pedal crank and shift pedal will flop forward. Doesn't matter - no need to control it. Retain the stock bullet locknut, as you will need it.
For the installation, remember the following:
The "inside" surface of the rod is the surface that faces the right or engine side after installation.
The "outside" surface of the rod is the surface that faces outward away from the engine.
The "rear" end of the rod is the end that says "Arlen Ness" on it.
So, the REAR OUTSIDE end of the rod is the portion of the rod that says "Arlen Ness" on it, and faces AWAY from the engine.
The REAR INSIDE end of the rod is "the other side" of the rod.
The significance is that not only does the inside surface of the rod lack the Arlen Ness printing, but more importantly, the machined hole in the end of the rod is LARGER on the INSIDE end of the rod. This larger hole makes it possible to insert a wave washer and a flat washer into the hole.
For the rear end of the Ness shifter rod:
- Put a generous blob of white lithium grease inside the spherical bearing at the rear end of the rod (this will provide the lubrication between the spherical bearing and the bolt you will later insert, so don't forget to do the grease!
- Put plenty of white lithium grease onto one wave washer, and place that wave washer into the machined hole on the INSIDE surface of the REAR end of the rod. The purpose of the grease is to HOLD the wave washer in the machined hole, so that it does not fall behind the primary cover, and get lost forever, so do not try to skip the grease!
- Put plenty of while lithium grease onto one flat washer, and stack that on top of the wave washer, in the machined hole, on the INSIDE surface of the REAR of the rod.
- With your right hand hold the transmission lever FORWARD (it will move a fraction of an inch forward when you push it forward)
- While still holding the transmission lever forward against its return spring pressure, take the SHORTER of the 2 bolts provided by Ness, apply some BLUE lactate to the bolt, and thread it into the threaded hole in the transmission lever. You'll need to keep that lever forward in order to gain access to the threaded hole without running into the primary case cover.
- You'll need a 3/16" allen wrench to thread that bolt in beyond the first few threads
- The Ness instructions say to torque that bolt to 15 foot pounds (180 inch pounds), but at least on my Breakout, you'll never get a socket with allen head to clear the primary case cover, so just tighten until you hit very sudden harder resistance (when the bolt head contacts the rod surface) and tighten just a BIT more. Don't overdo it - that bolt isn't going to unthread anytime soon, and you do not want to strip the threads in the transmission lever. If you use a small 3" allen wrench like I did, you won't be tempted to over torque.
For the FRONT end of the Ness rod:
- Put a generous blob of white lithium grease inside the spherical bearing at the front end of the rod (this will provide the lubrication between the spherical bearing and the bolt you will later insert, so don't forget to do the grease!)
- Put plenty of white lithium grease onto one wave washer, and place that wave washer into the machined hole on the INSIDE surface of the FRONT end of the rod. The purpose of the grease is to HOLD the wave washer in the machined hole, so that it does not fall behind the primary cover, and get lost forever, so do not try to skip the grease!
- Put plenty of while lithium grease onto one flat washer, and stack that on top of the wave washer, in the machined hole, on the INSIDE surface of the FRONT end of the rod.
- Now, put a generous blob of white lithium grease onto the plated spacer that Ness provides, and "stick" it (via the grease) to the OUTSIDE surface of the hole at the FRONT end of the rod.
- Apply BLUE lactate to the LONGER bolt provided by Ness.
- Align the freely movable shift pedal crank arm with the front end of the rod. Unlike the rear of the rod, which is outside of the transmission lever, the FRONT of the Ness rod is INSIDE the crank arm.
- From the outside of the rod, insert the Ness bolt through the crank arm, and then through the spacer, spherical bearing, wave washer, and flat washer until it protrudes nicely on the INSIDE surface of the rod
- Start the bullet locknut you kept from the stock setup, by hand, onto the end of the Ness bolt
- You'll need a 1/2" wrench to thread that bullet locknut beyond the first few threads.
- The Ness instructions again say to torque that bolt to 15 foot pounds (180 inch pounds). If you don't have a torque wrench, just tighten the bolt to the nut with REASONABLE torque.
- Wipe all the excess grease off the entire exterior of the rod, outside and inside surfaces, so that it does not attract and hold grit that will then wear the spherical joints!
The Ness rod was, at least on my Breakout, slightly shorter center-to-center between the 2 spherical bearings than my stock rod was, so the gear shift pedal got raised about 1/4 inch from where it used to be. This turned out to be a blessing, as, while the bike has always shifted very nicely, the extra 1/4 inch seems to work better with my foot, and it's even better now in terms of ergonomics.
The new setup obviously looks better than the tock setup, but the big surprise was the improvement in shifting precision. It appears that the tolerances on the ness rod are much closer than on the stock rod, so there is less "play". That has the dual benefit of (a) reducing the play and (b) further reducing the friction in the mechanism. That dual effect makes shifting an absolute dream now. The motion is now non-sloppy, shorter stroke (because less play) and you can FEEL when you hit the next gear or neutral, very precisely. Nice!
HD itself does offer optional shifter rods. However . . . the Ness rod is similar in list price to the optional rods offered by HD, but is in my opinion, greatly superior in terms of design and execution. No comparison. a technician at my local dealer
says the staff does not recommend the HD rods because they get very noisy very soon (because the design is inferior, and their tolerances are too loose, and so they wear).
I waited a long time until a suitable bargain popped up on eBay, and then I grabbed the rod for about 25% off list. Expensive, but the appearance improvement is immense, and the unexpected performance benefits are a superb plus.
Jim G
Last edited by JimGnitecki; 08-16-2014 at 01:21 PM.

#3
08-16-2014, 02:54 PM
#4
08-16-2014, 10:40 PM
Seasoned HDF Member
OK... I'm confused....
All the OEM harley shifter rods I've seen used a "ball & cuff" (if that's the real term) type joint.
The Harley aftermarket shift rods use a heim joint.
Like in this :
http://www.motorcyclephilosophy.org/...son-broken.htm
Pretty sure both my '03 Softail and my '12 Touring have the "ball & cuff" type shift rods.... I've been meaning to get the heim joint aftermarket rods for awhile now.
#5
08-16-2014, 10:42 PM
Club Member
#6
08-16-2014, 11:08 PM
OK... I'm confused....
All the OEM harley shifter rods I've seen used a "ball & cuff" (if that's the real term) type joint.
The Harley aftermarket shift rods use a heim joint.
Like in this :
http://www.motorcyclephilosophy.org/...son-broken.htm
Pretty sure both my '03 Softail and my '12 Touring have the "ball & cuff" type shift rods.... I've been meaning to get the heim joint aftermarket rods for awhile now.
The HD accessory rods (what you called HD "aftermarket") still use the external threads and ball.
Jim G
#7
08-16-2014, 11:10 PM
Jim G
Trending Topics
#8
08-17-2014, 10:47 AM

#9
08-17-2014, 12:09 PM
Seasoned HDF Member
I got curious about the OEM rod versus the Harley accessory rods. So I did some checking. Mostly to get it straight in my mind, but also to share what I found.
I couldn't find any reference to anything HD, other than the "ball & cuff" or Heim joint with bolt.
I checked my bikes, both of which I bought new...
My OEM '03 Softail w/ "ball & cuff" (or whatever it is really called);

My OEM '12 Touring w/ "ball & cuff"

I looked up the installation instructions for the Harley accessory shift rods. It (-J00200.pdf) shows an exploded view of both the OEM set-up and the accessory rod.
The OEM view, with "ball & cuff" style connection:

The Harley accessory rods have the heim joint, but it appears they don't use a "ball". Looks like a bolt goes through the heim joint and secures it to the trans & shift levers....


I certainly don't like the OEM set-up. Although I have never had an issue, I have read that many people do. That is why I've been planning (although dragging my feet) to switch to the HD accessory shift rod. Based on your recommendation, I will now need to see an Arlen Ness in person, so I can decide which way to go...
Last edited by hattitude; 08-17-2014 at 12:14 PM.