
cheap coil relocation bracket, how I did it
#1
 02-13-2012, 04:23 PM

Join Date: Feb 2012
Location: Raeford, NC
Posts: 109
Likes: 0
Received 0 Likes
on
0 Posts
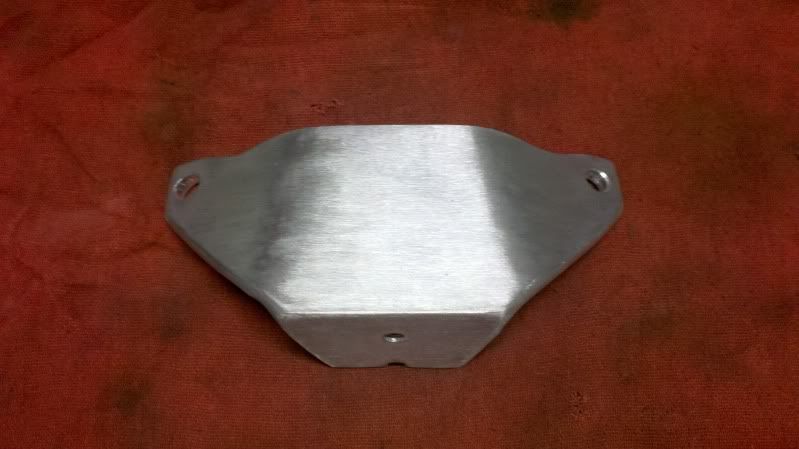
I think I was into this for about 3 bucks for the L bracket, 6 for the aluminum stock and about 3 for the fasteners.  these are the parts I used, from Home Depot

I measured out the aluminum a little long, made my first bend, measured across the top and made my second bend, then cut off the excess. I took the L bracket and cut the excess off of one side to mount to the aluminum then held the coil up to see how short to make the other side of the L. I drilled holes for 1/4 inch fasteners and made sure everything fit together before I painted it.

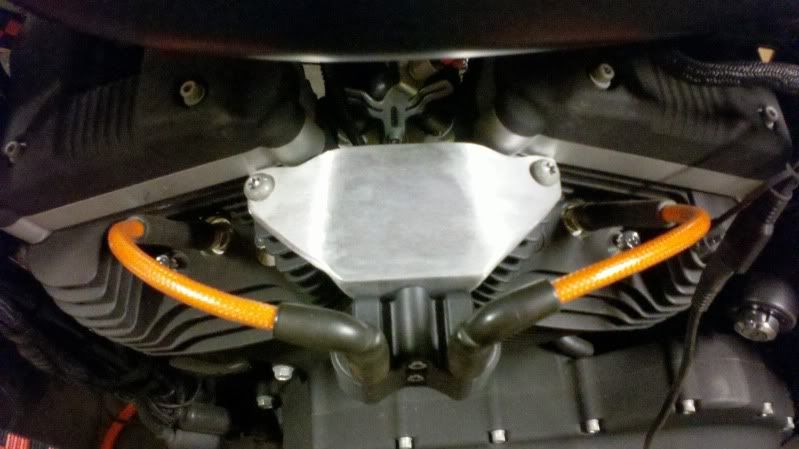
Mount the coil to the L bracket first

Mount the L bracket loosely to the aluminum crossover bracket so that you can square everything up once it is mounted to the engine

So minus the short coil wire that I ordered from the dealer, which I think was 8 bucks, here is the finished product
these are the parts I used, from Home DepotI measured out the aluminum a little long, made my first bend, measured across the top and made my second bend, then cut off the excess. I took the L bracket and cut the excess off of one side to mount to the aluminum then held the coil up to see how short to make the other side of the L. I drilled holes for 1/4 inch fasteners and made sure everything fit together before I painted it.
Mount the coil to the L bracket first
Mount the L bracket loosely to the aluminum crossover bracket so that you can square everything up once it is mounted to the engine
So minus the short coil wire that I ordered from the dealer, which I think was 8 bucks, here is the finished product

#4
02-13-2012, 07:52 PM
#5
02-13-2012, 08:49 PM
Join Date: Feb 2012
Location: Raeford, NC
Posts: 109
Likes: 0
Received 0 Likes
on
0 Posts
Did you heat the steal or just bend it.

#7
02-13-2012, 11:47 PM
Platinum Sponsor
Join Date: Nov 2010
Location: Red Banks, Mississippi
Posts: 17,464
Received 3,939 Likes
on
2,294 Posts
Been there, done that. Aluminum won't last 90% of the time. Also 1/8" steel will fatigue and break with time...sometimes in 5 years, sometimes in 5 weeks.
Use 3/16" thick steel and keep at least 3/16" meat between your holes and the edge of the bracket. You should have something that will hold up then.

Trending Topics
#8
02-14-2012, 08:27 PM
Road Captain
Use no less than a mapp gas torch to heat it, propane won't cut it. It's much easier to make clean bends when it's cherry red. And as tempting as it is, don't cool it off in water. Let it cool naturally or it'll be brittle. Get 3/4" wide by 3/16" thick flat stock and it'll work fine. A good tip is to have some tubing or conduit with an inner diameter the same as the width of the flat stock and sleeve that over it. It'll give you a nice straight bend and provide good leverage.
#9
02-14-2012, 09:04 PM
Road Captain
After doing the standard style bracket making a few times, I changed it up a bit. I wanted to actually have a piece made without heating anything, so I figured I'd use angle iron. It was a good idea, but my local Lowe's/Home Depot didn't have it in stock where it was wide enough. Then while at work (in an office of all places) there was this angled aluminum that was a width of 3" (I think?) and 1/4" thick. I don't know how, but somehow that 4' long piece made it into the bed of my truck. Beats me how it got there.
So I know it looks bulky, but since it's aluminum, it's superlight. And leaving as much material on there as I did keeps it stronger and less probable to fail. Once it's powdercoated wet black, you won't even notice its size. Plus, I can always paint a graphic on a nice flat surface if I want to.
Not much cutting, 4 drilled holes, a little bending with just my own strength and some sanding/shaping. Not a torch went to it and it didn't cost me a dime. As to why there's a half hole on the bottom of the front, that's all that's needed. The top bolt will hold the coil to the bracket just fine, the bottom bolt "half hole" is there to keep it centered. If the front of the bracket went down any further to make it a whole hole, there wouldn't be enough room for the wiring to enter the coil.
#10
12-03-2014, 06:19 AM

I think I was into this for about 3 bucks for the L bracket, 6 for the aluminum stock and about 3 for the fasteners. these are the parts I used, from Home Depot
I measured out the aluminum a little long, made my first bend, measured across the top and made my second bend, then cut off the excess. I took the L bracket and cut the excess off of one side to mount to the aluminum then held the coil up to see how short to make the other side of the L. I drilled holes for 1/4 inch fasteners and made sure everything fit together before I painted it.
Mount the coil to the L bracket first
Mount the L bracket loosely to the aluminum crossover bracket so that you can square everything up once it is mounted to the engine
So minus the short coil wire that I ordered from the dealer, which I think was 8 bucks, here is the finished product
these are the parts I used, from Home DepotI measured out the aluminum a little long, made my first bend, measured across the top and made my second bend, then cut off the excess. I took the L bracket and cut the excess off of one side to mount to the aluminum then held the coil up to see how short to make the other side of the L. I drilled holes for 1/4 inch fasteners and made sure everything fit together before I painted it.
Mount the coil to the L bracket first
Mount the L bracket loosely to the aluminum crossover bracket so that you can square everything up once it is mounted to the engine
So minus the short coil wire that I ordered from the dealer, which I think was 8 bucks, here is the finished product
I'm gynna have a go at making my own do you have the exact dimensions I need please
Thanks
Zac

Thread
Thread Starter
Forum
Replies
Last Post