
BlkSheep's Iron


#22
 09-11-2013, 03:11 PM
Join Date: Jun 2013
Location: PEI, Canada
Posts: 253
Likes: 0
Received 0 Likes
on
0 Posts
Other people all thought it was seriously lacking something, so I chose to add some silicone tape and part of the stock wire harness. Which I posted pics of. I was unhappy with this look and consulted others again. So I went back at it and decided on "auto/splice loom" that is completely wrapped in silicone tape.
I believe this look is uniform for consistency in appearance and provides ample protection while also preventing water from collecting inside the loom by the wires. It addresses several issues/concerns I have with removing the stock wire harness and repositioning some wires.
This may not suit other people and to each their own, but for me this method was the one that I felt looked the best and has the additional (bonus) benefit of being more protective.
I consulted both bike riders and non-bike riders when doing this mod and deciding on what looked the best or most "natural". And all agree that my bike as it sits currently has the most "factory done" appearance of the numerous options I considered.
Your bike looks good in the photo for sure! It's just personal preference that we all choose to complete the same task.
#23
09-11-2013, 03:22 PM
Join Date: Jun 2013
Location: PEI, Canada
Posts: 253
Likes: 0
Received 0 Likes
on
0 Posts
You did a great job!!
I promised I will leave it alone, but I can't... the work you did is too good to not address some little things here and there... feel free to send me to hell for pointing them out, but I think these are easy to do and will make it look even better. I just wish my comes out looking as good as yours when I redo/replace the normal electrical tape with silcone tape.
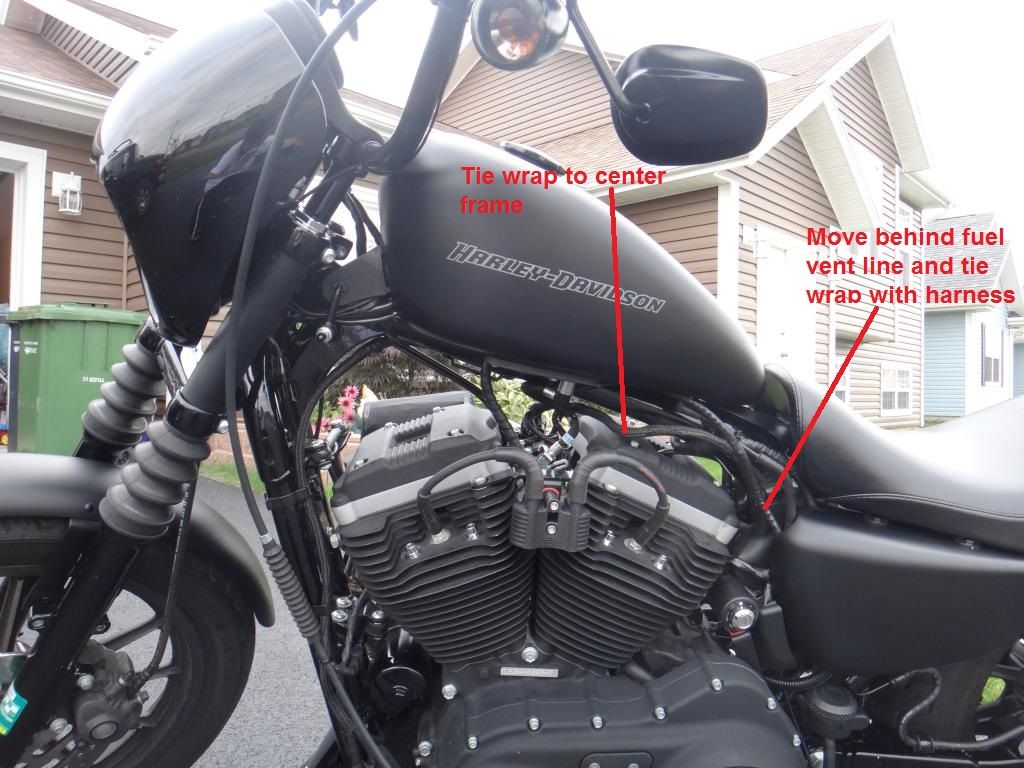
1. Twist the tie-wrap so that the connector points to the inside or down. So you can't see it on a side profile.
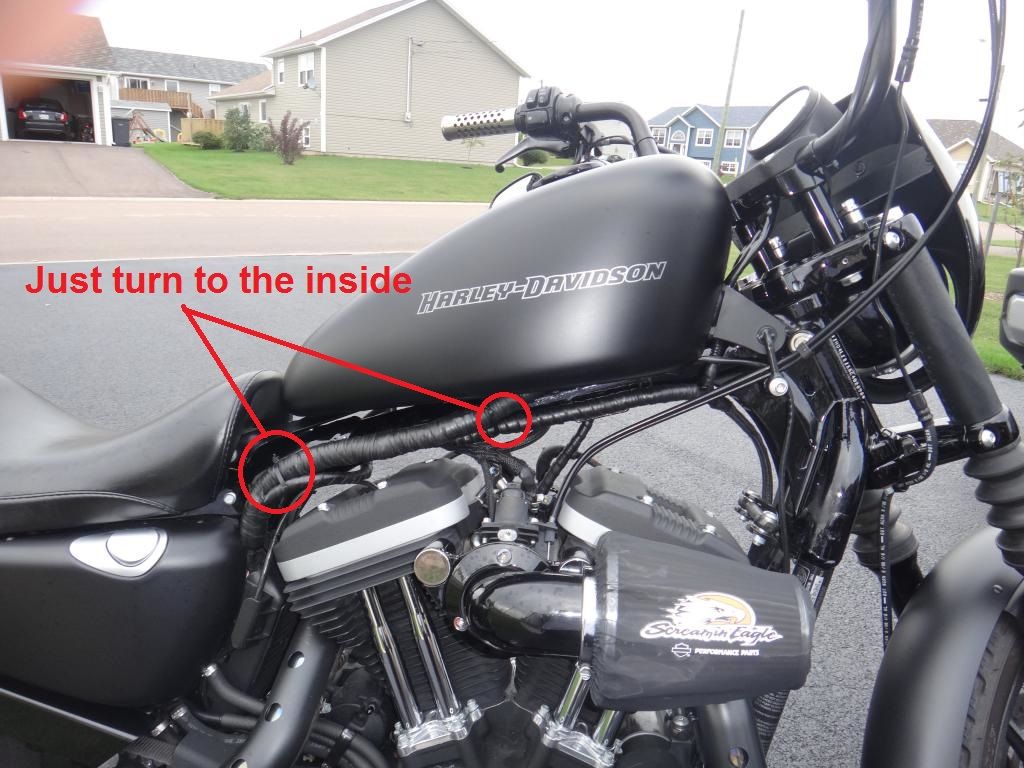
2. Move the Switch wires to the inside of the fuel vent line. Tie-wrap together. Fuel pump wire, tie-wrap on the center frame support so that it lifts from the cylinder heads.
Again, hope you take this the right way... and tell me to f* off if you don't
I promised I will leave it alone, but I can't... the work you did is too good to not address some little things here and there... feel free to send me to hell for pointing them out, but I think these are easy to do and will make it look even better. I just wish my comes out looking as good as yours when I redo/replace the normal electrical tape with silcone tape.
1. Twist the tie-wrap so that the connector points to the inside or down. So you can't see it on a side profile.
2. Move the Switch wires to the inside of the fuel vent line. Tie-wrap together. Fuel pump wire, tie-wrap on the center frame support so that it lifts from the cylinder heads.
Again, hope you take this the right way... and tell me to f* off if you don't
I will address the things you pointed out and is great feedback! Thanks! Those issues were ones that bugged me but didn't consider trying different angles to hide the connector! Thought I may have to live with seeing it, as I've seen others with the same connectors all showing!
Thanks again for encouraging me to do this myself! It is very self-rewarding!!
I have a number of mods to do that I will be relying on your build thread for guidance! Lights and shocks are atop that list!
#24
10-26-2013, 07:37 PM
Join Date: Jun 2013
Location: PEI, Canada
Posts: 253
Likes: 0
Received 0 Likes
on
0 Posts
So I was gonna make the sporty and most/all of the parts I wanted a winter project but it got the better of me way earlier than expected. I ordered a number of parts and instead of waiting I started putting them on.
I had some trouble with the shocks I ordered off a guy on here..... only one showed up. So we are working on resolving this with USPS. I had to find another pair and order those up as I still want them, so I was successful in finding another seller on here, HDForums, and they are at my aunt's house state side waiting for me to pick up. That mod will happen over the winter.
Handle bars still not installed as I figured that this will require some down time with the bike and as my season nears an end I don't want to have the bike out of commission on a day when I may still get out for a rip. This mod will happen over the winter.
The Custom Dynamics LED lights I ordered arrived and I installed them in front and rear. The front are the "Dynamic Rings". I am super happy with this product for quality, their appearance, and the practical application. Worthwhile upgrade! As a company they are fantastic to deal with, customer service is top notch!
I also did a HD signal relocation from the stock location, handlebars by mirrors, to the bottom tree on the front fork. Also put on HD smoked front signal visors to match the visors I put on the rear.


I got the all black bridge that covers up the head bolts and the spark plug area. Just a small finishing touch.


I replaced the clutch and brake levers with Bikers Choice O-series levers.
I also replaced the stock mirrors with HD Buckshot mirrors. Got these off another HDForum member.


I replaced the stock IRON upper belt guard with the RSD upper belt guard. The installed smoked front signal visors are more visible in the total bike shots here too.


I took some pictures of the bike after doing the installs. There is no step by step photos as most of these mods are very straight forward.
Of note, I did all of the mods listed myself, and continue to enjoy working on my bike myself. It is very rewarding and is a great feeling of accomplishment after the work is done and the bike still starts. LOL
In the photos you can also see that I took the time to properly line up the headlight with the front headlight visor/cowl. Much better looking now.
I had some trouble with the shocks I ordered off a guy on here..... only one showed up. So we are working on resolving this with USPS. I had to find another pair and order those up as I still want them, so I was successful in finding another seller on here, HDForums, and they are at my aunt's house state side waiting for me to pick up. That mod will happen over the winter.
Handle bars still not installed as I figured that this will require some down time with the bike and as my season nears an end I don't want to have the bike out of commission on a day when I may still get out for a rip. This mod will happen over the winter.
The Custom Dynamics LED lights I ordered arrived and I installed them in front and rear. The front are the "Dynamic Rings". I am super happy with this product for quality, their appearance, and the practical application. Worthwhile upgrade! As a company they are fantastic to deal with, customer service is top notch!
I also did a HD signal relocation from the stock location, handlebars by mirrors, to the bottom tree on the front fork. Also put on HD smoked front signal visors to match the visors I put on the rear.
I got the all black bridge that covers up the head bolts and the spark plug area. Just a small finishing touch.
I replaced the clutch and brake levers with Bikers Choice O-series levers.
I also replaced the stock mirrors with HD Buckshot mirrors. Got these off another HDForum member.
I replaced the stock IRON upper belt guard with the RSD upper belt guard. The installed smoked front signal visors are more visible in the total bike shots here too.
I took some pictures of the bike after doing the installs. There is no step by step photos as most of these mods are very straight forward.
Of note, I did all of the mods listed myself, and continue to enjoy working on my bike myself. It is very rewarding and is a great feeling of accomplishment after the work is done and the bike still starts. LOL
In the photos you can also see that I took the time to properly line up the headlight with the front headlight visor/cowl. Much better looking now.
Last edited by BlkSheep; 10-26-2013 at 07:41 PM.
#25
10-26-2013, 07:44 PM
Join Date: Jun 2013
Location: PEI, Canada
Posts: 253
Likes: 0
Received 0 Likes
on
0 Posts
I also bought/picked up the front axle and swing arm Willie-G bolt covers. They are still chrome and I'm trying to decide if I black them out or leave them chrome, or black out the front axle one and leave the swing arm one chrome.
I bought the rear axle bolt bar and shield cover.
These parts have yet to be installed as I only got them this week and need to decide what route I will take before putting them on the bike.
A few more parts are on the "To be ordered list".
I bought the rear axle bolt bar and shield cover.
These parts have yet to be installed as I only got them this week and need to decide what route I will take before putting them on the bike.
A few more parts are on the "To be ordered list".

#30
10-28-2013, 09:38 AM
Join Date: Jun 2013
Location: PEI, Canada
Posts: 253
Likes: 0
Received 0 Likes
on
0 Posts