
DIY: DK 587 Intake + Outlaw breather install for Iron 883 (or any sportster)
#1
 09-11-2013, 08:49 PM

Hello fellow knuckle draggers.
I’ve had some positive response in the past for posting a few pictorial DIY threads*, so when I decided it was finally time to swap my intake from stock to aftermarket, I figured I would post this.
*https://www.hdforums.com/forum/sport...exensions.html
*https://www.hdforums.com/forum/sport...k-no-lift.html
This is not designed for seasoned wrench turners, as this is a very simple job. What this is really for, is for the guys who are new to working on and modding bikes and are wondering if they can handle it. The answer is yes, just take is slow and focus on the details. The devil is always in the details.
Also: I may get some terms wrong. If you know the correct terms, feel free to correct me and I’ll edit the guide. Thanks.
Parts list:
1. DK Customs High Flow 587 Intake kit + anodized black breather bolts = $153.95
Tools list:
1. T27 Torx driver
2. � Inch socket, 14mm socket, wrench.
3. Hex keys: 3/16, 5/32, 1/8
4. 3/8 spanner
5. Antiseize compound
6. Threadlocker (blue or white, you choose)
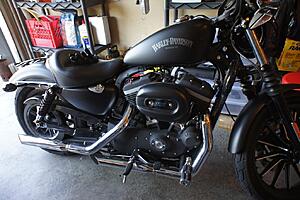
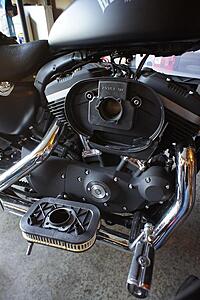
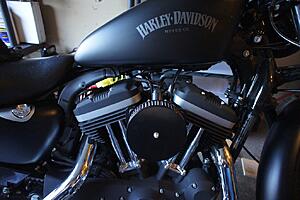
First, the before shot:
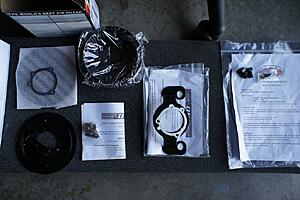
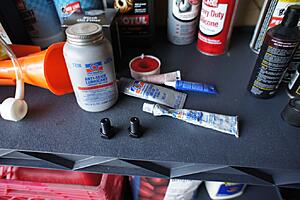
The kit, all laid out (filter, mounting hardware, breather bolts):
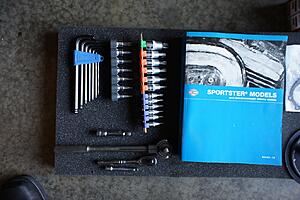
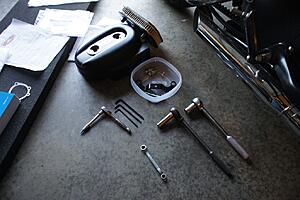
Tools, all laid out:
1. I like to organize this process by having a little Tupperware container, and every single part that comes off in this process, goes into it. That way I have everything in one place and its all separate from the new parts. This is optional but recommended.

2. Remove the two hex bolts that hold on the outer cover

3. Remove the cover plate, and cover, and set them aside.
4. Now you are looking at the filter, held on by three deep bolts that require the T27 torx key. Do not use a T25, as torx bolts seem to be designed for easy ruination. Go get a T27 and continue by removing the three bolts and pop off the filter.
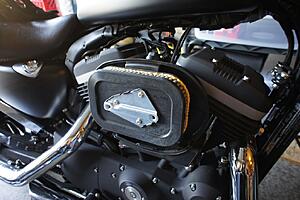
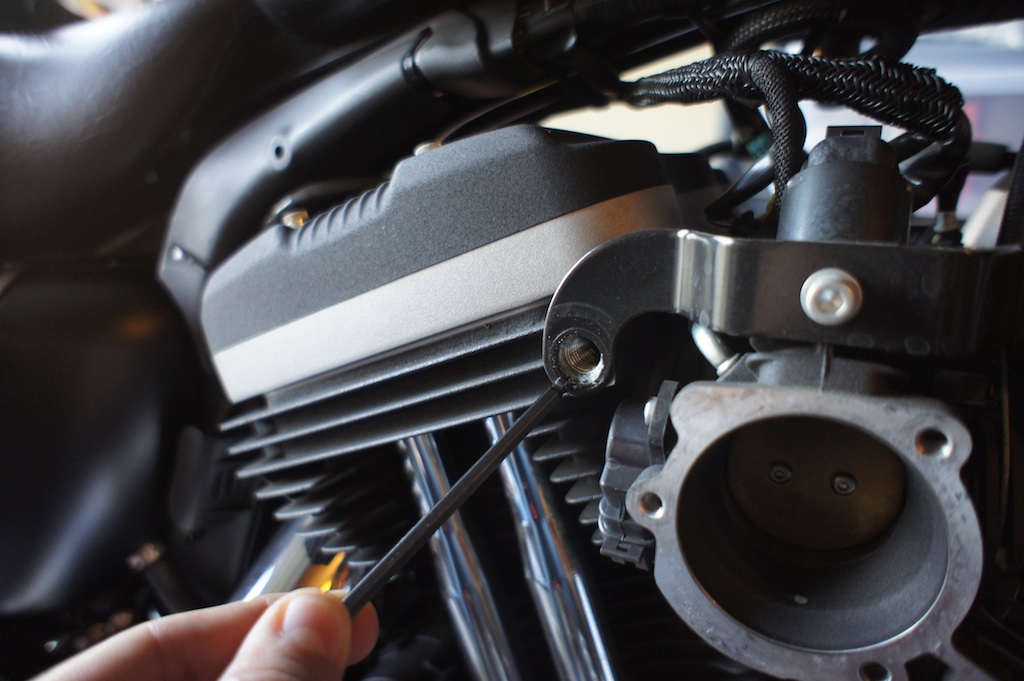
5. You are now staring at the intake manifold, throttle valve apparatus, and the back cover, held on by the factory breather bolts.
6. The best match I found for those bolts was my 14mm socket. That surprised me, and made me wonder if I was missing a few standard sockets…but anyway, the 14mm socket is perfect for removing the bolts.
7. NOTE: My breather bolts came out caked in white threadlock compound. That stuff is waxy and it left quite a bit of gunk on the mouth of the opening for each breather. I got out the shop vac and sucked all of it out careful not to knock any back into the engine.
Quick vacuum with the shop vac:
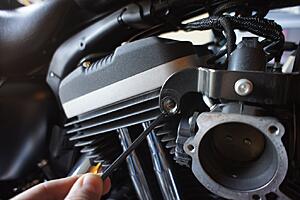
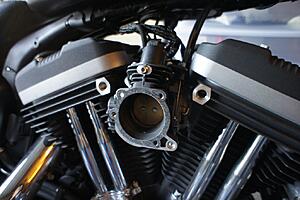
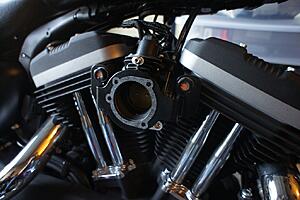
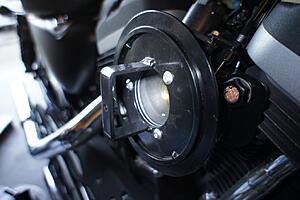
8. With the breather bolts removed, the back cover pretty much falls off and now you are looking at just the opening of the intake manifold.
9. There was a bracket that is held into the intake via one hex bolt, and the old breather bolts go through it. Remove it. In the DK kit, there is one lone stainless bolt that goes in this empty hole just to plug it, you can install that now with the threadlocker of your choice (I used the white high temp stuff).
10. You are done with the removal.
Next post, installation....
I’ve had some positive response in the past for posting a few pictorial DIY threads*, so when I decided it was finally time to swap my intake from stock to aftermarket, I figured I would post this.
*https://www.hdforums.com/forum/sport...exensions.html
*https://www.hdforums.com/forum/sport...k-no-lift.html
This is not designed for seasoned wrench turners, as this is a very simple job. What this is really for, is for the guys who are new to working on and modding bikes and are wondering if they can handle it. The answer is yes, just take is slow and focus on the details. The devil is always in the details.
Also: I may get some terms wrong. If you know the correct terms, feel free to correct me and I’ll edit the guide. Thanks.
Parts list:
1. DK Customs High Flow 587 Intake kit + anodized black breather bolts = $153.95
Tools list:
1. T27 Torx driver
2. � Inch socket, 14mm socket, wrench.
3. Hex keys: 3/16, 5/32, 1/8
4. 3/8 spanner
5. Antiseize compound
6. Threadlocker (blue or white, you choose)
First, the before shot:

The kit, all laid out (filter, mounting hardware, breather bolts):

Tools, all laid out:

1. I like to organize this process by having a little Tupperware container, and every single part that comes off in this process, goes into it. That way I have everything in one place and its all separate from the new parts. This is optional but recommended.

2. Remove the two hex bolts that hold on the outer cover

3. Remove the cover plate, and cover, and set them aside.
4. Now you are looking at the filter, held on by three deep bolts that require the T27 torx key. Do not use a T25, as torx bolts seem to be designed for easy ruination. Go get a T27 and continue by removing the three bolts and pop off the filter.

5. You are now staring at the intake manifold, throttle valve apparatus, and the back cover, held on by the factory breather bolts.
6. The best match I found for those bolts was my 14mm socket. That surprised me, and made me wonder if I was missing a few standard sockets…but anyway, the 14mm socket is perfect for removing the bolts.

7. NOTE: My breather bolts came out caked in white threadlock compound. That stuff is waxy and it left quite a bit of gunk on the mouth of the opening for each breather. I got out the shop vac and sucked all of it out careful not to knock any back into the engine.
Quick vacuum with the shop vac:

8. With the breather bolts removed, the back cover pretty much falls off and now you are looking at just the opening of the intake manifold.
9. There was a bracket that is held into the intake via one hex bolt, and the old breather bolts go through it. Remove it. In the DK kit, there is one lone stainless bolt that goes in this empty hole just to plug it, you can install that now with the threadlocker of your choice (I used the white high temp stuff).

10. You are done with the removal.
Next post, installation....
Last edited by parabellum_9x19; 09-11-2013 at 09:44 PM.
#2
09-11-2013, 08:50 PM
Continued: Installation of the DK 587 Intake and Outlaw Breather Bolts...
Installation of the DK 587 Intake kit:
1. Apply high temp antiseize compound to the threads on the breather bolts. You can probably use locktite also, but I like the metallic stuff that I use on sparkplugs and o2 sensors. This is pretty important. Even with anodized bolts, you can get something called Galvanic Corrosion anytime you have two different metals or alloys pressed against each other. Add heat and time, and without some kind of heat tolerant anti-seize compound in there, it can lead to problems later.
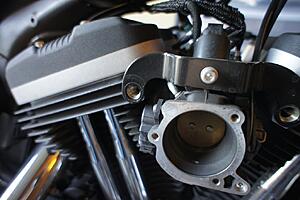
2. You will need to line up the following: The main mounting bracket, one gasket (two come in the kit), and the outlaw breather bolts AND WASHERS. This is where I think people could mess up. You need to make sure the following are happening:
a. One gasket will be applied to the front face edge of the intake manifold opening. Line it up with the holes carefully and stick it on.
b. Hold up the bracket to the manifold. What you will probably find, is that when the bracket mouth makes a nice seat onto the gasket you just stuck onto the manifold, there is a small gap between it and the heads, where the breather bolts go through the bracket. USE WASHERS to fill that gap, do NOT just crank down on things to make them flush.
c. Also use washers between the breather bolt heads and the main mounting bracket. Now you should have no washers left in the kit except for a tiny plastic one. That comes later.
d. Install the breather bolts and CAREFULLY SET THEIR TORQUE , noting that they are torqued in INCH POUNDS, not foot pounds. I don’t have an inch pound torque wrench so I set them carefully by hand. Note that they are � size and that means you might grab a rather large wrench for this…do NOT USE BIG TORQUE on these bolts or bad things will happen.
3. Next, you will install the final gasket (see pic above).
4. Next, the intake filter frame goes on with the three hex head bolts. Do not forget to apply locktite to these screws!
a. This is an important part: at this point, there should be a complete seal that goes:
Intake manifold <> Gasket 1 <> Main bracket <> Gasket 2 <> Intake filter frame
b. Make sure that this is a seal by inspecting it with good light and verify that there are no gaps. If there are gaps, either you messed up, or the kit is out of spec.
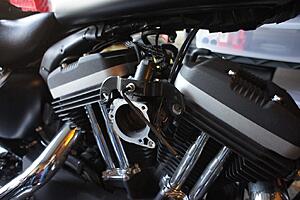
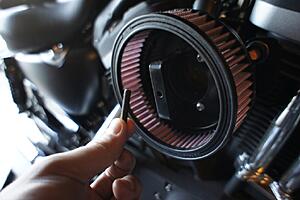
5. Lastly, install the K&N filter and the intake top plate. It comes with a funky threaded insert that is all thread. That goes in the intake filter frame and sticks through the top plate, and the round head (silver or brass) nut goes over that, and this is where you finally use that little plastic washer. I used a 3/8 spanner to tighten the top plate. Again, use locktite and do NOT overtighten it.
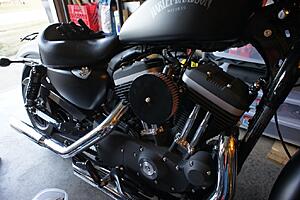
All done:
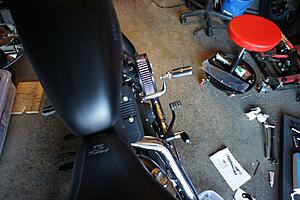
Last shot - All the removed parts plus every tool I used:
That is it. Go over everything you can see, and make sure you didn’t end up with extra pieces.
At this point all you can do is go ride your bike and pay attention to the temps, as with any intake installation, there is a chance that you could end up running a bit lean.
In my case, I’m running Cycle Shack slip ons with the cycle shack baffles, Xieds, and now the DK intake and I just put 30 miles on my bike, it ran like a champ. No problems, no ping, no pop on decal, no high temps (oil was 210f at the end of 30 miles on the highway in 85f heat).
So, how do I know its not running hot?
1. No color change on the head pipes. I can see my head pipes with a flashlight and the minimal bluing that is there has not changed or moved even though the bike was run long enough for it to show (usually pipes will blue in a few minutes).
2. No real temp change at the oil dipstick.
3. I touch the top of the rocker box sometimes, just to feel how hot the rockers are. I did that after this mod just like I often do, and it felt the same. I agree this is NOT scientific, I actually have a pyrometer but its on the fritz at the moment :-(
4. No smoke or visible oil mist from the breathers.
In my case, looks like this kit is going to run perfectly, hope you enjoyed the install!
Installation of the DK 587 Intake kit:
1. Apply high temp antiseize compound to the threads on the breather bolts. You can probably use locktite also, but I like the metallic stuff that I use on sparkplugs and o2 sensors. This is pretty important. Even with anodized bolts, you can get something called Galvanic Corrosion anytime you have two different metals or alloys pressed against each other. Add heat and time, and without some kind of heat tolerant anti-seize compound in there, it can lead to problems later.

2. You will need to line up the following: The main mounting bracket, one gasket (two come in the kit), and the outlaw breather bolts AND WASHERS. This is where I think people could mess up. You need to make sure the following are happening:
a. One gasket will be applied to the front face edge of the intake manifold opening. Line it up with the holes carefully and stick it on.

b. Hold up the bracket to the manifold. What you will probably find, is that when the bracket mouth makes a nice seat onto the gasket you just stuck onto the manifold, there is a small gap between it and the heads, where the breather bolts go through the bracket. USE WASHERS to fill that gap, do NOT just crank down on things to make them flush.
c. Also use washers between the breather bolt heads and the main mounting bracket. Now you should have no washers left in the kit except for a tiny plastic one. That comes later.
d. Install the breather bolts and CAREFULLY SET THEIR TORQUE , noting that they are torqued in INCH POUNDS, not foot pounds. I don’t have an inch pound torque wrench so I set them carefully by hand. Note that they are � size and that means you might grab a rather large wrench for this…do NOT USE BIG TORQUE on these bolts or bad things will happen.

3. Next, you will install the final gasket (see pic above).
4. Next, the intake filter frame goes on with the three hex head bolts. Do not forget to apply locktite to these screws!
a. This is an important part: at this point, there should be a complete seal that goes:
Intake manifold <> Gasket 1 <> Main bracket <> Gasket 2 <> Intake filter frame
b. Make sure that this is a seal by inspecting it with good light and verify that there are no gaps. If there are gaps, either you messed up, or the kit is out of spec.

5. Lastly, install the K&N filter and the intake top plate. It comes with a funky threaded insert that is all thread. That goes in the intake filter frame and sticks through the top plate, and the round head (silver or brass) nut goes over that, and this is where you finally use that little plastic washer. I used a 3/8 spanner to tighten the top plate. Again, use locktite and do NOT overtighten it.


All done:


Last shot - All the removed parts plus every tool I used:

That is it. Go over everything you can see, and make sure you didn’t end up with extra pieces.
At this point all you can do is go ride your bike and pay attention to the temps, as with any intake installation, there is a chance that you could end up running a bit lean.
In my case, I’m running Cycle Shack slip ons with the cycle shack baffles, Xieds, and now the DK intake and I just put 30 miles on my bike, it ran like a champ. No problems, no ping, no pop on decal, no high temps (oil was 210f at the end of 30 miles on the highway in 85f heat).
So, how do I know its not running hot?
1. No color change on the head pipes. I can see my head pipes with a flashlight and the minimal bluing that is there has not changed or moved even though the bike was run long enough for it to show (usually pipes will blue in a few minutes).
2. No real temp change at the oil dipstick.
3. I touch the top of the rocker box sometimes, just to feel how hot the rockers are. I did that after this mod just like I often do, and it felt the same. I agree this is NOT scientific, I actually have a pyrometer but its on the fritz at the moment :-(
4. No smoke or visible oil mist from the breathers.
In my case, looks like this kit is going to run perfectly, hope you enjoyed the install!
Last edited by parabellum_9x19; 09-11-2013 at 09:59 PM.
#3
09-11-2013, 08:55 PM
Also I have a very short video that is getting uploaded now....
As I mentioned above, I put 30 miles on the bike tonight, and a lot of it was WOT flat out up through the gears to really stress on the bike...but it ran just like it always does, cool and like a clock.
Differences I notice:
1. More leg clearance, better looks.
2. I can hear the sucking of the intake now, a sound that I love. Its nice to hear both ends of the bike when it runs. Crack the throttle at idle and I can easily hear it make that awesome pumping sound.
3. There is a small amount of fumage, in the sense of vapors you can smell when you are sitting at idle. I figure this is the same for all direct-to-air breathers as my Buell had the same effect when I re-routed the breathers on it. It doesn't bother me (smells like freedom!) but it might bother your old lady. You might smell more manly. Be advised.
Last edited by parabellum_9x19; 09-11-2013 at 09:25 PM.
#4
09-11-2013, 09:14 PM
Road Captain
#5
09-11-2013, 10:44 PM

#6
09-11-2013, 11:16 PM
Here is one more shot, its a comparison of the stock filter and the new one:

Also, the stock filter had a lot of bugs in it. Way more than I expected. The stock design pretty much ensures that any bugs sucked into that front facing intake opening would end up embedded in the filter.
Time will tell how the new exposed design works.
I'll keep the thread updated.

Also, the stock filter had a lot of bugs in it. Way more than I expected. The stock design pretty much ensures that any bugs sucked into that front facing intake opening would end up embedded in the filter.
Time will tell how the new exposed design works.
I'll keep the thread updated.
#7
09-11-2013, 11:23 PM
Intermediate
Join Date: Sep 2012
Location: Denver
Posts: 47
Likes: 0
Received 0 Likes
on
0 Posts
Para,
Great write-up. I read through it to double check myself and my install process.
Word to the wise, locktite that acorn nut (sorry if I missed you saying that in the write-up). Otherwise, you might turn a corner and lose your air cleaner cover 100 yards from your driveway. Not that I have any personal experience with that or anything...
Also, good to see that you can also smell the "freedom," I thought I might have a leak somewhere when I initially smelled it, but after a couple rides, and no noticeable problems after my initial teething pains, I took it as a normal by-product of the vent-to-atmosphere bolts.
Question for you, I know you said you're running the CS baffles, any idea what size they are? When I look in my pipes I have a cheese grater style baffle welded to the inside of the pipe, is that the same as you have?
Good looking bike, thanks again for the pictures and install.
-Wildcat
Trending Topics
#8
09-11-2013, 11:45 PM
Para,
Great write-up. I read through it to double check myself and my install process.
Word to the wise, locktite that acorn nut (sorry if I missed you saying that in the write-up). Otherwise, you might turn a corner and lose your air cleaner cover 100 yards from your driveway. Not that I have any personal experience with that or anything...
Also, good to see that you can also smell the "freedom," I thought I might have a leak somewhere when I initially smelled it, but after a couple rides, and no noticeable problems after my initial teething pains, I took it as a normal by-product of the vent-to-atmosphere bolts.
Question for you, I know you said you're running the CS baffles, any idea what size they are? When I look in my pipes I have a cheese grater style baffle welded to the inside of the pipe, is that the same as you have?
Good looking bike, thanks again for the pictures and install.
-Wildcat
Great write-up. I read through it to double check myself and my install process.
Word to the wise, locktite that acorn nut (sorry if I missed you saying that in the write-up). Otherwise, you might turn a corner and lose your air cleaner cover 100 yards from your driveway. Not that I have any personal experience with that or anything...
Also, good to see that you can also smell the "freedom," I thought I might have a leak somewhere when I initially smelled it, but after a couple rides, and no noticeable problems after my initial teething pains, I took it as a normal by-product of the vent-to-atmosphere bolts.
Question for you, I know you said you're running the CS baffles, any idea what size they are? When I look in my pipes I have a cheese grater style baffle welded to the inside of the pipe, is that the same as you have?
Good looking bike, thanks again for the pictures and install.
-Wildcat
As for the locktite, I used either white locktite or antiseize on literally set of threads in the process.
I'm actually going to do a 1200-1400 mile road trip to Deal's Gap next month. You can bet that a spare nut for that air cleaner is going to be in my kit. I might even safety wire it, safety wire looks badass if you twist it right.

#9
09-12-2013, 11:02 AM
Sponsor
Parabellum,
AWESOME WRITE UP!!!!! I love pointing people to these threads when they want pictures with the instructions!! Bike looks awesome!! Have fun on your trip you are taking!
P.S. be sure to send those pictures of the black breather bolts to us...
AWESOME WRITE UP!!!!! I love pointing people to these threads when they want pictures with the instructions!! Bike looks awesome!! Have fun on your trip you are taking!
P.S. be sure to send those pictures of the black breather bolts to us...
__________________
www.DKCustom.com
662-252-8828 Voice
662-420-4891 Text & Voice
Support@DKCustomProducts.com

www.DKCustom.com
662-252-8828 Voice
662-420-4891 Text & Voice
Support@DKCustomProducts.com
#10
09-12-2013, 11:16 AM
Let me know if you want better/more pics of the breather bolts, I can throw a different lens on my camera and get you some great closeups!
Last edited by parabellum_9x19; 09-12-2013 at 11:26 AM.