
Starting a home made 2 into 1..........
#1
 07-06-2014, 12:02 AM

I bought an 04 Sportster last year to tinker with. When I got it it was just running the stock header pipes with no mufflers so I bought a couple of short baffles and some turnout tips from Moon Eyes. I ran that low buck setup last year, but since I'm a tinkerer I decided I wanted to try my hand at making my own 2-1 exhaust. I picked up a 1-2 exhaust tip to use as the collector and a couple of 18" x 1 3/4" pieces of straight pipe at O'Reilly's today for $34 out the door. No one had any U bends so I ordered two of them from Summit and they should be here Tuesday or Wednesday.
While I'm waiting for those to show up I went ahead and started mocking up the front cylinder pipe and figuring out how I'm going to get around the mid control. While doing this I discovered that if I weld the two 1 3/4" turnouts together I make an "S" bend that is the perfect size to run one pipe under the peg and one over the peg. Here are a couple of pics from the mock up this evening. The end result if I get it right will be equal length head pipes.
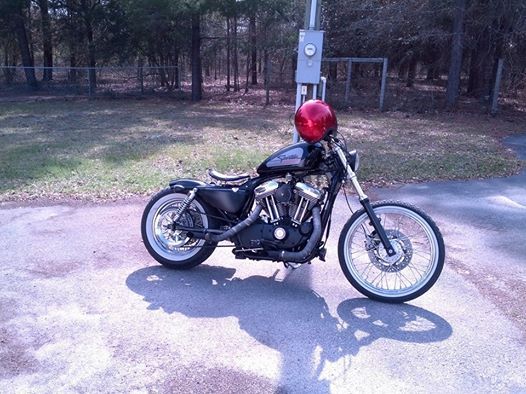
Here is how it has been for the last year with the turnouts.
Parts so far.

First part of mock up.

The two turn outs that will get welded together tomorrow.

My initial thought, but after looking at it I'll use the "S" bend on the bottom to get the muffler a little higher.

Right now I have three options for mufflers/baffles. Use the short "can opener" baffles in the y pipe, cut and modify a stock muffler that I already have with the center punched out, or pull a baffle from another slip that I have and fit it into the 2 1/4" piece of pipe I have. Right now I'm leaning towards the can opener baffles in the y pipe since it is the easiest option and it would allow me to put a 2 1/4" turnout and keep the tail pipe relatively short.
I'll update as I get stuff done. I hope to be done by next weekend if the U bends come on time.
While I'm waiting for those to show up I went ahead and started mocking up the front cylinder pipe and figuring out how I'm going to get around the mid control. While doing this I discovered that if I weld the two 1 3/4" turnouts together I make an "S" bend that is the perfect size to run one pipe under the peg and one over the peg. Here are a couple of pics from the mock up this evening. The end result if I get it right will be equal length head pipes.
Here is how it has been for the last year with the turnouts.

Parts so far.

First part of mock up.

The two turn outs that will get welded together tomorrow.

My initial thought, but after looking at it I'll use the "S" bend on the bottom to get the muffler a little higher.

Right now I have three options for mufflers/baffles. Use the short "can opener" baffles in the y pipe, cut and modify a stock muffler that I already have with the center punched out, or pull a baffle from another slip that I have and fit it into the 2 1/4" piece of pipe I have. Right now I'm leaning towards the can opener baffles in the y pipe since it is the easiest option and it would allow me to put a 2 1/4" turnout and keep the tail pipe relatively short.
I'll update as I get stuff done. I hope to be done by next weekend if the U bends come on time.
#3
07-06-2014, 04:53 AM
Club Member
#5
07-06-2014, 08:53 AM
#6
07-06-2014, 10:17 AM
Is it just my poor eyesight or an optical illusion that the rear fender on that bike isn't centered on the rear wheel? Sorry if I'm wrong but that was the first thing I noticed when looking at the first & third pictures you posted up.
A great tool for figuring out radii's and pipe bends is to locate the type of foam used in the upholstery industry/business. Often referred to as "piping" in the smaller diameters it can be purchased by the linear foot in a wide range of different diameters to emulate the diameter of your intended exhaust pipe material:

It's very easy to use this stuff to "mock up" around existing non-moveable entities such as foot pegs, controls, etc., and once you find that just right position, you use thin metal rods [like TIG welding wire] to pierce through the material [like ie., skewering an "S" shape with the wire to form into a $ sign] to hold it in place, which you can then "pin" it into shape onto a paper/stiff foam board [typically found at craft stores]. Now you have the shape you need to copy, and have only to replicate it using this form as a guide in your desired metal tubing. Any "tweaking" either in or out off of the flat plane is easily accomplished using spacers between the foam and support board or during final assembly. Also, if you'd like to get as close to a "tuned" exhaust as you can, you simply use two identical lengths of this foam tubing to go from engine ports to where they meet and voila'...you've got equal lengths of pipe which equates to equal amounts of exhaust pressure/volume.
Another idea is to use empty paper towel tubes. My Dad years ago restored a one of only 76 made vintage 1958 Porsche RSK Spiders, and to form his mock up for exhaust pipe fabrication where there were radius' required, he cut sections of paper towel tube into faceted pieces and simply taped them together to emulate the required radius', and when time came to make the bends the fabricator simply copied the cardboard pieces and TIG'd them together. Granted, these radius' weren't "smooth" but they were too tight to form on the current equipment available to the fabricator and were out of sight anyway.
Here's a website that will give you an idea of what's available in foam and it's associated cost:
http://www.foamforyou.com/standard_backer_rod_tubes.htm
Hats off for trying your hand at the homebuilt 2-into-1, I hope it turns out well when you get the rest of the parts and git 'er all fab'd & welded up!!
=8^)
A great tool for figuring out radii's and pipe bends is to locate the type of foam used in the upholstery industry/business. Often referred to as "piping" in the smaller diameters it can be purchased by the linear foot in a wide range of different diameters to emulate the diameter of your intended exhaust pipe material:
It's very easy to use this stuff to "mock up" around existing non-moveable entities such as foot pegs, controls, etc., and once you find that just right position, you use thin metal rods [like TIG welding wire] to pierce through the material [like ie., skewering an "S" shape with the wire to form into a $ sign] to hold it in place, which you can then "pin" it into shape onto a paper/stiff foam board [typically found at craft stores]. Now you have the shape you need to copy, and have only to replicate it using this form as a guide in your desired metal tubing. Any "tweaking" either in or out off of the flat plane is easily accomplished using spacers between the foam and support board or during final assembly. Also, if you'd like to get as close to a "tuned" exhaust as you can, you simply use two identical lengths of this foam tubing to go from engine ports to where they meet and voila'...you've got equal lengths of pipe which equates to equal amounts of exhaust pressure/volume.
Another idea is to use empty paper towel tubes. My Dad years ago restored a one of only 76 made vintage 1958 Porsche RSK Spiders, and to form his mock up for exhaust pipe fabrication where there were radius' required, he cut sections of paper towel tube into faceted pieces and simply taped them together to emulate the required radius', and when time came to make the bends the fabricator simply copied the cardboard pieces and TIG'd them together. Granted, these radius' weren't "smooth" but they were too tight to form on the current equipment available to the fabricator and were out of sight anyway.
Here's a website that will give you an idea of what's available in foam and it's associated cost:
http://www.foamforyou.com/standard_backer_rod_tubes.htm
Hats off for trying your hand at the homebuilt 2-into-1, I hope it turns out well when you get the rest of the parts and git 'er all fab'd & welded up!!
=8^)
Last edited by DrewBone; 07-06-2014 at 10:44 AM. Reason: of corse too korrect spellink
#7
07-06-2014, 02:17 PM
Thanks Drew, it must be the angle of the picture, the tire and fender are centered. I was able to get it all mocked today except for the rear pipe leading to the collector. That part should be pretty simple as soon as the two U bends get here. I'm a $hitty welder so it's a good thing they will be covered with exhaust tape. I'm not worried about them holding or leaking, they just aren't very pretty beads. I just don't weld enough to get better.
I think I may go with the 9-12" turnout for the tail pipe rather this 18" straight pipe. The rear pipe will come forward and make a u-turn into the top half of the collector.

I think I may go with the 9-12" turnout for the tail pipe rather this 18" straight pipe. The rear pipe will come forward and make a u-turn into the top half of the collector.

Trending Topics
#8
07-06-2014, 02:59 PM
#9
07-06-2014, 05:08 PM
#10
07-06-2014, 07:58 PM
Total Kudos to you for trying what I gave up on: I had the Fleabay 2-1 collector piece picked, some piping and plans, but I discovered the affordable Patriot Defenders 2-1 with adjustable gate and glasspack, and was sold, for about $178.00 -the sound is awesome with gate half open. I'd 86 the beercan baffles if I were you. Glass will ALWAYS sound better, unless you LIKE nasally, blatting fartcans, and isn't that hard to fab up. At your level, I'd tack everything and take it to the local welders for finish pricing. Even tiny holes make a bike sound like $hit.