
How I Checked Cam Chain Tensioners on TC88 03 RKC
#1
 04-27-2010, 08:00 PM

So, about a year or so ago I started asking questions on here about how to inspect the cam chain tensioners, what the problems were, what the options were on how to fix them. I read many threads on here that would have some good bits of info here and there, but there was no concise thread about the problems or even how to check them, at least that I could find at the time.
I created this thread asking my questions after my research:
https://www.hdforums.com/forum/touri...d-options.html
Post #9 in that thread I copied what I emailed to my friend, doing my best to explain the problem to him, and what I had learned the possible solutions are if your cam chain tensioners fail: https://www.hdforums.com/forum/4807647-post9.html
Well, guess what, that was the beginning of riding season and I never got around to it, and for one reason or another didn't get to it this winter. My warranty was expiring at the end of this month, and I wanted to inspect them before that, because I now have 30k on the bike, and would feel pretty stupid if I did all that research and didn't act on it, especially if they failed shortly after the warranty period.
So, my friend I referenced in the other thread who still needed to inspect his tensioners offered to help me (do most of the work, actually) since he's a more experienced wrench, and the fact I'm still recovering from knee surgery from a wreck I was in a couple years ago. Anyway, here's what we did...
Ironically, when searching on the subject again, the easiest step by step tutorials on how to strip the bike down enough to check the tensioners were from the UK, at least w/ pics.
The first link I found was very helpful w/ pics and everything about how to prepare and take it down: http://www.harley-davidson-hangout.c...ner-check.html
My friend plans to change his whenever he inspects them, and wanted to know what was involved to go a step further and get behind the cam plate, so I saved this link for him: http://www.harleyhog.co.uk/tensionerinstall.htm
Good thing I saved that second link, because it gave me a crucial tip when we got in a bind, while going from the advice in the first thread. See, the first guy has same motor, but different frame and no floorboards, but the second guy had a more similar frame and floorboards, which made a difference in the first part of the process, removing the front pipe.
HERE WE GO:
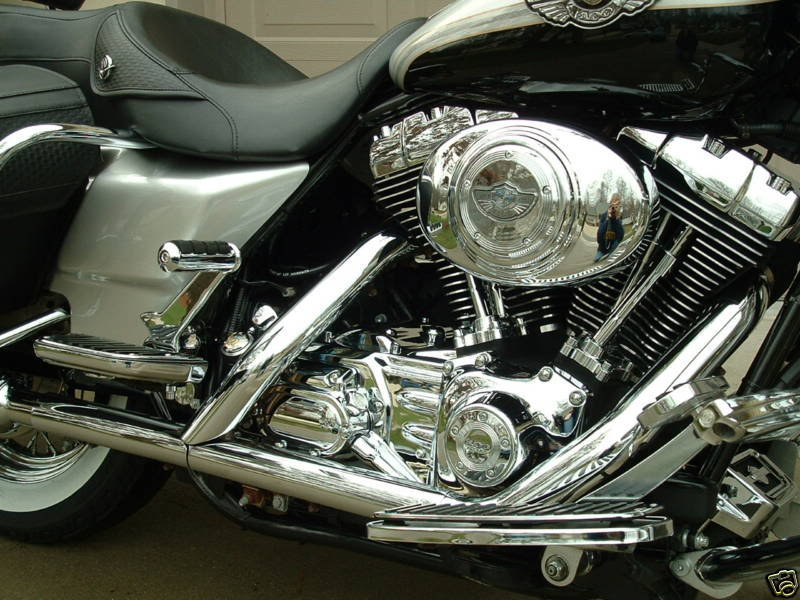
So, if you want to check your cam chain tensioners, you have to get to that box immediately behind the floorboards in this 'before' pic:
REMOVE FRONT PIPE:
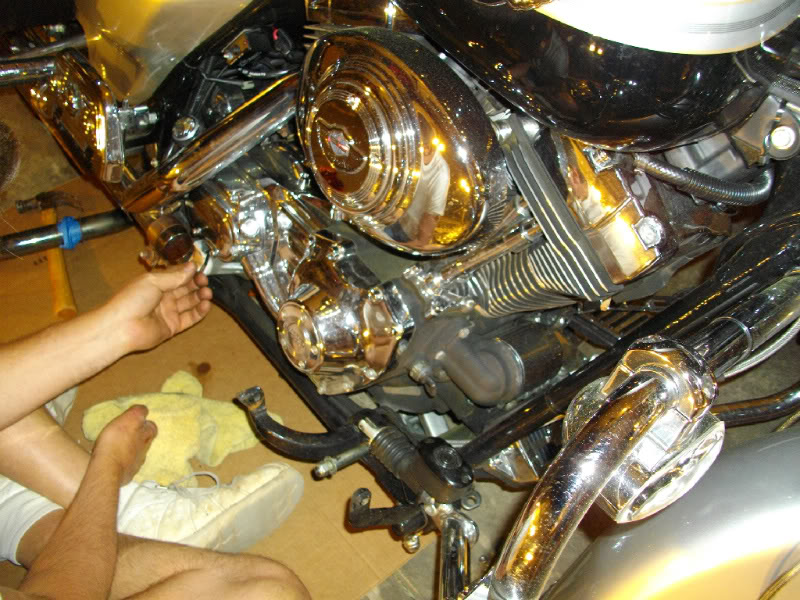
In order to do that, you need to remove the front pipe. In a relatively stock format, this means you have a Y pipe coming out of the back of the rear head, and part of that goes down the right side and merges with the front pipe and continues to go out the back. The heat shields need to be removed via their adjustable clamps, then you have to loosen or remove clamps that combine the front and rear pipe on that right side. You have to remove the nuts from the flange to get the front pipe out of the front head.
Now in order to actually get the pipe OUT at this point, in our case you had to move the front pipe forward quite a bit and spin it out between the frame and the head. That is, unless you want to remove a lot more exhaust pipes since it's all connected together in a stock set up. We used a spray lubricant to loosen the joint and worked the pipe forward, but it was hitting the floorboard, and the right downtube, and there was no way we were going to spin it out from there, no clearance.
This is the point where I realized guy #1 had a different frame and no floorboards, and pulled up thread #2, while the first guy had a more straightforward approach to just CHECKING the tensioners, which is what I wanted to do, the second guy did have some useful tips on how to get it out of a touring bike.
He suggested bleeding the rear brake line and tying down the pedal. We chose to remove the brake pedal, which includes removing a small cotter pin that connects the pedal to the cable, and once removed, you can remove the larger pin, and unbolt the brake pedal.
He also suggested removing the floorboard, which we did. We chose to remove the chrome part from the bracket, and leave the bracket in place, as you can see here, once we removed the pipe:
Now, once we loosened the pipe, and removed the brake pedal and floorboard, we still didn't have enough clearance, so that's when I remembered the third tip from the second thread, jacking up the motor. Per his suggestion, we removed the front motor mount, and used a scissor jack from my car to gently and slowly jack up the front of the motor, making sure not to hit anything (motor to tank or other devices, have to watch the left side where it would have started to hit on mine).
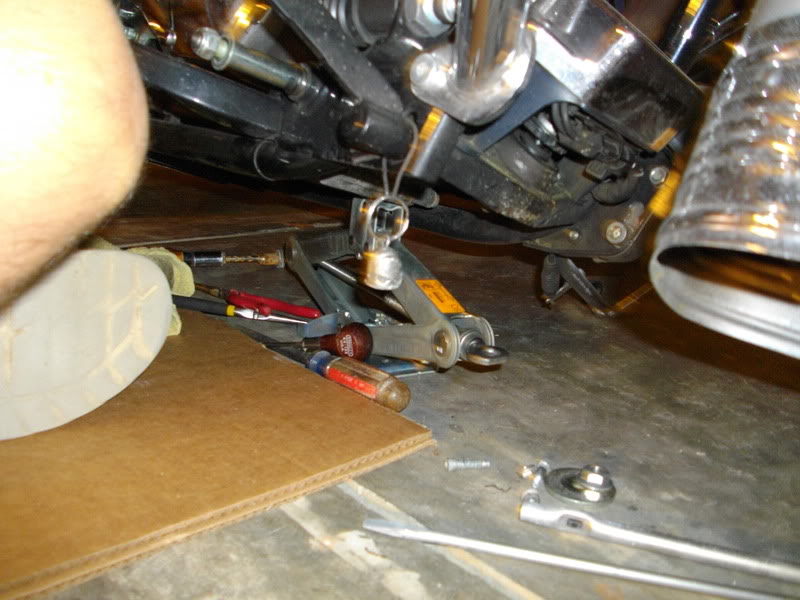
NOTE: As you can see in the pic, we did this on the jiffy stand (kick stand for normal people), as opposed to the other thread people who used a bike jack. I didn't have a jack anymore, although I do plan on getting one, but my friend pointed out that we'd lose less oil and have a better working angle if we just left it on the stand, so we did. Therefore, when we jacked up the motor, we had a stable platform to work on getting that pipe out of there. This little bit of added clearance made for an easy spin to get the front pipe out.
You may be able to reuse the gasket for the front pipe, but if you plan ahead you might as well get one in advance to slap back in there to be sure.
REMOVE CAM CASE COVER:
Next you'll be able to take off the cam cover, the big ol' case, not just the little cover in the middle. Again, you may want to have a gasket handy for replacing this cover, although if you're a risk taker you might be able to reuse the one that's on there.
This cover on my bike takes a big allen wrench, don't remember the size. The hardest part of this portion of the job was getting those little chrome caps off that I happen to have on my bike. I cracked a few, after a few days of riding w/ no leaks, I put them back on, but not sure if they'll stay permanently, I may have to buy some new ones.
Once the cover is removed, this is what's inside:
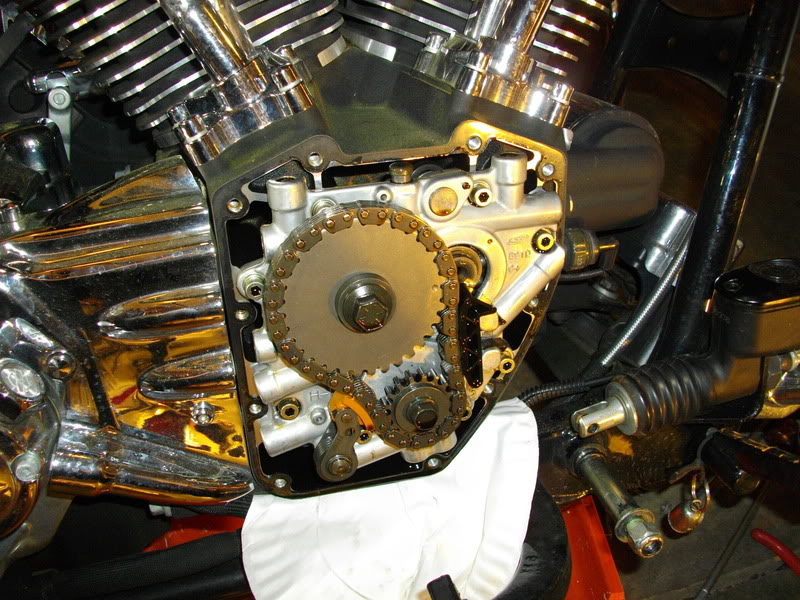
See the outer tensioner in lower left. Looks pretty clean in there, that's a good thing. This is also a good shot showing the short cable to the rear brake master cylinder, you can see the hole the big pin goes through the brake pedal itself, and this cable end. Notice also on the jiffy stand virtually no oil leaked out. I was about a 1/8-1/4 quart low at the time, don't know if that made a difference or not. I put a plate below that and a paint roller tray below in case I did lose anything.
INSPECTING OUTER TENSIONER:
So, it's under pressure, you need to get it off the chain to look at the surface, but first you can get an idea how it's wearing by looking down the side:
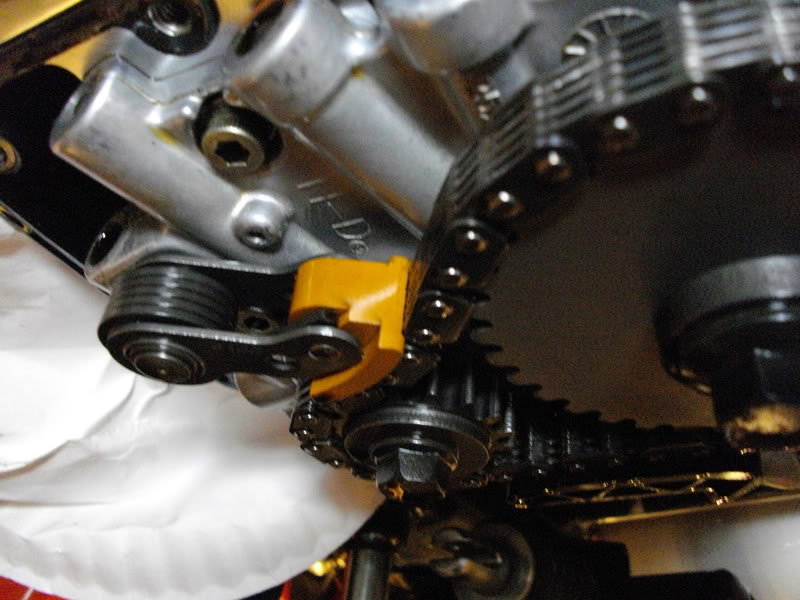
Now, in both those threads they have a tool to release the tension on the spring, I didn't have one. So we used a small crescent wrench to grab that metal arm below the shoe, then we used a larger crescent wrench to turn the other wrench, allowing us to get the tensioner off the chain. In the above pic you can see a small hole behind the tensioner, this allows you to stick a pin through the arm into the cam plate, and hold it open in place, off the chain. I didn't have a specific pin like they did, so I used a small allen wrench to stick in there.
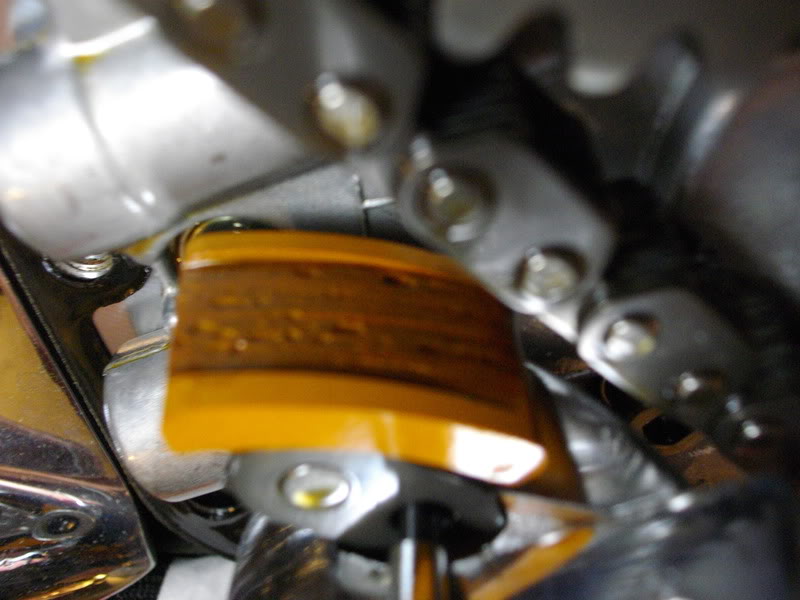
Here is the surface of the outer tensioner. Reasonable wear, but I don't like the pitting. If you do some searches you'll see this is pretty common, and as they wear down further the problem gets worse. It's those missing chunks that eventually get worse and cause problems gumming up your filter, potentially damaging your oil pump or engine, the whole reason behind doing these checks. At least mine aren't worn too bad, not even 50% after 30k miles on an '03.
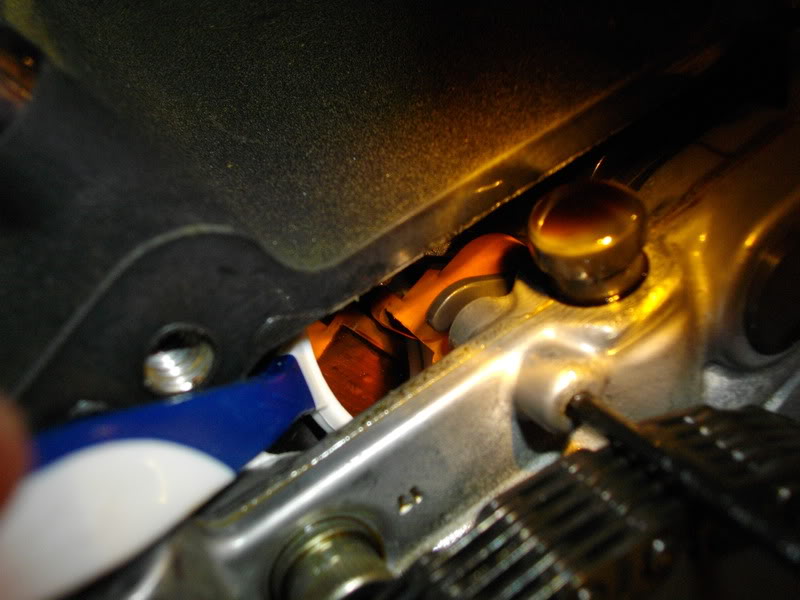
INSPECTING THE INNER TENSIONER:
So, if you look at the first guy's thread I linked to, he's got some great pictures in there w/ detailed text, lines and circles indicating what everything is. I'm too lazy to do that, since he already did, but just in case you're too lazy to read his thread, you can look up at the pic of the open case above and see a gap at the top of the cam plate. There's also a small hole up there. This is where everyone talks about sticking the dental mirror in there to check the inner tensioner. I didn't know what they were talking about until I saw pictures for myself, and then did it. That little hole also allows you to stick a pin in there and hold the tensioner open, so you can inspect the surface via the dental mirror. Before you can do that, you have to stick a small screw driver in there and leverage up the 'hook' on the inner tensioner.
Once I leveraged up the inner tensioner w/ the screwdriver, I stuck the allen wrench through the little hole, and stuck the dental mirror in there for inspection. I highly recommend getting the dental mirror ahead of time, and getting one w/ a very long and slim neck on it. The first one I had was short and fat and would not fit through the gap AT ALL. I had to go to the store and by the one you see in the pic, and it was too fat to stick in there while the tensioner was in the 'up' position, so I had to put in the mirror first, then pry it up w/ the screwdriver, stick in the allen wrench, then remove the screwdriver so I could reposition the mirror to see. Some of the dental mirrors come w/ lights on them, I couldn't find one in a hurry, so used what I had.
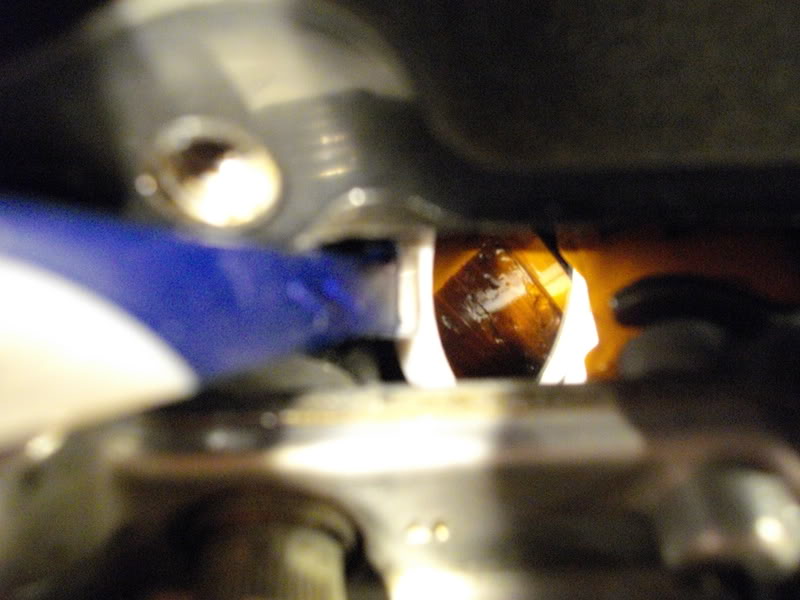
This pic is good showing the wear as far as depth. The top edge of this hits the chain more and should be the worst worn area, the bottom edge is much less worn usually. By my view I see my inner tensioner is more worn than the outer one, which is consistent with reports from others on this forum and other resources. Often it seems the outer one will still look within limits, while the inner one has completely failed. Some speculate that it gets less oil on it being at the top like that, and inside the cam plate, and that it does tend to put more pressure on the top end of the tensioner, whereas the outer one seems to make contact more evenly. Anyway, mine was worn more inside, but still less than 50%
Here is a pic of the surface:
I have more pics but you get the idea.
So, now that they've been inspected, I can release the inner tensioner again by removing the pin I put in there. Then bolt it all back up, replacing gaskets as necessary, and being aware of any torque values etc.
I have a service manual, but it's not much help in regards to inspecting these things, the best thing about the service manual in this case is the 'blow out' picture of this area and the torque values, imo. Without the two internet tutorials I would have been lost.
Anyway, I hope that helps someone. Thanks to the forum for your past and future help.
I created this thread asking my questions after my research:
https://www.hdforums.com/forum/touri...d-options.html
Post #9 in that thread I copied what I emailed to my friend, doing my best to explain the problem to him, and what I had learned the possible solutions are if your cam chain tensioners fail: https://www.hdforums.com/forum/4807647-post9.html
Well, guess what, that was the beginning of riding season and I never got around to it, and for one reason or another didn't get to it this winter. My warranty was expiring at the end of this month, and I wanted to inspect them before that, because I now have 30k on the bike, and would feel pretty stupid if I did all that research and didn't act on it, especially if they failed shortly after the warranty period.
So, my friend I referenced in the other thread who still needed to inspect his tensioners offered to help me (do most of the work, actually) since he's a more experienced wrench, and the fact I'm still recovering from knee surgery from a wreck I was in a couple years ago. Anyway, here's what we did...
Ironically, when searching on the subject again, the easiest step by step tutorials on how to strip the bike down enough to check the tensioners were from the UK, at least w/ pics.
The first link I found was very helpful w/ pics and everything about how to prepare and take it down: http://www.harley-davidson-hangout.c...ner-check.html
My friend plans to change his whenever he inspects them, and wanted to know what was involved to go a step further and get behind the cam plate, so I saved this link for him: http://www.harleyhog.co.uk/tensionerinstall.htm
Good thing I saved that second link, because it gave me a crucial tip when we got in a bind, while going from the advice in the first thread. See, the first guy has same motor, but different frame and no floorboards, but the second guy had a more similar frame and floorboards, which made a difference in the first part of the process, removing the front pipe.
HERE WE GO:
So, if you want to check your cam chain tensioners, you have to get to that box immediately behind the floorboards in this 'before' pic:
REMOVE FRONT PIPE:
In order to do that, you need to remove the front pipe. In a relatively stock format, this means you have a Y pipe coming out of the back of the rear head, and part of that goes down the right side and merges with the front pipe and continues to go out the back. The heat shields need to be removed via their adjustable clamps, then you have to loosen or remove clamps that combine the front and rear pipe on that right side. You have to remove the nuts from the flange to get the front pipe out of the front head.
Now in order to actually get the pipe OUT at this point, in our case you had to move the front pipe forward quite a bit and spin it out between the frame and the head. That is, unless you want to remove a lot more exhaust pipes since it's all connected together in a stock set up. We used a spray lubricant to loosen the joint and worked the pipe forward, but it was hitting the floorboard, and the right downtube, and there was no way we were going to spin it out from there, no clearance.
This is the point where I realized guy #1 had a different frame and no floorboards, and pulled up thread #2, while the first guy had a more straightforward approach to just CHECKING the tensioners, which is what I wanted to do, the second guy did have some useful tips on how to get it out of a touring bike.
He suggested bleeding the rear brake line and tying down the pedal. We chose to remove the brake pedal, which includes removing a small cotter pin that connects the pedal to the cable, and once removed, you can remove the larger pin, and unbolt the brake pedal.
He also suggested removing the floorboard, which we did. We chose to remove the chrome part from the bracket, and leave the bracket in place, as you can see here, once we removed the pipe:
Now, once we loosened the pipe, and removed the brake pedal and floorboard, we still didn't have enough clearance, so that's when I remembered the third tip from the second thread, jacking up the motor. Per his suggestion, we removed the front motor mount, and used a scissor jack from my car to gently and slowly jack up the front of the motor, making sure not to hit anything (motor to tank or other devices, have to watch the left side where it would have started to hit on mine).
NOTE: As you can see in the pic, we did this on the jiffy stand (kick stand for normal people), as opposed to the other thread people who used a bike jack. I didn't have a jack anymore, although I do plan on getting one, but my friend pointed out that we'd lose less oil and have a better working angle if we just left it on the stand, so we did. Therefore, when we jacked up the motor, we had a stable platform to work on getting that pipe out of there. This little bit of added clearance made for an easy spin to get the front pipe out.
You may be able to reuse the gasket for the front pipe, but if you plan ahead you might as well get one in advance to slap back in there to be sure.
REMOVE CAM CASE COVER:
Next you'll be able to take off the cam cover, the big ol' case, not just the little cover in the middle. Again, you may want to have a gasket handy for replacing this cover, although if you're a risk taker you might be able to reuse the one that's on there.
This cover on my bike takes a big allen wrench, don't remember the size. The hardest part of this portion of the job was getting those little chrome caps off that I happen to have on my bike. I cracked a few, after a few days of riding w/ no leaks, I put them back on, but not sure if they'll stay permanently, I may have to buy some new ones.
Once the cover is removed, this is what's inside:
See the outer tensioner in lower left. Looks pretty clean in there, that's a good thing. This is also a good shot showing the short cable to the rear brake master cylinder, you can see the hole the big pin goes through the brake pedal itself, and this cable end. Notice also on the jiffy stand virtually no oil leaked out. I was about a 1/8-1/4 quart low at the time, don't know if that made a difference or not. I put a plate below that and a paint roller tray below in case I did lose anything.
INSPECTING OUTER TENSIONER:
So, it's under pressure, you need to get it off the chain to look at the surface, but first you can get an idea how it's wearing by looking down the side:
Now, in both those threads they have a tool to release the tension on the spring, I didn't have one. So we used a small crescent wrench to grab that metal arm below the shoe, then we used a larger crescent wrench to turn the other wrench, allowing us to get the tensioner off the chain. In the above pic you can see a small hole behind the tensioner, this allows you to stick a pin through the arm into the cam plate, and hold it open in place, off the chain. I didn't have a specific pin like they did, so I used a small allen wrench to stick in there.
Here is the surface of the outer tensioner. Reasonable wear, but I don't like the pitting. If you do some searches you'll see this is pretty common, and as they wear down further the problem gets worse. It's those missing chunks that eventually get worse and cause problems gumming up your filter, potentially damaging your oil pump or engine, the whole reason behind doing these checks. At least mine aren't worn too bad, not even 50% after 30k miles on an '03.
INSPECTING THE INNER TENSIONER:
So, if you look at the first guy's thread I linked to, he's got some great pictures in there w/ detailed text, lines and circles indicating what everything is. I'm too lazy to do that, since he already did, but just in case you're too lazy to read his thread, you can look up at the pic of the open case above and see a gap at the top of the cam plate. There's also a small hole up there. This is where everyone talks about sticking the dental mirror in there to check the inner tensioner. I didn't know what they were talking about until I saw pictures for myself, and then did it. That little hole also allows you to stick a pin in there and hold the tensioner open, so you can inspect the surface via the dental mirror. Before you can do that, you have to stick a small screw driver in there and leverage up the 'hook' on the inner tensioner.
Once I leveraged up the inner tensioner w/ the screwdriver, I stuck the allen wrench through the little hole, and stuck the dental mirror in there for inspection. I highly recommend getting the dental mirror ahead of time, and getting one w/ a very long and slim neck on it. The first one I had was short and fat and would not fit through the gap AT ALL. I had to go to the store and by the one you see in the pic, and it was too fat to stick in there while the tensioner was in the 'up' position, so I had to put in the mirror first, then pry it up w/ the screwdriver, stick in the allen wrench, then remove the screwdriver so I could reposition the mirror to see. Some of the dental mirrors come w/ lights on them, I couldn't find one in a hurry, so used what I had.
This pic is good showing the wear as far as depth. The top edge of this hits the chain more and should be the worst worn area, the bottom edge is much less worn usually. By my view I see my inner tensioner is more worn than the outer one, which is consistent with reports from others on this forum and other resources. Often it seems the outer one will still look within limits, while the inner one has completely failed. Some speculate that it gets less oil on it being at the top like that, and inside the cam plate, and that it does tend to put more pressure on the top end of the tensioner, whereas the outer one seems to make contact more evenly. Anyway, mine was worn more inside, but still less than 50%
Here is a pic of the surface:
I have more pics but you get the idea.
So, now that they've been inspected, I can release the inner tensioner again by removing the pin I put in there. Then bolt it all back up, replacing gaskets as necessary, and being aware of any torque values etc.
I have a service manual, but it's not much help in regards to inspecting these things, the best thing about the service manual in this case is the 'blow out' picture of this area and the torque values, imo. Without the two internet tutorials I would have been lost.
Anyway, I hope that helps someone. Thanks to the forum for your past and future help.
The following 4 users liked this post by karz10:
daisy cutter (04-04-2018),
figgis (06-07-2018),
Joe from So Cal (04-08-2018),
tjconnection (04-07-2018)
#2
04-27-2010, 08:14 PM
I'm still not sure when I'll check them again, or what I'll do when they fail. I've got 30k on it now, and I figure that at the end of this season I may turn 40k, so either this next winter, or the following one, maybe 45-50k I plan on being prepared to replace them.
I might just put in replacement shoes, or the upgraded hydraulic ones, unless I get in the mood and have the cash to do mods, at which point I might consider gear drives and new cams etc. I guess time will tell....
BTW, the dealer I think said 3hrs or so of labor, which would have been over $210 depending on labor rate. Had they found a problem (total failure) it may have been covered under warranty at the time, but I'm glad we did this ourselves, and saved the cash. Although we were stumped a bit on the pipe part, and while there are usually more ways to do things, the one we chose seemed to turn out ok. But even my friend said he wouldn't have wanted to do this by himself, and was happy to have an extra hand. W/out his help, I would have felt a little overwhelmed, especially w/out the research I already did. If someone laid all this out ahead of time in idiot proof terms, I would have felt more confident. At any rate, all is well for now. Bike's in the shop for other issues prior to warranty end.
Thankfully during this process I discovered I had cracks in my Y pipe and another area of the pipe, which explained an increase in heat I was feeling, and I was able to get that on the list to be dealt with prior to the warranty ending... Another good reason to do some work yourself sometimes. Especially looking under those fancy chrome covers from time to time...
BTW, I'm not a mechanic, or a lawyer, or anything else relevant to this topic, just a guy w/ a bike who was trying to save some cash and avoid a total failure of a known problem part post warranty. This was the best plan of attack I could come up w/ and it might not be perfect, as I'm sure others may have suggestions on how to do something better, but I had a hard time finding this much info specific to my touring bike, so wanted to share what little I was able to accomplish and learn in the process, in the event it helped even one person... YMMV and work at your own risk, good luck.
Last edited by karz10; 04-27-2010 at 08:23 PM.
#3
04-27-2010, 08:51 PM
#4
04-27-2010, 08:56 PM
Road Warrior
Good post! I check mine every 10k miles. When you do it again, try dropping all the pipes to get access. I believe it would be easier than any of the things you tried. I've also done it by cutting off an allen wrench to get into the bolts at the bottom front of the cover. It can be done that way, but it's pretty tedious.
Also, from the picture I'd judge your inner is getting down pretty close to 50% worn. Don't wait too long to get in there again.
Also, from the picture I'd judge your inner is getting down pretty close to 50% worn. Don't wait too long to get in there again.
#5
04-27-2010, 09:04 PM
Advanced
Join Date: Mar 2010
Location: Chattanooga Tennessee
Posts: 89
Likes: 0
Received 0 Likes
on
0 Posts
Great informative thread!! My buddy checked mine, also 03 RKC late last year at about 27,000 miles. Mine had less of a grove and no pitting than yours. He thought we should check again in about 6 to 8K miles. Only cost me fluids and gaskets. Thinking of just going with new cams and gear drive stuff this coming fall. Since it seems they can fail without notice!!!
#7
04-27-2010, 09:56 PM
Tourer
Join Date: Aug 2009
Location: Boston & thereabouts
Posts: 383
Likes: 0
Received 0 Likes
on
0 Posts
Great pics, and a beautiful bike!

I was able to get the cam chest open without removing the pipe. I just loosened the clamps and the nuts, and slid it forward and off the studs. The reflector had to come off the frame to slide the pipe forward enough. Floorboard had to come off, but brake pedal stayed in place.
JR
I was able to get the cam chest open without removing the pipe. I just loosened the clamps and the nuts, and slid it forward and off the studs. The reflector had to come off the frame to slide the pipe forward enough. Floorboard had to come off, but brake pedal stayed in place.
JR
Last edited by JR-Boston; 04-27-2010 at 10:01 PM.
Trending Topics
#8
04-28-2010, 07:33 AM
Road Warrior
#9
04-28-2010, 11:13 AM


The following users liked this post:
Goose_NC (08-09-2016)
#10
04-28-2010, 11:21 AM
Thanks for the responses. This is what I was wondering, how some other people did it, since when I searched on here, a lot of the threads had various opinions, but few specific instructions or pics.
PaulHog: Yeah, like I said, when my buddy does his, he'll be prepared to replace them, and when I open mine up again, I'll be prepared to replace them. I was in a unique position here, as my warranty was up in a couple days, and I was coming off taxes and knee surgery, it was kind of a deal where I was running out of time and some action was better than no action. If mine were failed, or I could make an argument that I lost more than 50% and had substantial pitting, then it was my belief that I could get the warranty to cover the cost of replacement, and if they weren't at or near failure, it would ease my mind a bit as the warranty expired, and buy me some time to determine what I wanted to do next time, replace w/ same, upgrade to new hydraulic kit, or do more mods etc.
UncleScrooge: We debated dropping more of the pipes, but when I mentioned the engine thing, he wanted to do it that way, so we did. I thought about trying to work around the pipe too, I think JR had a good suggestion that a couple posts down.
JR-Boston: I like the idea of loosening the front pipe, but not taking it completely off, and working around it. That seems like an option for next time, I'll mention it to my buddy too. I notice your pic w/ the blue tape, we did that too, to keep the flange and all that in place while moving it around. My reflector's already been removed, so I got that going for me...
Like I said, there's more than one way to do things, so thanks for the ideas, hopefully it can help someone else too, trying to do it for the first time and stumbling across the thread...