
Another Garage Door Opener Solution
#51
 12-21-2013, 10:32 AM


So, Y`all have a way to open a garage door via of a remote on your motorcycles, but I need something that will open TWO items independently; namely an automatic gate AND a garage door. Currently I have to carry two openers in my pockets, which can be a hassle at times, especially when the weather sucks.
#52
12-21-2013, 10:38 AM
So, Y`all have a way to open a garage door via of a remote on your motorcycles, but I need something that will open TWO items independently; namely an automatic gate AND a garage door. Currently I have to carry two openers in my pockets, which can be a hassle at times, especially when the weather sucks.
Just a thought.
#53
12-21-2013, 11:32 AM

Advanced
Join Date: Dec 2012
Location: California
Posts: 54
Likes: 0
Received 0 Likes
on
0 Posts
http://gripswitch.readingdesigns.com/
We've already got $25-30-40 grand in these machines. What's another $100! Doesn't require any programming. Check it out.....
We've already got $25-30-40 grand in these machines. What's another $100! Doesn't require any programming. Check it out.....
#54
12-21-2013, 11:46 AM

#55
12-21-2013, 12:03 PM
http://www.kawiforums.com/showthread.php?t=20947
Trucky911
#56
12-21-2013, 02:27 PM
Here is how I did mine back in the day:
-------------------------------------------------------------------------------------
-------------------------------------------------------------------------------------
-------------------------------------------------------------------------------------
I wanted to install a garage door opener on the scoot, without giving the MoCo $130 bucks, so I used an existing visor mount model, and installed it in the dash. From the outside, there is no way to tell it's there.
Not counting the connectors and wire, which I already had, and the opener, which I already had, I have a total of 9 bucks, and 2 hours in this project.
This is a really simple project, if you trust yourself with a test light, a continuity tester and a soldering iron.
Here's how to do it:
First, make sure you have a 12 volt unit. The battery will tell you how many volts. A 12v battery is near the diameter of a AA, but it is shorter.

__________________________________________________ __________________________________________
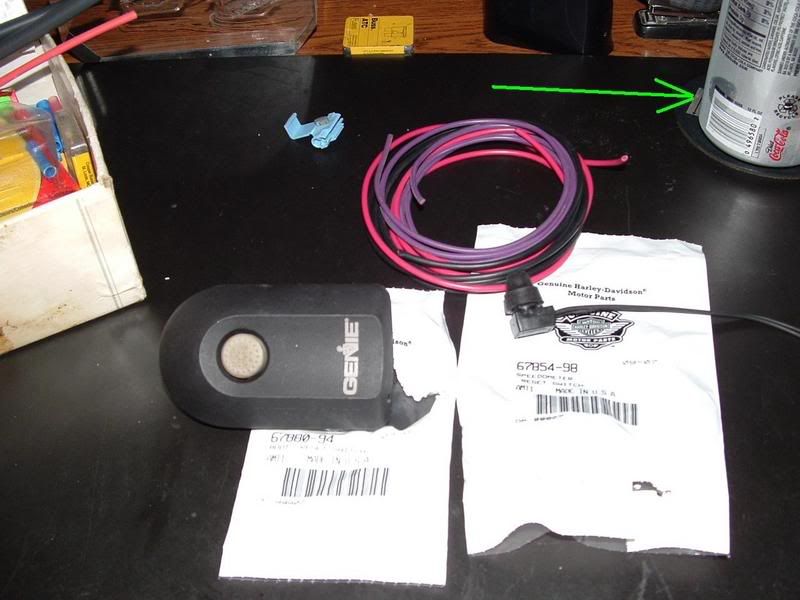
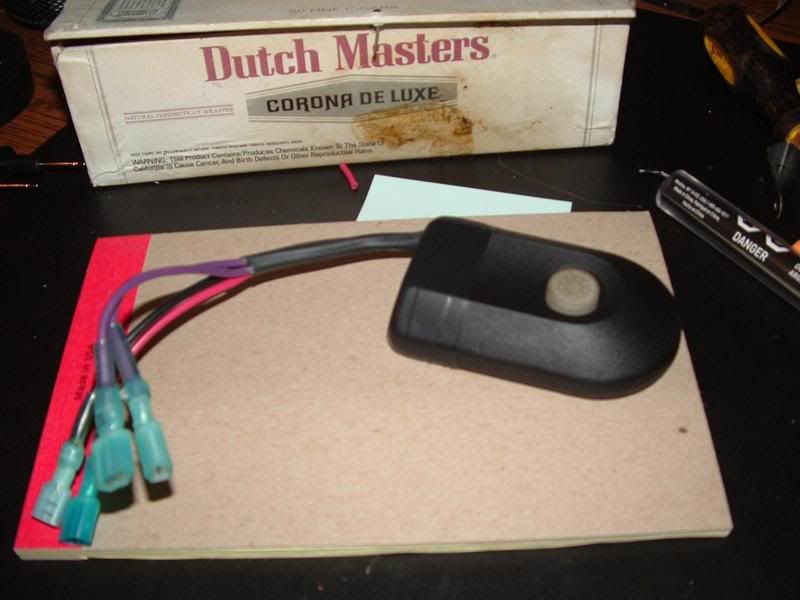
Second is the parts I needed.
HD# 67880-94 is the rubber boot.
HD# 67854-98 is the Speedometer Reset switch.
The opener, some wire, I used red for hot, black for ground, and purple for the switch.
A 3M Quick Connect, for the hot lead.
Shrink tube and heat-shrink connectors, I like waterproof.
And most important, if you follow the green arrow... Diet Coke.
__________________________________________________ __________________________________________
This is what it looks like, when you take it apart.

__________________________________________________ __________________________________________
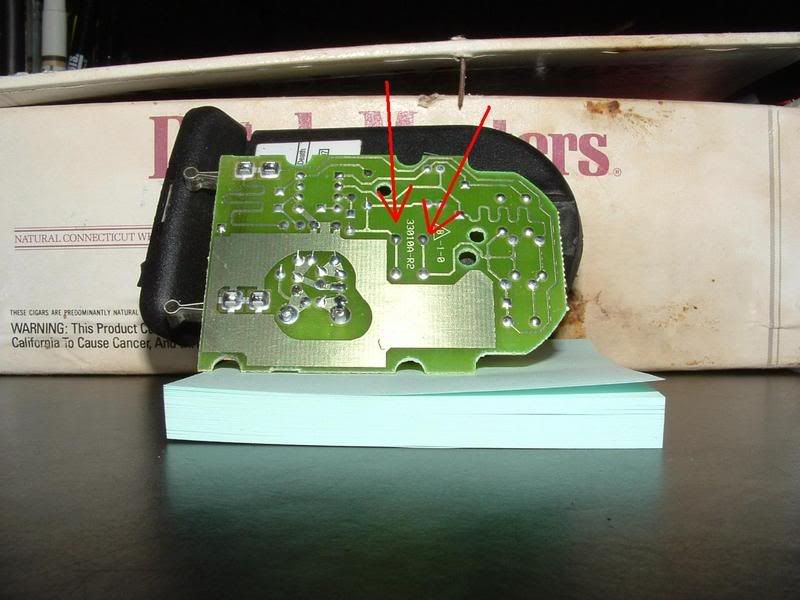
This is the bottom of your circuit board. The red arrows point to the back of the switch. Note there are 2 poles to each side of the switch.
__________________________________________________ __________________________________________
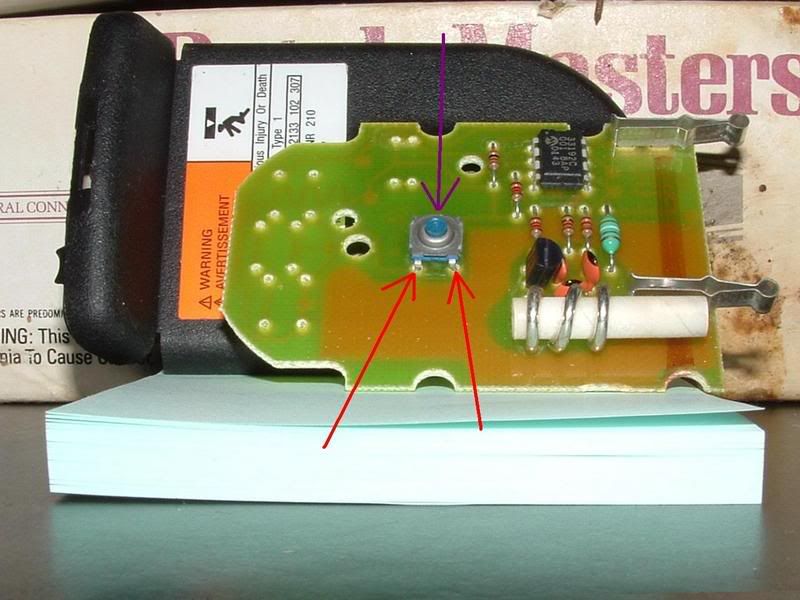
This is the top of your circuit board. The purple arrow points to the switch, and the red arrows point to 2 of the poles.
__________________________________________________ __________________________________________
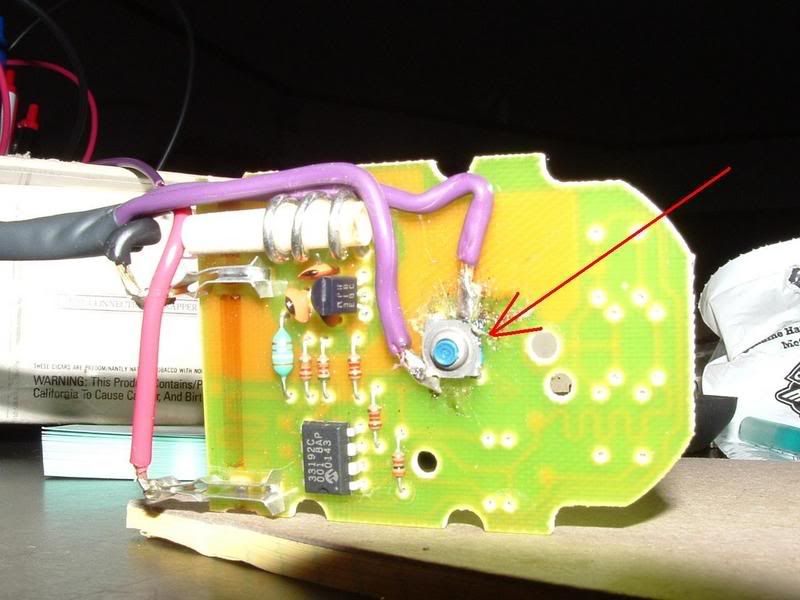
Here it is with all of the wires soldered in place. Note where the red arrow is I bent the corner of the switch up. I used a continuity tester to be sure I did not cross the switch, and found I had, so I bent it up a bit.
Be sure you know which pole is hot and which is ground for your power.
__________________________________________________ __________________________________________
Here it is finished, and reassembled.
__________________________________________________ __________________________________________
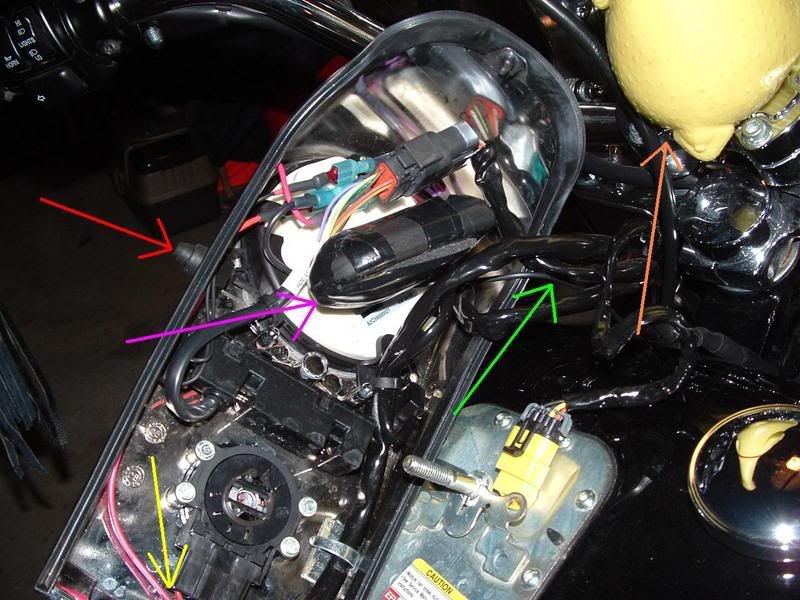
In the dash...
Yellow arrow: Hot lead to the accessory lead under the ignition switch.
Green arrow: Ground run to the bolt at the top of my engine guard.
Red arrow: New switch installed.
Purple arrow: I wrapped some weatherproof foam and tape around the unit.
Orange arrow: Chickie's Butt.
__________________________________________________ __________________________________________
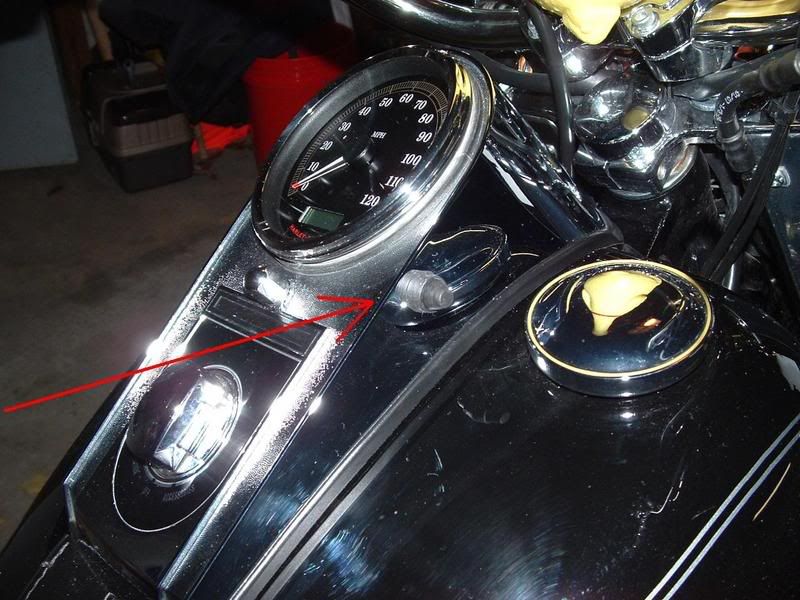
Here is the new switch installed...
__________________________________________________ __________________________________________
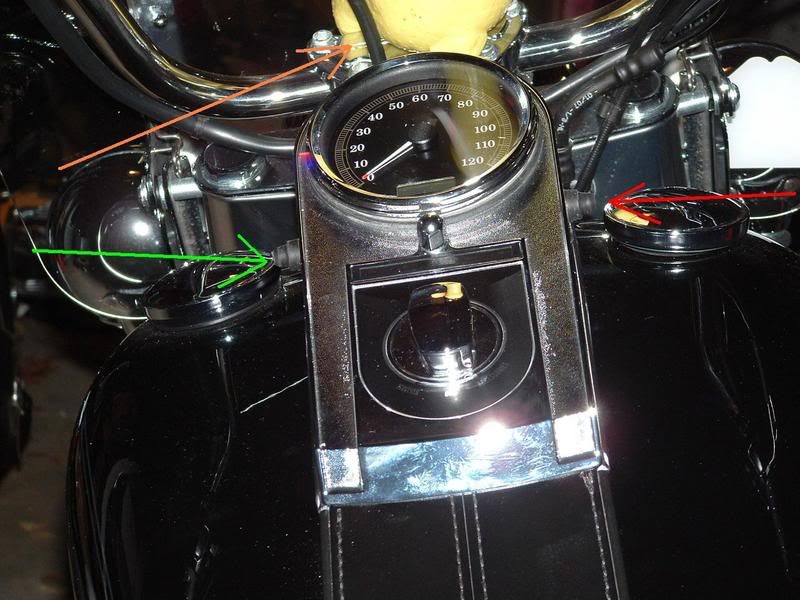
And here it is once again, finished
Green arrow: Speedometer/Clock/Odometer reset
Red arrow: Garage Door Opener
Orange arrow: Chickie's Butt
-------------------------------------------------------------------------------------
-------------------------------------------------------------------------------------
-------------------------------------------------------------------------------------
I wanted to install a garage door opener on the scoot, without giving the MoCo $130 bucks, so I used an existing visor mount model, and installed it in the dash. From the outside, there is no way to tell it's there.
Not counting the connectors and wire, which I already had, and the opener, which I already had, I have a total of 9 bucks, and 2 hours in this project.
This is a really simple project, if you trust yourself with a test light, a continuity tester and a soldering iron.
Here's how to do it:
First, make sure you have a 12 volt unit. The battery will tell you how many volts. A 12v battery is near the diameter of a AA, but it is shorter.
__________________________________________________ __________________________________________
Second is the parts I needed.
HD# 67880-94 is the rubber boot.
HD# 67854-98 is the Speedometer Reset switch.
The opener, some wire, I used red for hot, black for ground, and purple for the switch.
A 3M Quick Connect, for the hot lead.
Shrink tube and heat-shrink connectors, I like waterproof.
And most important, if you follow the green arrow... Diet Coke.
__________________________________________________ __________________________________________
This is what it looks like, when you take it apart.
__________________________________________________ __________________________________________
This is the bottom of your circuit board. The red arrows point to the back of the switch. Note there are 2 poles to each side of the switch.
__________________________________________________ __________________________________________
This is the top of your circuit board. The purple arrow points to the switch, and the red arrows point to 2 of the poles.
__________________________________________________ __________________________________________
Here it is with all of the wires soldered in place. Note where the red arrow is I bent the corner of the switch up. I used a continuity tester to be sure I did not cross the switch, and found I had, so I bent it up a bit.
Be sure you know which pole is hot and which is ground for your power.
__________________________________________________ __________________________________________
Here it is finished, and reassembled.
__________________________________________________ __________________________________________
In the dash...
Yellow arrow: Hot lead to the accessory lead under the ignition switch.
Green arrow: Ground run to the bolt at the top of my engine guard.
Red arrow: New switch installed.
Purple arrow: I wrapped some weatherproof foam and tape around the unit.
Orange arrow: Chickie's Butt.
__________________________________________________ __________________________________________
Here is the new switch installed...
__________________________________________________ __________________________________________
And here it is once again, finished
Green arrow: Speedometer/Clock/Odometer reset
Red arrow: Garage Door Opener
Orange arrow: Chickie's Butt
#57
12-21-2013, 03:42 PM

Why not something simple as this:
http://www.homedepot.com/webapp/wcs/...1&marketID=206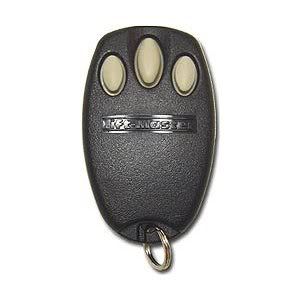
or find a comparable one to work with your particular door opener?
That way you can take it with you for what ever vehicle you decide to use from your fleet...
http://www.homedepot.com/webapp/wcs/...1&marketID=206
or find a comparable one to work with your particular door opener?
That way you can take it with you for what ever vehicle you decide to use from your fleet...
#58
12-22-2013, 07:52 AM
The remote is a momentary switch. It's always powered when the battery is in it. When you hit the high beam switch the remote switch goes on then off. I've done 3 Harleys this way.
http://www.kawiforums.com/showthread.php?t=20947
Trucky911
http://www.kawiforums.com/showthread.php?t=20947
Trucky911
#59
12-22-2013, 08:20 AM
Elite HDF Member
If you have a garage door opener that works on something other than 12v, then a voltage regulator can be incorporated to drop the bikes voltage to whatever voltage your garage door opener is designed to use. A lot of transmitters these days run on the 2032 batteries which are 3 volts.
http://www.radioshack.com/product/in...=c&cagpspn=pla
But really, why go to all of this trouble when simply sticking, with Velcro, a spare opener behind the lower back pad of the passenger? Works like a champ, easy, quick, out of sight, always there, protected from weather, and easily reachable by rider or passenger. The passenger does not feel it at all. Way too simple for the Ultra owner.

Thread
Thread Starter
Forum
Replies
Last Post
akakillroy
2014-2023 Touring Models
15
10-04-2015 09:32 PM