
Air Ride install Part 2
#1
 12-16-2011, 05:10 PM

Join Date: Jan 2009
Location: Bowling Green, KY
Posts: 628
Likes: 0
Received 0 Likes
on
0 Posts
Well Thanks to 999 Customs and Coolerman69, I got my air ride installed and ready to ride. I would have a ride report but it's raining so that will have to wait till tomorrow. It took about 7 beers and a couple hours. Pretty basic install.
Had to cut a little off the bottom of the shock hole spacer and added a 1/2x5/8x1 insert to have the bolt fit right. The top shock hole I just drilled it out to a 1/2in. I added longer grade 8 bolts top and bottom just from piece of mind. Total cost was under $150. I got all the air fittings from work which saved a little.
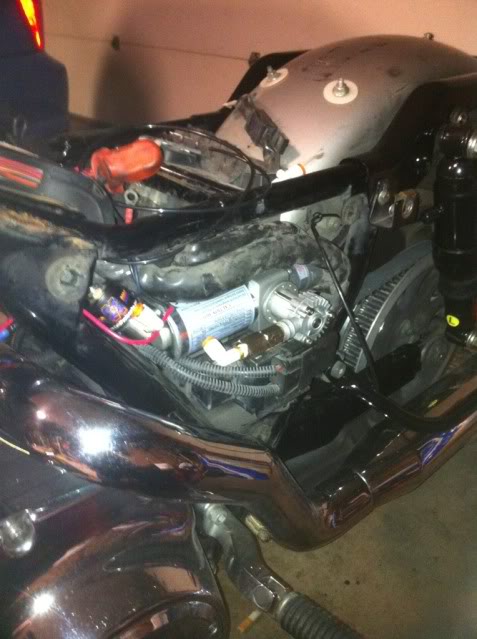
I mounted the compressor and solenoid on the left side behind the cover. The switch is mounted on the down tube above the trans and below the seat.
Rolling it around the garage with all the air let out nothing rubs at all.
This is what I have.
Monroe MA785 Max-Air Air Shocks ($60 Amazon)
Viair 92C 12 Volt Air Compressor Kit ($65 Amazon
used NOS solenoid (Leftover from my racing days)
Lines are from the shocks and extra from auto parts store
Fittings I got from work (push style)
Universal 12 Volt Remote Control Kit (just for fun) ($20 Amazon)
3 position switch from auto store ($5 Autozone)
I don't have the remote hooked up yet but it will be next on the list.
You can ready the original post from 999 customs and get all the info there.
https://www.hdforums.com/forum/touri...installed.html
Mounting the compressor
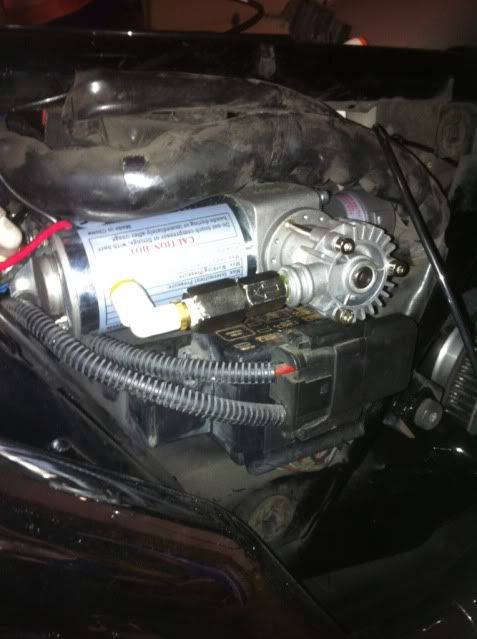
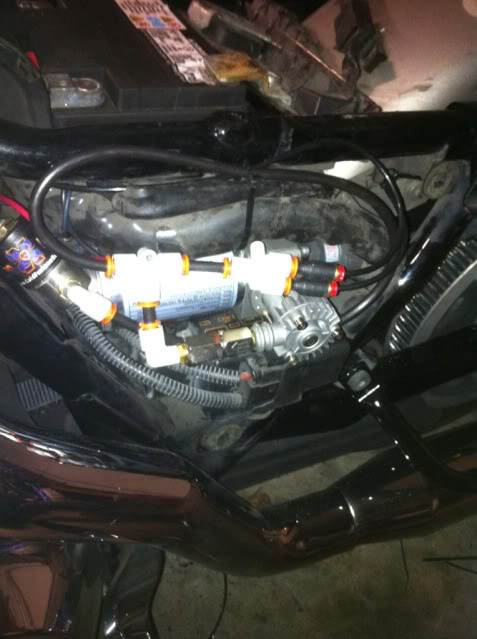
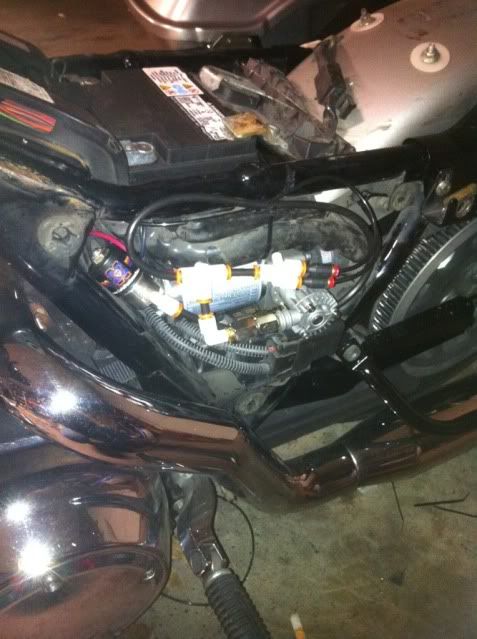
Hoses, Solenoid and fittings.
Video
http://youtu.be/y1siny2GQmQ?hd=1
Had to cut a little off the bottom of the shock hole spacer and added a 1/2x5/8x1 insert to have the bolt fit right. The top shock hole I just drilled it out to a 1/2in. I added longer grade 8 bolts top and bottom just from piece of mind. Total cost was under $150. I got all the air fittings from work which saved a little.
I mounted the compressor and solenoid on the left side behind the cover. The switch is mounted on the down tube above the trans and below the seat.
Rolling it around the garage with all the air let out nothing rubs at all.
This is what I have.
Monroe MA785 Max-Air Air Shocks ($60 Amazon)
Viair 92C 12 Volt Air Compressor Kit ($65 Amazon
used NOS solenoid (Leftover from my racing days)
Lines are from the shocks and extra from auto parts store
Fittings I got from work (push style)
Universal 12 Volt Remote Control Kit (just for fun) ($20 Amazon)
3 position switch from auto store ($5 Autozone)
I don't have the remote hooked up yet but it will be next on the list.
You can ready the original post from 999 customs and get all the info there.
https://www.hdforums.com/forum/touri...installed.html
Mounting the compressor
Hoses, Solenoid and fittings.
Video
http://youtu.be/y1siny2GQmQ?hd=1
Last edited by OutlawBagger; 12-16-2011 at 05:17 PM.
#3
12-16-2011, 09:38 PM

Novice
Join Date: Sep 2011
Location: south dakota
Posts: 24
Likes: 0
Received 0 Likes
on
0 Posts
#4
12-17-2011, 07:43 AM
Road Warrior
#5
12-18-2011, 04:08 PM
Join Date: Jan 2009
Location: Bowling Green, KY
Posts: 628
Likes: 0
Received 0 Likes
on
0 Posts
Well I took it out for a ride yesterday. It rides good didn't get to play with pressure that much. . Just a little trip to the stealer to see my GF. Good thing I stopped there. The dump solenoid took a dump LOL. it burnt up on me and stopped working. Had to take the GF's car home and get my spare noid. All is well now. The looks I got from people when I lowered it was sweet and everyone asked who's kit it was. Felt good to tell them MINE with the help of HD Forum's.
Best mod I think I have ever done.
Best mod I think I have ever done.
#6
12-18-2011, 06:33 PM
Road Warrior
Well I took it out for a ride yesterday. It rides good didn't get to play with pressure that much. . Just a little trip to the stealer to see my GF. Good thing I stopped there. The dump solenoid took a dump LOL. it burnt up on me and stopped working. Had to take the GF's car home and get my spare noid. All is well now. The looks I got from people when I lowered it was sweet and everyone asked who's kit it was. Felt good to tell them MINE with the help of HD Forum's.
Best mod I think I have ever done.
Best mod I think I have ever done.
#7
12-18-2011, 07:32 PM

Advanced
Join Date: Aug 2011
Location: arizona
Posts: 95
Likes: 0
Received 0 Likes
on
0 Posts
Good info here thanks,I will be finishing up my bars tomorrow as long as UPS brings my cable and brake line.I will also researching compressor and shocks tomorrow.
I would also like to hear from anyone that has had this set up and has not been happy.If there is anyone who has done it and has not been happy with it please speak up.As of now everyone that has gone this route seems happy and thats reassuring.
Stainless lines would be alot cleaner install,abs plastic will probablly last almost forever.I might go with small OD braided air line then just keep an extra piece coiled up in a saddle bag for emergencies along with a couple of misc fittings and maybe even an xtra solenoid for emergencies.
Trending Topics
#8
12-19-2011, 12:47 PM
Advanced
Join Date: Aug 2011
Location: arizona
Posts: 95
Likes: 0
Received 0 Likes
on
0 Posts
Looking at the Arnott site this am and correct me if i am wrong but this would be everything the same except swap out the Bilstiens for Monroe?
12 in. Black Bilstein Rear Air Suspension System

Photos: 1 | 2 | 3 | 4
See Larger View
Price: $599.00 Quantity:
 We ship internationally!
Click here to request a quote.
The Arnott� rear Air Suspension system comes complete with an onboard compressor and control switch. The Bilstein� kit gives you the luxury of inflating or deflating your air ride system with just the flip of an onboard switch. At the core of this impressive system we used a Bilstein� shock absorber. Bilstein�s patented valving and high pressure nitrogen gas keeps the rear tire in constant contact with the road. Unlike your factory �air-assist� shocks, our air suspension kit will allow you to raise or lower the rear shocks through the full range of the suspension�s travel. Giving you, the rider, the flexibility of setting the height of your rear suspension based on your weight, height, and preference, helping you to ensure safety through enhanced control and stability.
Please download the schematic for the shock specifications.
Product Features:
� Bilstein� Monotube Shock Absorbers
� Goodyear� Air Spring Sleeves
� Compressor w/built in Vent Solenoid
� Black Finish
� New Mounting Hardware
� Engineered and Made in USA
� 12" Extended, 9.75" Collapsed
Includes:
� Two Black Bilstein� Air Shocks
� Compressor with Mounting Bracket
� Switch with Mounting Hardware
� Premade Hose and Wire Harness
� Stainless Steel Mounting Bolts
� Black Bolt Covers
� Detailed Instruction Manual
Warranty Information:
Take the Arnott Challange today!
If you are not 100% satisfied with your new air ride system, we will refund 100% of your purchase price, if returned within the first 30 days. The system also comes complete with a full 5 Year Warranty
12 in. Black Bilstein Rear Air Suspension System
Photos: 1 | 2 | 3 | 4
See Larger View
Price: $599.00 Quantity:
We ship internationally!Click here to request a quote.
The Arnott� rear Air Suspension system comes complete with an onboard compressor and control switch. The Bilstein� kit gives you the luxury of inflating or deflating your air ride system with just the flip of an onboard switch. At the core of this impressive system we used a Bilstein� shock absorber. Bilstein�s patented valving and high pressure nitrogen gas keeps the rear tire in constant contact with the road. Unlike your factory �air-assist� shocks, our air suspension kit will allow you to raise or lower the rear shocks through the full range of the suspension�s travel. Giving you, the rider, the flexibility of setting the height of your rear suspension based on your weight, height, and preference, helping you to ensure safety through enhanced control and stability.
Please download the schematic for the shock specifications.
Product Features:
� Bilstein� Monotube Shock Absorbers
� Goodyear� Air Spring Sleeves
� Compressor w/built in Vent Solenoid
� Black Finish
� New Mounting Hardware
� Engineered and Made in USA
� 12" Extended, 9.75" Collapsed
Includes:
� Two Black Bilstein� Air Shocks
� Compressor with Mounting Bracket
� Switch with Mounting Hardware
� Premade Hose and Wire Harness
� Stainless Steel Mounting Bolts
� Black Bolt Covers
� Detailed Instruction Manual
Warranty Information:
Take the Arnott Challange today!
If you are not 100% satisfied with your new air ride system, we will refund 100% of your purchase price, if returned within the first 30 days. The system also comes complete with a full 5 Year Warranty
#9
12-19-2011, 01:46 PM
Join Date: Jan 2009
Location: Bowling Green, KY
Posts: 628
Likes: 0
Received 0 Likes
on
0 Posts
#10
12-19-2011, 02:07 PM

Cruiser
Join Date: Sep 2011
Location: ohio
Posts: 100
Likes: 0
Received 0 Likes
on
0 Posts