
2002 TC88 Cam Plate Upgrade/Cam Swap PART II
#1
 08-15-2011, 09:08 PM

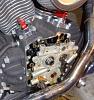
Next – pulling the Cam Plate and Cams
**while performing install/assembly I used Lucas Assembly lube on all parts/chains/pump/orings....etc.....
· Lock cam sprocket with crank sprocket. Use specialty tool or lower bike to floor to keep engine from rotating.
· Remove cam and crank sprocket bolts. I don't care about marking my chain and sprockets because I have all new.
· Pry back the primary cam tensioner and hold in place by inserting a small allen wrench through the tensioner hooks and hole in cam plate. Or use that specialty tool.
· Work the cam and crank sprocket and chain assembly off shafts simultaneously.
CLICK on Pics for Close-up
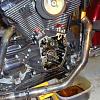
· Remove the six cam plate bolts and proceed to pull the cam plate/cam assembly out of the cam cavity. I left my pump attached because my kit has the newer pump.
· At this point, I realized that my Harley magnets were not holding my lifters up high enough, so I had to prop something under the "U" section of the magnet to draw the lifters up about an 8th inch higher, out of the way of the cams as I pulled them out. (I probably had the wrong size magnets, but they still worked great)

· Pull the cam bearings with whatever tools you have. The Harley tool, the Beatty tool, the Autozone rental bearing puller. I used the autozone special.
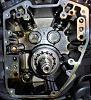
- There is a lip/seat behind the cam bearing that is not visible until the bearings are out. When pulling the bearings out, grab the back inside edge of the bearing just enough to pull them. Mine came out pretty easily.
- At this point I wiped everything in the cavity clean with a lint free rag.
- Press the new cams in with that specialty tool. I removed one of the stock cams and tapped the bearings in with that until fully seated. Of course I installed the new bearing on the end of the cam that it is supposed to be on (letters on bearing edge toward the cam so they faced outward when tapped into place) squared it up against the bearing hole and tapped, with a hammer, the chain drive end of the cam. Went in smoothly. I made sure they were fully seated.
- Remove old O-rings and Install new O-rings – three into cam cavity. You can slide the oil pump oring (the big one) on the oil pump tube when you build the new cam plate assembly and install it that way. Just make sure you replace all three. A good dose of assembly lube will hold them in place.


#2
08-26-2013, 10:55 AM


Thread
Thread Starter
Forum
Replies
Last Post