
2002 TC88 Cam Plate Upgrade/Cam Swap PART IV
#1
 08-15-2011, 09:36 PM

Install New Assembly into cam cavity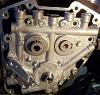
- Hold the new assembly in front of the cavity and observe the flats on the crank shaft and the flats on the pump. These have to line up.
- Rotate the rear wheel to rotate the crank shaft or use your finger to rotate the pump assembly to line up the flats.
- Confirm that the lifters are up out of the way.
- Confirm that the new orings are in place.
- Slide and rotate the new assembly into the cavity observing the crank shaft coming through the pump assembly. If everything is right, it should slide right in place.
- Snug three cam plate bolts, forming a triangle, onto cam plate to seat the assembly and rotate the rear tire to rotate the pump assembly to center it.

- Torque pump assembly bolts (4) in sequence and to specs.
- Rotate rear tire a few more times.
- Attach plate assembly in place using six cam plate bolts. Torque bolts in sequence and to specs.
- Place the .110 shim over the rear cam shaft.
- Place cam and crank sprockets on ends of shafts and push them all the way on.
- Use straight edge to determine that sprockets edges line up within tolerance.
- My sprocket edges lined up perfectly and required no further shimming.
- Apply/remove shims under cam sprocket until sprocket edges are within tolerance.

- Remove sprockets, making sure proper shims stay in place.
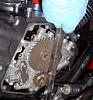
- Attach primary chain to cam and crank sprockets making sure the dots line up.
- Slide cam and crank sprocket with chain attached over shaft ends and into place making sure the dots remain lined up. Rotation of engine/crank shaft may be required.
- Lock cam with crank sprocket or lower vehicle to keep engine from rotation while you torque both bolts in sequence and to specs.
- Attach well lubed primary hydraulic tensioner/shoe assembly and torque to specs. Remove pin that holds shoe in place.
Last edited by mrmud4x4; 08-17-2011 at 06:38 AM.

Thread
Thread Starter
Forum
Replies
Last Post
fuelmoto
Milwaukee Eight (M8)
17
11-25-2023 03:03 PM