
Starter Clutch Replacement on 09 SG
#1
 10-18-2011, 06:52 PM

Well I have to replace the starter clutch on my 09 SG as I have the dreaded hot start issues. I have a 09 SG Fuel moto stage 1 96" motor, I have ordered a SE compensator kit and will also replace that to help eliminate the issue. There are some great threads on how to replace the compensator but there is very little about replacing the starter clutch. I have been searching and reading different threads on this since last week and still not a lot of information. I have the new HD starter cluch in my garage and I also have a HD service manual which is pretty useless as far as the starter or any pictures. Do any of you guys have pictures and any suggestions on replacing it. As far as removing the starter that does not look to bad but I have no information on the actual starter clutch replacement. Thanks for any and all help!
The following 2 users liked this post by Scubamike:
lunatikfringe (11-22-2016),
swabby09 (09-26-2016)
#2
10-18-2011, 09:27 PM
Road Master
Join Date: Apr 2007
Location: Michigan/Florida
Posts: 902
Likes: 0
Received 0 Likes
on
0 Posts
Really not that hard. but to complex to try and post. The most important thing is to be careful while pulling the starter apart as to NOT pull the armature out of the brushes. If you dont feel comfy doing it yourself i would take the starter and new clutch assm. to a starter rebuild guy or someone capable and have them replace the clutch assm. It only took me about 15/20 minutes to do mine (once out of the bike). So I wouldn't think they would charge too much. Wish I could be more help. If you wee closer I'd come over and help ya
#3
10-20-2011, 07:40 AM
Club Member
#4
10-20-2011, 07:58 AM

It is a good idea to run a sharp knife around the parting line of the starter nose so the powder coating doesn't peel off.
Here is an exploded view.
http://partsfinder.onlinemicrofiche....=13&A=664&B=14
Here is an exploded view.
http://partsfinder.onlinemicrofiche....=13&A=664&B=14
#5
10-20-2011, 10:03 AM
#6
10-20-2011, 11:43 AM
Thanks guys for the information and the parts breakdown as that should help. I have the part on hand and am hoping to change it out today if my work schedule allows it. After looking at it it does not look to bad I just have to make sure I like you said score the powder coat and take my time. I will let you know how it goes when completed. I am also looking forward to getting my SE compensator on next week as well.
#7
10-20-2011, 07:04 PM
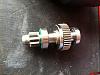
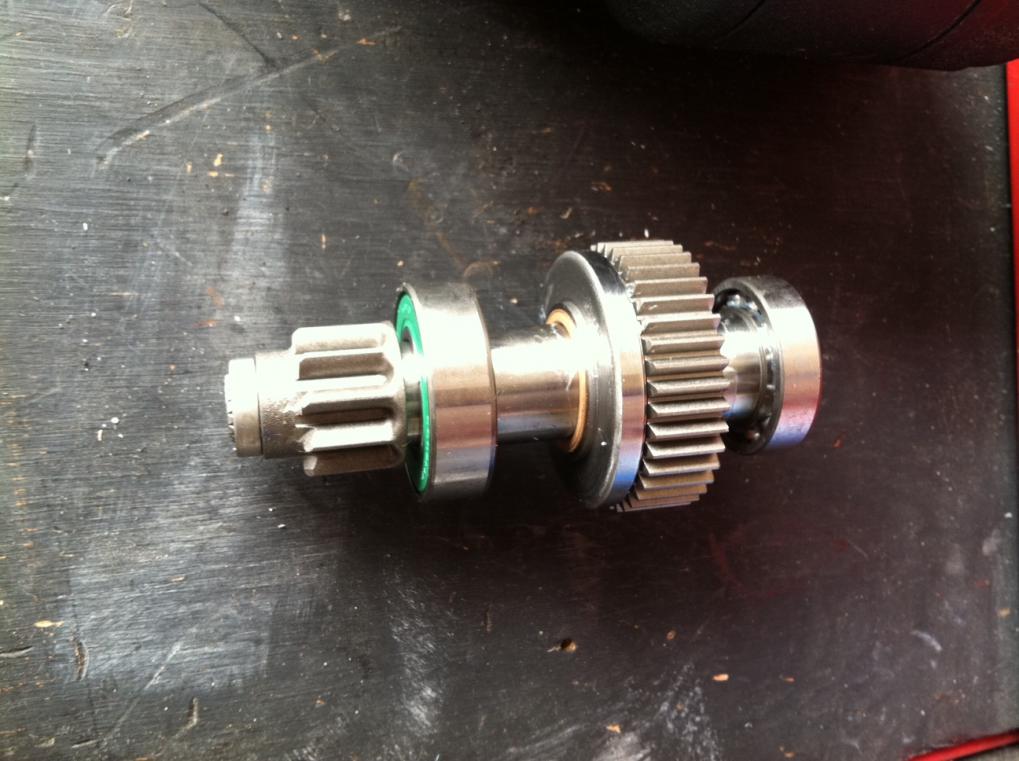
Ok so I went ahead today because I had time and decided I would replace my worn starter clutch in my 09 Streetglide with 25k on it and it was not starting or had the hot start grinding sound. The HD kit part number is 31633-07A which includes a new starter cluch assembly, o-ring, spring, and ball msrp about $125 from HD. I did not find a lot of information in the HD service manual but removing the starter was pretty straight forward. I disconnected the battery and for my sake just removed it. I then disconnected the positive cable on top of the starter solenoid assembly as well as disconnected the connector on the lower forward side of the starter. Removed the two securing allen bolts and gently tugged and removed the starter assembly at a upward angle. The book states to remove the oil fill cap but I did not have to. Also another caution is to make sure you do not loose the two ring dowels in the mount holes for the starter to install into the backside of the primary. Thats it for removing the starter, pretty easy. Pictured below is the new start clutch assembly.
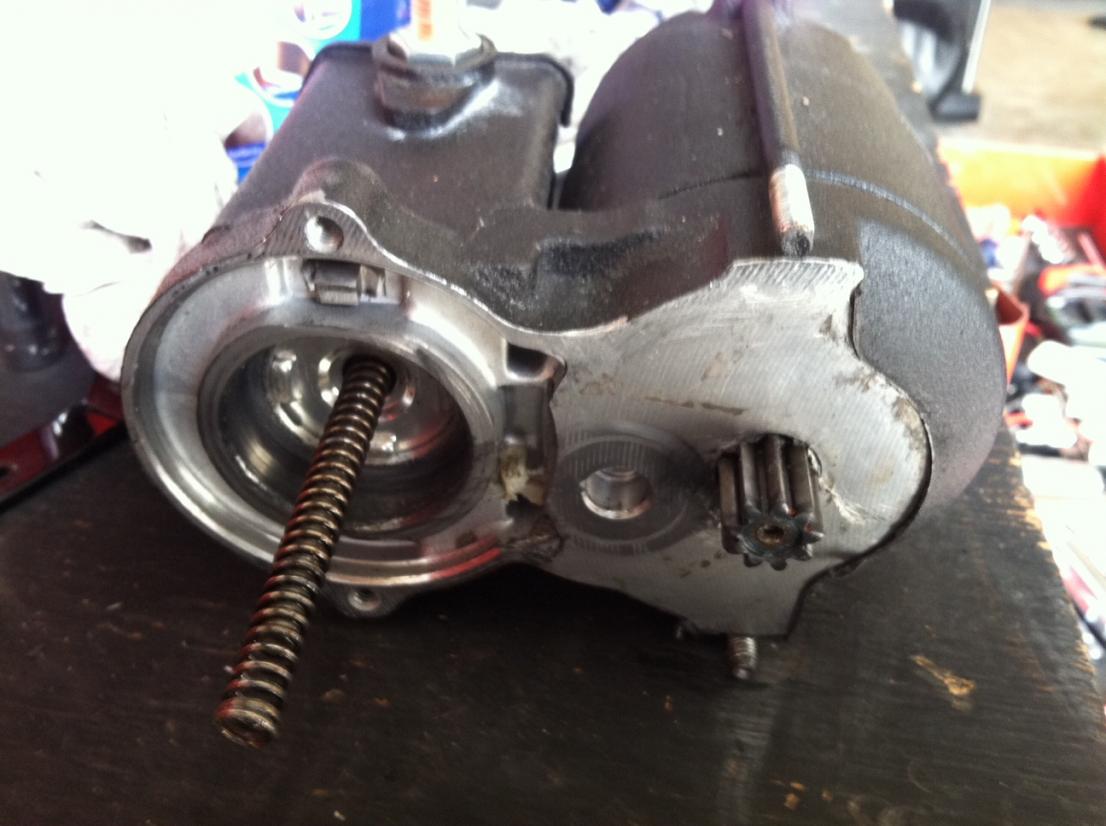
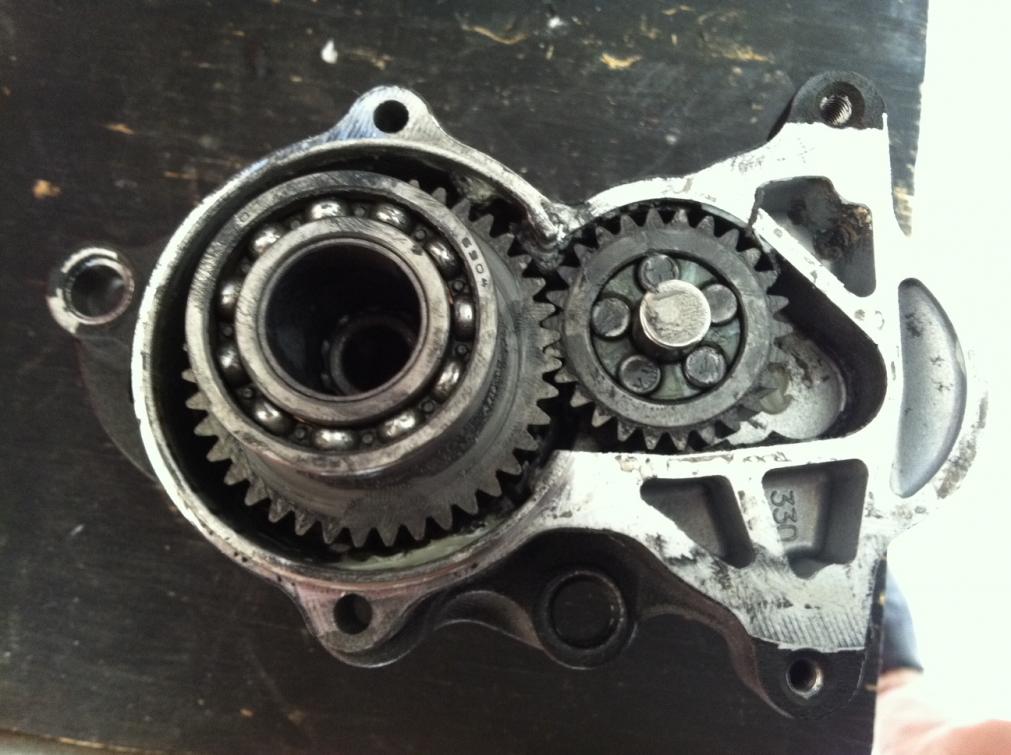
Now the fun part to replace the starter clutch. As stated earlier in this thread I cleaned and wiped off the starter and took a knife and cut the powder coat at the seam where it comes apart to try to eliminate it flaking. Its a little hard to explain but once you have the assembly out you can kind of see what you have to do to get at it and hopefully the pictures help. Remove the chrome cap and bracket off the solenoid. If you look you will see two recessed phillips screws that you have to loosen and remove. Mine were covered in powder coat so I used a phillips socket and gently hit the bit into place and then a rachet to loosen and remove those two fasteners. Second where you removed the chrome cover and bracket on the solenoid end you have to loosen those two long fasteners holding the solenoid in place. Be carefull to lay the starter assembly on its side and not allow the solenoid assembly to come apart or the brushes can drop out of place. Just loosen the two fasteners and leave that part together. Now with those four fasteners removed you can gently spit the starter assembly and see the starter clutch and the rest of the gears and pieces. Also be careful that there is five roller type bearings that are loose inside the center of the smaller gear inside a plastic retainer do not loose those. Here are a few pictures to help explain what I am talking about.
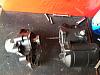

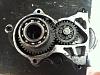
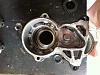
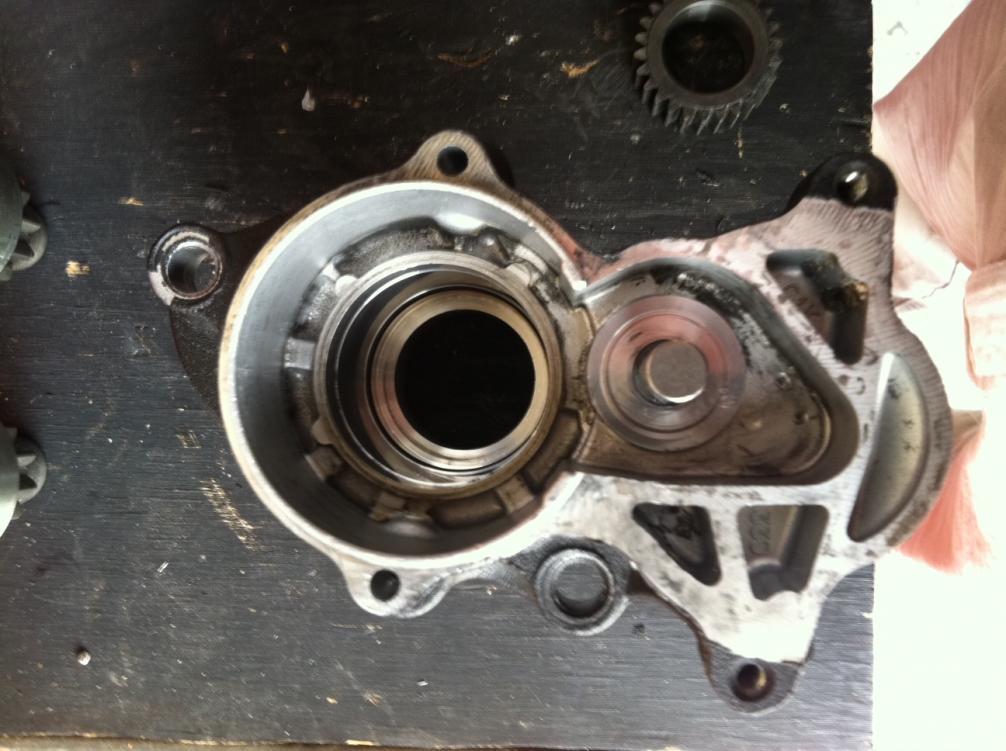
I left the solenoid part of the started sideways on my bench and cleaned that assembly. I then removed the original starter clutch assembly with a light pull. After which I removed the smalled gear with the roller bearings insided and cleaned the assembly. After which I placed a little oil around the bearing race and insearted the new starter clutch assembly in the starter housing with a gentle force and made sure it seated the bearing in the case. After which I installed the smaller gear and bearings in place. The kit gives you a new ball bearing make sure you place that inside the shaft of the new starter clutch. If you look inside the original one you will see it. Next replace the spring on the plunger assembly it just slides of and on. After that i put a little oil on the other bearing and gently slid the two haves together while leaving it on the bench as to not disrupt the solenoid brushes and I then tightened the four removed fasteners. I then installed the new o-ring on the starter that goes into the backside of the primary. After which again make sure your ring dowels are in place and reinstall the starter as you removed it and make sure to locktight and tourqe the two starter mount bolts to 22-24ft-lbs per the HD service manual. I then installed the battery and seat and tried it out and it worked perfect. I let the bike warm up and shut it of and on a few times and it again worked great. Went for a short ride to get it warmed up to operating temp stopped for gas and again it worked great like it used to. I have a new SE compensator on order and am going to change that next week as well. Also another note as I could not see any visible wear on the original starter clutch.
The starter clutch job did not take very long and if you just take your time its pretty easy to do. Maybe took about 1 1/2 hours total and thats with me screwing around and cleaning everything which I guess thats what the dealer quoted me. Sorry for the long winded post I just thought it may help somebody down the road with theirs. If you have any questions of suggestions please post or if you would like to add anything to this thread. Thanks again to the guys that posted their information and suggestions.

Now the fun part to replace the starter clutch. As stated earlier in this thread I cleaned and wiped off the starter and took a knife and cut the powder coat at the seam where it comes apart to try to eliminate it flaking. Its a little hard to explain but once you have the assembly out you can kind of see what you have to do to get at it and hopefully the pictures help. Remove the chrome cap and bracket off the solenoid. If you look you will see two recessed phillips screws that you have to loosen and remove. Mine were covered in powder coat so I used a phillips socket and gently hit the bit into place and then a rachet to loosen and remove those two fasteners. Second where you removed the chrome cover and bracket on the solenoid end you have to loosen those two long fasteners holding the solenoid in place. Be carefull to lay the starter assembly on its side and not allow the solenoid assembly to come apart or the brushes can drop out of place. Just loosen the two fasteners and leave that part together. Now with those four fasteners removed you can gently spit the starter assembly and see the starter clutch and the rest of the gears and pieces. Also be careful that there is five roller type bearings that are loose inside the center of the smaller gear inside a plastic retainer do not loose those. Here are a few pictures to help explain what I am talking about.

I left the solenoid part of the started sideways on my bench and cleaned that assembly. I then removed the original starter clutch assembly with a light pull. After which I removed the smalled gear with the roller bearings insided and cleaned the assembly. After which I placed a little oil around the bearing race and insearted the new starter clutch assembly in the starter housing with a gentle force and made sure it seated the bearing in the case. After which I installed the smaller gear and bearings in place. The kit gives you a new ball bearing make sure you place that inside the shaft of the new starter clutch. If you look inside the original one you will see it. Next replace the spring on the plunger assembly it just slides of and on. After that i put a little oil on the other bearing and gently slid the two haves together while leaving it on the bench as to not disrupt the solenoid brushes and I then tightened the four removed fasteners. I then installed the new o-ring on the starter that goes into the backside of the primary. After which again make sure your ring dowels are in place and reinstall the starter as you removed it and make sure to locktight and tourqe the two starter mount bolts to 22-24ft-lbs per the HD service manual. I then installed the battery and seat and tried it out and it worked perfect. I let the bike warm up and shut it of and on a few times and it again worked great. Went for a short ride to get it warmed up to operating temp stopped for gas and again it worked great like it used to. I have a new SE compensator on order and am going to change that next week as well. Also another note as I could not see any visible wear on the original starter clutch.
The starter clutch job did not take very long and if you just take your time its pretty easy to do. Maybe took about 1 1/2 hours total and thats with me screwing around and cleaning everything which I guess thats what the dealer quoted me. Sorry for the long winded post I just thought it may help somebody down the road with theirs. If you have any questions of suggestions please post or if you would like to add anything to this thread. Thanks again to the guys that posted their information and suggestions.
Last edited by Scubamike; 10-20-2011 at 07:11 PM. Reason: spelling
The following 5 users liked this post by Scubamike:
1957buick (04-29-2018),
desertpatriot (03-15-2016),
F150HD (04-30-2018),
stickz (08-17-2017),
thistlehead (05-09-2016)
Trending Topics
#8
02-15-2012, 04:54 PM

6th Gear
Scubamike. This is great. My bike has been down for a week now and decided to tackle the job with your posts. Seems easy enough. I got my new starter clutch yesterday. This all started with a simple service at 15k. Went to warm up to change fluids and no start. Just that damn spinning sound. Hope that is all it is. I'll let you know how it goes. All that you experienced on trying to find the info. online, I had the same woes. This post was the most information I saw on it. Thanks again.
#9
05-16-2012, 08:05 AM

Stage I
Join Date: May 2012
Location: Florida
Posts: 1
Likes: 0
Received 0 Likes
on
0 Posts
Scubamike..thanks for the great post and pictures, I was alittle gun shy about taking the starter apart after I got my parts. Thanks to your pics and post I now have alittle more confidence. I'm also doing the SE Compensator sprocket at the same time. My problem was bike not starting due to strater grinding, have to "bump" it alot to get it to start. The initial problem is probably the compensator but it's smart to put in the upgraded starter clutch also.
Thanks again.
Thanks again.
#10
09-09-2012, 08:06 PM

Stage I
Join Date: Sep 2012
Location: Brazil
Posts: 1
Likes: 0
Received 0 Likes
on
0 Posts

