
Drilling the Cat = Photo Proof!
#1
 05-06-2013, 09:43 AM

After reading countless posts on De-cat'ing the header, i.e. cutting vs. drilling, I decided to try drilling first. I also figured I could lend evidence to just how effective drilling is and how much cat material is removed/ left behind.
I'm in a unique position b/c in my sales job, I sell something called a dental intraoral camera. It looks a lot like an electric toothbrush and dentists use it for close inspection. The camera auto focuses down to 1mm and has built-in lighting, and can capture still and video images. Since I have an older demo unit I decided to use it while drilling the cat. In order to reach way back into the pipe I created an "extension handle" for the camera out of a piece of PVC.
Results: The 16" long, 1"wide spade bit did a very good job. However it does leave a very small amount of material where the angle of the bit simply can't reach. As you'll see in the pictures the remaining material is about 3x as thick as the dime, about 2-3x's as wide as the dime and based on the video clip, which I can't seem to post, the area is about 3x's as deep as the dime's size. Also, the material section is shaped like a wedge with the thickest part near the front (where the dime is) and then gets thinner towards the rear where the drill bit starts hitting it. I'm guessing the actual size of the material is no larger than a silver dollar, probably a bit smaller. It resides where the chamber expands and on the side farthest away from the slip-on/exhaust pipe opening.
My conclusion:
1) Because I had this camera and could inspect the work as I went, I'm OK with my result. Drilling does work however not as thoroughly as cutting the cat open. But considering how small the amount of left-over material is, I can't see it having any affect vs. it being removed.
2) I have no feedback on changes to heat build-up, sound or performance related to the de-cat. The bike was bone stock. In addition to the de-cat I also did Big Sucker a/c, XIED's and MGS slip-on's. Went out for 50 miles yesterday and the bike sounded and peformed great.
3) My goal for the de-cat was heat reduction. I know there's a debate on that too, but I decided to trust all those who complain about the heat and it's reduction once de-cat was done. I didn't want to leave it in only to find a big heat issue later this summer. In June, July & August, we've ot enough heat here in ATL as it is!
I hope this info helps others who are deciding on a course of action.
Good Luck!
Image 1: Here's the drill bit as close to the material as possible. Trust me, I tried very hard to get this piece out. This area is untouchable for the drill bit.
[IMG]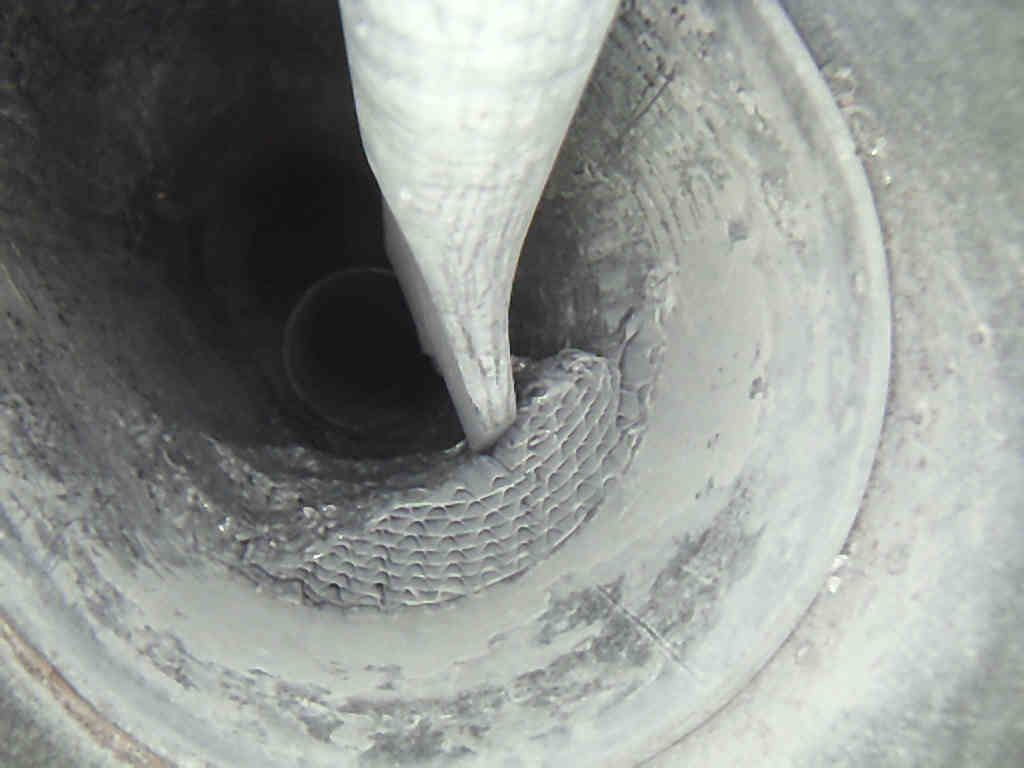 [/IMG]
Image 2: Here's the first shot w/ the dime; front to back:
[IMG] [/IMG]
Image 3: 2nd dime photo; bird's eye view:
[IMG] [/IMG]
Image 4: Finished! As good as it's going to get.
[IMG] [/IMG]
I'm in a unique position b/c in my sales job, I sell something called a dental intraoral camera. It looks a lot like an electric toothbrush and dentists use it for close inspection. The camera auto focuses down to 1mm and has built-in lighting, and can capture still and video images. Since I have an older demo unit I decided to use it while drilling the cat. In order to reach way back into the pipe I created an "extension handle" for the camera out of a piece of PVC.
Results: The 16" long, 1"wide spade bit did a very good job. However it does leave a very small amount of material where the angle of the bit simply can't reach. As you'll see in the pictures the remaining material is about 3x as thick as the dime, about 2-3x's as wide as the dime and based on the video clip, which I can't seem to post, the area is about 3x's as deep as the dime's size. Also, the material section is shaped like a wedge with the thickest part near the front (where the dime is) and then gets thinner towards the rear where the drill bit starts hitting it. I'm guessing the actual size of the material is no larger than a silver dollar, probably a bit smaller. It resides where the chamber expands and on the side farthest away from the slip-on/exhaust pipe opening.
My conclusion:
1) Because I had this camera and could inspect the work as I went, I'm OK with my result. Drilling does work however not as thoroughly as cutting the cat open. But considering how small the amount of left-over material is, I can't see it having any affect vs. it being removed.
2) I have no feedback on changes to heat build-up, sound or performance related to the de-cat. The bike was bone stock. In addition to the de-cat I also did Big Sucker a/c, XIED's and MGS slip-on's. Went out for 50 miles yesterday and the bike sounded and peformed great.
3) My goal for the de-cat was heat reduction. I know there's a debate on that too, but I decided to trust all those who complain about the heat and it's reduction once de-cat was done. I didn't want to leave it in only to find a big heat issue later this summer. In June, July & August, we've ot enough heat here in ATL as it is!
I hope this info helps others who are deciding on a course of action.
Good Luck!
Image 1: Here's the drill bit as close to the material as possible. Trust me, I tried very hard to get this piece out. This area is untouchable for the drill bit.
[IMG]
 [/IMG]
Image 2: Here's the first shot w/ the dime; front to back:
[IMG]
 [/IMG]
Image 3: 2nd dime photo; bird's eye view:
[IMG]
 [/IMG]
Image 4: Finished! As good as it's going to get.
[IMG]
 [/IMG]
Last edited by MikeBel; 09-12-2013 at 02:29 PM. Reason: repost of pictures
#4
05-06-2013, 10:13 AM
As for a tuner, I installed the XIED's to richen up the mixture b/c of the new a/c I installed. I'm not sure how much the cat affects back pressure. In my limited 50 mile test run, the bike ran strong with no decel popping, and I was intentionally trying to make it happen.
#5
05-06-2013, 10:15 AM
Interesting to see your pics of an actual internal shot. I wonder if a wider bit would have finished it off. I honestly couldn't feel any left over material with anything I could stick down there, but if that's all the material that's left then I agree the drilling method is still good to go.
#7
05-06-2013, 10:38 AM
Cruiser
Join Date: Mar 2012
Location: Sin City
Posts: 165
Likes: 0
Received 0 Likes
on
0 Posts
An actual post with photo proof and not just someone reprinting what was read on another forum or post. Outstanding job on your handy work. I have seen many hatchet jobs with ugly welds that sealed up the window that was cut in order to get to the cat. I am sure someone will be along to say something negative about the possibility of back pressure breaking off a piece of the remaining cat and sending it back into the valve seat but I say just ignore that kind of talk.
Two thumbs up for your pics, proof and work.
Two thumbs up for your pics, proof and work.
Trending Topics
#8
05-06-2013, 10:43 AM

Seasoned HDF Member
