
Got an Electrical Problem - Need Help
#21
 03-11-2007, 03:39 AM


Join Date: Jan 2005
Location: Westminster, MD
Posts: 100
Likes: 0
Received 0 Likes
on
0 Posts
Hello friends,
OK, got started on my stator replacement. This will be a little photo story of the process, complete with pictures.
Thursday, I took the left side floorboards, front and passenger, off, as well as the shifter pegs. Took out the primary drain plug, and let it empty into a bucket for a whole day. Ooo Ooo that smell, to quote Lynyrd Skynyrd.
Yesterday, I ordered a shifter shaft seal from Cometic. $2 plus shipping. You have to take off the whole primary to do that, so I'll do the stator and the shaft seal at the same time. Got on Zanotti's website, and ordered the stator also. Quite a bit less than HD list, even with shipping.
WARNING - The following pictures contain filth. If a dirty Harley bothers you, please don't go any further. My (somewhat lame but true) excuse is that I took two rides last week, and in both, I ran through A WHOLE BUNCH of those little snow melt streams. Made a pretty good mess of the scoot. The second ride was when the electrical problem appeared. Barely made it home. That was a couple of days ago. I also must confess that I ride and tinker with it more than I clean it. But it usually looks at least somewhat better than this .
.
I followed the manual closely, and here are the pics.....
The barn set-up. The old piece of carpet is handy for me old knees.....
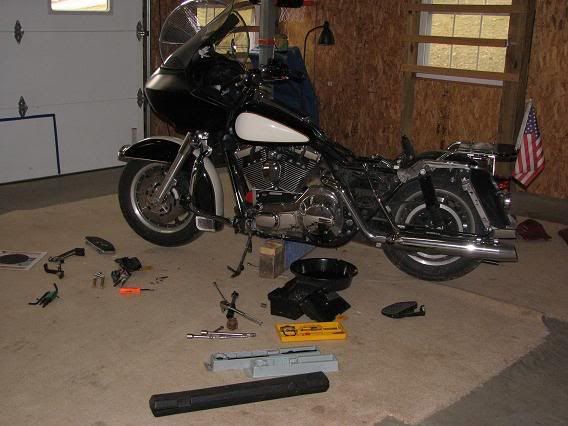
Took off the left side boards and shifters and drained the primary.....
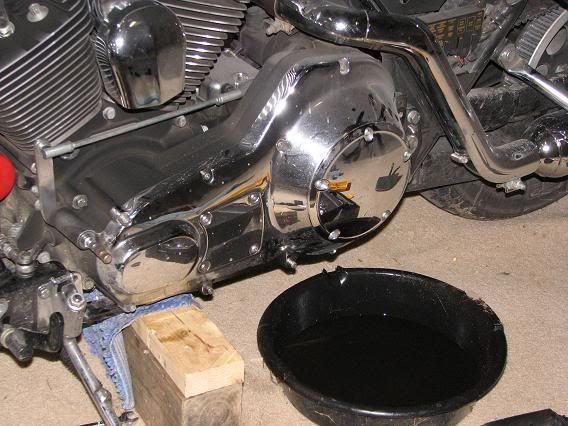
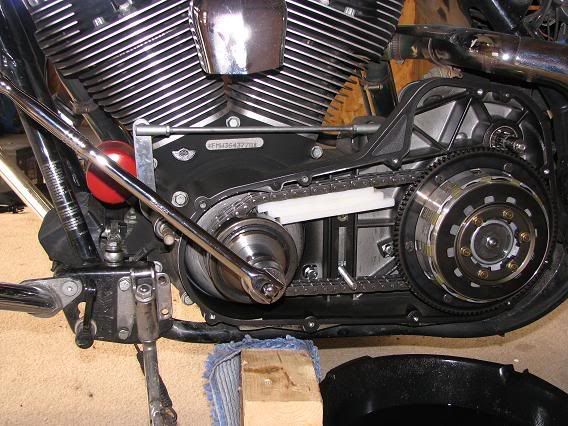
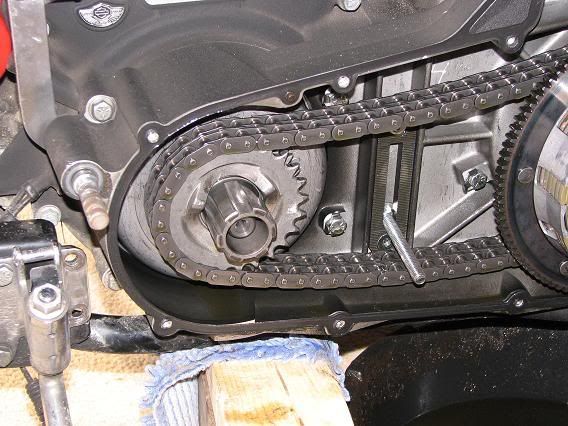
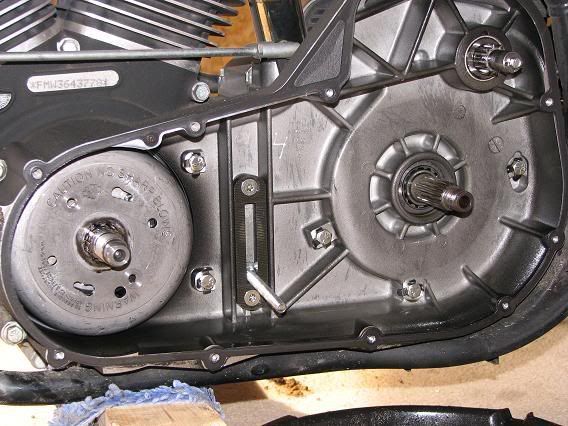
Removed all the screws and pulled the whole outer primary cover. You can see the HB-125 Auto Chain Tensioner.....
Removed the tensioner. The backplate for the tensioner can stay.....
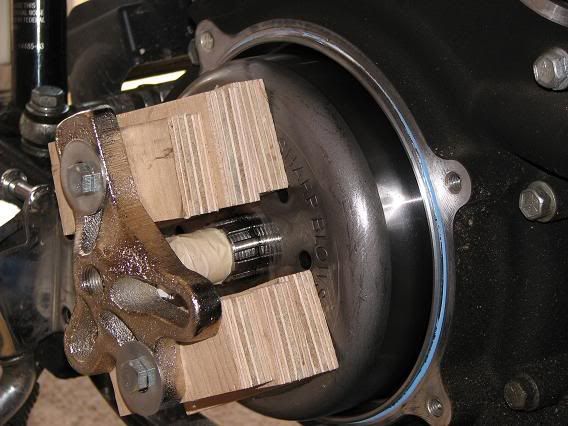
Went to the Dealer the other day. They wanted almost $40 for a piece of plastic called the primary chain locking tool. Read somewhere else that a chunk or two of a cutting board works just as well. So to Walmart I went. $4 later I had a new cutting board. Traded it with my wife for an old one.....
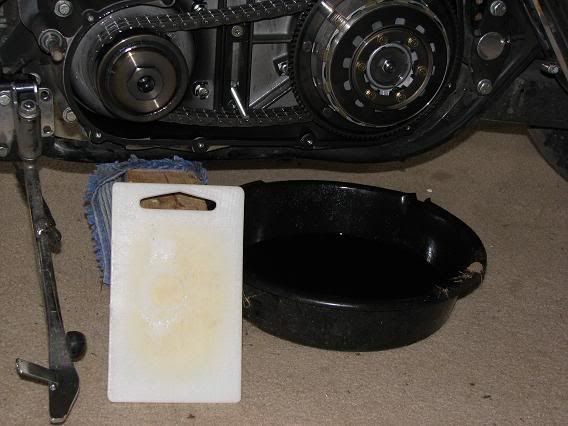
Cut three strips 1 1/4 inch wide, and screwed them together in step fashion to come up with my ($4!!) version.....
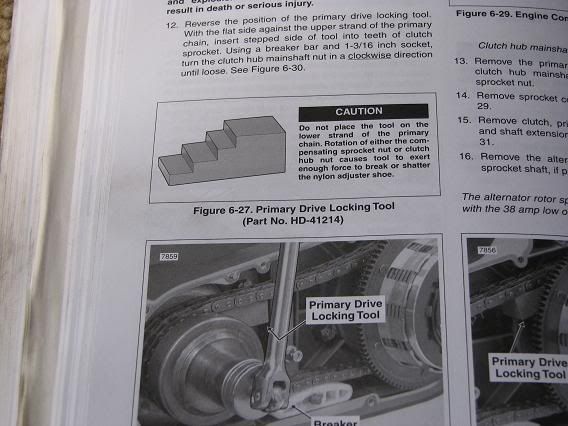
From the manual, HD's version of the tool.....
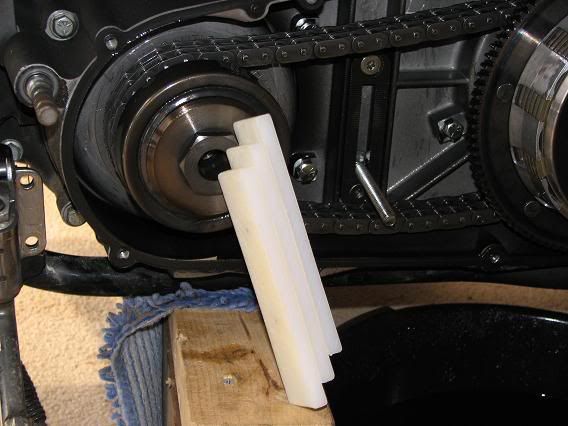
Breaker bar with 1 1/2 socket on the compensating nut, the locking tool in place. Added a pipe over the bar for leverage, and it came loose easier than I had read it might. Normal lefty loosy, righty tighty for this one.....
Nut and cover (has a name, manual is in the barn, sorry)removed.....
Will continue with more posts.
Ride on, ride well.
Doug
"I took the one less traveled by,
And that has made all the difference."
OK, got started on my stator replacement. This will be a little photo story of the process, complete with pictures.
Thursday, I took the left side floorboards, front and passenger, off, as well as the shifter pegs. Took out the primary drain plug, and let it empty into a bucket for a whole day. Ooo Ooo that smell, to quote Lynyrd Skynyrd.
Yesterday, I ordered a shifter shaft seal from Cometic. $2 plus shipping. You have to take off the whole primary to do that, so I'll do the stator and the shaft seal at the same time. Got on Zanotti's website, and ordered the stator also. Quite a bit less than HD list, even with shipping.
WARNING - The following pictures contain filth. If a dirty Harley bothers you, please don't go any further. My (somewhat lame but true) excuse is that I took two rides last week, and in both, I ran through A WHOLE BUNCH of those little snow melt streams. Made a pretty good mess of the scoot. The second ride was when the electrical problem appeared. Barely made it home. That was a couple of days ago. I also must confess that I ride and tinker with it more than I clean it. But it usually looks at least somewhat better than this
.I followed the manual closely, and here are the pics.....
The barn set-up. The old piece of carpet is handy for me old knees.....
Took off the left side boards and shifters and drained the primary.....
Removed all the screws and pulled the whole outer primary cover. You can see the HB-125 Auto Chain Tensioner.....
Removed the tensioner. The backplate for the tensioner can stay.....
Went to the Dealer the other day. They wanted almost $40 for a piece of plastic called the primary chain locking tool. Read somewhere else that a chunk or two of a cutting board works just as well. So to Walmart I went. $4 later I had a new cutting board. Traded it with my wife for an old one.....
Cut three strips 1 1/4 inch wide, and screwed them together in step fashion to come up with my ($4!!) version.....
From the manual, HD's version of the tool.....
Breaker bar with 1 1/2 socket on the compensating nut, the locking tool in place. Added a pipe over the bar for leverage, and it came loose easier than I had read it might. Normal lefty loosy, righty tighty for this one.....
Nut and cover (has a name, manual is in the barn, sorry)removed.....
Will continue with more posts.
Ride on, ride well.
Doug
"I took the one less traveled by,
And that has made all the difference."
#22
03-11-2007, 03:48 AM
Join Date: Jan 2005
Location: Westminster, MD
Posts: 100
Likes: 0
Received 0 Likes
on
0 Posts
Continuing on.....
I used my new retaining ring pliers to remove the retaining ring spring thingy on the clutch basket. Yes, I followed the manual's strong warning to wear goggles for eye protection. It went easliy, without spring flying incident.....
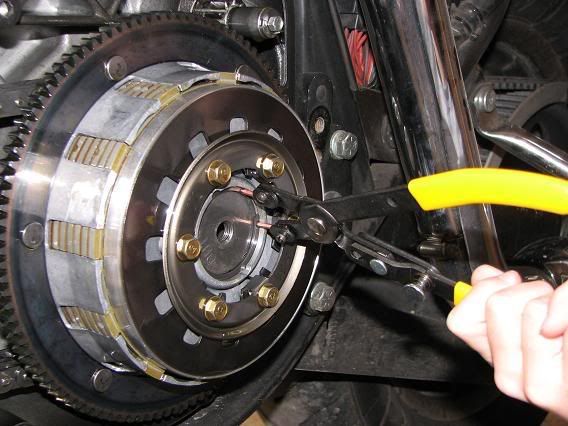
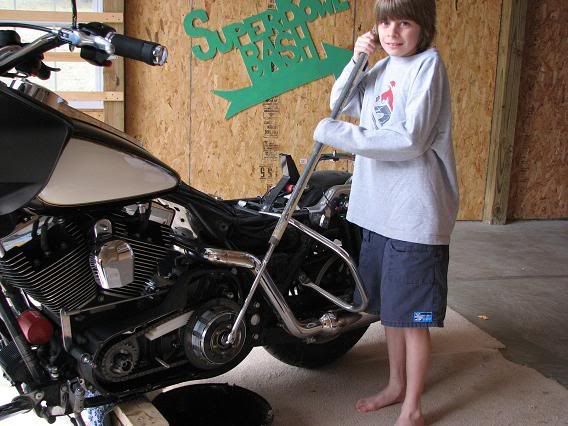
Time to put the breaker bar with 1 3/16 inch socket on the clutch main nut. This one is reverse threaded, righty loosy. The locking tool is now on the upper right under the primary chain. My trusty assistant, ready to heave ho. This one went easy also.....
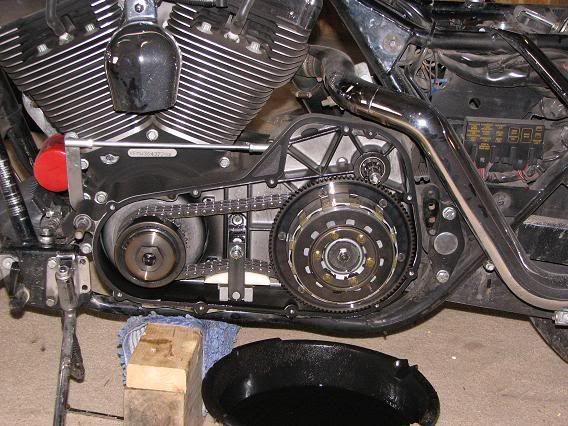
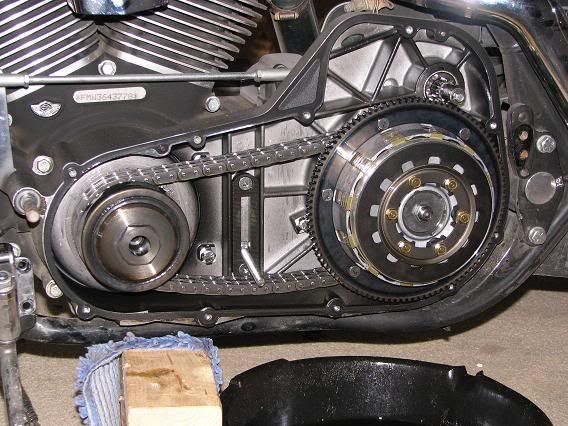
I removed the adjuster nut and screw along with the little plate. Then I pulled out the sprocket, chain, and clutch basket, just like the manual said. Here are all the primary contents.....
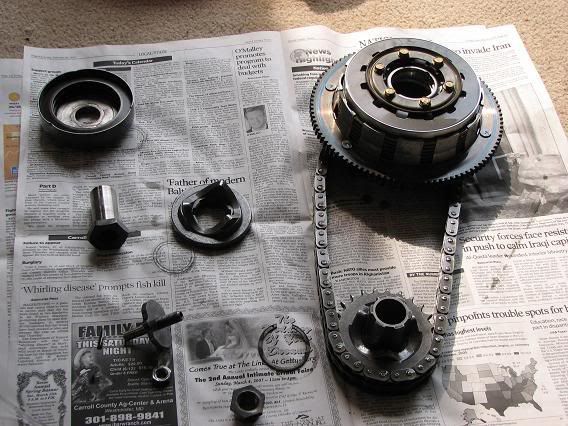
Just the Inner Primary left on the bike now.....
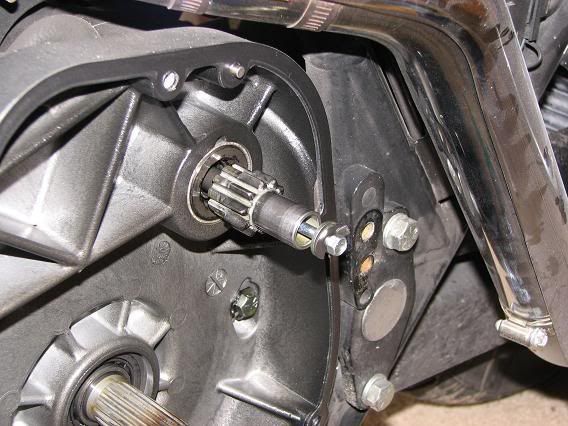
Removed the little Starter Jackshaft nut, and pulled out the jackshaft screw and sleeve.....
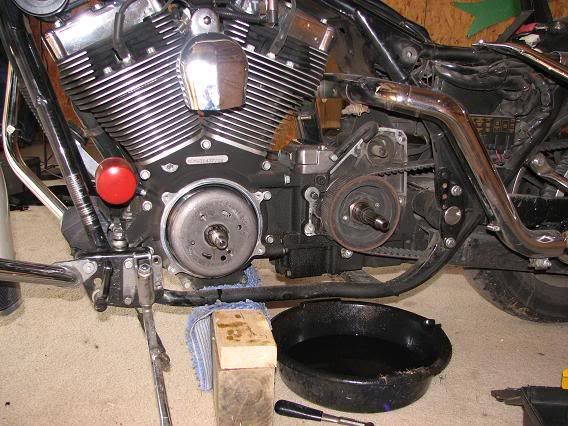
Kept following the manual. Went to the right side of the bike and removed the two screws securing the starter. They go into the backside of the inner primary case. Back to the left side. Removed the two front bolts, and then loosened the locking tabs on the five inside bolts that hold the inner primary to the motor and trans. Removed them, and then pulled off the inner primary. Man the filth. The leaking shifter shaft seal sure didn't help.....
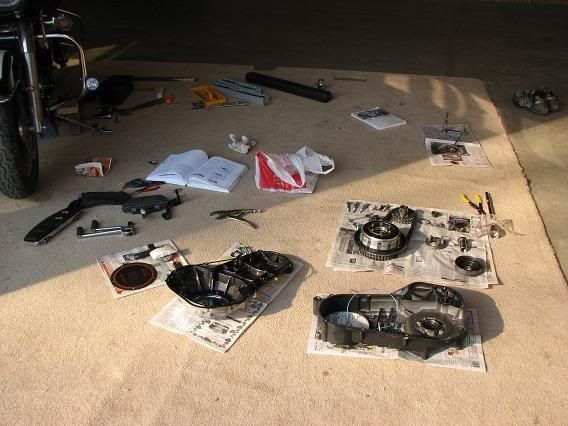
That's all for today. Took my time. Actually kind of enjoying it now. It's a challenge. Next will be the removal of the rotor over the stator. There is a special HD tool just for that. I've got a plan, and we'll see if it works. Can't wait to get the rotor off and get a gander at that stator.
Here's the barn now, alot of stuff laid out.
Got about 2 -3 easy hours in it so far. Just taking my time, and trying to get it right. Will post back when I make some more progress. Once I get the rotor off and the stator removed, I'll have to wait for the parts to arrive before I can do much else. Could be a week or a little longer.
Hmm. Maybe I'll take off the front wheel and fender, since they are already up off the ground a few inches. I can start working on getting that fender sanded down and primed. It's next on the "going to paint it red" list.
Ride on, ride well.
Doug
"I took the one less traveled by,
And that has made all the difference."
I used my new retaining ring pliers to remove the retaining ring spring thingy on the clutch basket. Yes, I followed the manual's strong warning to wear goggles for eye protection. It went easliy, without spring flying incident.....
Time to put the breaker bar with 1 3/16 inch socket on the clutch main nut. This one is reverse threaded, righty loosy. The locking tool is now on the upper right under the primary chain. My trusty assistant, ready to heave ho. This one went easy also.....
I removed the adjuster nut and screw along with the little plate. Then I pulled out the sprocket, chain, and clutch basket, just like the manual said. Here are all the primary contents.....
Just the Inner Primary left on the bike now.....
Removed the little Starter Jackshaft nut, and pulled out the jackshaft screw and sleeve.....
Kept following the manual. Went to the right side of the bike and removed the two screws securing the starter. They go into the backside of the inner primary case. Back to the left side. Removed the two front bolts, and then loosened the locking tabs on the five inside bolts that hold the inner primary to the motor and trans. Removed them, and then pulled off the inner primary. Man the filth. The leaking shifter shaft seal sure didn't help.....
That's all for today. Took my time. Actually kind of enjoying it now. It's a challenge. Next will be the removal of the rotor over the stator. There is a special HD tool just for that. I've got a plan, and we'll see if it works. Can't wait to get the rotor off and get a gander at that stator.
Here's the barn now, alot of stuff laid out.
Got about 2 -3 easy hours in it so far. Just taking my time, and trying to get it right. Will post back when I make some more progress. Once I get the rotor off and the stator removed, I'll have to wait for the parts to arrive before I can do much else. Could be a week or a little longer.
Hmm. Maybe I'll take off the front wheel and fender, since they are already up off the ground a few inches. I can start working on getting that fender sanded down and primed. It's next on the "going to paint it red" list.
Ride on, ride well.
Doug
"I took the one less traveled by,
And that has made all the difference."
#23
03-11-2007, 11:00 AM

#24
03-13-2007, 12:22 AM
Join Date: Jan 2005
Location: Westminster, MD
Posts: 100
Likes: 0
Received 0 Likes
on
0 Posts
Thanks again Wally,
Made a little more progress today.
On Saturday, I got to where I had to get the Rotor off of the stator. The High Amp (45) Rotor uses bigger magnets, and the manual and other stuff I read said that you couldn't just pull it off with risking damage to it or the shaft, or injury to yourself.
The manual shows a little tool for removing and re-installing the rotor. Kind of like a steering wheel or bearing puller. So the other day at the dealership, I also was looking for this tool. Doesn't look too fancy, I thought, shouldn't be too steep. Went to the parts counter, with part number in hand. Go to the accessories counter. OK walked over to the other side of the dealership to that counter. Me - "Hi, I need the rotor removal tool". Them - "Huh?" Me - "It's the tool to remove the rotor from the stator". Them - Talked to each other, seemed confused. Me - "Here, I have the part number". Them - "Maybe we should look in the tools book". Well a long story short, is they finally found the part in some tool book. Me - "How much is it?" Them - "We would have to order it". Me - OK, how much would it be?" Them - A long phone call to wherever they order tools from. I overheard that their cost was $168. "Your cost about $220". Me - "No thanks".
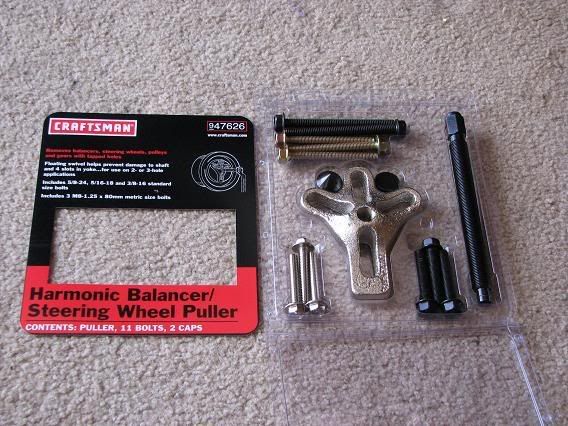
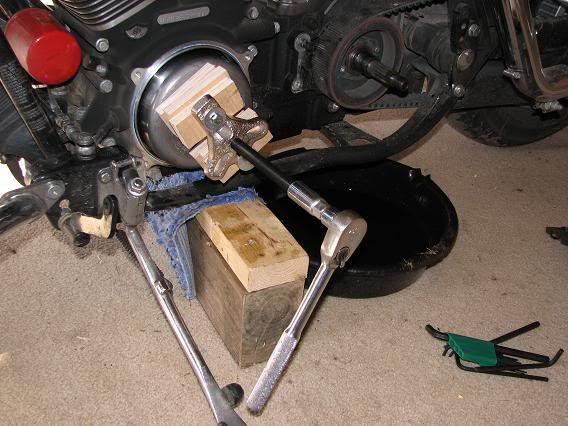
I read where someone did it using a wheel puller. So while at Sears picking up a couple of other items, I found this for $20. Probably could have got one for a little less at Auto Zone or similar, but I wanted something solid.....
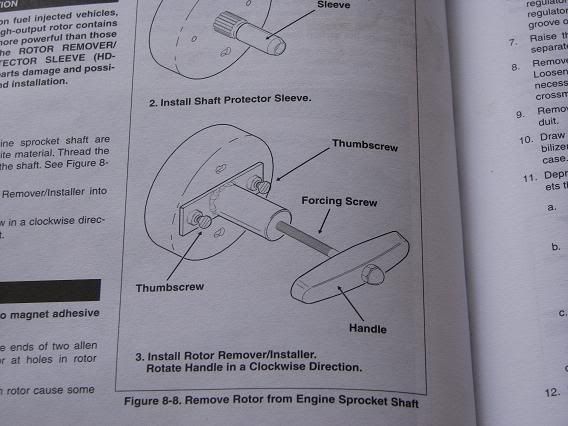
BTW, here is a picture of the HD tool in the manual.....
Needed a couple of small blocks of wood to get the puller frame up over the shaft.....
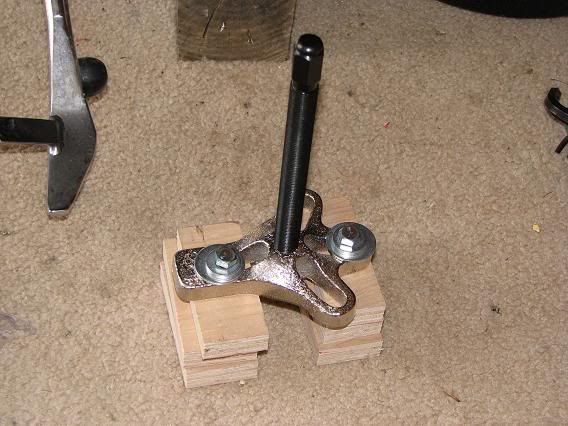
Put a little tape over the shaft for protection. Don't want to damage any of the little splines.....
Bought two 3 inch 5/16 bolts to attach through the puller/wood into the threaded screw holes in the rotor.....
Inserted the main threaded rod and put the socket wrench on.....
Turned the wrench for a little, and presto, it came right off. Not much force needed at all with this setup.....
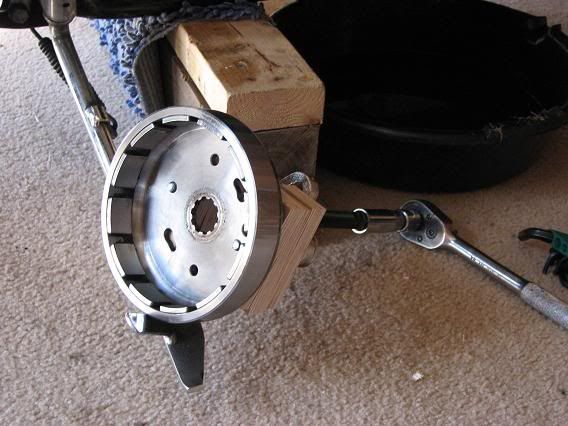
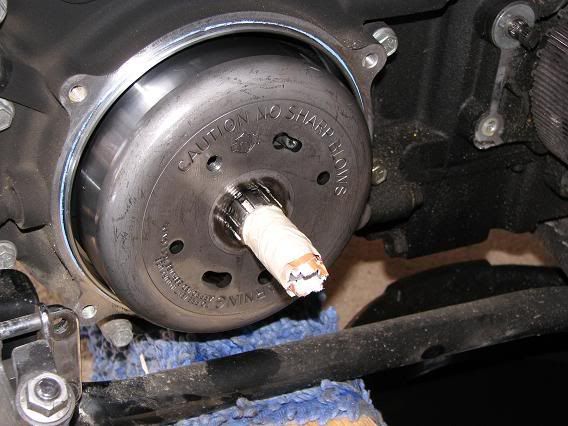
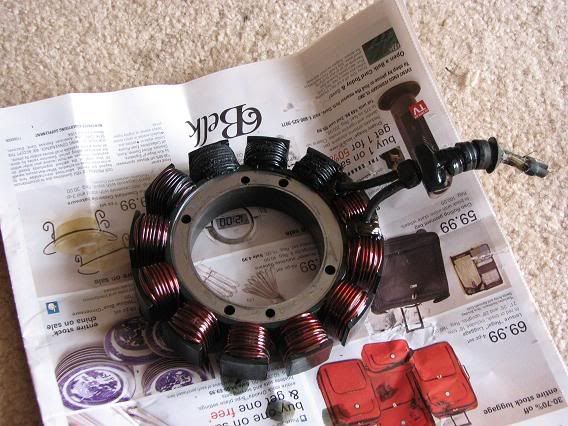
And behind the rotor, my problem, a fried stator. Was glad to see it actually. Assumed, but couldn't confirm, that this was in fact my electrical problem until I saw the stator.....
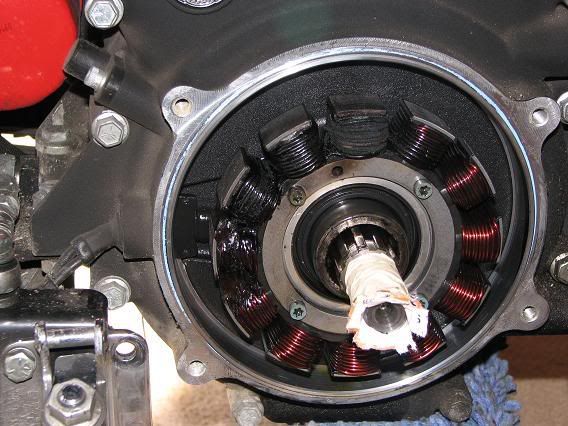
Removed the 4 screws, snipped the wires outside the primary, pulled the the wires and rubber plug/stopper thing back through the wire hole, and pulled out the stator. One last pic of the culprit.....
Now I have to wait for my new shifter shaft seal and the new stator to arrive. Could be several more days, or even a week or so. I'll keep this going as I (hopefully) progress.
BTW - I did pull the fender, and will try and get it sanded down and primed in the next few days. Hope to have it done in a week or so. I'm hoping to be back in the wind in 10 -12 days.
Ride on, ride well.
Doug
"I took the one less traveled by,
And that has made all the difference."
Made a little more progress today.
On Saturday, I got to where I had to get the Rotor off of the stator. The High Amp (45) Rotor uses bigger magnets, and the manual and other stuff I read said that you couldn't just pull it off with risking damage to it or the shaft, or injury to yourself.
The manual shows a little tool for removing and re-installing the rotor. Kind of like a steering wheel or bearing puller. So the other day at the dealership, I also was looking for this tool. Doesn't look too fancy, I thought, shouldn't be too steep. Went to the parts counter, with part number in hand. Go to the accessories counter. OK walked over to the other side of the dealership to that counter. Me - "Hi, I need the rotor removal tool". Them - "Huh?" Me - "It's the tool to remove the rotor from the stator". Them - Talked to each other, seemed confused. Me - "Here, I have the part number". Them - "Maybe we should look in the tools book". Well a long story short, is they finally found the part in some tool book. Me - "How much is it?" Them - "We would have to order it". Me - OK, how much would it be?" Them - A long phone call to wherever they order tools from. I overheard that their cost was $168. "Your cost about $220". Me - "No thanks".
I read where someone did it using a wheel puller. So while at Sears picking up a couple of other items, I found this for $20. Probably could have got one for a little less at Auto Zone or similar, but I wanted something solid.....
BTW, here is a picture of the HD tool in the manual.....
Needed a couple of small blocks of wood to get the puller frame up over the shaft.....
Put a little tape over the shaft for protection. Don't want to damage any of the little splines.....
Bought two 3 inch 5/16 bolts to attach through the puller/wood into the threaded screw holes in the rotor.....
Inserted the main threaded rod and put the socket wrench on.....
Turned the wrench for a little, and presto, it came right off. Not much force needed at all with this setup.....
And behind the rotor, my problem, a fried stator. Was glad to see it actually. Assumed, but couldn't confirm, that this was in fact my electrical problem until I saw the stator.....
Removed the 4 screws, snipped the wires outside the primary, pulled the the wires and rubber plug/stopper thing back through the wire hole, and pulled out the stator. One last pic of the culprit.....
Now I have to wait for my new shifter shaft seal and the new stator to arrive. Could be several more days, or even a week or so. I'll keep this going as I (hopefully) progress.
BTW - I did pull the fender, and will try and get it sanded down and primed in the next few days. Hope to have it done in a week or so. I'm hoping to be back in the wind in 10 -12 days.
Ride on, ride well.
Doug
"I took the one less traveled by,
And that has made all the difference."
#26
03-13-2007, 01:11 AM

just curious if INSTEAD of using a "primary chain locking tool" you used an impact wrench (electric or air) if it would do the trick without needing the tool. That's what we did on my son's YZ and it broke free without a worry. It there a concern doing that to the bottom end of a Harley block?
#27
03-13-2007, 05:58 AM

good job.
If you want any suggestions, at this address you can find my tutorial that i made when I have changed my belt
http://www.caputmundicrew.it/tutorialcinghia.pdf
If you want any suggestions, at this address you can find my tutorial that i made when I have changed my belt
http://www.caputmundicrew.it/tutorialcinghia.pdf
#28
03-13-2007, 11:20 PM

Road Captain
Join Date: May 2006
Location: Citizen of the Republic of Texas, now in GA
Posts: 554
Likes: 0
Received 0 Likes
on
0 Posts

#30
03-21-2007, 11:42 AM
Join Date: Jan 2005
Location: Westminster, MD
Posts: 100
Likes: 0
Received 0 Likes
on
0 Posts
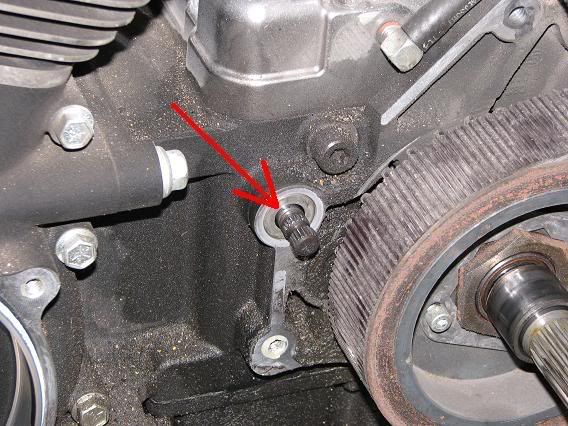
OK, new stator arrived Monday, and it is time to get back to it. Wanted to get the new Cometic shifter shaft seal in. Went to work on getting the old (leaking) one out. Read it can be a little difficult.
Here is the old leaking seal.....
Drilled two small holes in the old seal.....

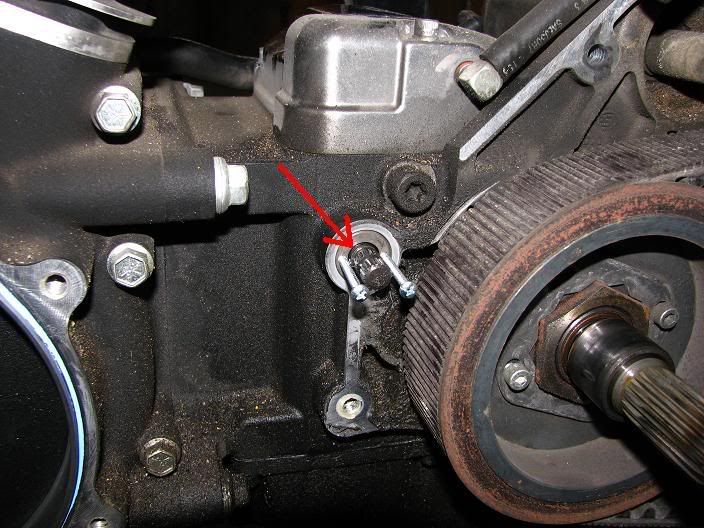
Screwed in two screws and pulled with pliers. Didn't work. BTW - Notice the mess the leaking seal made:[sm=smiley6.gif].....
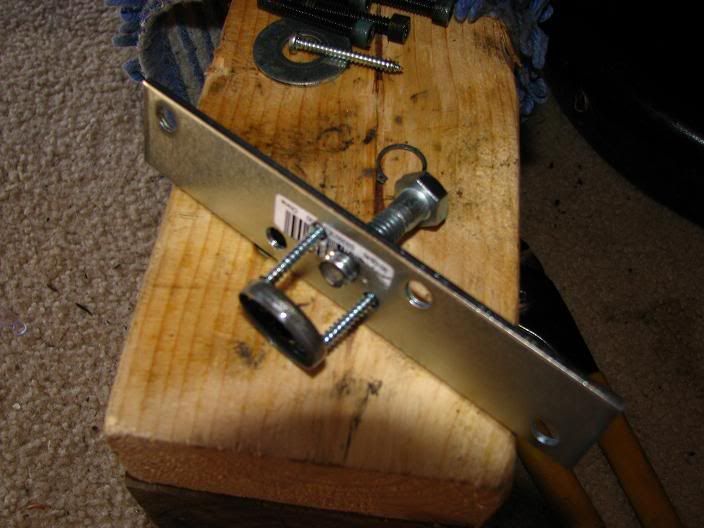
Tried it several more times, and no success. Took a break, and posted a request for help. Got several answers. Decided to make a mini puller. Bought a small metal plate and drilled and tapped a bolt hole, and drilled 2 small holes. Here it is.....
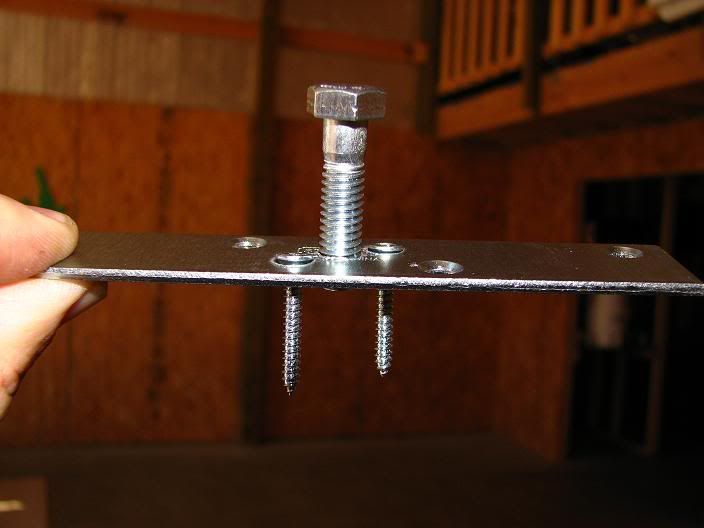
Attached to the seal with the 2 sheet metal screws.....
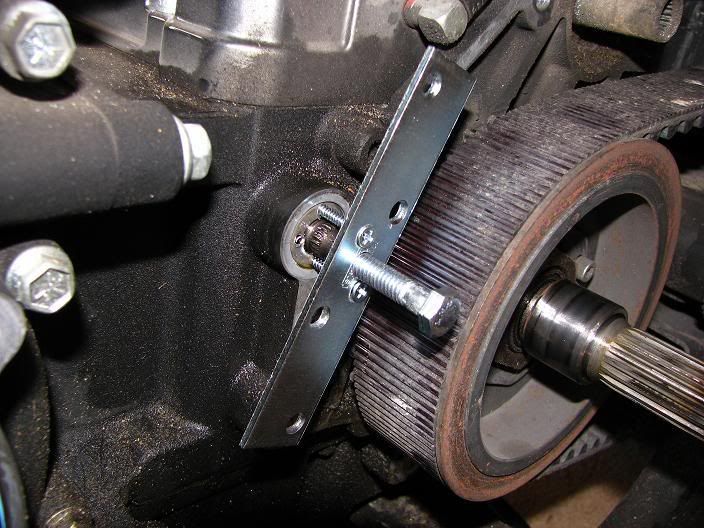
Tightend the nut, and the seal pulled right out!.....
The shifter shaft with the seal removed.....
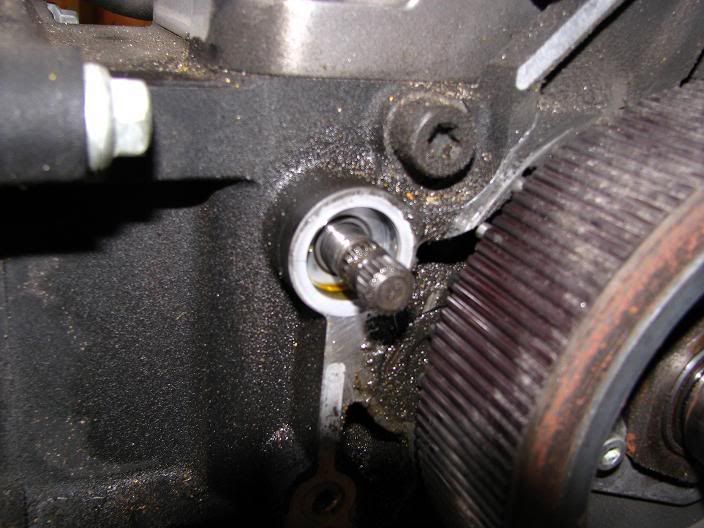
Cleaned around the shaft opening real careful like, and pushed the new Cometic seal on.....

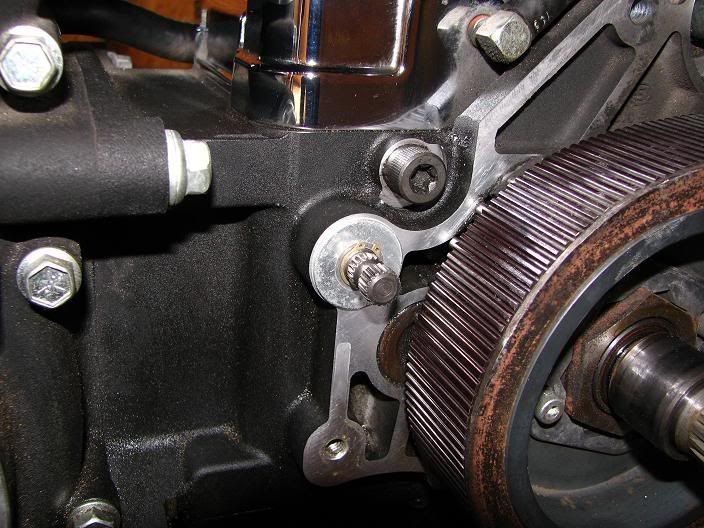
Cleaned up the rest of the area and case, and put the washer and lock ring on.....
Continued in next post.....
Ride on, ride well.
Doug
"I took the one less traveled by,
And that has made all the difference."
Here is the old leaking seal.....
Drilled two small holes in the old seal.....
Screwed in two screws and pulled with pliers. Didn't work. BTW - Notice the mess the leaking seal made:[sm=smiley6.gif].....
Tried it several more times, and no success. Took a break, and posted a request for help. Got several answers. Decided to make a mini puller. Bought a small metal plate and drilled and tapped a bolt hole, and drilled 2 small holes. Here it is.....
Attached to the seal with the 2 sheet metal screws.....
Tightend the nut, and the seal pulled right out!.....
The shifter shaft with the seal removed.....
Cleaned around the shaft opening real careful like, and pushed the new Cometic seal on.....
Cleaned up the rest of the area and case, and put the washer and lock ring on.....
Continued in next post.....
Ride on, ride well.
Doug
"I took the one less traveled by,
And that has made all the difference."