Ongoing '14 Tri-Glide build-out, lots of pics, & thoughts on the differences
#61
 07-15-2014, 01:13 AM

Join Date: Nov 2010
Location: Red Banks, Mississippi
Posts: 17,464
Received 3,940 Likes
on
2,295 Posts
Ok, another picture update.
I already had a Power Vision tune on the bike while it was breaking in. But I recently did the rest of the Stage 1 by adding the Outlaw 636v A/C system and some Fuel Moto 2-1-2 headers, finished off (for now) with some Rush Slip-ons.
Stock A/C removed, stock headers removed. Ready to install the new headers.
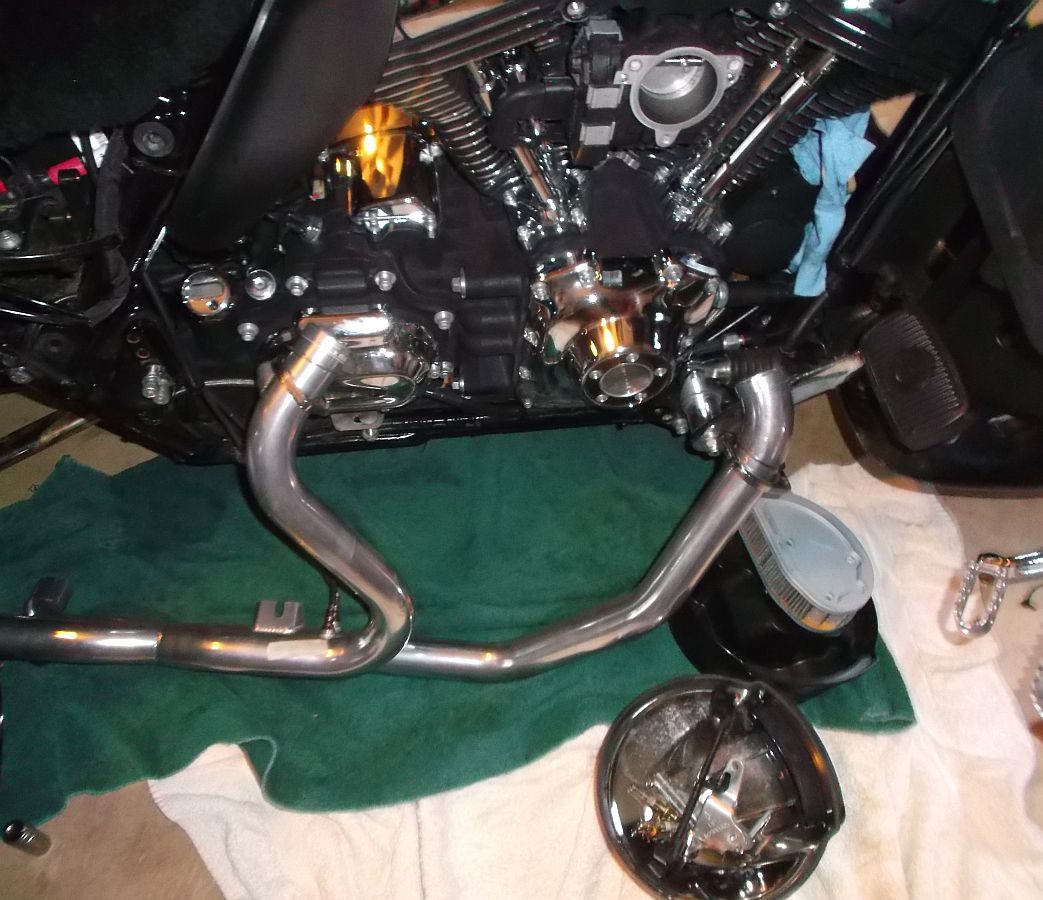
Got the catless 2-1-2 headers installed, along with the slip-ons and the Outlaw 636v installed.
DETAILS-
On the 2011 TG I cut out the cat on the stock headers. This time I decided to get some headers that were already catless, also that would have the bung for the wide-band sensors. (Devin as the "PRO auto-tune" for the Power Vision that I'm going to mess with).
Also, got them ceramic coated for some heat reduction.
For a few months I've been paying close attention to the sound of slip-ons, and I kept liking the sound of the Rush best. So I put my old Rush Slip-ons on. No Baffles, just the TTI W258's. (that's the configuration that produced the best dyno #'s on the 2011, and I like the sound just fine ).
).
However, I will be building some slip-ons from scratch in the next couple of months. I believe they will produce more power, and hopefully I will like the sound. We'll see.
One complication encountered...the OilBud Oil Cooler thermostat housing sticks up too far for the headers with the wide-band sensors. I called Oil Bud and he overnighted me a shorter housing...except it did not show up...someone elses parts were in the box he sent me. We ended up fabricating our own plate for the thermostat housing.
On the OilBud, I am still not done testing it...will report more when I have a definitive conclusion.
The headers installed easily and quickly, re-using the stock heat shields.
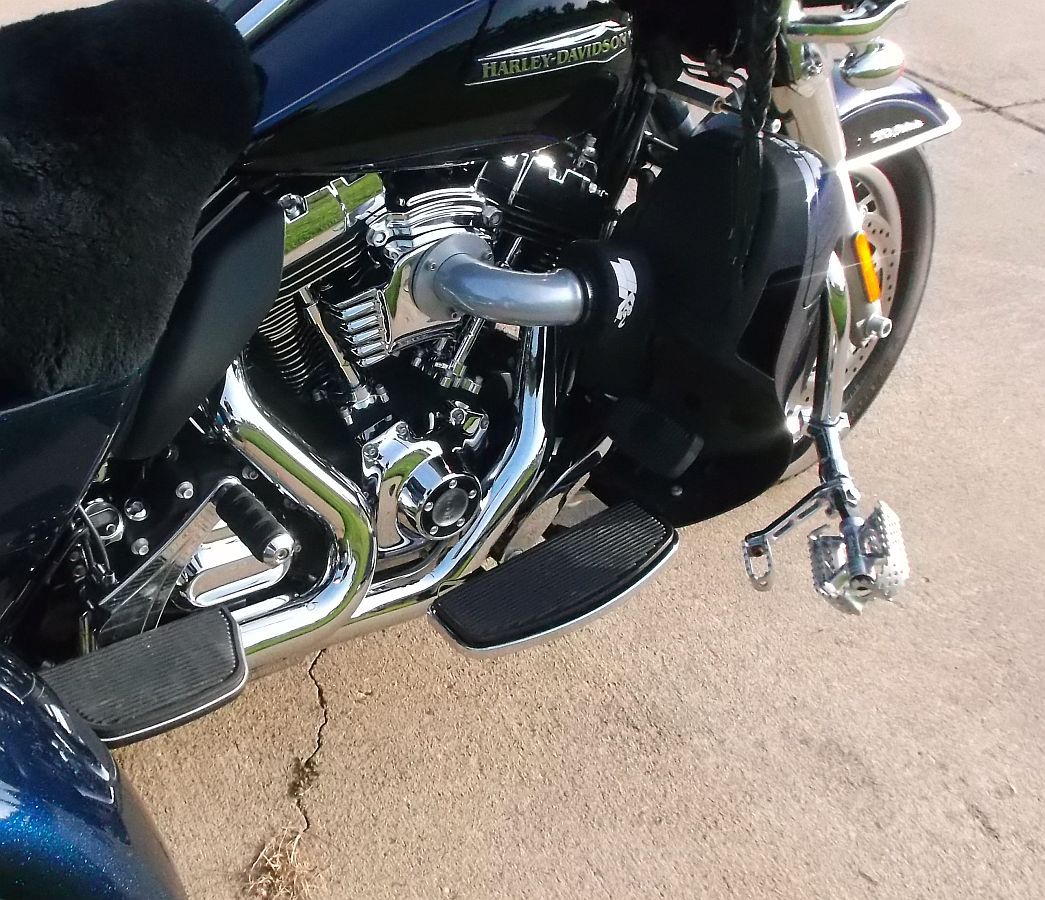
Because the 636v dyno's out ever so slightly better than the 587, even with the shorty filter element, that is what I installed. However, I am not at all sure I like the look with the shorty filter. I may end up putting a 587 on it.
On the TBW Servo Cover and the Support Bracket cover. I am not one much for chrome, but I REALLY like the set-up quite well. Covers up the wires from the servo motor, and the Rocker covers are nicely tied together with the support bracket cover.
Results (so far)
I have had it out on the road only about 100 miles since the Stage 1 upgrade. Did a couple of auto-tune runs. WOW! Stock (with the Power Vision) this thing was stronger than the Stage 1 2011 TG (which dyno'd at 97 ft. lbs). Now with the Stage 1 on the 2014, it has significantly more power! Will be interesting to see what #'s it produces. It is more than enough for the riding we do.
As far as heat, we will know much better in a week or so. Mary and I are going on a 4 day ride this coming weekend and I'll report back after that on the heat (or hopefully lack thereof).
Wiring-
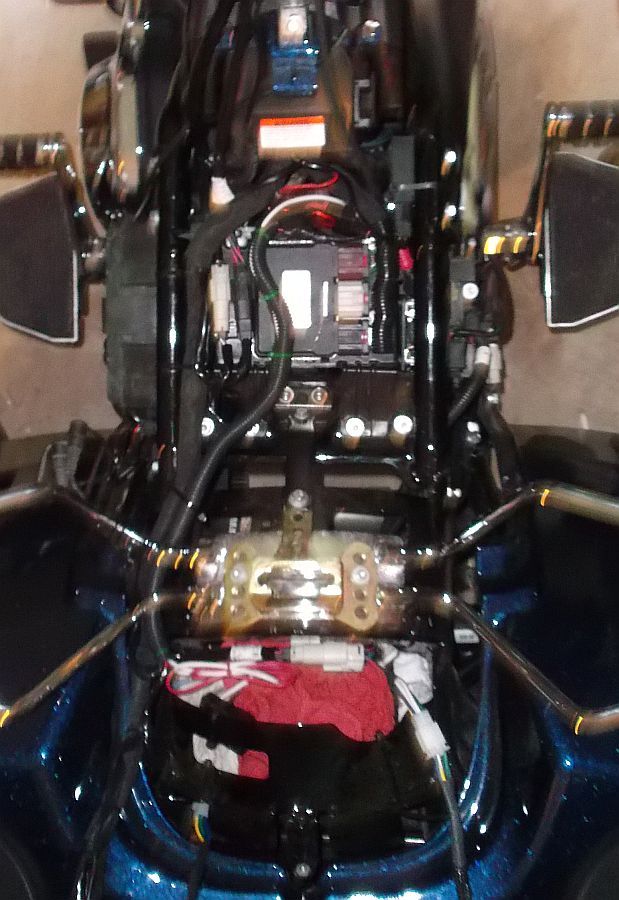
Next thing I did was a bunch of wiring.
Power Point in Tour-Pak
Two ports for heated gear
Cig Lighter mounted on handlebars
Power Vision cable routed better
Already had the Wards Parts Werks fans wire, but cleaned that up a bit
Isolator, canbus converter, and adapter for some aux lights
These are all connected directly to the battery with inline fuses. It was a real rats nest of wires once I had hooked everything up and tested to make sure it was all working. All that went without a hitch. But I did not take a pic of it when it was a rats nest...just too nasty looking.
But below is a pic of how it turned out once I tucked almost all the wires into a flexible wire conduit. I was more than a little nervous/cautious doing all this wiring on a Canbus system. But it all worked out well, and is much cleaner than the wiring I did on the 2011 TG.
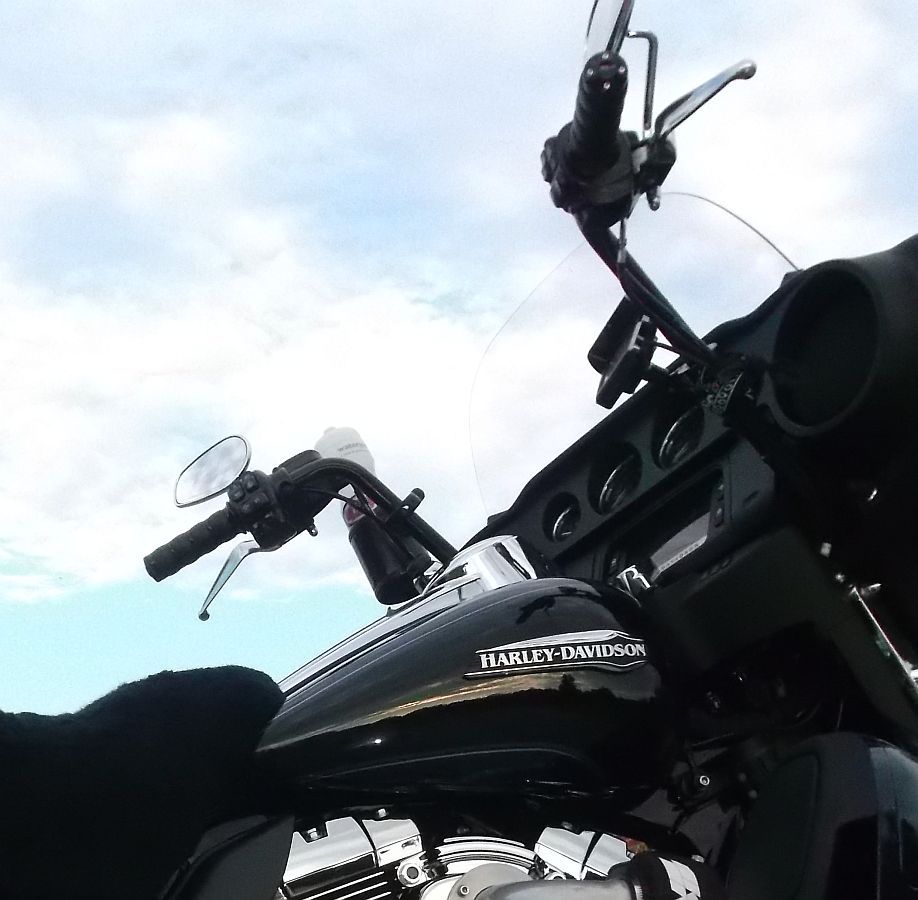
Handlebars-
I need to take some better pics, but the one below are the stock bars, extended 9" longer. Much more comfortable, and I have the following mounted on them with room to spare.
Drink holder
Power Vision
Cig Lighter
Video Camera mount
I also have some ISO grips on it and am really starting to feel a bit at home on the 2014.
Will have more to report after this next trip.
I already had a Power Vision tune on the bike while it was breaking in. But I recently did the rest of the Stage 1 by adding the Outlaw 636v A/C system and some Fuel Moto 2-1-2 headers, finished off (for now) with some Rush Slip-ons.
Stock A/C removed, stock headers removed. Ready to install the new headers.
Got the catless 2-1-2 headers installed, along with the slip-ons and the Outlaw 636v installed.
DETAILS-
On the 2011 TG I cut out the cat on the stock headers. This time I decided to get some headers that were already catless, also that would have the bung for the wide-band sensors. (Devin as the "PRO auto-tune" for the Power Vision that I'm going to mess with).
Also, got them ceramic coated for some heat reduction.
For a few months I've been paying close attention to the sound of slip-ons, and I kept liking the sound of the Rush best. So I put my old Rush Slip-ons on. No Baffles, just the TTI W258's. (that's the configuration that produced the best dyno #'s on the 2011, and I like the sound just fine
).However, I will be building some slip-ons from scratch in the next couple of months. I believe they will produce more power, and hopefully I will like the sound. We'll see.
One complication encountered...the OilBud Oil Cooler thermostat housing sticks up too far for the headers with the wide-band sensors. I called Oil Bud and he overnighted me a shorter housing...except it did not show up...someone elses parts were in the box he sent me. We ended up fabricating our own plate for the thermostat housing.
On the OilBud, I am still not done testing it...will report more when I have a definitive conclusion.
The headers installed easily and quickly, re-using the stock heat shields.
Because the 636v dyno's out ever so slightly better than the 587, even with the shorty filter element, that is what I installed. However, I am not at all sure I like the look with the shorty filter. I may end up putting a 587 on it.
On the TBW Servo Cover and the Support Bracket cover. I am not one much for chrome, but I REALLY like the set-up quite well. Covers up the wires from the servo motor, and the Rocker covers are nicely tied together with the support bracket cover.
Results (so far)
I have had it out on the road only about 100 miles since the Stage 1 upgrade. Did a couple of auto-tune runs. WOW! Stock (with the Power Vision) this thing was stronger than the Stage 1 2011 TG (which dyno'd at 97 ft. lbs). Now with the Stage 1 on the 2014, it has significantly more power! Will be interesting to see what #'s it produces. It is more than enough for the riding we do.
As far as heat, we will know much better in a week or so. Mary and I are going on a 4 day ride this coming weekend and I'll report back after that on the heat (or hopefully lack thereof).
Wiring-
Next thing I did was a bunch of wiring.
Power Point in Tour-Pak
Two ports for heated gear
Cig Lighter mounted on handlebars
Power Vision cable routed better
Already had the Wards Parts Werks fans wire, but cleaned that up a bit
Isolator, canbus converter, and adapter for some aux lights
These are all connected directly to the battery with inline fuses. It was a real rats nest of wires once I had hooked everything up and tested to make sure it was all working. All that went without a hitch. But I did not take a pic of it when it was a rats nest...just too nasty looking.
But below is a pic of how it turned out once I tucked almost all the wires into a flexible wire conduit. I was more than a little nervous/cautious doing all this wiring on a Canbus system. But it all worked out well, and is much cleaner than the wiring I did on the 2011 TG.
Handlebars-
I need to take some better pics, but the one below are the stock bars, extended 9" longer. Much more comfortable, and I have the following mounted on them with room to spare.
Drink holder
Power Vision
Cig Lighter
Video Camera mount
I also have some ISO grips on it and am really starting to feel a bit at home on the 2014.
Will have more to report after this next trip.


#63
07-17-2014, 12:17 AM
Join Date: Nov 2010
Location: Red Banks, Mississippi
Posts: 17,464
Received 3,940 Likes
on
2,295 Posts
Thanks! Glad you are liking them.
Yes, was pretty busy getting her ready for our 5 day trip. Today was the first day and it went well! Not sure if I'll have internet the next 3-4 days, but will be posting up some pics after we get back.
#64
07-22-2014, 01:54 PM
Join Date: Nov 2010
Location: Red Banks, Mississippi
Posts: 17,464
Received 3,940 Likes
on
2,295 Posts
Back from trip and will be posting up some pics and a vid later this week.
Another little thing I discovered on the '14 TG last week-
The cable housing for the parking brake runs directly under the drain plug for the primary...no way to drain the primary without getting oil on the cable housing. It is easy to clean up though. After wiping it down well, it did not accumulate any dirt from any oil residue.
#65
07-22-2014, 03:21 PM

Advanced
Join Date: Dec 2010
Location: Columbus, NE
Posts: 83
Likes: 0
Received 0 Likes
on
0 Posts
Why does she like linked brakes better? Decades of riding have me using primarily my front brakes...without linked brakes the front dives a bit, whereas the rear brakes are more comfortable for her...but I have never gotten into that habit of using the rear brakes as primary stopping power.
With the linked brakes, when I squeeze the "front" brake lever, it applies both front and rear brakes...less dive, she's more comfortable.
While talking about brakes....I do not like the linked brakes. It is not a huge irritant, but I just don't like it. I want to control which brakes get how much use. Something that surprised me when I first started riding the TG-trail braking works in the curves...would have never thought it would, but it does...maybe not as much as on 2 wheels, but certainly enough to be able to be more aggressive in the curves.
With the linked brakes, trail braking does not work so good...maybe I will find a sweet spot, but so far I have not.
A few more comments on the brakes-
I never had any problem with the rear brakes on the 2011. I could lock them up at will...but it did take some pressure, and being generous, the feedback was weak...but they got the job done for me and I never felt I was in a compromised situation because of them.
On the 2014 the rear brakes are much more effective, with better feedback.
Related to that...I thought the linked brakes would work with the same proportioning whether I used the "front" brake lever or the "rear" brake pedal.
They do not. No matter how hard I squeeze the brake lever, I do not get as much feedback OR rear braking as I do when I step on the brake pedal. Interesting.
Bottom line- brakes work better, Mary's more comfortable, and I don't like them being linked. lol
from HD:
New for 2014 is the hydraulically linked rear braking system. This system uses a hydraulic linking rather than electronic linking like the touring models. The linking only occurs when the rider uses the rear brakes.
The linking of the rear to the front brake system is accomplished by the 6 piston front calipers. There are two independent hydraulic circuits in the caliper.
The center two pistons are connected to the rear master cylinder and are 1� or 25.4mm in diameter.
The 4 remaining pistons are connected to the front master cylinder and are larger in diameter. If the same hydraulic pressure were applied to each system, the front would develop more braking power because the pressure on the pads would be greater due to the larger surface area of the 4 pistons verses the 2 smaller rear pistons.
#66
07-22-2014, 11:46 PM
Intermediate
Kevin, thanks for the sportster spacers, worked out great. Plus we hooked up with an extended foot brake from softbrake.com. All in all took about 1 1/2 hrs to complete and very nice. The wife and I gotta jump in the semi and head to Wichita and back to Renton,Wa but when we get back in I'll post some pics. Thanks and ride safe.
#67
07-23-2014, 12:41 AM
Join Date: Nov 2010
Location: Red Banks, Mississippi
Posts: 17,464
Received 3,940 Likes
on
2,295 Posts
Kevin, I am not sure if anyone mentioned this in regards to the linked braking. If I am not mistaken, the 2014 Tri-glide brakes are only linked on the rear brake pedal. The rear brake pedal controls the rear brakes plus 2 pistons on the front. The front brake lever controls 4 pistons on the front and nothing on the rear.
from HD:
New for 2014 is the hydraulically linked rear braking system. This system uses a hydraulic linking rather than electronic linking like the touring models. The linking only occurs when the rider uses the rear brakes.
The linking of the rear to the front brake system is accomplished by the 6 piston front calipers. There are two independent hydraulic circuits in the caliper.
The center two pistons are connected to the rear master cylinder and are 1� or 25.4mm in diameter.
The 4 remaining pistons are connected to the front master cylinder and are larger in diameter. If the same hydraulic pressure were applied to each system, the front would develop more braking power because the pressure on the pads would be greater due to the larger surface area of the 4 pistons verses the 2 smaller rear pistons.
#68
07-23-2014, 12:45 AM
Join Date: Nov 2010
Location: Red Banks, Mississippi
Posts: 17,464
Received 3,940 Likes
on
2,295 Posts
Kevin, thanks for the sportster spacers, worked out great. Plus we hooked up with an extended foot brake from softbrake.com. All in all took about 1 1/2 hrs to complete and very nice. The wife and I gotta jump in the semi and head to Wichita and back to Renton,Wa but when we get back in I'll post some pics. Thanks and ride safe.
Have a safe trip, and fun riding with your new mods when you return.
Looking forward to the pics!
#69
07-23-2014, 08:48 PM

Tourer
#70
07-25-2014, 12:10 AM
Join Date: Nov 2010
Location: Red Banks, Mississippi
Posts: 17,464
Received 3,940 Likes
on
2,295 Posts
A couple of tanks back I thought for sure I was going to get close to 6 gallons in it....I had traveled 26 miles further than I had on any other tank...but it turns out I was just getting better MPG, it still only took 5.56 gallons.
What I really need to do is carry a gas can with me and run out of fuel, and see how many miles it goes after the MTE is at 10 miles, and how much fuel I can put in.