Sportster 180 rear tire conversion write-up
#1
 01-31-2015, 03:49 PM


Join Date: Oct 2014
Location: Tyler, TX
Posts: 10
Likes: 0
Received 0 Likes
on
0 Posts
Hopefully this will help some of you guys attempting to do a 180 rear tire on your sportsters.. I tried to find information when doing my swap & it was a nightmare so i decided to write this to help my 2 wheel brothers. Please let me know if any revisions need to be made or for any tips or suggestions! Sorry i didn't get any pics during the process, it was a lot of trial & error.
My bike is a 2014 Sportster Forty-Eight XL1200X, I imagine it will work for most late model 07+ sports.
Parts you will need…
Michelin Scorcher 11 180/55R17 (HD part no. 43200011)
**you may be able to get away with other brands of tires, it is a tight fit so check your measurements, I chose this tire to match the OEM front tire on my 48.**
17x4.5 Street Bob 25mm rear wheel (HD part no. 41430-09 for black, 40979-08 for chrome) or any wheel of your choosing will work so long as it meets the same specs.
17” band & tube for the tire (most shops will have these when you get the tire mounted)
**NOTICE** The street bob wheel must be mounted BACKWARDS as the drive side and brake rotor are on the OPOSSITE side of a sportster vs a Dyna.******
Bearings (9276A) & sleeve (43905-08), if needed, I reused mine, as my bike only had 1,000 miles on it.
Two (2) spacers to re-center the wheel. If you have never noticed, the rear wheel of the sportsters sit slightly off-center. This will be necessary to avoid being too close to the frame rails on the left side.
eBay user diggnvball custom cut these spacers for me per my specifications, contact him if you need a source for them. Specifications are as follow:
Inside Diameter: 25mm
Outside Diamter: 1-1/2" (1.500)
Length: 3/16"
(0.1875)
and the other;
Inside Diameter: 25mm
Outside Diamter: 1-1/2"
(1.500)
Length: 1.28125"
Chain conversion parts, I do not know for certain if the belt can be reused. If your not afraid to hit the frame with an angle grinder and reuse the factory axle spacers i don't see why it wouldn't. My goal was to convert to chain anyway, maybe someone can provide this information at a latter date. This is the kit I used, give them a call for a custom ratio to suite your needs. You may also be able to piece together the kit and save some coin but this is the easiest option.
http://www.zippersperformance.com/pr...n-kits-xl.html
1. DO NOT lift the bike just yet. You will need all the help you can get breaking loose the nut on the transmission (this step is not necessary if you do not plan to do a chain conversion, however, as previously stated, I do not know if clearance exist for the belt)
2. Remove rear exhaust pipe (if necessary) and cover, etc to access transmission sprocket.
3. Remove transmission nut lock with the 2 allen screws.
4. Remove the transmission nut using a 1 7/8” socket. Keep in mind that **IT IS REVERSE THREAD** & good luck. It takes some serious muscle to get this SOB off.
5. Remove the seat & rear fender, etc & lift the rear of the bike & loosen the belt tensioners (10mm bolt at rear of swing arms)
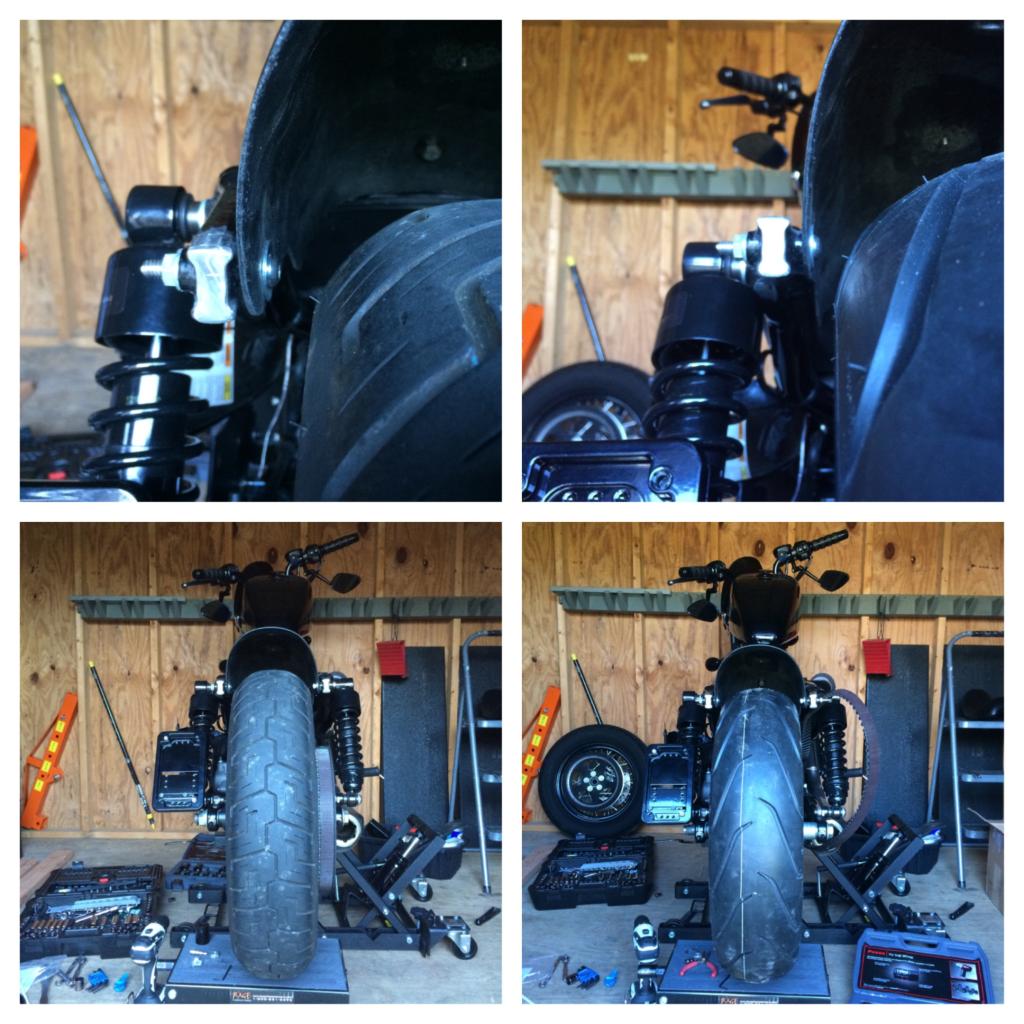
6. Remove the large axle nut from the “driver’s” side & slide out the axle sleeve, your wheel and tire should be free once you wrestle free the brake caliper. **You will reuse the ‘driver’ side spacer, do not discard it** You’ll need to undo the shock mount to get the belt free, or just cut it if you do not intent to reuse it.
7. Install bearings, rotor, and drive sprocket onto the new rear wheel/tire, torque to spec & don’t forget the loctite. (55-65 ft lbs)
8. Reinstall the wheel onto the bike, using the 1.28125” spacer in place of the OEM ‘passenger’ side spacer. The original ‘driver’ spacer will be reused between the wheel and caliper bracket, with the new 3/16” spacer placed between the swing arm and caliper bracket. Hope this all makes sense.
9. Install your new chain sprocket to the transmission (If doing chain conversion) and check & confirm alignment with your rear sprocket.
10. Ensure that the axle is slide all the way forward and install the new chain to the proper length.
11. Reinstall the transmission nut, put the bike in gear & torque to 50 ft lbs, replace the lock nut (again, don’t forget the loctite).
12. Tension your chain using the 10mm tensioners on the rear of the swing arms, measure the axle on each side from a common point to make sure it is perfectly straight, torque the axle (95-105 ft lbs).
13. Replace fender, seat, etc & enjoy how our bikes should have came from the factory
My bike is a 2014 Sportster Forty-Eight XL1200X, I imagine it will work for most late model 07+ sports.
Parts you will need…
Michelin Scorcher 11 180/55R17 (HD part no. 43200011)
**you may be able to get away with other brands of tires, it is a tight fit so check your measurements, I chose this tire to match the OEM front tire on my 48.**
17x4.5 Street Bob 25mm rear wheel (HD part no. 41430-09 for black, 40979-08 for chrome) or any wheel of your choosing will work so long as it meets the same specs.
17” band & tube for the tire (most shops will have these when you get the tire mounted)
**NOTICE** The street bob wheel must be mounted BACKWARDS as the drive side and brake rotor are on the OPOSSITE side of a sportster vs a Dyna.******
Bearings (9276A) & sleeve (43905-08), if needed, I reused mine, as my bike only had 1,000 miles on it.
Two (2) spacers to re-center the wheel. If you have never noticed, the rear wheel of the sportsters sit slightly off-center. This will be necessary to avoid being too close to the frame rails on the left side.
eBay user diggnvball custom cut these spacers for me per my specifications, contact him if you need a source for them. Specifications are as follow:
Inside Diameter: 25mm
Outside Diamter: 1-1/2" (1.500)
Length: 3/16"
(0.1875)
and the other;
Inside Diameter: 25mm
Outside Diamter: 1-1/2"
(1.500)
Length: 1.28125"
Chain conversion parts, I do not know for certain if the belt can be reused. If your not afraid to hit the frame with an angle grinder and reuse the factory axle spacers i don't see why it wouldn't. My goal was to convert to chain anyway, maybe someone can provide this information at a latter date. This is the kit I used, give them a call for a custom ratio to suite your needs. You may also be able to piece together the kit and save some coin but this is the easiest option.
http://www.zippersperformance.com/pr...n-kits-xl.html
1. DO NOT lift the bike just yet. You will need all the help you can get breaking loose the nut on the transmission (this step is not necessary if you do not plan to do a chain conversion, however, as previously stated, I do not know if clearance exist for the belt)
2. Remove rear exhaust pipe (if necessary) and cover, etc to access transmission sprocket.
3. Remove transmission nut lock with the 2 allen screws.
4. Remove the transmission nut using a 1 7/8” socket. Keep in mind that **IT IS REVERSE THREAD** & good luck. It takes some serious muscle to get this SOB off.
5. Remove the seat & rear fender, etc & lift the rear of the bike & loosen the belt tensioners (10mm bolt at rear of swing arms)
6. Remove the large axle nut from the “driver’s” side & slide out the axle sleeve, your wheel and tire should be free once you wrestle free the brake caliper. **You will reuse the ‘driver’ side spacer, do not discard it** You’ll need to undo the shock mount to get the belt free, or just cut it if you do not intent to reuse it.
7. Install bearings, rotor, and drive sprocket onto the new rear wheel/tire, torque to spec & don’t forget the loctite. (55-65 ft lbs)
8. Reinstall the wheel onto the bike, using the 1.28125” spacer in place of the OEM ‘passenger’ side spacer. The original ‘driver’ spacer will be reused between the wheel and caliper bracket, with the new 3/16” spacer placed between the swing arm and caliper bracket. Hope this all makes sense.
9. Install your new chain sprocket to the transmission (If doing chain conversion) and check & confirm alignment with your rear sprocket.
10. Ensure that the axle is slide all the way forward and install the new chain to the proper length.
11. Reinstall the transmission nut, put the bike in gear & torque to 50 ft lbs, replace the lock nut (again, don’t forget the loctite).
12. Tension your chain using the 10mm tensioners on the rear of the swing arms, measure the axle on each side from a common point to make sure it is perfectly straight, torque the axle (95-105 ft lbs).
13. Replace fender, seat, etc & enjoy how our bikes should have came from the factory
Last edited by kstamp09; 02-03-2015 at 01:55 PM.


#4
02-01-2015, 04:08 PM
Join Date: Oct 2014
Location: Tyler, TX
Posts: 10
Likes: 0
Received 0 Likes
on
0 Posts
but the tire is $300 from harley
wheel was roughly 250 used.
chain conversion was another $300.
probably around $25 for bearings.
you could probably get away with doing it for under $600 depending on what kind of deal you can get for a rear wheel, and i imagine the tire can be found for less. But thats assuming no chain conversion, which as i said I'm not sure if it the clearance exist for that. Wish i would have checked during the teardown.
#5
02-02-2015, 04:17 PM
Club Member
#6
02-03-2015, 08:08 PM
Road Master
Excellent thread kstamp09! I'm in the middle of doing a 180 conversion as well, but am keeping the belt. Without any modifications to the spacers, there's a 1/4" gap between the tire (I'm using a Scorcher 11 as well) and the belt. Adding a 3/16" spacer to the caliper side and removing 3/16" from the axle spacer on the belt side (as you did) will move the tire 3/16" closer to the belt, leaving only 1/16" between the belt and tire. TZrider did something similar but used a 3mm spacer on the caliper side:
https://www.hdforums.com/forum/sport...d-details.html
https://www.hdforums.com/forum/sport...sion-pics.html
Since you spaced the caliper 3/16" away from the swingarm using an axle spacer, do you now have a gap between the rest of the caliper and swingarm, or did you also use a 3/16" flat spacer to fill the gap? It looks like TZrider used a 3mm flat spacer in addition to the 3mm axle spacer.
#7
02-04-2015, 09:58 AM
Join Date: Oct 2014
Location: Tyler, TX
Posts: 10
Likes: 0
Received 0 Likes
on
0 Posts
Excellent thread kstamp09! I'm in the middle of doing a 180 conversion as well, but am keeping the belt. Without any modifications to the spacers, there's a 1/4" gap between the tire (I'm using a Scorcher 11 as well) and the belt. Adding a 3/16" spacer to the caliper side and removing 3/16" from the axle spacer on the belt side (as you did) will move the tire 3/16" closer to the belt, leaving only 1/16" between the belt and tire. TZrider did something similar but used a 3mm spacer on the caliper side:
https://www.hdforums.com/forum/sport...d-details.html
https://www.hdforums.com/forum/sport...sion-pics.html
Since you spaced the caliper 3/16" away from the swingarm using an axle spacer, do you now have a gap between the rest of the caliper and swingarm, or did you also use a 3/16" flat spacer to fill the gap? It looks like TZrider used a 3mm flat spacer in addition to the 3mm axle spacer.
https://www.hdforums.com/forum/sport...d-details.html
https://www.hdforums.com/forum/sport...sion-pics.html
Since you spaced the caliper 3/16" away from the swingarm using an axle spacer, do you now have a gap between the rest of the caliper and swingarm, or did you also use a 3/16" flat spacer to fill the gap? It looks like TZrider used a 3mm flat spacer in addition to the 3mm axle spacer.
Trending Topics
#8
02-07-2015, 03:40 PM
Road Master
No, didn't need to grind anything down. Since I'm playing around with cutting the stock fender or installing an aftermarket one, I did cut the fender supports/struts like many others have done.

#10
08-02-2015, 09:40 AM

1st Gear
Join Date: Mar 2014
Location: Perth
Posts: 5
Likes: 0
Received 0 Likes
on
0 Posts
well i left that out for a reason, if you can source the parts off eBay like i did you can really cut down on costs vs new parts.
but the tire is $300 from harley
wheel was roughly 250 used.
chain conversion was another $300.
probably around $25 for bearings.
you could probably get away with doing it for under $600 depending on what kind of deal you can get for a rear wheel, and i imagine the tire can be found for less. But thats assuming no chain conversion, which as i said I'm not sure if it the clearance exist for that. Wish i would have checked during the teardown.
Just need some clarification regarding the spacers used. I also want to keep the belt, so could you please clarify the spacers used for the right and left. Thanks