View Full Version : DIY Cheap Mods


Citoriplus
05-05-2008, 01:52 PM
Alright gentleman, and any ladies who would like to participate.
It came to my attention some time ago that the Dyna and Touring guys have started treads on cheap mods.
Now we all know that Softail riders are just as innovative (readcheap) as those guys are. So I think it’s about time we had one of our own, and this is going to be it.

The rules will be no catalog or store bought items, at least nothing you get from a bike catalog or shop.
Home Depot, Lowes,a local hardware store, or the local 7-11 is another story.


What we want are the do it yourself stuff. I encourage you topost pictures and details on what you did, any tools needed, how you did it, and any challenges you found.

Remember the cheaper the better.

Would also like to see comments from the general population, such as;
Requests for more information
Ideas for improving a design
Ideas for a potentialproject

I’ll be editing this with an index and links to the various mods as time goes on.

I’ll start with some that I have come up with for starters, but I don’t wanna be alone here guys. I know there have tobe a bunch of ingenious projects you guys have come up with for your bike.

Here are links to the Dyna and Touring threads, they have a bunch of good ideas that can be used on your bike too.

Sportster Thread

http://www.hdforums.com/forum/showthread.php?t=215353 (http://www.hdforums.com/forum/showthread.php?t=215353)

Dyna Thread
http://www.hdforums.com/forum/showthread.php?t=173504 (http://www.hdforums.com/forum/showthread.php?t=173504)

Touring Thread
http://www.hdforums.com/forum/showthread.php?t=172254 (http://www.hdforums.com/forum/showthread.php?t=172254)


Hardware upgrade Citoriplus
http://www.hdforums.com/forum/showthread.php?p=3306932#post3306932 (http://www.hdforums.com/forum/showthread.php?p=3306932#post3306932)

Muffler sound upgrade Citoriplus
http://www.hdforums.com/forum/showthread.php?p=3306932#post3306932 (http://www.hdforums.com/forum/showthread.php?p=3306932#post3306932)


Wire Soldering Helper Citoriplus
http://www.hdforums.com/forum/showthread.php?p=3307100#post3307100 (http://www.hdforums.com/forum/showthread.php?p=3307100#post3307100)

Wire Harness Cleanup Citoriplus
http://www.hdforums.com/forum/showthread.php?p=3307162#post3307162 (http://www.hdforums.com/forum/showthread.php?p=3307162#post3307162)


Painting front sliders and spokes Asphalt Cowboy
http://www.hdforums.com/forum/showthread.php?p=3307376#post3307376 (http://www.hdforums.com/forum/showthread.php?p=3307376#post3307376)

Softail Custom Plate Mount cleanup jb55
http://www.hdforums.com/forum/showthread.php?p=3341553#post3341553 (http://www.hdforums.com/forum/showthread.php?p=3341553#post3341553)

Cigarette Lighter/Battery Tender hookup Harley03joe
http://www.hdforums.com/forum/showthread.php?p=3426848#post3426848 (http://www.hdforums.com/forum/showthread.php?p=3426848#post3426848)

Brake Rotor Polish junkorgem
http://www.hdforums.com/forum/showthread.php?p=3438844#post3438844 (http://www.hdforums.com/forum/showthread.php?p=3438844#post3438844)

Stock Muffler mod Nighthawg
http://www.hdforums.com/forum/showthread.php?p=3462007#post3462007 (http://www.hdforums.com/forum/showthread.php?p=3462007#post3462007)

Laydown plate for Tombstone light beepo
http://www.hdforums.com/forum/showthread.php?p=3493532#post3493532 (http://www.hdforums.com/forum/showthread.php?p=3493532#post3493532)

Fender Contour plate mountSimpleman04
http://www.hdforums.com/forum/showthread.php?p=3501038#post3501038 (http://www.hdforums.com/forum/showthread.php?p=3501038#post3501038)

Painting bolt heads 95CHUCK
http://www.hdforums.com/forum/showthread.php?p=3536689#post3536689 (http://www.hdforums.com/forum/showthread.php?p=3536689#post3536689)

Painting Brake Rotors 95CHUCK
http://www.hdforums.com/forum/showthread.php?p=3536697#post3536697 (http://www.hdforums.com/forum/showthread.php?p=3536697#post3536697)

Aircleaner Carb/Throttlebody matching 95CHUCK
http://www.hdforums.com/forum/showthread.php?p=3536708#post3536708 (http://www.hdforums.com/forum/showthread.php?p=3536708#post3536708)

Reshaping stock seats deluxe rider
http://www.hdforums.com/forum/showthread.php?p=3554964#post3554964 (http://www.hdforums.com/forum/showthread.php?p=3554964#post3554964)

Homemade breather kit coop57
http://www.hdforums.com/forum/showthread.php?p=3554964#post3554964 (http://www.hdforums.com/forum/showthread.php?p=3554964#post3554964)

$35 Camera Mounting & $25 Remote Control Garage Door Opener 128auto
http://www.hdforums.com/forum/showthread.php?p=3557651#post3557651 (http://www.hdforums.com/forum/showthread.php?p=3557651#post3557651)

Skull Taillight 1941ratrod
http://www.hdforums.com/forum/showthread.php?p=3565292#post3565292 (http://www.hdforums.com/forum/showthread.php?p=3565292#post3565292)

Vacuuming wires through handlebars wtf6316
http://www.hdforums.com/forum/showthread.php?p=3578914#post3578914 (http://www.hdforums.com/forum/showthread.php?p=3578914#post3578914)

Vented Heat Shields GymRat523
http://www.hdforums.com/forum/showthread.php?p=3594102#post3594102 (http://www.hdforums.com/forum/showthread.php?p=3594102#post3594102)

Darkening smoked turn signal lenses nikonf8
http://www.hdforums.com/forum/showthread.php?p=3617431#post3617431 (http://www.hdforums.com/forum/showthread.php?p=3617431#post3617431)

Replacing punched out stock baffles Goodwrench1967
http://www.hdforums.com/forum/showthread.php?p=3630061#post3630061 (http://www.hdforums.com/forum/showthread.php?p=3630061#post3630061)

Blackening chrome mufflers sdbiker
http://www.hdforums.com/forum/showthread.php?p=3654622#post3654622 (http://www.hdforums.com/forum/showthread.php?p=3654622#post3654622)

Rear Turn Signal relocation PoorBoy
http://www.hdforums.com/forum/showthread.php?p=3705617#post3705617 (http://www.hdforums.com/forum/showthread.php?p=3705617#post3705617)

Saggy Bag fix wrenchguy24
http://www.hdforums.com/forum/showthread.php?p=3828203#post3828203 (http://www.hdforums.com/forum/showthread.php?p=3828203#post3828203)

Swingarm frame inserts & home made bags 2008softail
http://www.hdforums.com/forum/showthread.php?p=3836971#post3836971 (http://www.hdforums.com/forum/showthread.php?p=3836971#post3836971)

Citoriplus
05-05-2008, 01:58 PM
I found a nice and reasonably cheap way to get rid of some of the crappy cad plated junk hardware the factory puts our bikes together with. I did this one on the fender struts on my bike.
But I'm sure that you guys can find otherplaceson your bikes to use it or a variation of it on.

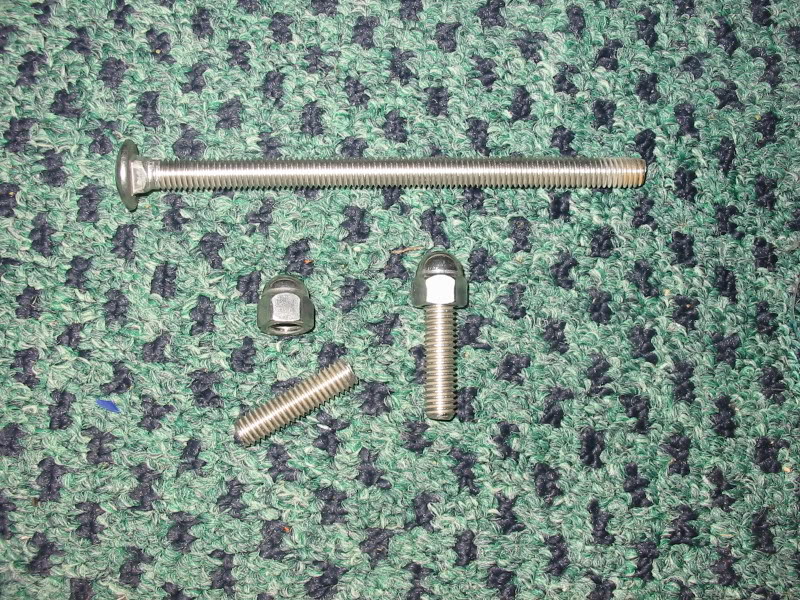
Usesome SS treaded rod, I used SS carrage bolts and cut the threaded section to lengths needed. Jam acorn nuts on the ends with some JB Weld so they don't come apart. I would have used a stainless steel pin through the nut and rod but couldn't find any, and the JB seems to do the job just fine.

Stock Torx bolts in strut.
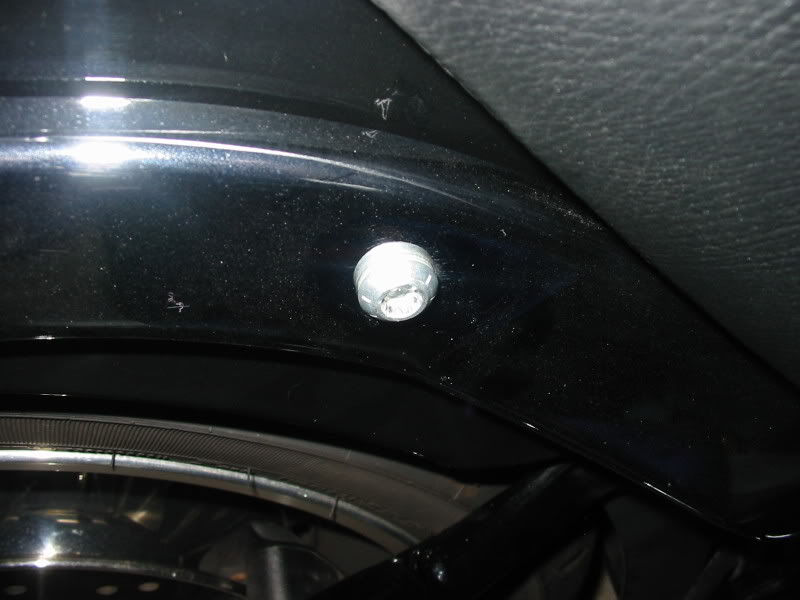
http://i102.photobucket.com/albums/m103/Citoriplus/IMG_4050.jpg

The parts you need.

http://i102.photobucket.com/albums/m103/Citoriplus/IMG_4031.jpg

And the finished product.

http://i102.photobucket.com/albums/m103/Citoriplus/IMG_4051.jpg

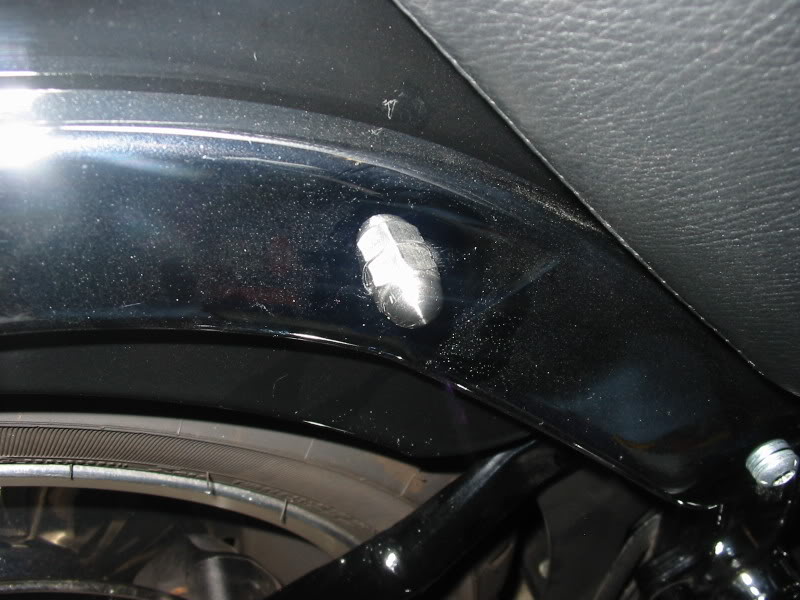
I think they look a lot better, you can remove them a lot easier than the soft Torx headed bolts andI don't have to worry about them rusting.

Citoriplus
05-05-2008, 02:03 PM
Here's avery easy and cheap way to get a much more"Harley" like sound a bike should have had from the factory.
There is no needto have the Delphi FI system remapped if youleave the intake alone.I spent under $5 for the parts I used to do it right.

Here's the tools I used to take it 'out';

http://i102.photobucket.com/albums/m103/Citoriplus/IMG_4089.jpg

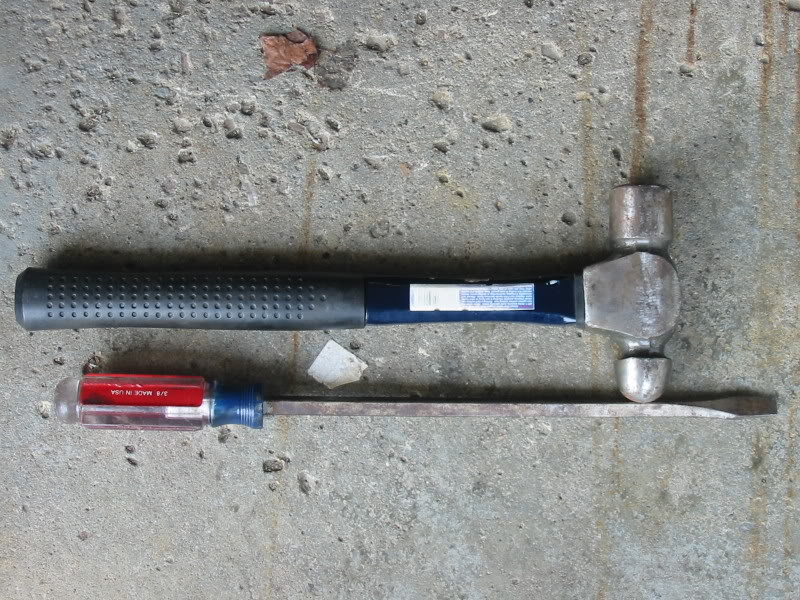
I didn't have a hole saw that would fit all the way down to the plate so I used a hammer and screwdriver, unfortunatly it leaves a bunch of ragged edges. So I came upwith these parts, under $5 at the local Lowes plus a 21mm socket to clean things up.
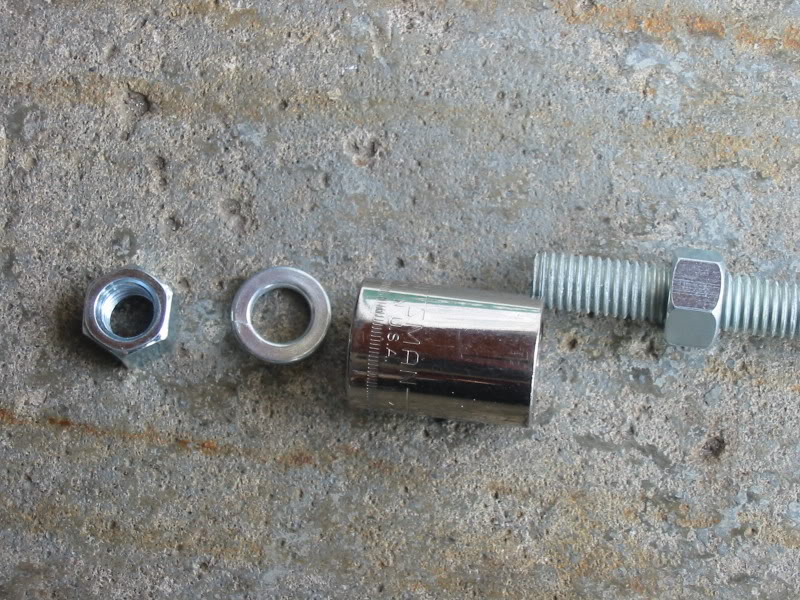
1 piece of 1/2" X 3' long threaded rod, three nuts to fit and four washers.

http://i102.photobucket.com/albums/m103/Citoriplus/IMG_4085.jpg

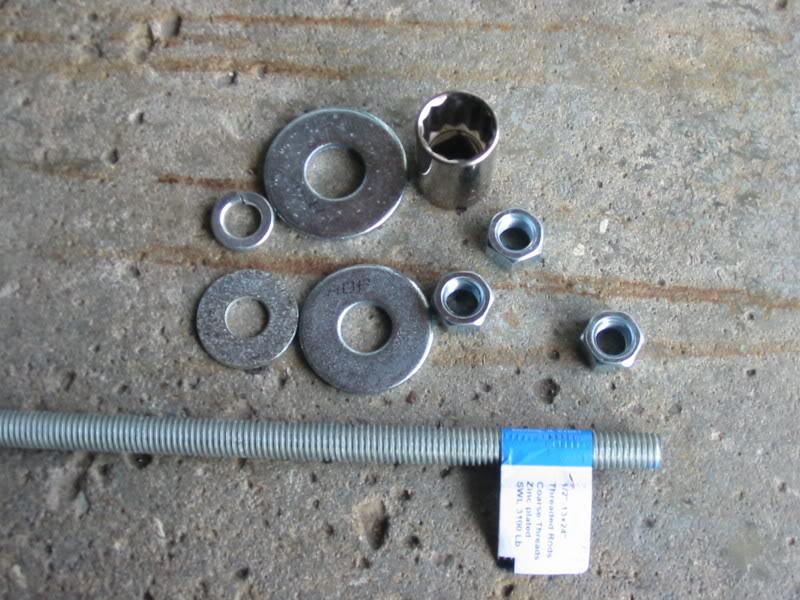
Put two nuts, the socket, and a lock washer together like this at one end.

http://i102.photobucket.com/albums/m103/Citoriplus/IMG_4086.jpg

http://i102.photobucket.com/albums/m103/Citoriplus/IMG_4087.jpg
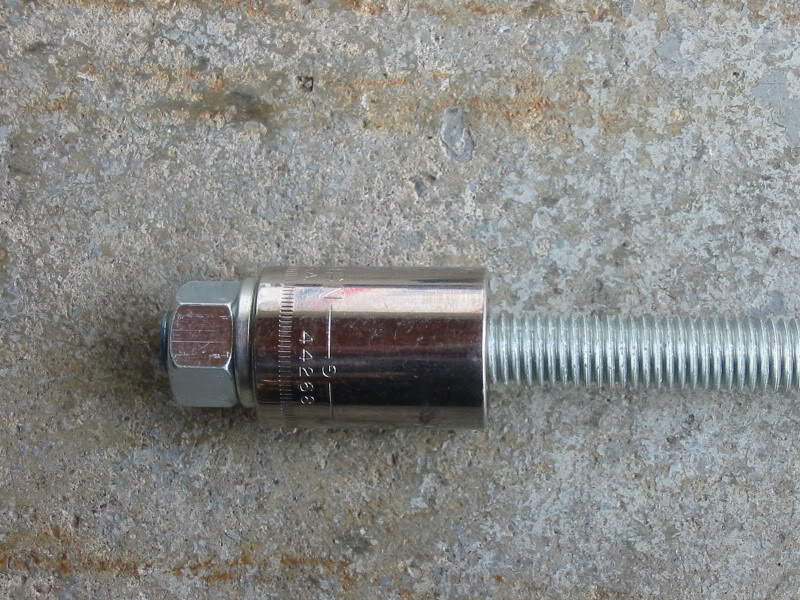
As the socket is certain to get jammed in there when you hammer it through, don't let it go in too far. It only has to go in about 1/2 to 3/4" to work. If you go in too far you might have trouble getting it out without removing the muffler from the bike.

Anyway you can use the rest of the washers and the last nut to prevent it from going in too far, and as a bonus it can be used to "jack" the piece back out. Cause you will almost certainly not be able to pull it out by hand.

http://i102.photobucket.com/albums/m103/Citoriplus/IMG_4088.jpg

Don't expect it to sould like its got a set of Rush slip on's w/2" baffles, or a set of Big Radius pipes. But if you like the stock looks but not the sound or your just short funds for new pipes its acheap way to improve what you got.

BigJohn Fatboy
05-05-2008, 02:06 PM
Citoriplus

Great idea. Of those that have the older bikes know, you can somewhat rebuild the whole bike, at least an old shovelhead, going through the fastener section at Lowe's or Home Depot. Electrical tape, zip ties, JB Weld, Fuses, extra wire, spark plugs, a quart of oil for those longer trips, and the required tools...........

I'll do my best to come up with some goodies.

Citoriplus
05-05-2008, 02:40 PM
Here's a cheap way to help get good solder connections when you need to lengthen, shorten, or add lines in the bikes electrical system.

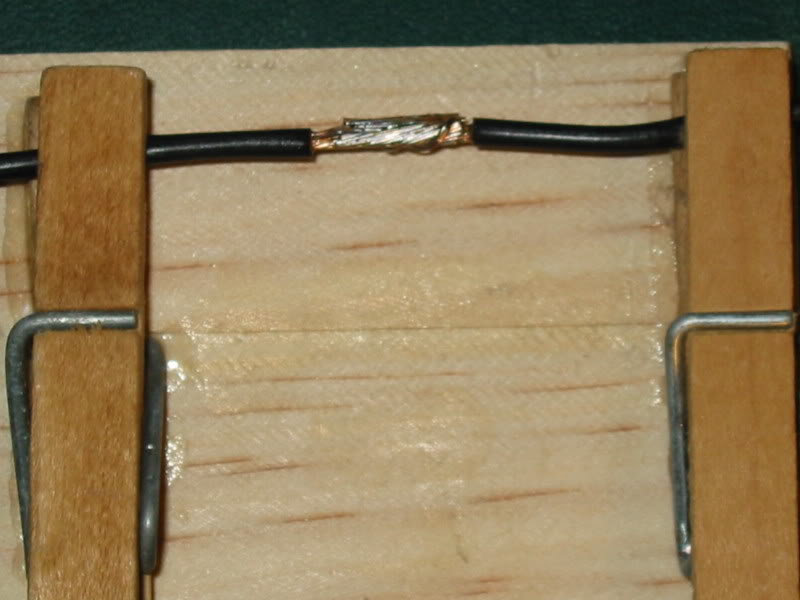
The biggest problem with soldering wires on a bike is you need to be an octopus. You need a couple of extra hands to hold the wires whileyou use solder with one hand and the iron in the other. So I came up with a simple and cheap way to make a couple of different wire holders.

http://i102.photobucket.com/albums/m103/Citoriplus/IMG_4179.jpg

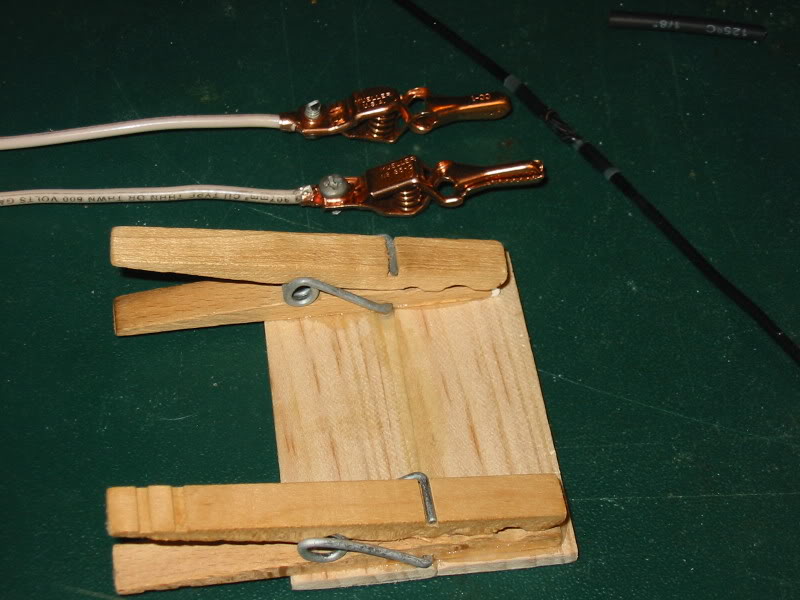
I think I spent a grand total of less than a buck for both of them, and that's because I wanted to get a new pair of alligator clips. The wood one was made from a pair of cloths pins glued to a couple of pieces of a paint mixing stick I got from Home Depot for free. The clips I swiped off the wife. This one is good for any wires that you can lay on a table, or you can glue a magnet to the back and stick it to any steel surface.

The other one with the alligator clips I mademade from the clips and a one foot long piece of scrap 12ga solid copper wire. Its great for using where you can use a clamp or vise grips on the wire between the clips and bend the ends to wherever you need them. Just be careful of using metal clips like these. A hot iron on the wores will have the teeth melting through the wire insulation. So you might considerfiling the teeth down a little and covering them with some tape or shrink tubing.

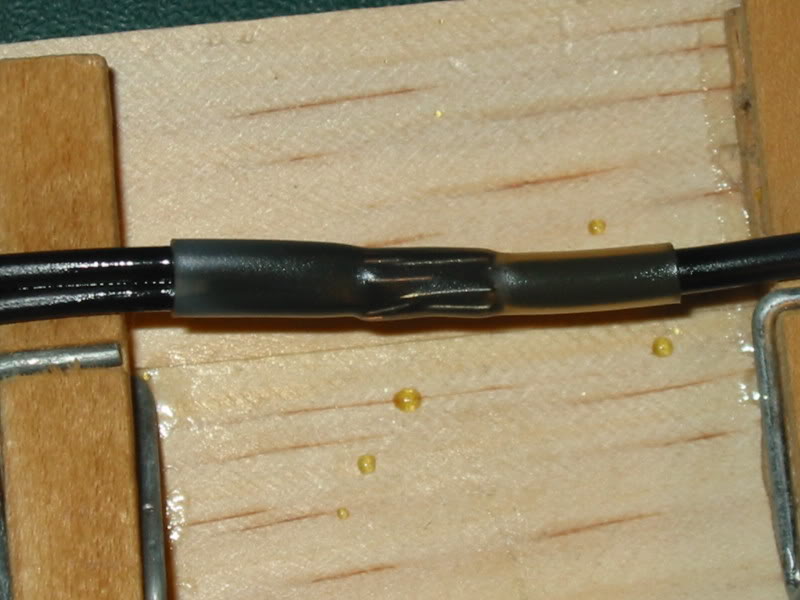
Soldering wires isn't rocket science, but it does take a little practice to do well all the time. But here's a tip for making solder connections that are nearly bullet proof. Once you get the wires soldered properly, like this.

http://i102.photobucket.com/albums/m103/Citoriplus/IMG_4175.jpg

Get some of the wives nail polish or some of this liguid tape and paint the exposed wire and solder connection.
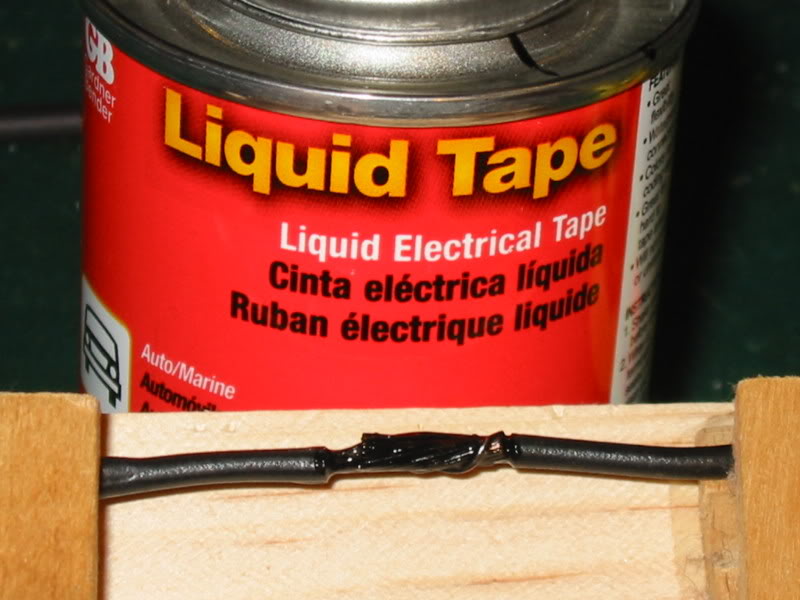
http://i102.photobucket.com/albums/m103/Citoriplus/IMG_4177.jpg

When you ā€˜paint’ the connection pay particular attention to the ends of the insulation and make sure its well coated. This will prevent any moisture from migrating up the wire strands and corroding them. It won't bother anything today, but a couple of years down the road it will drive you nuts trying to find the electrical gremlins.

Once its dry use a good grade of heat shrink tubing to seal and protect the connection.
Done right the connection will be only slightly larger than the original wire size and last a lifetime.

This is what it looks like before I heated the shrink tubing.
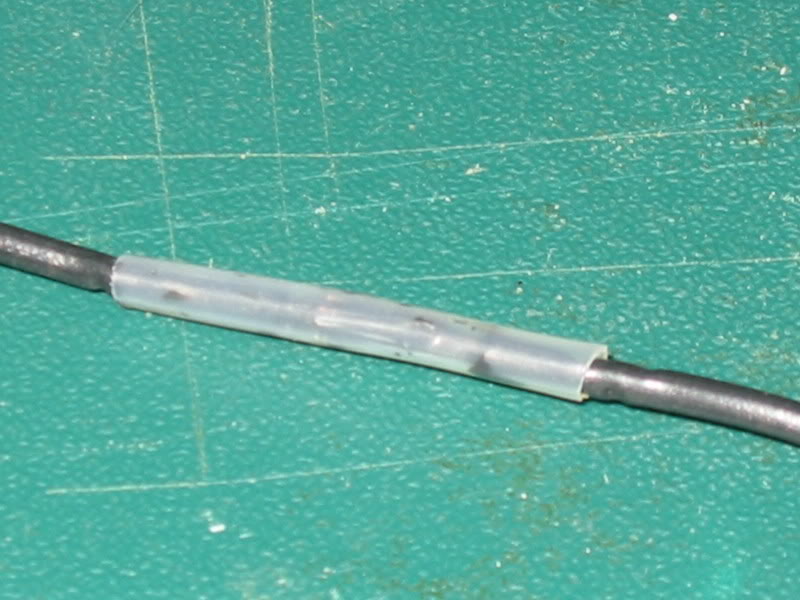
 http://i102.photobucket.com/albums/m103/Citoriplus/IMG_4171.jpg

And after.

http://i102.photobucket.com/albums/m103/Citoriplus/IMG_4173.jpg

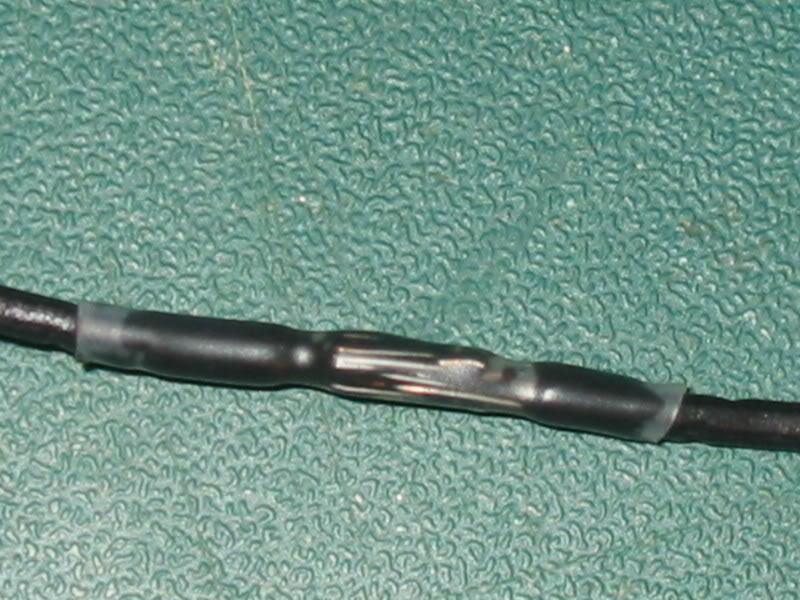
And here's one where I spliced one wire to an existing line.

http://i102.photobucket.com/albums/m103/Citoriplus/IMG_4185.jpg

Ride safe.

Citoriplus
05-05-2008, 02:51 PM
Its not much of a big time mod, but it is under $50 and it does make the wires in the tripple tree area look a bit better.
I'm in the process of changing the bars on my bike and didn't like the cheap a$$ed plastic covering the factory put on my wires. But when I was in a dealer I noticed that the Wideglide has a plastic meshcovering that looks a lot better with thenew Diamondback lines and cables I'm putting on.
So I did a little digging and found the part number70017-06 (Conduit, Black Mesh) and ordered a couple of pieces from Zenotti's to replace the ones on my bike.
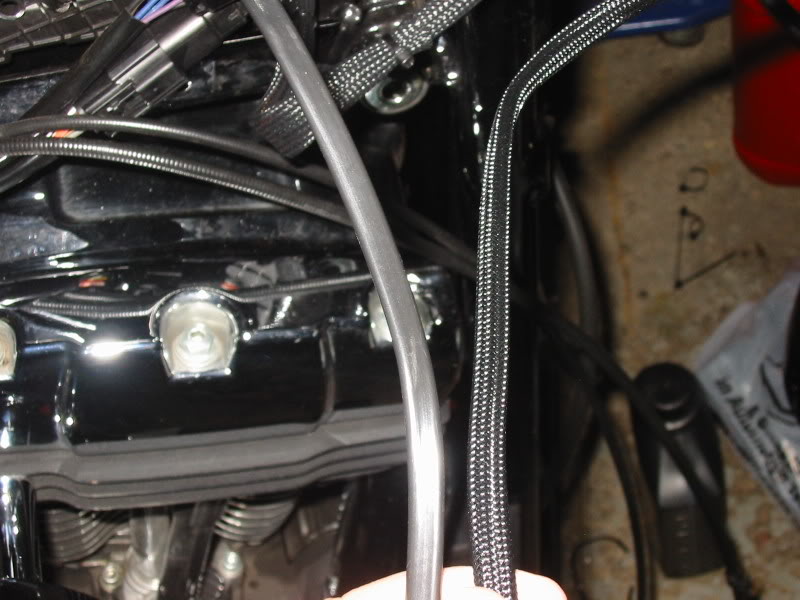
Here's a couple of pics of the old plastic on the right, and the new mesh on the left.
Please no cracks about how dirty the bike is, its in that "winter mod" state.
I have since I did this found a better place to get the mesh from,its cheaper and avalable in different sizes to boot.
Frys.com sells it in four different sizes.I ordered and all four of them cost about $35 delivered.
2281378 1/8" X 20'
2281388 1/4" X 16'
22813981/2" X 10'
22814083/4" X 8'
Each piece is only $6.99 and all together there's enough to do at least 2 complete bike's.

http://i102.photobucket.com/albums/m103/Citoriplus/IMG_4200.jpg

Here's a closer look at it.

http://i102.photobucket.com/albums/m103/Citoriplus/IMG_4201.jpg

BTW there is an unexpected benifit to using the mesh on internal wires. It was very easy to slip the wires through the bars with this covering on them. My bars don't have any major bends in them, but the old covering was so stiff and bent up it was a sure bet that they were going to be Royal Pain in The A$$ to get through.

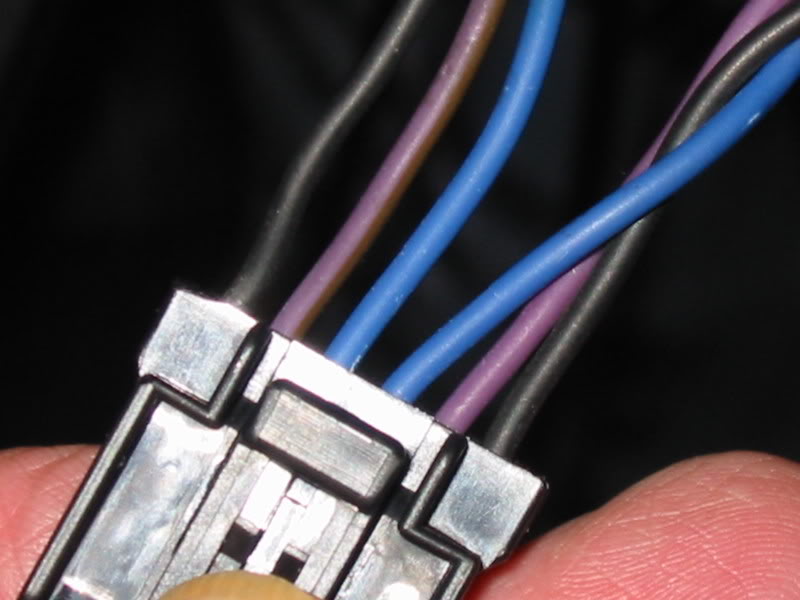
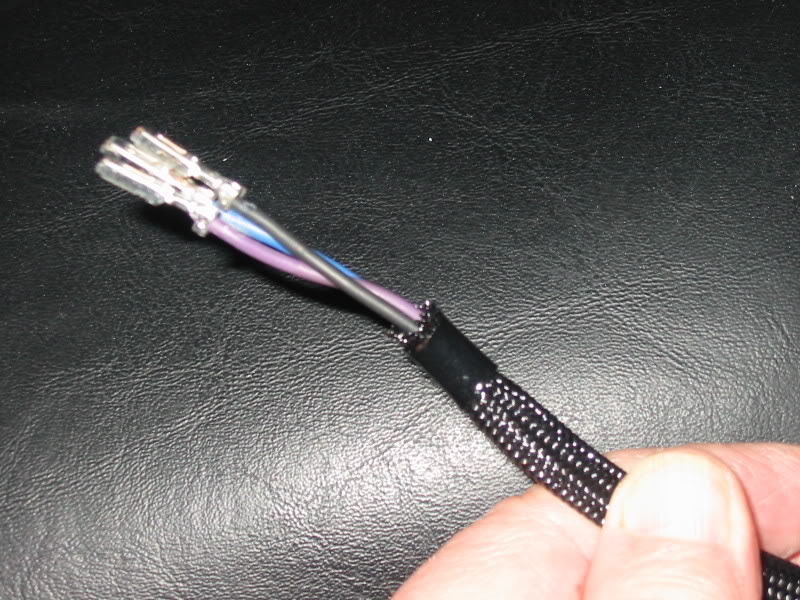
This is the plug that is used on my Softail for the turn signals.
You'll notice that the pinouts are mirror images and I suggest that you only take the pins out of one side at a time. That will eliminate the possibility of itgetting missplaced or lost on you and you'll have a ready guide to putting the pins back in properly. Just remember its exactly oppisite and you won't have a problem.

http://i102.photobucket.com/albums/m103/Citoriplus/IMG_4218.jpg

For the turn signals I used the 1/8" stuff so it would fit snugly over the original covering. First thing is to put a piece of tape over the pin plugs. It will make iteasier to slip the mesh over them. Onceyou have enough on so that its about 4" to 6" from the signal cut the mesh about 1" below the pins.
That should be more than enough to cover it and with it not completely on yet it will let you slidetwo short pieces of shrink tubing on much easier.

http://i102.photobucket.com/albums/m103/Citoriplus/IMG_4229.jpg

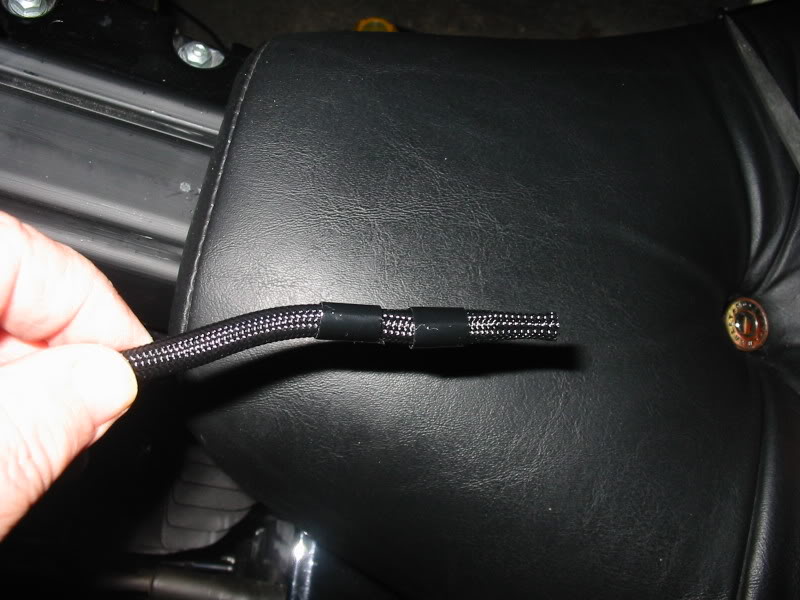
Once its all the way up it will look like this.

http://i102.photobucket.com/albums/m103/Citoriplus/IMG_4221.jpg

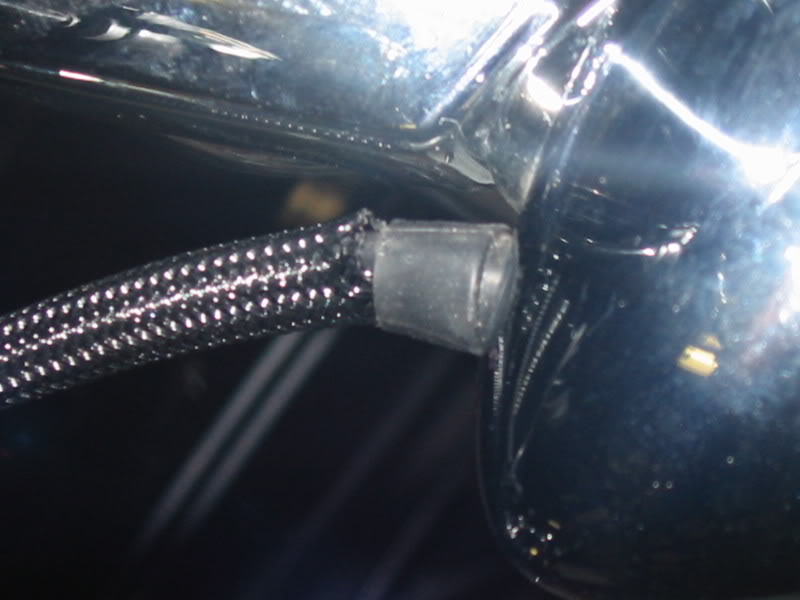
Because the mesh has a fairly low melting point you should put a short piece of electrical tape, enough for a little over one wrap around the end first. Then slide one piece of the shrink tube up and shrink it over the end. The shrink tube will keep the mesh from fraying or unraveling and give it a more 'finished' look.

http://i102.photobucket.com/albums/m103/Citoriplus/IMG_4223.jpg

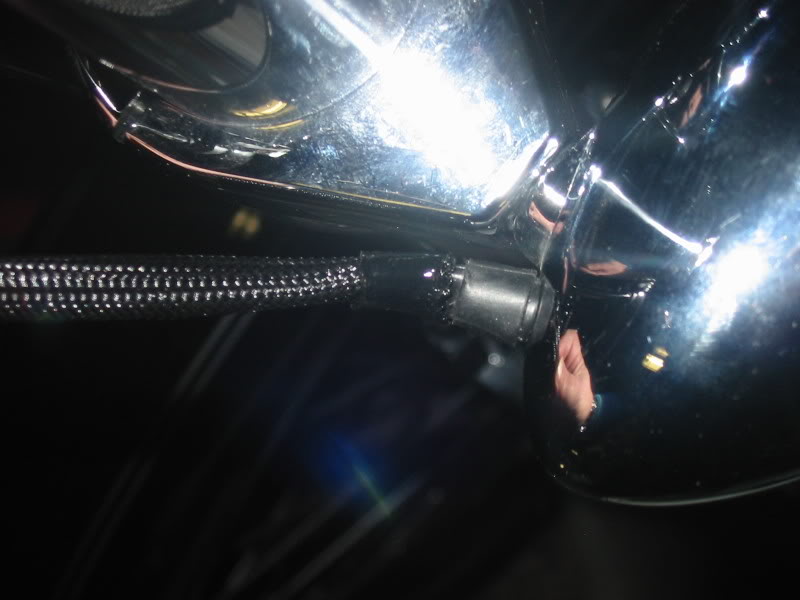
Then do the same to the other end. You don't need the elecrical tape here because its going to be hidden under the tank. But its up to you.

http://i102.photobucket.com/albums/m103/Citoriplus/IMG_4228.jpg

Here's what the cable looks like before on the left, and the after on the right.

http://i102.photobucket.com/albums/m103/Citoriplus/IMG_4226.jpg

Now for my next trick, the headlight cable.

Good luck and ride safe
Frank

Asphalt Cowboy
05-05-2008, 03:41 PM
This thread is a GREAT idea! Here is my 1st contribution:

W/2 kids and a Wife to feed, well... ok, I'm cheap. I wanted to PC the lowers on my Train, but I didn't want to take apart the front end and pay $80 or so to get it done. I also didn't like the stock spoke wheel up front and don't have $1,500 or so for a new one (Did I mention that I'm cheap?), so I killed two birds with one stone.

Materials:
2 cans of Rustoleum in gloss black
1 can of clear coat
1 roll masking tape
1 old sheet, moving blanket, or whatever your wife won't kick your a$$ over for painting black!
* a six pack of your favorite brew*

I removed the front wheel and brake, covered the front end with the sheet, and taped off the lower sliders. Then, I removed the rotor from the front wheel and went to tapingthe wheeloff. This is by far the most tedious task I have tackled in a while. Take your time and do it right, and the finished product looks like it was disassebled and PC'd.

Back to the point. Start spraying. Lots of THIN coats w/ a minute or so in between. Go heavy on the clear for the sliders. This will help protect the finish from chips. Let it all dry and re-assemble. Oh, and I used Rustoleum because it is made to protect metal when it's outside.... My not need to but it made me feel like I tried. And if it chips from a rock or big a$$ Florida bug, simply touch up with black nail polish.

All in, you get a totaly different look for less than $10 (minus the beer) and a couple hours on Sat.

local://upfiles/57932/213B11C597164F3B9368E39865E1214F.jpg

Citoriplus
05-05-2008, 04:14 PM
Asphalt Cowboy

Great idea, one question, what kind of prep work did you do to the sliders and spokes?
Did you sand them or just wash them with a cleaner or something to get the paint to stick better?

Asphalt Cowboy
05-05-2008, 04:47 PM
I just cleaned them REALLY well. The rustoleum paint is made to use on metal, and seems to "stick" better than regular rattle can stuff. Plus, with the lowers and spokes being polished, they are nowhere near as smooth as chrome. I've put on 1,500 miles or so since, and no chips.

Citoriplus
05-05-2008, 04:52 PM
Good deal, and thanks for your contribution. Gotta show those Dyna and Bagger guys that their not the only ones who can do good things on thecheap.

Vikingnomad
05-07-2008, 07:14 AM
Great post Frank
I especially like the cloth pin idea for holding wires still while soldering

Thanks


Bone

jb55
05-11-2008, 11:00 PM
Okay, here's one that I did after looking at the back of my 07 custom. InPa. we have the small style license plates. I guess the tail light assemblies are made tohold both the small and large plates. So I removed my plate and scraped off the gay reflector that goes between the tail light and plate.I moved the license plate upcloser to the tail light. I madean outline of the plate, and took an airsaw and cut the extra off. It looks like it came from the factory, and reallty cleans up the back of the bike.

And best of all total cost.... 0 dollars !!

Iwill try to post a pisture later if I can.

JB.

scaryonly
05-12-2008, 08:33 AM
good point. what about on sheet metal? would you recommend rustoleum for fenders?

Asphalt Cowboy
05-12-2008, 09:37 AM
scaryonly - I'm sure it would work. I have painted whole bikes with rattle cans before. If you are going with a flat color, you're golden. However, gloss NEVER comes out of a rattle can like it does a spray gun, and you will never get a mirror gloss finish. The paint just isn't mixed the same. Hope that helps.

blackness
05-14-2008, 08:55 PM
ORIGINAL: jb55

I removed my plate and scraped off the gay reflector that goes between the tail light and plate.I moved the license plate upcloser to the tail light. I madean outline of the plate, and took an airsaw and cut the extra off. It looks like it came from the factory, and reallty cleans up the back of the bike.

And best of all total cost.... 0 dollars !!


I did the same thing to mine. It really looks A LOT better that way. It kinda looks like the plate mount on the tri-bar tail light. Here is a crappy pic of mine...

local://upfiles/50095/022B5A64E6CF483EB906B8D54B49CE20.jpg

Citoriplus
05-14-2008, 09:38 PM
Blackness,
Nice job on the plate mounting.
Are those LED's in your turn signals and if so what kind, brand/model are they and how do you like them?

blackness
05-15-2008, 07:23 AM
ORIGINAL: Citoriplus

Blackness,
Nice job on the plate mounting.
Are those LED's in your turn signals and if so what kind, brand/model are they and how do you like them?


Yes those are LEDs, the cheap ones from AutoZone. Everyone I rode with said they were very hard to see unless you were staring right at them. I have since changed back to the standard 1156 amber bulb, they give much better visibility.

Citoriplus
05-15-2008, 08:02 AM
ORIGINAL: blackness
Yes those are LEDs, the cheap ones from AutoZone. Everyone I rode with said they were very hard to see unless you were staring right at them. I have since changed back to the standard 1156 amber bulb, they give much better visibility.

Been there done that one too. But I also noticed that you like the clear lenses, me too.
I found a nice alternative to the crappy LED's that's also brighter than the stock amber bulb. Sylvania Silverstars, they have a sligtly bluish tintwhen the bulb is off but light up very bright amber when on.

Here's what they look like off, please excuse the different turn signal locations. I origianlly took the pic to show how the different relocation systems looked.

http://i102.photobucket.com/albums/m103/Citoriplus/IMG_4136.jpg

Its actually kind of hard to get a decent pic of them as the camera flash or bright sunlight makes them show up slightly amber tinted to the camera. Butthey look more blueish to the naked eye.
You can find them on the light bulb racks in clear packaging at the localAuto Zone so you can see what they look like before you buy them.

Ride safe

blackness
05-16-2008, 05:58 PM
Here is a better pic I took today of the license plate mount cut down. I just used a cutoff wheel on a die grinder but you could use a hacksaw and sand the fuzz off the edges after you cut it. This mod is really easy and really looks A LOT better.

local://upfiles/50095/922777139A16481BBDB2C3A96A5A7C2C.jpg

jb55
05-17-2008, 09:20 AM
Blackness, that's pretty much how mine looks. It really cleans up the back of the bike. Nice job.

JB.

R_Niner
05-22-2008, 02:13 PM
Cool! So you're basically punching a big 'ole hole in the baffle? Have you noticed any backfire or anything since doing the mod? I wonder what this does to the warranty? Should I do this while engine is running? HA! So how can you describe the new sound? Just louder? Or sweeter? or Nastier? I know it's subjective...

Great thread btw!

Thanks,

Rick

Citoriplus
05-23-2008, 01:26 AM
R_Niner,
I'm assuming that your asking me aboutpunching out the baffle plate.
Anyway to me it sounded about the same until you jumped on it. Then it got very authoritative without the high pitched bark that frag pipes have.
If I were to do it again I would cut the weld that holds the baffle tube in. Pull it out and enlarge all the holes adding a couple of new rows wherever I could, then reweld it back in. That way if anyone wanted to see if it had been 'tampered' with they would have to cut the baffle out to prove it.

UT Harley Rider
05-23-2008, 02:10 PM
Great idea, I think I will do this to mine this weekend it is supposed to raind all day Saturday, so what a better day to do a mod. Thanks for the great idea.

Harley03joe
05-24-2008, 02:25 PM
My Friends Homedepot Bike It Has A B&S Motor
He's Waiting On The Plywood Seat
See The X Bones Look :D

http://i259.photobucket.com/albums/hh319/Harley03joe/RedNeckChopper.jpg

mudpuddle
05-26-2008, 01:02 AM
ORIGINAL: Harley03joe

My Friends Homedepot Bike It Has A B&S Motor
He's Waiting On The Plywood Seat
See The X Bones Look :D

http://i259.photobucket.com/albums/hh319/Harley03joe/RedNeckChopper.jpg


Harley03joe, didn't you mean to post this with you empty beer cans???

Just curious.


And yeah, I don't believe you when you say you have a friend.
mud

Harley03joe
05-26-2008, 01:13 AM
ORIGINAL: mudpuddle

ORIGINAL: Harley03joe

My Friends Homedepot Bike It Has A B&S Motor
He's Waiting On The Plywood Seat
See The X Bones Look :D

http://i259.photobucket.com/albums/hh319/Harley03joe/RedNeckChopper.jpg


Harley03joe, didn't you mean to post this with you empty beer cans???

Just curious.


And yeah, I don't believe you when you say you have a friend.
mud


A Hole Its Just A Joke ,,,,,,,,,,, Get With The Program,,,,, Or Keep Your Pie Hole Shut
Ok sonny Boy

Harley03joe
05-28-2008, 04:21 PM
My 2 Cents.
This Is What I Did For A Lighter/Cell Phone Hook up
For My 03 Heritage, I Just Plug It Into My Batt Tender Plug
Real Cheap Fix, I Keep It In My windshield Bag.
[sm=goodidea.gif]??????????? YES OR NO ???????????????

http://i259.photobucket.com/albums/hh319/Harley03joe/CIMG2708.jpg

Citoriplus
05-28-2008, 04:29 PM
No its a good idea, and worth at least a nickle, maybe even a dime. J/K its good I like it.
I was thinking of going the opposite way. Hard mount the lighter socket under the seat somehow and rewire the end of the tender with an adapter plug. Then when I wanted to put it on the tender I would just have to plug the adapter into the waiting lighter socket.
I just need to find a nice waterproof (boat store maybe) socket assembly I can use for it and a good place to mount it.

Harley03joe
05-28-2008, 04:38 PM
ORIGINAL: Citoriplus

No its a good idea, and worth at least a nickle, maybe even a dime. J/K its good I like it.
I was thinking of going the opposite way. Hard mount the lighter socket under the seat somehow and rewire the end of the tender with an adapter plug. Then when I wanted to put it on the tender I would just have to plug the adapter into the waiting lighter socket.
I just need to find a nice waterproof (boat store maybe) socket assembly I can use for it and a good place to mount it.


Well For Me It's Just For Incase I need It, I Look At Is As The Same As Money
I Have It If I Need It, If Not I Still Have It Ha Ha Ha
So Im All Set Now.

P. S. Need A Light :D

Want To See Neat Look This Over For Changing primary oil
And Not Taking Off the Derby Cover To Refill It Back Up
Corbin EZ-Fill Inspection Covers
I Got One On My Bike :D

http://www.corbin.com/accessories/ezpour.shtml

http://i259.photobucket.com/albums/hh319/Harley03joe/ezpour_thm-1.jpg

It's one of those things that is so simple it makes you want to scream... "Why hasn't this been done before?" With the Corbin EZ-Fill adding oil to your primary is simple, just remove the knurled plug from the inspection cover and pour. It looks great and works just as well (a hallmark of Corbin design).
Forged aluminum and triple plate chromed for a perfect fit and finish. Rubber o-ring creates a positive seal and secure fit of the chromed plug. Two models are available for a variety of Harley-Davidson models.


#HD-ST-EZ-FILL
Fits: 1970 - 2006
FX, FL Shovelheads
FLST Softails
FXDWG Dyna Wide-Glide
Softail Deuce

#HD-FLH-EZ-FILL
Fits: 1985 - 2006
FXR Models
Roadking
Road-Glide
FLH / FLT models


Special Notes and Infohttp://www.corbin.com/techinfo.gifEZ-Fill primary inspection covers do not fit on Harley models with mid-controls like the standard Dyna-Glides. There is no hole for the shifter shaft.
http://www.corbin.com/techinfo.gifOn some models, it may be required to slightly bend the side-stand helper for clearance (that's the thing you hook your boot on to get the stand to swing out).
http://www.corbin.com/techinfo.gifEZ-Fill primary inspection covers do not fit the 2007 models.
http://www.corbin.com/techinfo.gifEZ-Fill primary inspection covers do not fit any after market shifters that are longer than stock shifters.


ITEM
DESCRIPTION
PRICE


#HD-ST-EZ-FILL
EZ-Fill Cover, Shovelhead, Softails, Deuce & Dyna Wide-Glide
$99.00


#HD-FLH-EZ-FILL
EZ-Fill Cover, FLH/FLT, Roadking, Roadglide & FXR
$99.00

junkorgem
05-31-2008, 08:51 AM
Hello, I might have something for you guys. I polished my rear brake rotor for about $20, and it looks awesome! Heres what you need:

1) 1000 grit wet or dry, 3M Imperial, and a rubber sanding block
2) a can of WD-40 or something like it
3) a sewn buff wheel 6" or so
4) white buffing compound
5) something to rake the wheel with, a screwdriver would work (a kitchen fork is
better,but don't let your old lady find out[:o])
6) a bench mounted buffer, or a grinder if you don't have a buffer (3500-5000 RPMs)
Next time you have your wheel off remove your rotor. You have to start by wet sanding the rotor with WD-40 instead of water. I know it sound odd but the oil makes the paper last quite a bit longer. You have to sand it until most of the machine marks are gone. Plan on spending some time on it, and wearing out a couple pieces of paper per side, anyways. You don't need to make the surface completely blemish-free, but you should remove all the marks you can. When your satisfied clean the rotor with hot soapy water, or brakecleaner, be sure to clean all of the abrasives out of the slots, holes.
Now your ready to start buffing! Mount your sewn buff on your buffer/grinder. If you have a buffer you will have to put a little more pressure on the work than if you have a grinder. Add a small amount of compound to the wheel and rake often. I rake every time I add compound. You should be able to tell when your done in a spot, it'll take a while and your rotor may get a little warm. It may take a while to get the hang of it but you won't be able to damage the rotor.It's going to shine as good as chrome! Better than chrome because it's polished stainless, less maintenence and no worries.
Now I should touch on safety, Be sure to CLEAN THE ROTOR before you put it back on the bike. The compound has grease in it, grease and brakes don't work well together, dig? If you mistakenly shined up part of you friction surface don't be alarmed. Be sure that it is clean and it will go back to the way it was in about 2 seconds under your brake pad. Also your going to want a respirator or at least a dry particulates mask/ filter. Heavy metal is not cool to breathe and don't forget the safety glasses either, compound isn't good for the eyes.
If you can't find this stuff readily you can google Caswell Plating, they have it all and a pretty good forum as well.
I would try to post a pic except my wife has the camera somewhere, maybe later if anyones interested.

paulca
06-02-2008, 11:06 AM
Frank, thank you for thisexcellent thread. Your bike is looking great by the way - haven't seen your "new" signature until now.

Nighthawg
06-04-2008, 07:51 PM
OK, here's my easy way to make performance exhaust with your stock muffles.&nbsp\\; I have an 07 Night Train and was shopping for aftermarket exhaust upgrade because I just didn't have the sound and performance I wanted...from a Harley.
&nbsp\\;
I started by taking my mufflers off and punching the center baffle disk out...sounded good but didn't make the rumble I was looking for.
&nbsp\\;
After studing the construction of the muffler, I took a dremel and cutter wheel, from the aft end of the pipe, I cut around about 1/4 to 3/8 inch forward from the aft tip.&nbsp\\; Then I took a punch bar, stuck it in the forward end and gave it a couple of taps and the whole baffle assembly slid right out the back.&nbsp\\; Installed them back on the bike and cranked her up and blew the fiber glass out.
&nbsp\\;
I got the deep throaty sound I was looking for and I've ran her for about 750 miles and have noticable throttle reaction when I get on it and the fuel economy and engine running seem to be fine.&nbsp\\; It doesn't miss, spit or backfire.
&nbsp\\;
Ride on

Scott.Harris
06-05-2008, 06:29 AM
You wanna see some cheap mods? Check out all these I did on my Fatboy. See if you can name them all!
http://cid-9a5eacb7dce06822.spaces.live.com/photos/cns!9A5EACB7DCE06822!115/

HD32
06-05-2008, 07:12 PM
Anyone have any good ideas on how to decrease friction between my grip and handlebars?&nbsp\\; I have chrome spike grips that look great but the metal of the grips and the handlebars don't allow for a smooth throttle action.&nbsp\\; Kinda noisy too, when the grips starts squeaking.&nbsp\\; I've looked at the roller bearing kits that stick in the end of the handlebar, but they require cutting .5" of the bar off.&nbsp\\; Just wondering if there are any better ways to tackle the issue.&nbsp\\; Thanks.

Citoriplus
06-05-2008, 07:33 PM
You might try to find some Teflon sheet, Teflon coated plastic sheet material or even nylon sheets.
You could slip a piece of that rolled to fit inside the grip and get it to stop sticking and making rattling noises.

tjolley2000
06-06-2008, 12:12 PM
Any one got a suggestions for making the ugly stock bolts all over the bike look better particularly the ones on the engine.
&nbsp\\;
I was thinking about getting some Black hottoppers, but a. they are expensive, and b. the look to be a gloss black from what I can tell and want them to match the wrinkle black paint on the engine case that is on the (07 FXSTC and I assume many others), that way they kind of disappear. Then do some kind of chrome look to the ones that bolt on chrome parts.
&nbsp\\;

Citoriplus
06-06-2008, 12:34 PM
Have you considered trying some Rust-O-Leum wrinkle black paint?
Be simple and cheap, might not match perfectly, but be a lot better than the cad plated junk that's on there now.

CNC WHEEL GUY
06-10-2008, 09:17 PM
ORIGINAL: HD32

Anyone have any good ideas on how to decrease friction between my grip and handlebars?&nbsp\\;\\\\\\; I have chrome spike grips that look great but the metal of the grips and the handlebars don't allow for a smooth throttle action.&nbsp\\;\\\\\\; Kinda noisy too, when the grips starts squeaking.&nbsp\\;\\\\\\; I've looked at the roller bearing kits that stick in the end of the handlebar, but they require cutting .5" of the bar off.&nbsp\\;\\\\\\; Just wondering if there are any better ways to tackle the issue.&nbsp\\;\\\\\\; Thanks.


Put a thin layer of grease on the bar end under the throttle side, it will quiet it right down and it costs nothing.&nbsp\\; It did it and it works great.

blk n wht hog
06-10-2008, 10:54 PM
Damn, Im too late CNC............I was gonna try and have you barred from tha competition!!!&nbsp\\; But he did say "cheap" mods, so that counts you out any way!!!&nbsp\\; Have a good one....

beepo
06-14-2008, 05:15 PM
I've got one if you have a tombstone light out back.&nbsp\\; I hated the way the liscense plate just stood straight up, especially when I put on the solo seat and had a bare rear fender.&nbsp\\; A piece of aluminum flat stock from Home Depot and some bolts were all the supplies I needed to make a new bracket for mounting the plate.&nbsp\\; I just bent it to the angle I liked, drilled some holes, and installed it.&nbsp\\; I'll probably get around at some point to ordering the nice chrome piece that they sell to do the same job, but for now it's doing the job...
http://i224.photobucket.com/albums/dd302/beepo67/back2.jpg

Simpleman04
06-17-2008, 01:04 PM
As done before I removed my emblems and reflectors, but I made a plate holder that follows the contour of the fender. Took a piece of 18ga sheet metal and drilled 7 holes, 3 for the fender mount and 4 for the tag. I used 1-1/4 x 5/16 bolts, nuts, and washers as well as 3 1/2" pieces of rubber air hose to keep hardware off paint. Not perfect but free for me. If purchased about 10 bucks.
http://memimage.cardomain.com/member_images/11/web/2783000-2783999/2783793_3_full.jpg
&nbsp\\;
http://memimage.cardomain.com/member_images/11/web/2783000-2783999/2783793_4_full.jpg
&nbsp\\;
http://memimage.cardomain.com/member_images/11/web/2783000-2783999/2783793_5_full.jpg

95CHUCK
06-26-2008, 02:54 AM
I had my primary cvr, trans end cvr and my cam cvr powdercoated flat black. The bolts stood out like a swore thumb. I painted them all with model car paint from wal mart. Anytime i remove the bolts, and scratch the painted bolts.....a few minutes with a fine tio brush, back to looking good again. Beats paying $$$$ for the hottoppers.

95CHUCK
06-26-2008, 03:02 AM
I wanted a black rear brake rotor, and wasent paying Harley what they wanted for theres.
heres how I did it....1 can of high emp exhaust paint. 1 cheap cookie pan. 1 can of carb/brake cleaner. 1 roll of masking tape.
&nbsp\\;
1. Remove Brake rotor
2. clean with brake/carb cleaner
3. tape up the outside of the rotor, where the brake pads wear
4. spray with High temp exhaust paint
5. remove tape and place on cheap cookie pan
6. follow instructions on paint can, for baking paint
7. steps 3-6 for the other side of rotor( if you tape up both sides and paint, use 3 spacers to&nbsp\\;hold&nbsp\\; rotor off of cookie pan)
8. install rotor on bike

JRK5892
06-26-2008, 03:02 AM
i painted my bolts with black touch up paint for cars... it is a bit tougher and will adhear really well!

95CHUCK
06-26-2008, 03:14 AM
More air flow? Match the air cleaner assembly, and intake to the throttle body.
I bought a throttle body and an intake off of ebay, just to have around. I got to thinking (scary, I know) that everyone ports and polishes heads, why cant the throttle body and intake be done the same way?
I took&nbsp\\;my dremel tool, several packs of the different grit brillo pad(?) looking&nbsp\\;bits &nbsp\\;and my drill with a flap wheel to the parts.
The flap wheel was used first, to remove most of the unwanted matterial in the intake and the inlet side of the throttle body. I used the dremel to smooth out the rough cut of the flap wheel.
I dont know how much improvment (if any) there is...I didnt have the creation flow tested. Seems to work out nicely, Havent had any ill affects that I've noticed. Its got to flow more air, right?
TRY AT YOUR OWN RISK!!!

deluxe_rider
06-30-2008, 07:46 PM
Since Harley's seats are so uncomfortable for long rides, I reshaped my stock Softail Deluxe seat by shaving layers off until I got the right fit for me.&nbsp\\; I took the cover off, shaved it with an electric carving knife, and am going to staple it back on.&nbsp\\; I am debating if I should install a gel pad kit or not.&nbsp\\; I got the right fit, and it moved me back a few inches.&nbsp\\; The thigh area was too thick, so I shaved that area down a little.&nbsp\\; A custom fit seat for nothing! (cost nothing if you have an electric carving knife laying around!)
&nbsp\\;

MannyFerrer
06-30-2008, 11:31 PM
Hi,
&nbsp\\;
I have a 2007 soft tail standard and I just had my big radius and Stage 1,
Does your back fire? During gear changing?
&nbsp\\;
Thanks
Manny

coop57
07-01-2008, 12:12 AM
My Cheap mods

http://i301.photobucket.com/albums/nn66/TCoop57/My%20Bike/CheapMods.jpg
http://i301.photobucket.com/albums/nn66/TCoop57/My%20Bike/CanBrreather.jpghttp://i301.photobucket.com/albums/nn66/TCoop57/My%20Bike/Seat.jpg
http://i301.photobucket.com/albums/nn66/TCoop57/My%20Bike/100_1556.jpg

128auto
07-01-2008, 11:16 AM
$35 Camera Mount

I was looking for a camera/camcorder mount for a while, they are really expensive to buy. I found $5 camera mount mod online but it looks kind of cheap, click here for the link (http://www.helmethairblog.com/entries/diy-5dollar-motorcycle-camera-mount/). I decide to make my own, order a 1" chrome handlebar clamp from Kuryakyn part number 1420, bought a optex car window 2-way panhead camera mount from a local store, I bolted the camera mount right onto the clamp, it costs me $35 in total. If you have a light weight camcorder, it may also work. I will go capture some videos with my digital camera this weekend, stay tuned.
WARNING: Although the camera stays tight, I highly recommend using safety tie down.
http://128auto.com/cover/mount01.jpg
http://128auto.com/cover/mount02.jpg

http://128auto.com/cover/mount03.jpg
http://128auto.com/cover/mount04.jpg
http://128auto.com/cover/mount05.jpg

$25 Remote Control Garage Door Opener
Another mod to share, I wanted a garage door opener for so long, I always keep the remote in my jacket but a lot of time I miss the button. All you need is a 4 terminals relay (5 is ok) and a garage door remote control. I tap the high beam wire to the relay terminal 86, white color according to the wiring diagram, terminal 85 to ground, terminal 30 and 87 to remote control switch circuit. Now when I hit the high beam switch, I activate the relay and join my remote switch circuit. Remote control costs $20, relay $5 + 2 beer labor. Not bad at all compare to $125 for the HD one. Cheers! Alex
P.S. If you use a 5 terminals relay, just leave the 87a unused. You can also wire a momentary switch to join the relay solenoid circuit. I prefer high beam switch because it is easy to hit.

1941ratrod
07-02-2008, 11:29 PM
http://i36.photobucket.com/albums/e19/1941ratrod/taillight/taillight005.jpg
$17 on ebay for an ash tray, the stock taillight socket, and about 8 hours of work gets a bitchin taillight like this.

JoeFLSTC
07-03-2008, 07:28 AM
Auto zone sells toppers in the engine dress up section, dozens of them cheap. I have put&nbsp\\;them all over my bike. For the large CAD bolts I put a dab of silicone glue (instead of the fastener) and smack it with a rubber mallet. They been on there of thousands of miles. Glued one remove very easy by prying or grabbing with a plyers.

wtf6316
07-06-2008, 08:17 PM
Easy way to run wire inside handle bars. Tape off one end of bars. get a long shoe string or fishing line. Tie a knot or something on that will fit threw the barsand tie the other end to the wires. Get your vacum and put the hose on the open end of the bars and turn it on. Feed the line in and let it suck it up. Then just pull the wires up.&nbsp\\;Then do the other side. It works I have done it 5 times so far.

GymRat523
07-09-2008, 08:11 PM
here is one I did on my sportster last year, a 1" metal door hole saw and a $4 can of high temp flat black BBQ spay paint and about 1 hour labor not counting dry time.
http://xlforum.net/photopost/data/813/medium/Jun25_0003.jpg
http://xlforum.net/photopost/data/813/medium/Jun27_0006.jpg
&nbsp\\;
oh yea, and 25 cents for the bandaid when the drill slipped
http://xlforum.net/photopost/data/813/medium/Jun25_0002.jpg

mopardave
07-12-2008, 02:46 AM
I've got the perfect fix for the grip stick problem:
&nbsp\\;
&nbsp\\;
http://img.jpcycles.com/product/0b563862-b107-47f5-be4f-9cb0a87dff88.jpegThis is a bearing for your throttle and it's only 20 bucks.
&nbsp\\;
http://www.jpcycles.com/productdetail.aspx?PID=500-467&amp\\;cs=Harley&amp\\;GID=FD279D4E-646C-4E63-8C53-0F8E943AAB69&amp\\;store=&amp\\;page=&amp\\;search=
&nbsp\\;

mopardave
07-12-2008, 02:48 AM
I don't know what happened to that link, but here it is. It's part number 500-467 at J&amp\\;P Cycles
&nbsp\\;
http://www.jpcycles.com/productdetail.aspx?PID=500-467&amp\\;cs=Harley&amp\\;GID=FD279D4E-646C-4E63-8C53-0F8E943AAB69&amp\\;store=&amp\\;page=&amp\\;search=

nikonf8
07-15-2008, 11:23 PM
I have the Harley smoked turn signals on my bike and they are way to light they almost look clear. I decided to make the background of the lights black so the lens would appear darker. i started to use black tape place a piece in position to get the cut out for the bulb and when i removed it the silver backing came off so i keep applying tape and removing it until the silver backing was gone. the results was a much darker look to the lens but the lights as just as bright. its not a true cheap mod because the smoked lens are not that cheap but its a mod that i feel looks much better. you can use the black tape or remove the silver backing

travis dasher
07-16-2008, 06:01 AM
On my Crossbones I replaced the soft CAD torx bolts on the rear fender strut with Chrome allen bolts and stainless washers. It was $25 at ACE and it looks killer. I am going to paint the washers black but for now it is fine.

Goodwrench1967
07-19-2008, 08:34 AM
well.. this is actually a cheap way to un-do the cheap "punch a hole in the baffle" mod. I did that almost immediately on my 08 fatboy and after 3k miles I was noticing that the engine always runs hot and pings under acceleration (lean). so I removed the mufflers and drove a 1 5/16 freezeplug (available at any auto parts store) from the inlet side down the baffle tube until it bottoms out on the remainder of the baffle cap you punched out. the freezeplug fits nice and tight and cant be worked out the pipe due to heat and vibration. It looks totally stock when you look down the pipe compared to before any mod was done.
&nbsp\\;You will be surprised how much better the bike runs and how much low end torque you were missing when you modified the stock exhaust. I asked&nbsp\\;my service manager what modifying the stock mufflers can do to affect the warranty and basically if the engine is damaged due to a lean condition that you caused its your baby. I am planning on eventually getting the vance and hines 2 into 1 big radius and the fuel pack.
&nbsp\\;

sdbiker
07-25-2008, 04:28 PM
I have a Night Train and Hate lots of chrome so I decided to do something about it. I took off the python mufflers and heat shields off and used VHT 1500 degree flat black paint. It has chipped a bit from the wife's car door but it is an easy touch up. As I said I am not a fan of lots of chrome so I pulled off the brake lever, **** lever and linkage and painted them with VHTs Wrinkle paint to try to match the the bike. the wrinkle did not come out perfect but until you get down close and look at it you can not tell. all this for about $30. I got the paint through the local auto parts store because it is about $5 cheaper then JP and no shipping. Up next is the rear turn signals but I am not sure about painting plastic.

Just Dave
07-26-2008, 10:52 AM
Thats awesome.

hispeed
07-27-2008, 02:29 PM
Citori, great idea with the soldering kit.&nbsp\\; One recommendation though is to always twist your wires at least a couple of times before soldering.&nbsp\\; This way they won't pull apart if you inadvertently apply a pull on the installation.&nbsp\\;
&nbsp\\;
I noticed on your blinker wires you had all your ends cut the same length.&nbsp\\; I always stagger the cut ends so there's no big bulge in one spot.&nbsp\\; With all the crimped ends there's always a hassle finding a place to tuck that big bulge in some tight spots on todays bikes.&nbsp\\;
&nbsp\\;
I will definately be ordering some of that mesh sheathing.&nbsp\\; I am doing my turn signals and want that same clean look.&nbsp\\; Thanks for the numbers, that makes it easy.&nbsp\\; Great idea for this thread.

PoorBoy
08-07-2008, 08:17 PM
Unable to find relocation kit from HD. They have a part number but no one has the kit in stock (or available).

I needed to move the rear turn signals so the HD Fatboy Saddlebags could go on and off their rail system that came stock with the bags.

I made my own. IM or email me for additional pics or info. I was able to relocate the stock signals (that have that wing or flare stand-off off the stock side bracket)

J&P Cycle Part numbers:

4420125 3" chrome universal flat strap $3.99 each (you need two of them)
970-297 3/8" Chrome Hot Toppers covers $1.99

1. Mark and drill one extra hole to pass wires through flat strap.
2. All stock side rail holes are reused to pass wires and mount strap.
3. Stock turnsignal wing stand-offs are fit perfectly onto flat strap.

You now have room for saddlebags to slide on and off rail mounts.

http://img.photobucket.com/albums/v177/pvancelette/Relo0004.jpg

http://img.photobucket.com/albums/v177/pvancelette/Relo0001.jpg

http://img.photobucket.com/albums/v177/pvancelette/Relo0003.jpg

Citoriplus
08-08-2008, 09:45 AM
Citori, great idea with the soldering kit. One recommendation though is to always twist your wires at least a couple of times before soldering. This way they won't pull apart if you inadvertently apply a pull on the installation.
I noticed on your blinker wires you had all your ends cut the same length. I always stagger the cut ends so there's no big bulge in one spot. With all the crimped ends there's always a hassle finding a place to tuck that big bulge in some tight spots on todays bikes.

hispeed,
You have obviously used a soldering iron before and understand that it really isn't rocket science. What I was trying to do however is show the novice the simplest/easiest/best way to get a reliable/safe connection.
Your right about twisting the wires. But with the "helper" it isn't really required. A good solder connection is nearly impossible to pull apart and if one should come apart during installation the odds are that you had a bad or cold solder joint that would have given you trouble sooner or later anyway. Better it comes apart during the installation and force you to do it over (even if it is a pain in the butt) than have it cause strange electrical gremlins or fail outright out in the middle of nowhere someday.
Also most people who do the cut and splice routine do it either because they don't want to or can't remove major parts of the bike, like the tank, or are a little unsure about taking the end connectors off. So twisting wires together with the ends on can be a bit difficult especially if you forget to back twist them first. One wire is easy, but put several together in a bundle and it can be very frustrating.
Your also right about the staggering, however remember it was geared to the novice and as long as the wires are soldered/shrink wrapped properly (not taped, tape sucks) and your only dealing with no more than 4 or 5 wires the bulge is minimal and again just easier for the novice to deal with. More than 5 or so wires and I have to agree that staggering becomes nearly mandatory.

JRK5892
08-08-2008, 04:06 PM
Auto zone sells toppers in the engine dress up section, dozens of them cheap. I have put&nbsp\\;them all over my bike. For the large CAD bolts I put a dab of silicone glue (instead of the fastener) and smack it with a rubber mallet. They been on there of thousands of miles. Glued one remove very easy by prying or grabbing with a plyers.
agreed... i painted all mine.. then my bro got me a kit... wow... worth it!
def not a cheap mod but very cool!
http://i36.tinypic.com/2le3qu.jpg
http://i35.tinypic.com/novbs6.jpg

hispeed
08-08-2008, 11:37 PM
Citori... you are exactly right. I forgot the theme of the thread...simple home made fixes or improvements.

I just finished most of the additions to my Rocker and will be taking a few pieces off to use some of the suggestions from this thread. The brake discs are getting polished for sure and I'm gonna take my shifter and rear brake arms off and slot them on a milling machine. That will save me a few bucks but that leads me to a question...

After I machine them is there anything I can do to seal the bare metal that will be exposed? I don't want it rusting the first night?

Citoriplus
08-09-2008, 01:46 AM
I'm not sure but I think those parts are chromed, at least they are on my Custom. So ANY cutting into them is going to require some special treatment or the first hint of moisture is going to start lifting the chrome off at the edge of the cuts.
My first suggestion would be to radius the edges of the cuts to match the outer edges. If you don't the sharp edges of the cuts will allow the chrome to flake off a lot easier.
Then use either a clear coat over the whole thing to seal it. Or for a little bit of contrast how about painting the inner edges or sides of the new holes either black or the same color paint that's on the fenders and tank. Then clear coat the whole thing. Covering the cuts with a different color should hide the fact that there is no chrome under it better than clear coating alone would. As a bonus if its done carefully it will look noticeably different and keep the dreaded rust from wrecking an otherwise nice looking piece.
You can always chrome the whole thing later when you either have some extra cash or get tired of how it looks.

PS just remember that you need to COMPLETELY degrease and clean the parts before you do any painting. I suggest a decent grade of primer or Rust-o-lium for bare metal before using the color paint. It will adhere better than straight color paint and resist chipping better.

hispeed
08-10-2008, 06:35 PM
Sounds like a winner. I didn't think of painting the inside with the same color paint. Great idea.
Thanks

Citoriplus
08-10-2008, 08:41 PM
I have seen it done before with contrasting colors like red and yellow on things like the I beam frame work on carnival rides. But never on a bike and for the life of me I can't think of a decent reason why you couldn't or shouldn't do it. It would make for a really unique look that's not going to break your piggy bank the way a customs set of pedals would.

mopardave
08-21-2008, 06:07 PM
That finish idea works on the brake rotors as well. HD rotors are apparently semi-stainless so if you use a dremel and some small sanding drums or tootsie rolls you can remove all the rust and then spray them with clear (taping off the scrub area) or do the contrast paint in the holes and then clear.....then they will match that mod and look bitchin'! I have not done mine yet but it's on the list...LOL

P.S. You need to use high temp (engine) paint on those. Brake caliper paint (ceramic) works good too.

mopardave
08-21-2008, 06:13 PM
Like I said, I have not done my bikes rotors yet, but I did one of my cars and it's holding up great.
http://i134.photobucket.com/albums/q117/Vicmonster/Dave/aIMG_0099zzz.jpg

Deluxe Rider
08-23-2008, 04:04 AM
Citori, great idea with the soldering kit.&nbsp\\; One recommendation though is to always twist your wires at least a couple of times before soldering.&nbsp\\; This way they won't pull apart if you inadvertently apply a pull on the installation.&nbsp\\;
&nbsp\\;
I noticed on your blinker wires you had all your ends cut the same length.&nbsp\\; I always stagger the cut ends so there's no big bulge in one spot.&nbsp\\; With all the crimped ends there's always a hassle finding a place to tuck that big bulge in some tight spots on todays bikes.&nbsp\\;
&nbsp\\;
I will definately be ordering some of that mesh sheathing.&nbsp\\; I am doing my turn signals and want that same clean look.&nbsp\\; Thanks for the numbers, that makes it easy.&nbsp\\; Great idea for this thread.

Here is another source for expandable sleeving in a lot of different colors:

http://www.partsexpress.com/webpage.cfm?webpage_id=3&CAT_ID=54&ObjectGroup_ID=588

They have other diameters. You will have to look around. Look under "tools and tech aid"

wrenchguy24
09-04-2008, 07:26 PM
Made my own out of plexaglass, made tops for the lids and pieces for the dront and back, total cost 30.00

2008softail
09-07-2008, 01:31 AM
Already made stainless steel inserts for rear frame. Now working on stainless steel inserts for rear inner fender, photos to follow.
Inserts were made from a flat sheet of stainless. Made pattern with masking tape and sawed out with jewlers saw then finished off with dremel tool.4134

4138


Both bags were made from scratch using Tandy Leather 10oz. hides then dyed for the antique look.
4143

And also made this fully functional camera mount to shoot pictures and videos, using pvc hose clamps and the top part of an old tripod that's been sitting in the closet for ten years.
4141

doghair
10-01-2008, 11:15 PM
Ingredients:
Existing door opener
Old aquarium light hood switch with rubber boot
Spare computer cable

Cost $0.00

http://doghair.org/bike/DSC01738.JPG

Soldered some wire between the switch contacts and the button

http://doghair.org/bike/DSC01739.JPG
http://doghair.org/bike/DSC01740.JPG

Punched a hole in the bag, screwed the switch on, stuck the opener to the inside and booted it.

http://doghair.org/bike/DSC01742.JPG
http://doghair.org/bike/DSC01743.JPG

Citoriplus
10-01-2008, 11:23 PM
Very clever sticking it inside the bags like that. Keeps it close without taking up any of the very limited under seat space.
One suggestion I have would be to cover the unit and especially the loose wires with something to protect them from anything you might stuff in or pull out of the bag.

doghair
10-02-2008, 11:41 AM
One suggestion I have would be to cover the unit and especially the loose wires with something to protect them from anything you might stuff in or pull out of the bag.

Agreed. This was the MacGyver I came up with last night after standing in my driveway yesterday in 101 degree heat looking for the opener for 5 minutes.

I am looking for a small plastic box (pack o' smokes size) to put the opener in with a longer wire to bury it at the bottom of the bag, maybe a small tube to run the wire through.... or better yet ... Hot Glue! I love hot glue.

Thanks for the reply.

Citoriplus
10-02-2008, 12:03 PM
As a MacGyver fix, its excellent. But there is no real need to move the unit and burring it under things in the bottom of the bag might actually inhibit the output signal if you were to put anything on top of it with a metal content or metalized mylar. Better to leave it where it is and just go to the local Auto Parts place and see about picking up a short piece of that split plastic wire covering, put the wires in it and 'hot glue' it to the inside of the bag. The split tube will let you put it on without having to desolder and resolder the wires again. Just slip it over them and glue it to the side of the bag.

If your not sure what I'm talking about. I did a quick search on line and this is the first place I found where you can see what it looks like. As you can see its not very expensive and your probably only going to need 4 or 5 inches of the smallest sized.

http://cableorganizer.com/wire-loom/colored.html

Have fun and thanks for putting up your idea.

JRK5892
10-08-2008, 12:59 PM
i wrapped all my wires in that a while back! looks great looks just like black braided cables

WARG
10-12-2008, 10:06 AM
Front Turn Signal Relocation on an FL Frontend:

Alright, here's my contribution. This is one of my favorite mods so far, and cost less than $10.00 and some time. Enjoy...

Finally got around to relocating my turn signals on my 2006 FATBOY. I know this has been a popular topic around here lately, so I just wanted to post a step-by-step process for others to reference. Hope it helps. Thanks to everyone for the input.

Remove signals from bars, pull wires out.
http://i110.photobucket.com/albums/n87/Toogie68/DSCF3968.jpg[/URL]

Locate the turn signal plug on right side of tank.
http://i110.photobucket.com/albums/n87/Toogie68/DSCF3967.jpg

Install 2" 5/16x24 bolt with blue locktite.Useone 5/16x24 nut to tighten down fork accent strip. Use a second 5/16x24 nut to tighten against turn signal. Screw turn signal on bolt and tighten nut down to lock in place.
http://i110.photobucket.com/albums/n87/Toogie68/DSCF3974.jpg
(http://i110.photobucket.com/albums/n87/Toogie68/DSCF3968.jpg)
http://i110.photobucket.com/albums/n87/Toogie68/DSCF3978.jpg

Repeat the previous step on opposite side.
http://i110.photobucket.com/albums/n87/Toogie68/DSCF3980.jpg (http://i110.photobucket.com/albums/n87/Toogie68/DSCF3978.jpg)

You are now ready to splice thewires. I used wire connector b/c my soldering gun crapped out on me in the middle of the project.

http://i110.photobucket.com/albums/n87/Toogie68/DSCF3981.jpg

http://i110.photobucket.com/albums/n87/Toogie68/DSCF3982.jpg

http://i110.photobucket.com/albums/n87/Toogie68/DSCF3983.jpg (http://i110.photobucket.com/albums/n87/Toogie68/DSCF3982.jpg)

I also reccomend putting heat shrink over the splice.

I used a multimeter to make sure connections were sound.
http://i110.photobucket.com/albums/n87/Toogie68/DSCF3984.jpg

Use zip ties to secure loose wires and keep everything in place. And your done!
http://i110.photobucket.com/albums/n87/Toogie68/DSCF3988.jpg[URL="http://i110.photobucket.com/albums/n87/Toogie68/DSCF3988.jpg"] (http://i110.photobucket.com/albums/n87/Toogie68/DSCF3984.jpg)

128auto
10-14-2008, 02:16 PM
I have done that 2 years ago.
http://www.hdforums.com/forum/showthread.php?t=127027#1931040

Ingredients:
Existing door opener
Old aquarium light hood switch with rubber boot
Spare computer cable

Cost $0.00

http://doghair.org/bike/DSC01738.JPG

Soldered some wire between the switch contacts and the button

http://doghair.org/bike/DSC01739.JPG
http://doghair.org/bike/DSC01740.JPG

Punched a hole in the bag, screwed the switch on, stuck the opener to the inside and booted it.

http://doghair.org/bike/DSC01742.JPG
http://doghair.org/bike/DSC01743.JPG

Gundog
10-15-2008, 06:03 PM
I have done that 2 years ago.

Well, not exactly.:confused:

ffblee
10-16-2008, 01:38 AM
hey 128 that is f-ing kool. I've been trying to figure out how iwas going to be able to have a garage door opener along for the ride thanks man.

mike@nhca.us
10-16-2008, 09:40 AM
I have a working fix to replace the two acorn nuts that hold on the seats of the softail customs. The existing bolts are unsecured at the rear and it has been a major pain for me to remove them if I need to go under the seat because they spin as you try to remove them. Not only that but the nuts were getting scratched up being removed for service. Not good in my opinion, but you have to try it to really understand.

But for those that have this problem I have a $10 answer.

Go to your local hardware and get 2 shaft collars, 1/4 inch interior diameter, 1/2 inch exterior diameter. These are in the standard packs on the wall of nuts and bolts the stores buy. Basically, these look like a thick washer with a small hole on one side in which is threaded an allen bolt headed screw. The screw twist thru the body and pushes against whatever is inside. This holds the collar on to a bolt.

http://i102.photobucket.com/albums/m103/Citoriplus/DSC06954.jpg
Next go to local dealer with the collar and find a 1/2 inch diameter chrome bolt cover that almost slides over the collar. Again, standard size thing these guys sell to hide engine bolts.

http://i102.photobucket.com/albums/m103/Citoriplus/DSC06951.jpg

Then all we do is remove acorn nuts for one last time from bolts, slide on and lock on shaft collar. and then, using a demmel or small file, trim the interior of the bolt cover until it slides firmly over the locked collar.

http://i102.photobucket.com/albums/m103/Citoriplus/DSC06950.jpg

Last step, put allen wrench for collar in tool pouch.

If there is any interest I will take a few pics and send the to Citoriplus. I have had no luck reducing or posting lately.

This idea gives a clean bolt cover that can be quickly removed with tools, but is otherwise secure.

Any thoughts post or email me.

Mike

STEPHEN95
10-25-2008, 02:08 PM
This is not mine but the idea is there.

anubisss
11-18-2008, 01:58 PM
Rear bullet turn signals mod $20
Got these signals off of ebay.
http://rover.ebay.com/ar/1/711-53200-19255-0/1?mpt=684008078&adtype=1&size=1x1&type=3&campid=5336075432&toolid=10001 http://cgi.ebay.com/ebaymotors/ws/eBayISAPI.dll?ViewItem&item=310085678851&sspagename=STRK%3AMEWNX%3AIT&viewitem= (http://rover.ebay.com/rover/1/711-53200-19255-0/1?type=3&campid=5336075432&toolid=10001&mpre=http%3A%2F%2Fcgi.ebay.com%2Febaymotors%2Fws%2 FeBayISAPI.dll%3FViewItem%26item%3D310085678851%26 sspagename%3DSTRK%253AMEWNX%253AIT%26viewitem%3D)

Needed a longer 3/8" bolt to mount these to the very rear of the strut. Also used a 3/8" nut that cost 10 cents as a spacer as the fancy chrome one I bought was too wide and I don't ahve a machine shop here at home. Took off the old super lollipop signals and took off the connectors from the taillight. Had to add a little bit of wire from the old signals to the new ones so it would reach the plug in the taillight. Crimped it together with butt connectors and ran the wiring. Plugged it in and off I went. The longer bolts I got for the mounting of the signals were free from a custom shop near here. $20 plus and outrageous $12 to ship 2 miles as the guy would not let mne pick it up. Still a deal for relocated signal.
http://i50.photobucket.com/albums/f321/anubisss/newsignals004.jpg

$40 attitude stick made by shoptroll (a banned user who is on a nother site now) I already ahd the sideplates so I had him fashion the style of sissybar I wanted and paint it black. Shipping put it jsut over $50 as he lives across the country, but another nice cheap mod. To see pics search my threads of if you want more info feel free to PM me.

http://i50.photobucket.com/albums/f321/anubisss/newsissybar006.jpg

Danny D
11-19-2008, 06:43 PM
If you are in need of stainless steel items like nuts, bolts, washers and pins or the like try a sail boat or marina shop. Anything near the water, especially salt water, has got to be stainless.
Danny D