How To Change the Brake Pads for Your Harley Davidson Dyna
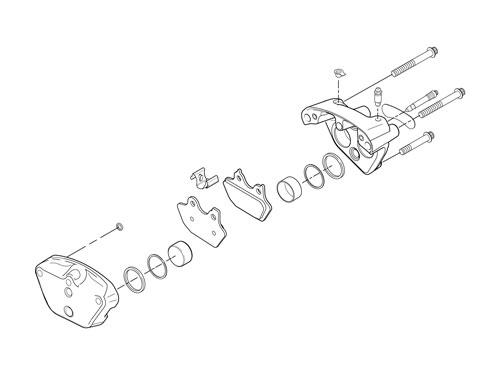 Technical Drawing of a Dyna Front Brake Caliper
 The Harley Davidson Dyna relies, like other motorcycles and vehicles on the road, on brake pads to help it stop in a controlled and efficient fashion. The brake pistons push up against the brake pads to create friction, which thereby slows down the spinning of the wheels and brings the motorcycle to a halt. Without proper brake pads that function well, your Dyna will not be safe to ride. In order to maintain the safety of your vehicle, plan to replace the brake pads every 2000 to 3000 miles, or whenever the brakes become sluggish and unresponsive. You can change the brake pads at home in a short period of time and for little money by following these steps.
Step 1 — Gather Materials
Collect the following tools and materials before you begin:
New brake pads
Allen wrench
Screwdriver
Cleaning spray
Pliers
Step 2 — Prepare and Mount the Bike
If you’ve recently had the engine of your Dyna on, allow it to cool for several hours before you attempt to mount it and remove the brake pads. Working with overheated brake pads can cause injury and make the process unnecessarily difficult. Once the engine has cooled, mount the bike such that you’ll have access to both sides of it.
Step 3 — Remove the Caliper Bolts
Use the Allen wrench to unscrew the caliper bolts so that they can be removed. Set them aside so that you can replace them at the end of the procedure. if your Dyna has retaining clips to hold the calipers in place instead of standard caliper bolts, turn the retaining clips around until the ends of the clips jut out. Pull out the clips by the ends using the set of pliers, then set the clips aside in a safe and protected place as well.
Step 4 — Remove and Clean the Calipers
Pull out the calipers by hand or by using a screwdriver to pry them out. Examine them for signs of cracks, wear and tear or other damage. If they do exhibit this damage, remove them completely and throw them away so that you can replace them. If not, use the cleaning spray to clean off any dirt or debris that may be in the way of the calipers.
Step 5 — Remove the Pads and Clean the Pistons
Take out the brake pads on either side by hand. Depress the brake pedal on the Dyna so that all of the air is forced out of the brake caliper pistons. Once the pistons have fully evacuated the air out of the system, use the cleaning spray to clean both the pistons and the spring sets as well. Having accomplished that, next push the pistons back into the brake calipers using the screwdriver tip.
Step 6 — Replace the Pads
Place the new brake pads into the set position in the brake system. Fit the calipers back over them and fix the calipers in place by tightening the caliper bolts once again with the Allen wrench, or by attaching the retaining pins and turning them so that they’re secure. Before you attempt to start up your Dyna once again, depress the brake pedal to make sure that it will work properly. Next, remove the motorcycle from the mount and test drive it slowly in a careful way and a safe area to be sure that the brakes work as they should while driving.
All of the different materials and components that you’ll need for this project can be found either at a motorcycle repair store or at a hardware shop.