How Shotgun Shocks Work - Part 1
==========================
HOW SHOTGUN SHOCKS WORK
Since there seems to be so many write-ups done already that deal with the installation of Shotgun Shocks, I thought I’d do one explaining how they actually work.
I’ve see a lot of posts on the subject talking about “figuring the switches out” or “experimenting” in order to properly “dial-in” these shocks for various conditions, so this subject seemed like a good idea.
When I first approached J.D. with my own questions about installation I was under the impression that the front switch controlled the height, while the rear switch controlled rebound. (..more on both of those later).
As it turned out I was wrong on both counts – or as J.D. put it, "both switches can change height, and both switches can change rebound."
Confused yet? I know I was...
But after J.D. explained it in more detail it all made sense.
Hopefully I’ll be able to explain what I learned and with a little luck, maybe you’ll even find it useful. I hope you do.
A lot of the information presented here is fairly basic and probably already understood by most of you, but if this helps anyone to gain a better understanding of setups and adjustments, it will have been worth it.
And bear with me as this is a little long-winded – I didn’t want to leave anything out.
Lastly, please excuse my cartoonish, crayon-quality, not-to-scale drawings but I tried to make this as simple as possible.
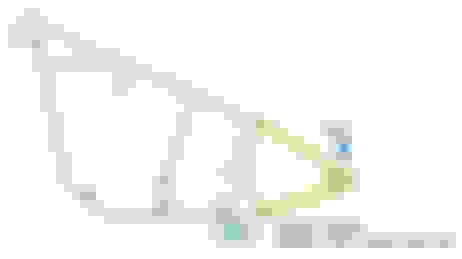
First, a few words about how the Softail rear suspension works.
Here is a diagram showing the components of the Softail swingarm:
Fig. 1
The operation is fairly simple and straightforward.
The swingarm is a floating assembly attached to the rear of the frame in only two places.
The first is by a pair of bushings that are bolted to the frame at the pivot points shown, to allow rotational (up & down) movement. The second is where the shocks bolt between the frame and the swingarm. The fronts of the shocks are bolted directly to the underside of the frame, dampened slightly by a pair or rubber bushings on either side of the frame rail.
The rear of the shocks bolt directly to the front of the swingarm, and like the pivot points mentioned, they also allow for rotational movement as the swingarm rises and falls.
As you ride and encounter changes in the road surface, the shock expands and contracts to absorb the up and down movement of the rear tire.
Here are a couple of different views:
Fig. 2
The shock only moves in and out, while the swingarm rotates at the pivot point.
The rubber bump stop is located on the frame, at the top of the swingarm.
This is the limit of upward movement, and it acts as a cushion if the swingarm is raised that high. When your bike is “slammed” (lowered as far as it will go) your swingarm is sitting against this bump stop.
..and when you hear guys say they "bottomed out", this is what they're talking about.
Fig. 3
This image (Fig. 3) shows how the orientation of the swingarm to the frame appears on a stock, unladen bike.
Fig. 4
This image (Fig. 4) shows how the orientation changes when the bike is raised.
Fig. 5
..and this image (Fig. 5) shows how the orientation changes when the bike is lowered.
(more on that later...)
How Shotgun Shocks Work - Part 2
==========================
The Shotgun Shock basics:
The Shotgun Shock (hereafter referred to simply as “SS”) is a premium, replacement air-ride suspension system for the rear of Harley-Davidson Softail models.
(..and just a FYI, but currently J.D. is also working on a similar system for baggers as well.)
It is a single unit (as opposed to the stock dual shock system), that uses a compressor to add/adjust the air in the system. It comes complete with the main shock body, an air compressor, a pair of switches for control, and all necessary wiring harnesses and mounting hardware.
The shock body itself comes as a one-piece “dual shock” configuration to be a direct bolt-on replacement.
Fig. 6
Each individual “shock” contains two air chambers separated by a “piston” that is connected to the pneumatic “ram”. The piston/ram travels in and out depending on air pressures to adjust both ride height and rebound. Rebound can best be described as either the stiffness or softness of the ride.
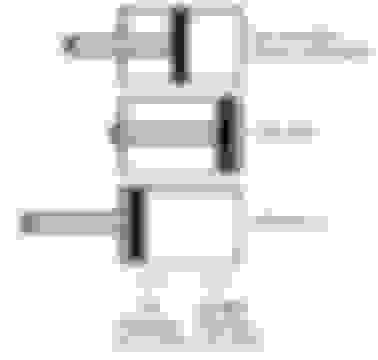
Here’s a simple diagram of the SS:
Fig. 7
Each “shock” contains both an “UP” and “DOWN” air chamber, separated by the piston, which is in turn connected to the ram. The piston and ram move back and forth together, which will eventually determine your ride height. Also, as you can see from the diagram, both “UP” chambers, as well as both “DOWN” chambers are connected internally. This design allows both shock units to maintain equal pressures and function as a single unit.
On your stock shocks, it is possible (although there is no practical reason why you would want to do so) to adjust each one differently.
On the SS, this is impossible. Air entering either chamber is distributed equally between the two at all times.
So, for the remainder of this write-up and in all further diagrams, I will no longer refer to or display the SS as a “dual” shock unit, but rather one single shock, for simplicity.
(NOTE: As far as naming these chambers "UP" & "DOWN", I only did so for simplicity, since adding air to that chamber will result in the bike moving in that direction. I could have just as easily named them "FRONT" & "BACK" but I wanted to be consistent with my descriptions of the operations.)
There are two switches that operate the SS. These switches work via an external relay and a combination of internal solenoids and air valves to control the entire unit.
Here they are shown mounted in their “default” location, which is on the left side of the bike, attached to the horn bolt.:
Fig. 8
The front switch operates the “UP” air chamber, while the rear switch operates the “DOWN” air chamber.
(Keep in mind, this is J.D.’s latest revision as of September, 2013, so I can’t guarantee that earlier models function in exactly the same way…)
Using the previous diagrams as a reference, as you add air to the UP chamber, the piston pulls back, or contracts into the shock, causing the swingarm to lower, and the bike to rise up. (see Fig. 4)
Alternately, as you add air to the DOWN chamber, the piston moves out, or extends from the shock, causing the swingarm to rise, and the bike will lower. (see Fig. 5)
We’ll get into rebound in a bit, but first a quick word or two about air volume –vs- air pressure.
- Air VOLUME is the amount of AREA that air occupies in an enclosed space.
- Air PRESSURE is the DENSITY of the air within that same space.
In the case of the SS, it is air VOLUME (in both chambers) that determines HEIGHT via piston travel, and it is AIR PRESSURE (in both chambers) that determines REBOUND.
Here’s how differences in air VOLUME (area) between the two chambers affects HEIGHT:
Fig. 9
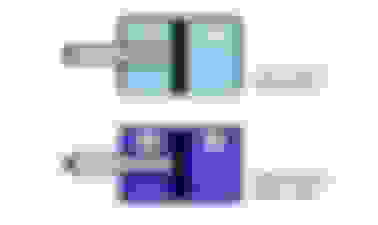
And here’s how differences in air PRESSURE (density) between the two chambers affects REBOUND:
Fig. 10
In the top example (Fig. 10), you have relatively low air pressure in both chambers.
This will result in a very soft rebound, or a very soft ride. (moderate piston travel with little resistance on either side)
In the bottom example, you have relatively high air pressure in both chambers.
This will result in a very stiff rebound, or a very harsh ride. (limited piston travel with much resistance on both sides)
Notice that in both cases you can see that the piston hasn’t moved, therefore the HEIGHT is the same. Only the REBOUND has changed.
How Shotgun Shocks Work - Part 3
==========================
Shotgun Shock operation:
Let’s have another look at those switches.
Fig.11
Now again, bear in mind that I’m showing the operation of the switches in their most recent revision, so once again I can’t guarantee that earlier models function in exactly the same way…
Each switch is a single-pole, double-throw (SPDT) electrical switch – meaning that each controls a single function (or circuit) but it flips in two directions.
In this case each switch flips up AND down, with the center position being neutral, or OFF.
Both switches are also of the “momentary contact” type, meaning that no matter which way you flip the switch, it will only remain there as long as you hold it.
Once you let go, it will spring-return back to center (OFF).
(Note: Older revisions of these switches were quite different in that one direction (up) would lock on, allowing you to let go with it still running. This was changed in later revisions, probably to prevent you from burning up your compressor by leaving it running for too long. Also, the orientation of the switches was changed as well, but I won’t get into that here.)
The current switch operation is as follows:
1. The FRONT switch operates the UP chamber.
2. Flipping it UP, turns on the compressor and fills the UP chamber in the shock.
3. Flipping it DOWN releases the air valve for the UP chamber, dumping the air.
4. The REAR switch operates the DOWN chamber.
5. Flipping it DOWN, turns on the compressor and fills the DOWN chamber in the shock.
6. Flipping it UP releases the air valve for the DOWN chamber, dumping the air.
7. Both switches can be feathered or “blipped” in short bursts without harm – in fact as you’ll see later, this can be quite useful.
If you haven’t noticed, the UP and DOWN operations are reversed from one another…
(look at Fig. 11 again)
ie; the front switch (UP) turns on when UP, the rear switch (DOWN) turns on when DOWN.
This makes sense strictly because of the movement of the bike.
Up is up and down is down – as it should be.
There are two general rules for SS operation:
1. The bike will fall a lot faster then it will rise due to, well you know, gravity.
2. It takes longer to pump air in than to let air out.
On my bike, a 2013 Softail Slim, I can raise the bike to full height (from slammed) in as little as 10-12 seconds. I can dump it flat in about 2 seconds.
Now, a word of warning may be in order here ..BE CAREFUL, because this thing can change heights FAST.
If you’ve never done it or seen it done, it may even startle you because of just how fast it is.
According to the instructions supplied with the SS:
The quickest way to RAISE the bike up as far as it will go is to hold BOTH switches UP.
This does two things: It turns the compressor on and diverts the air into the UP chamber, while opening the valve in the DOWN chamber, dumping the air and offering no resistance.
The quickest way to LOWER the bike down as far as it will go is to hold BOTH switches DOWN.
This does two things as well, but in reverse: It turns the compressor on and diverts the air into the DOWN chamber, while opening the valve in the UP chamber, dumping the air and offering no resistance.
**Another way to quickly lower the bike is to simply dump the air from BOTH chambers.
Setting Height and Rebound:
Here’s a different way of looking at the various switch positions and their operation.
Each switch position serves two purposes:
Fig. 12
1. RAISES the bike HEIGHT + increases REBOUND (compressor ON)
2. LOWERS the bike HEIGHT + decreases REBOUND (air dump)
3. RAISES the bike HEIGHT + decreases REBOUND (air dump)
4. LOWERS the bike HEIGHT + increases REBOUND (compressor ON)
This may very well be the only diagram you need to fully understand how to operate your SS.
Think in terms of the TWO functions that each switch serves;
Part 1 is for HEIGHT, and Part 2 is for REBOUND; Start with Part 1, and then adjust using Part 2.
- If you want to RAISE your HEIGHT, use positions 1 & 3
- If you want to LOWER your HEIGHT, use positions 2 & 4
- To increase REBOUND, use positions 1 & 4
- To decrease REBOUND, use positions 2 & 3
After having used the SS for a while I highly recommend setting the height first, and then adjust the rebound afterwards.
I say this only because it takes a little longer to set the height than it does to set the rebound.
How Shotgun Shocks Work - Part 4
==========================
If you hold the front (UP) switch up, the bike will rise to full height as I mentioned in about 10-12 seconds. Now let go of the switch as soon as it reaches maximum height.
By stopping there, you’ve added enough VOLUME to raise the bike, but you still haven’t added enough PRESSURE to increase REBOUND. If you press down on your fender you’ll see that it’s fairly soft.
Now hit the UP switch again and hold it on for about 10 more seconds.
The bike won’t rise any further, by now you’re adding PRESSURE to the UP chamber.
Now press down on your rear fender. It should have firmed up quite a bit.
If you have it too firm this may make it difficult to add air to the DOWN chamber to change HEIGHT. As you can see this will require a bit of practice to get it “dialed in”. And keep in mind, best results will be achieved when you have pressurized air in both chambers.
Also, riding while having the shock piston bottomed out in either the full UP or DOWN position will hamper your efforts to adjust rebound properly (see Fig. 9) and frankly I can’t imagine why you would want to ride in either of these positions anyway.
What I generally do is (and let’s assume we’re starting from “slammed”, or both chambers empty), I’ll press both switches up until it reaches maximum height, and then stop.
Then I’ll press the DOWN switch DOWN to begin adding air to the DOWN chamber, but only for a few seconds.
This will do two things; it will begin to lower the bike, but it will also be adding REBOUND as it goes. Now you should have a fair amount of air volume in BOTH chambers.
Once you have the bike at the height you want, now you can start to adjust for rebound.
Like I mentioned earlier, this is where both switches can be feathered or “blipped” in short bursts to get the desired result.
- If the height is where you want it but it’s too stiff, simply “blip” each switch to its DUMP position, alternating back and forth until you’ve released enough air to soften the ride.
- If the height is where you want it but it’s too soft, simply “blip” each switch to its ON position, alternating back and forth until you’ve added enough air to stiffen the ride.
Keep in mind that when adding air, try 1 or 2-second intervals, but when dumping air, short “blips” are all you want since you can dump all the air from a chamber in just 2 seconds.
It’s really quite simple once you get the hang of it, and in only a short time (just a few days for me) I’ve managed to become proficient enough that I can dial it in to whatever I need in about a minute. I’m also becoming more familiar with making adjustments “on the fly” so that I can make small changes as road conditions change, without stopping or even taking my eyes off the road.
However... it's probably a good idea to NOT attempt adjustments while moving until you are ABSOLUTELY SURE that you are familiar enough with all operations to do so.
For example, you wouldn't want to dump all of the air out and drop suddenly and not be expecting it...
One great feature of the SS is that it’s a sealed unit, which means that if you would ever lose power to it or pinch or damage the air line that feeds it, it will retain its current height and rebound.
It’s nice knowing you won’t need a tow should anything happen to it.
In fact, if you were to set it up exactly as you wanted and had no intention of ever changing it again, you could literally remove the compressor and all of the associated air lines, switches and wiring and forget about it. Seriously.
And there’s another, really quite incredible design feature of the SS.
Despite my "exaggerated" diagrams, the actual piston/ram travel is only ONE INCH, but coupled with the geometry of the swingarm and its pivot points it allows for a full 5” of height adjustment.
On my bike that’s 2.5” lower than stock (slammed), all the way up to 2.5” higher than stock.
Fig. 13
Look above (Fig. 13) at not only the fender height, but also the relative locations of the top of my exhaust and the axle nut. That’s quite a difference from one extreme to the other.
The same goes for rebound – a medium setting is very similar to the feel of the stock shocks. But with the SS, I can increase or decrease rebound far beyond the capability of the stock setup.
That alone, in my opinion, is an engineering marvel and a thing of beauty just for its perfect symmetry in both cases…
How Shotgun Shocks Work - Part 5
==========================
Now, I’ve seen a lot of posts from guys who say “the only reason you got a Shotgun Shock is to look cool”.
Well, those posts are generally from guys who don’t have one, and if that’s what they think it’s all about they’re really missing the point. It’s all about comfort and even safety, as you can keep your rear end planted firmly on the ground and I’m sure you can appreciate how beneficial that can be. You can also “dial it up” for those times when you want to take a “spirited” ride through the twisties if that’s your thing. And if you do any “two-up” riding you’ll really appreciate just how fast you can accommodate a passenger and/or a pile of luggage.
But since they mention the “cool factor”, well yeah, sure it has that too – so why not show it off?
Parking your bike “slammed” is a real attention getter and it never fails to draw a crowd.
But rather than just parking and dropping it, try this;
Hit the DOWN dump, this will raise it all the way up in about a second.
THEN hit the UP dump, this will slam it just as fast… that’ll get their jaws droppin’.
Kind of like a California low-rider… ..hey, if you got it you may as well flaunt it, right?
And speaking of parking it slammed, here’s one VERY important tip.
ALWAYS park on level ground and ALWAYS make sure you have the handlebars locked hard left.
On my bike, it’s already so low to the ground that if I slam it with the forks turned straight ahead, or worse, turned to the right, the bike is basically balancing at its tipping point.
No further explanation required I’m sure.
Lastly, there is one thing you need to be aware of, and that is the SS's block access to your transmission drain plug, but this is really not a big deal.
The front mounting bolts on the SS can be removed entirely, allowing you to swing the SS down and out of the way.
Your stock shocks can't do this because the mounting bolt is an integral part of the shock.
If nothing else, it might even make this fluid change a little neater since now you're not emptying your tranny all over your shocks...
Well… that’s about it, but before I go I just wanted to say that I’ve found several (previously unknown to me) benefits to having the SS.
1. You can use it to adjust your view over a windshield.
2. You can use it to get a jack under your bike easier. On my Slim, and using a Sears red jack I had to stand the bike upright and hang on with one hand while sliding the jack under it – even then it barely fit.
But now I can just raise the bike higher than stock and the jack slides right under.
3. In fact, you can actually use the SS as a jack itself for quick access beneath the bike, which is certainly handy for fluid changes.
4. Working on the rear end has never been easier – pulling the splashguard, removing the wheel, even washing and detailing, etc.
5. Due to its solid one-piece construction (as opposed to the stock single shock bodies which can "flex" individually), it feels as though I've added a rear stabilizer.
While I can't back this up with any real data, the "seat-o'-my-pants" feel tells me it has firmed up, and quite a bit.
Now, as a nice little side benefit to that, while I don’t know what the average service life is for a set of swingarm bearings, the reduction or even total elimination of lateral movement can only extend this considerably.
6. ..and last but not least, having a SS may even help you avoid getting a ticket…: Can the Shotgun Shock actually save you $ ? ..Thanks Midgard...
I hope you found the information in this write-up useful.
All of it was put together with the gracious cooperation of J.D. himself, for giving it the once over and the final green light. ..and I’d like to give a special shout-out and a big “Thanks” to Gary Weishaupt @ “The Chopper Builders Handbook” for giving me permission to use one of his Softail frame sketches for this write up (Figs. 2-5).
Thanks again Gary…
And once again thanks also to J.D., without whose help and generosity, this write-up would never have happened in the first place…
Thanks again J.D.! You the man.
Ok so I have only read the first post so far but it's a good write up so far. Thanks for taking the time to do it. Although I don't know where you found the time to do it while also kicking *** on the softail challenge thread.
Last edited by Uncle Chester; 10-05-2013 at 12:49 PM.
I'm mentally retired. Unfortunately I still need to physically be at work though.
Took a good dump while finishing the rest of your write up. Good job man, I had the switches nailed down but you did a real good job of explaining the inner workings of the shock/chambers.
 10-05-2013, 11:25 AM


 ..hey, if you got it you may as well flaunt it, right?


