How To: XR1200 caliper swap on Fat Bob Legs
#1
 07-04-2017, 05:18 PM

How to... I'm posting this because there is a lot of interest based on my PM traffic. Enjoy.
For my dual disc conversion I used Fat Bob fork legs in the stock mid glide triple clamps, XR1200 Nissin four piston calipers and master cylinder, and Harley 300mm floating rotors, so the conversion is all Harley-Davidson out of the parts or accessory catalogs. This conversion is not quite a bolt on as machining is required on the caliper mounting lugs to get everything to line up properly and custom length bolts to attach the calipers to the fork legs. The pad/rotor interface is perfect with the pad making contact with the rotor just below the chamfer at the edge the disc rotor, I was concerned about the pad fit as the XR1200 uses a 292MM rotor but this was not an issue.
So how do I get all this stuff to fit?
First measure the width of the caliper mounting bosses on both of the fork legs and the mounting bosses on both of the calipers. Arrange your measurements in left hand upper and lower and right hand upper an lower for both the legs and the calipers. Add each of the dimensions together by sets (caliper boss + fork leg boss = X, by position, right upper and lower, left upper and lower) and record this sum by position.
Next step is to assemble the fork legs in the triple clamps, the rotors on the front wheel mount the wheel in the forks, assemble and torque everything per the factory manual.
Grab your brake calipers and ensure the pads are fully retracted. Using plastic shim stock between the pads and the rotor, shim equally until the caliper won't fall off the rotor as shown below.
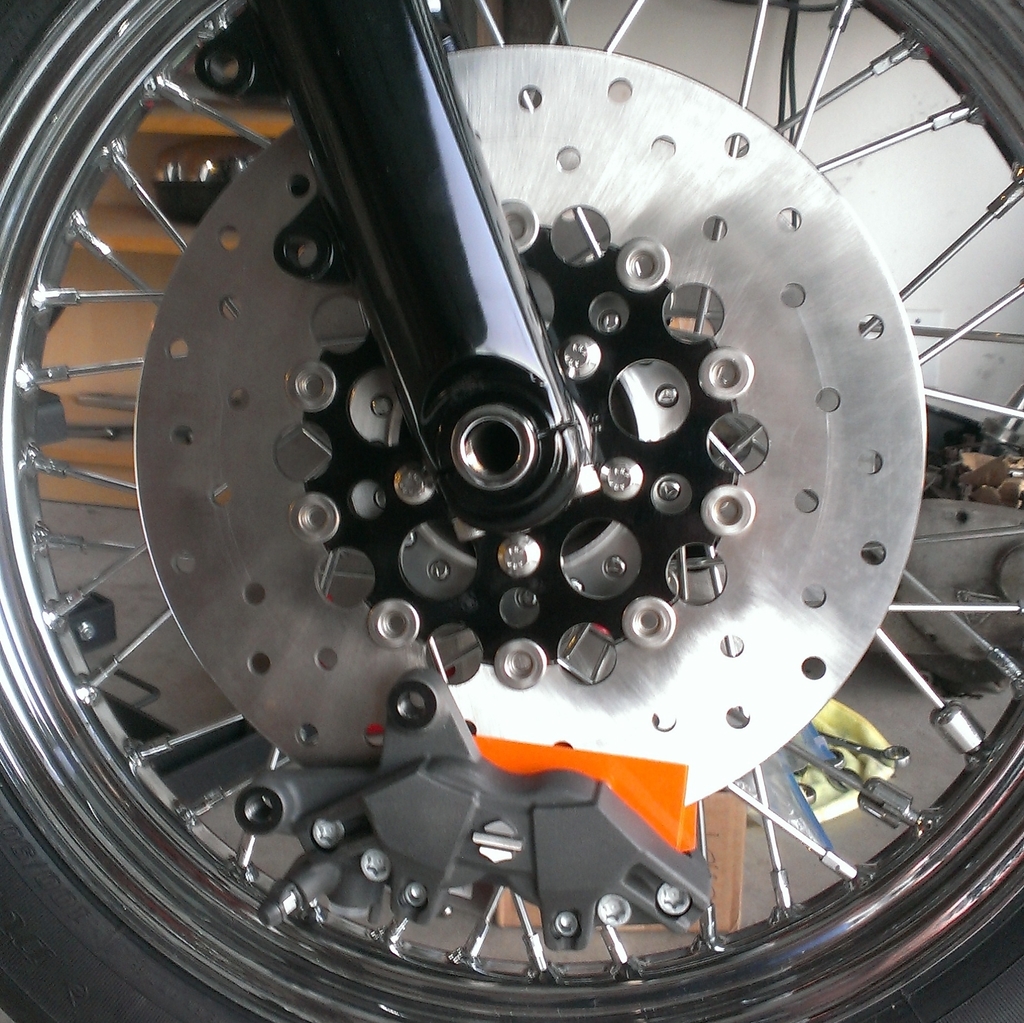
Rotate the caliper in a position where the bosses touch as shown below.
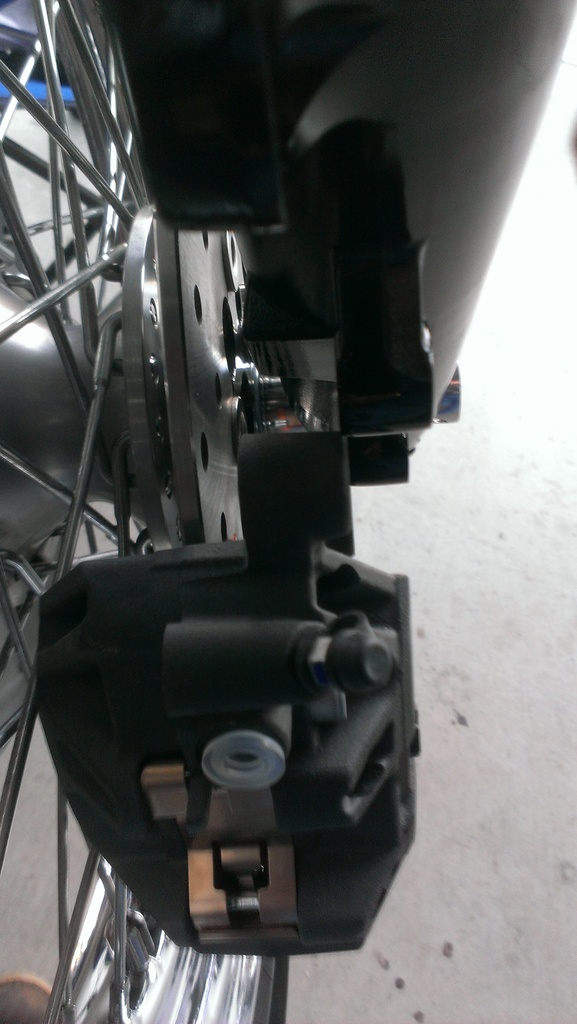
Measure the total height of each set of adjacent bosses for all four positions.
Subtract this measurement from the corresponding position measurement that was summed in the step above the photo, the results should agree with each other within .003 inches (if not you screwed up the measurement or you have a wonky rotor). You now have a left side result and a right side result, this is the amount of material that has to be milled off of the caliper mounting boss.
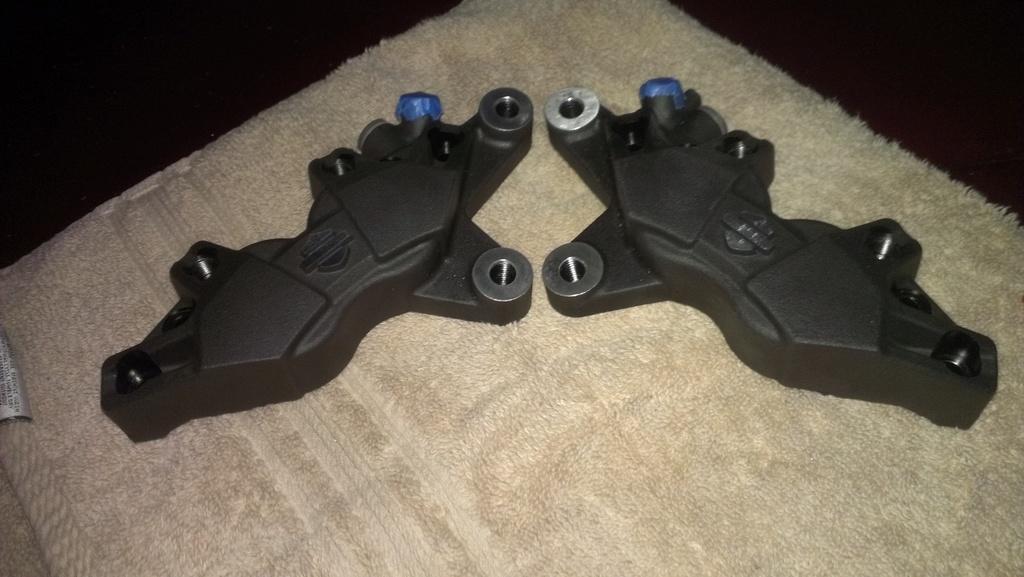
Disassemble your calipers marking everything left and right, haul your parts to the mill, take a deep breath and remove the amount of material that you identified in the measurements and your calipers will now bolt up with caliper/rotor geometry better than anything that the factory does.
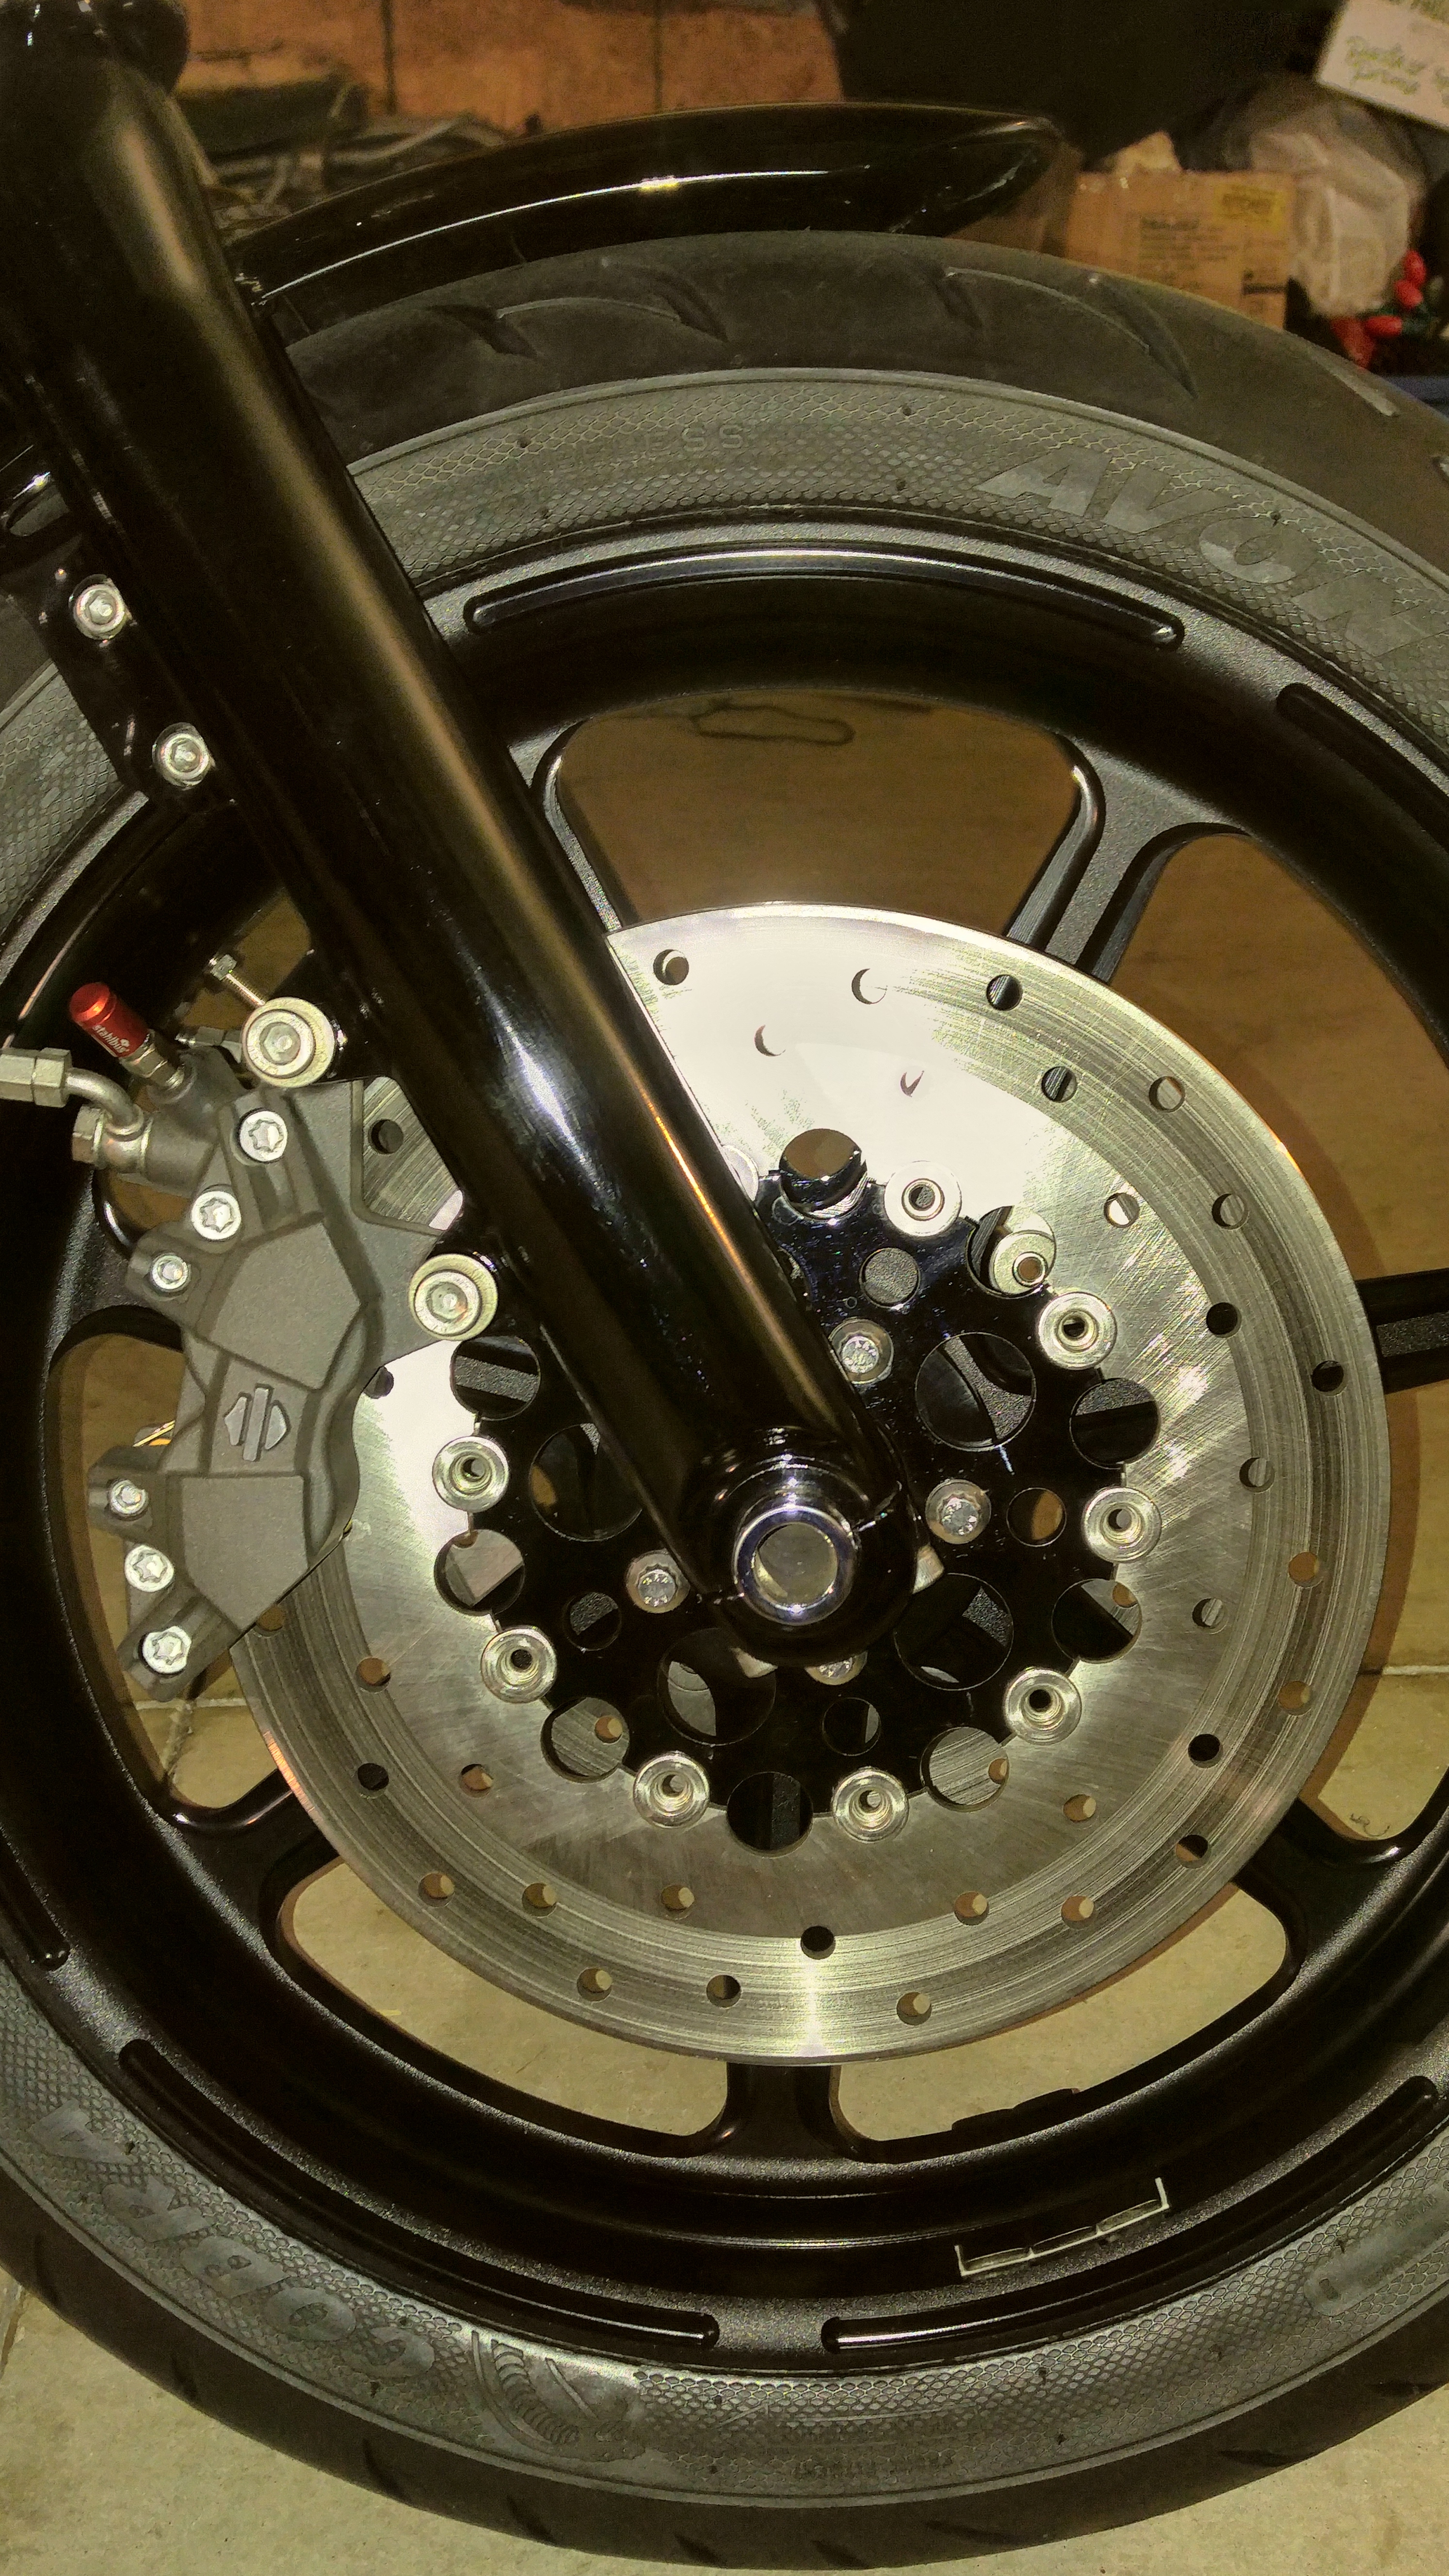
And that is what it looks like completed, Super Brakes For A Super Glide.
And Bonus Information... Build your own brake lines.
The brake lines are fabricated from parts purchased from Earls Supply (Speed-Seal fittings and Speed-Flex hose). I did the assembly myself, Pressure tested to 2000 PSI using a drilled aluminum block to make the connection from a sprague pump to banjo fitting with crush washers and the other end of the line was sealed with a banjo bolt, crush washers, and tapped aluminum block. The assembly photos show -2 hose used for my oil pressure gage, the standard -3 hose is much easier to work with and the assembly is the same.
The assembly goes like this...
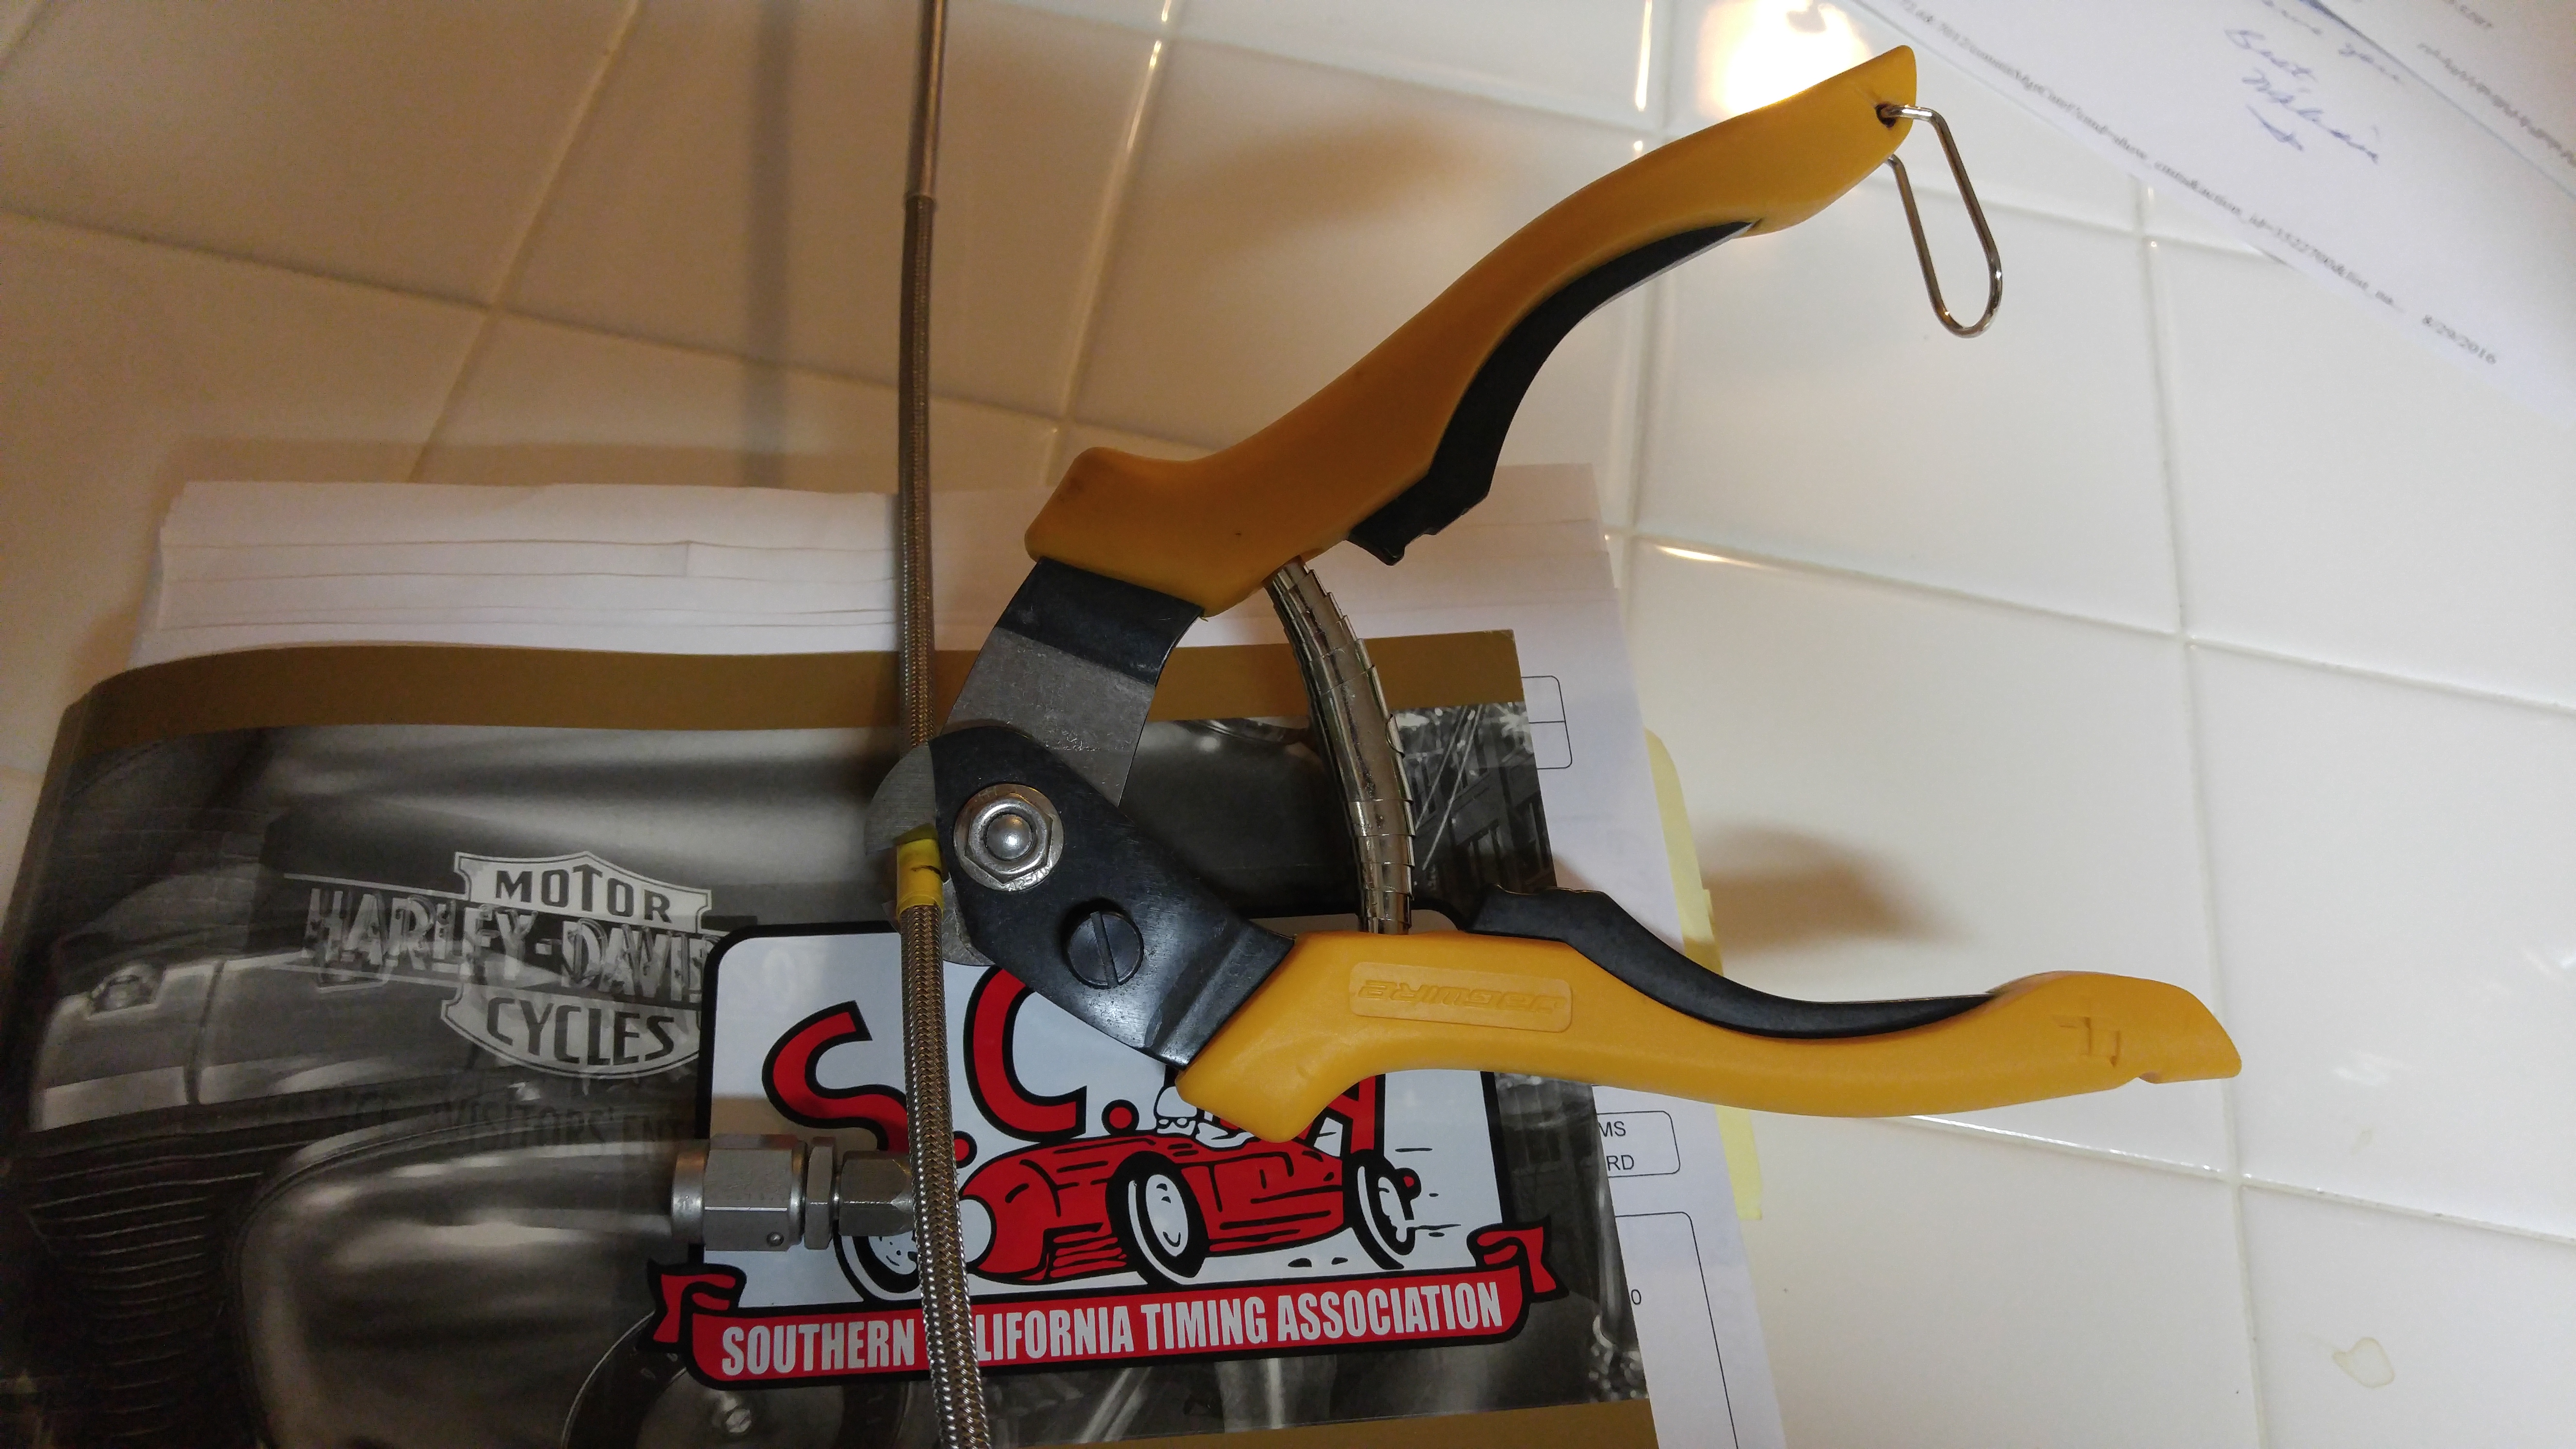
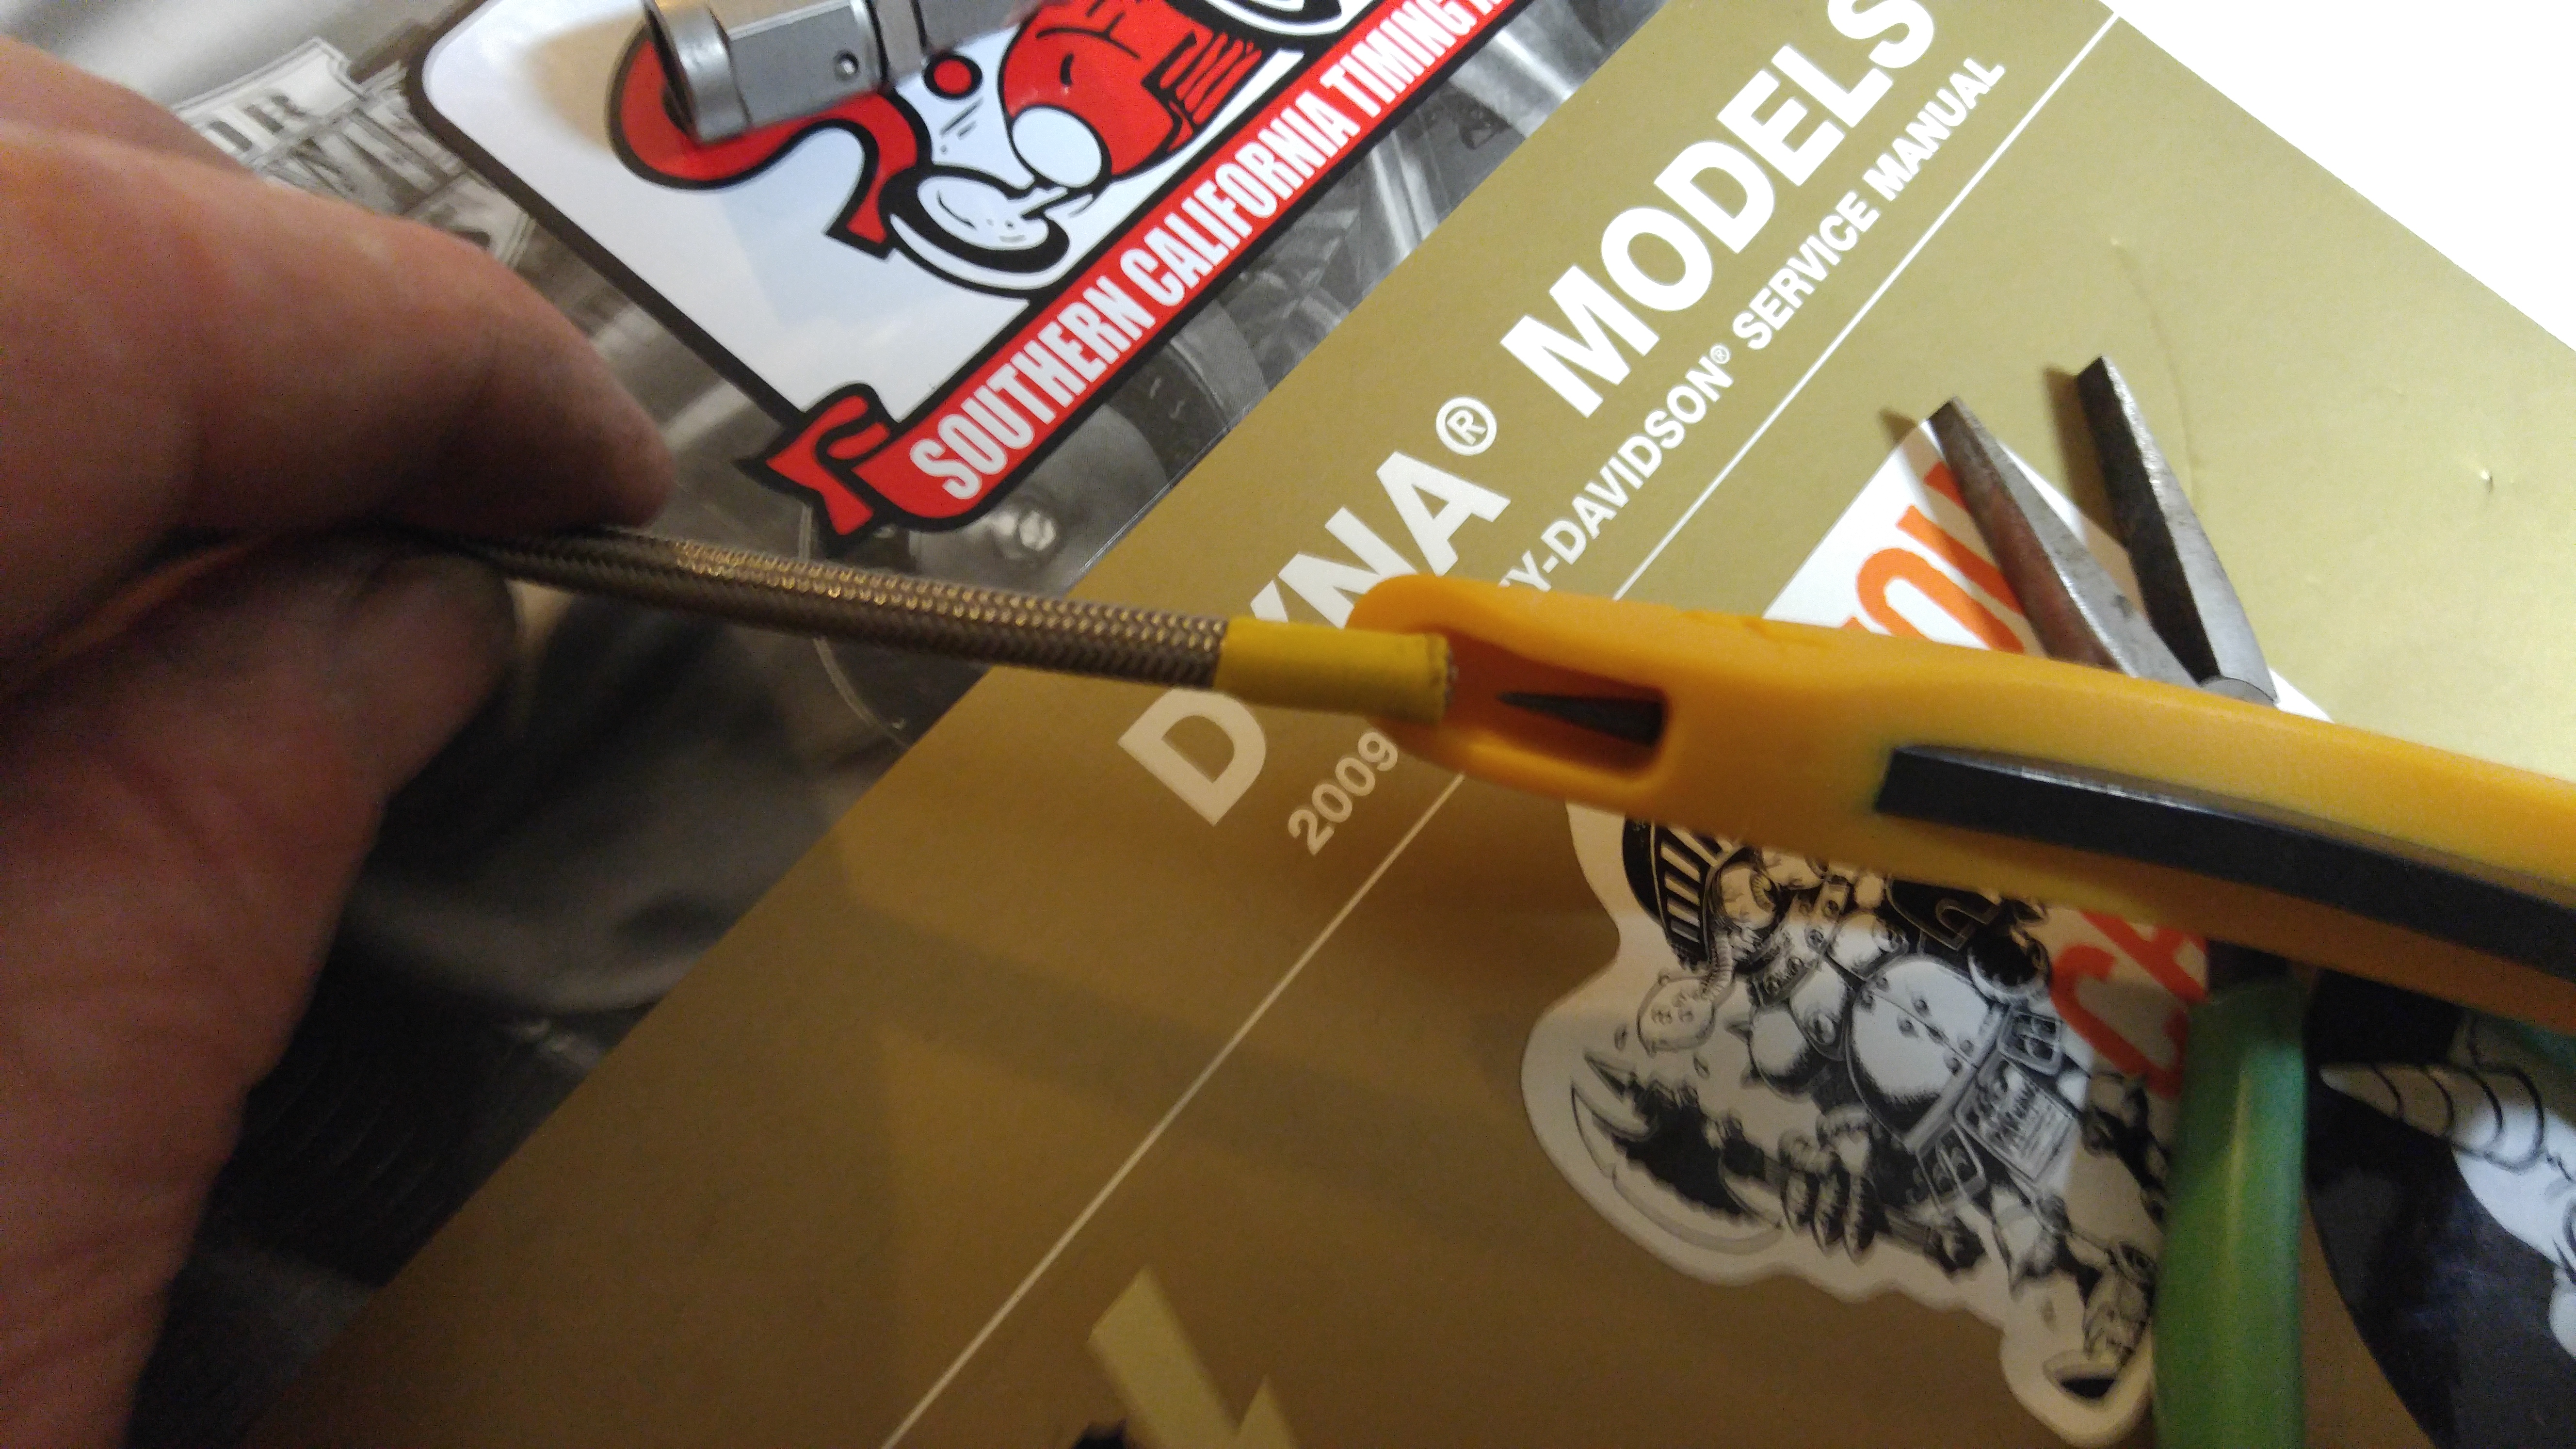
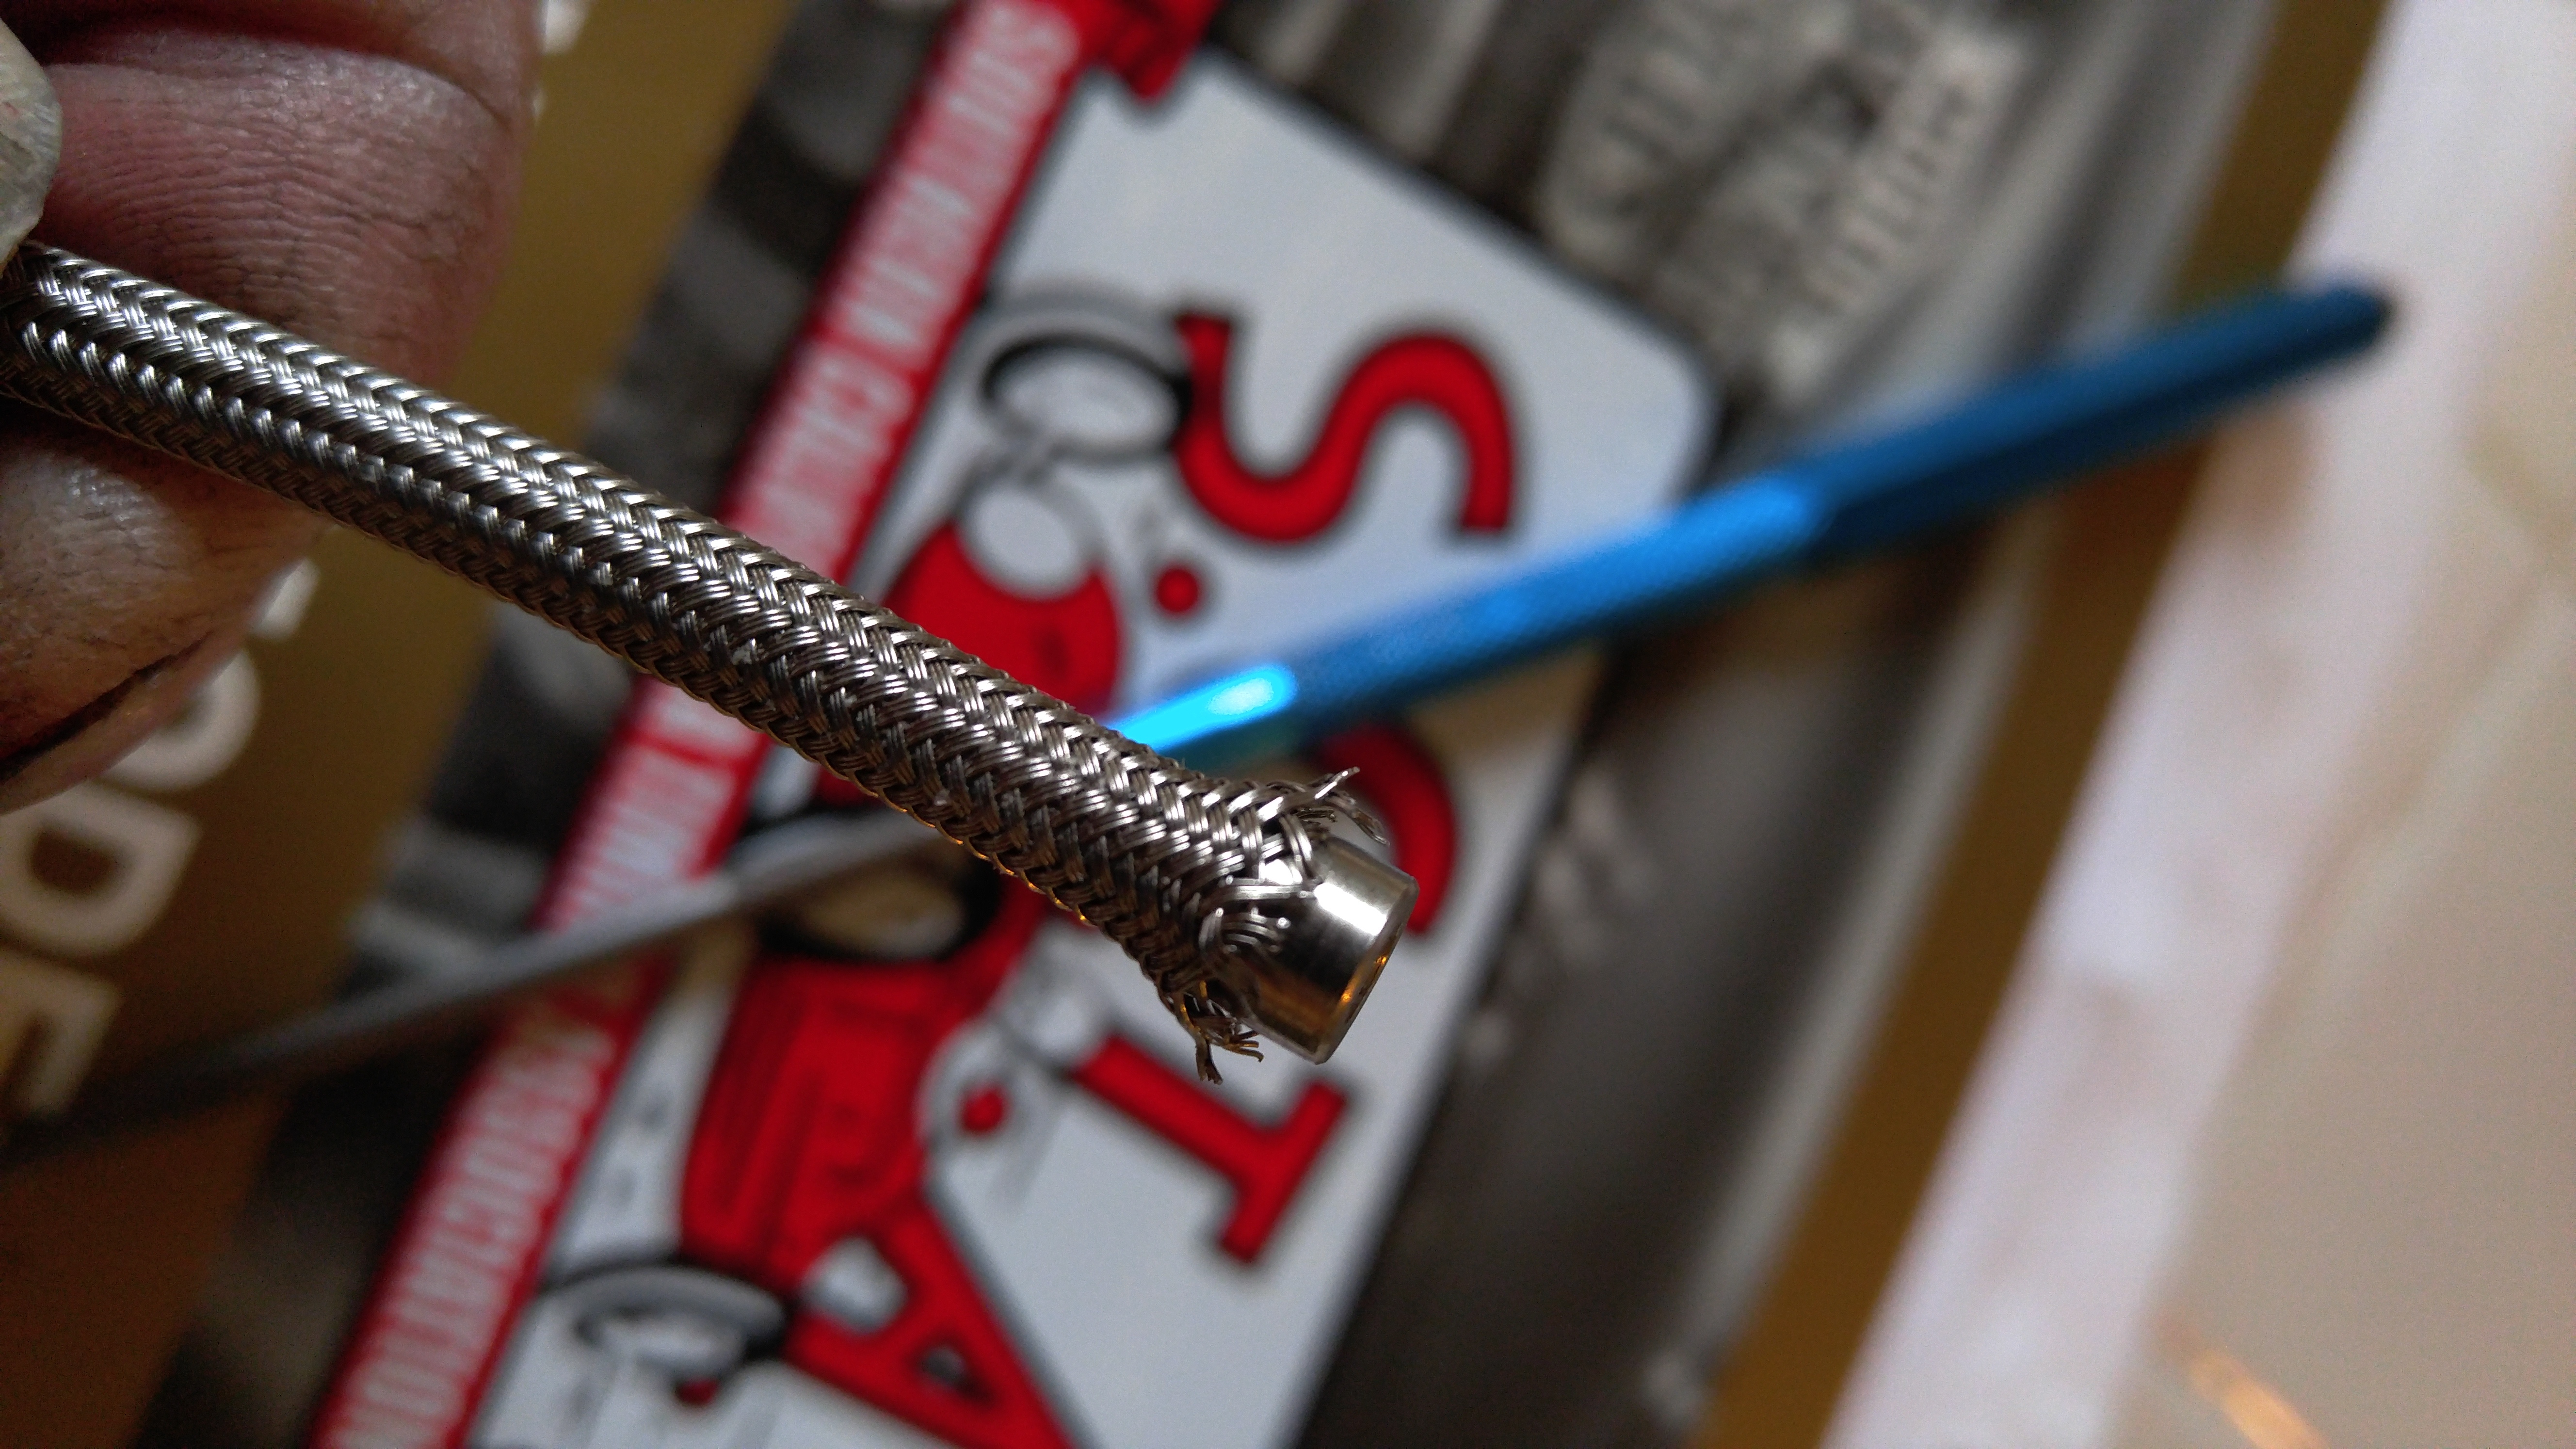
Mark line and cut, I used pliers designed for cutting bicycle brake cable.
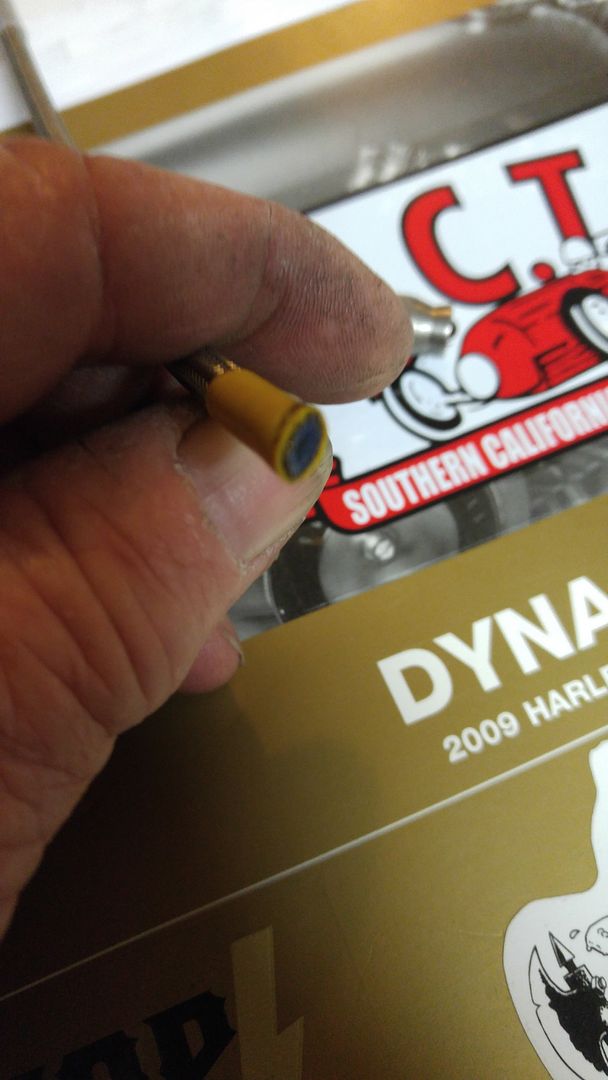
Using duck bill pliers to form the end of the cut hose back to round, use an awl to correct the shape of the teflon hose
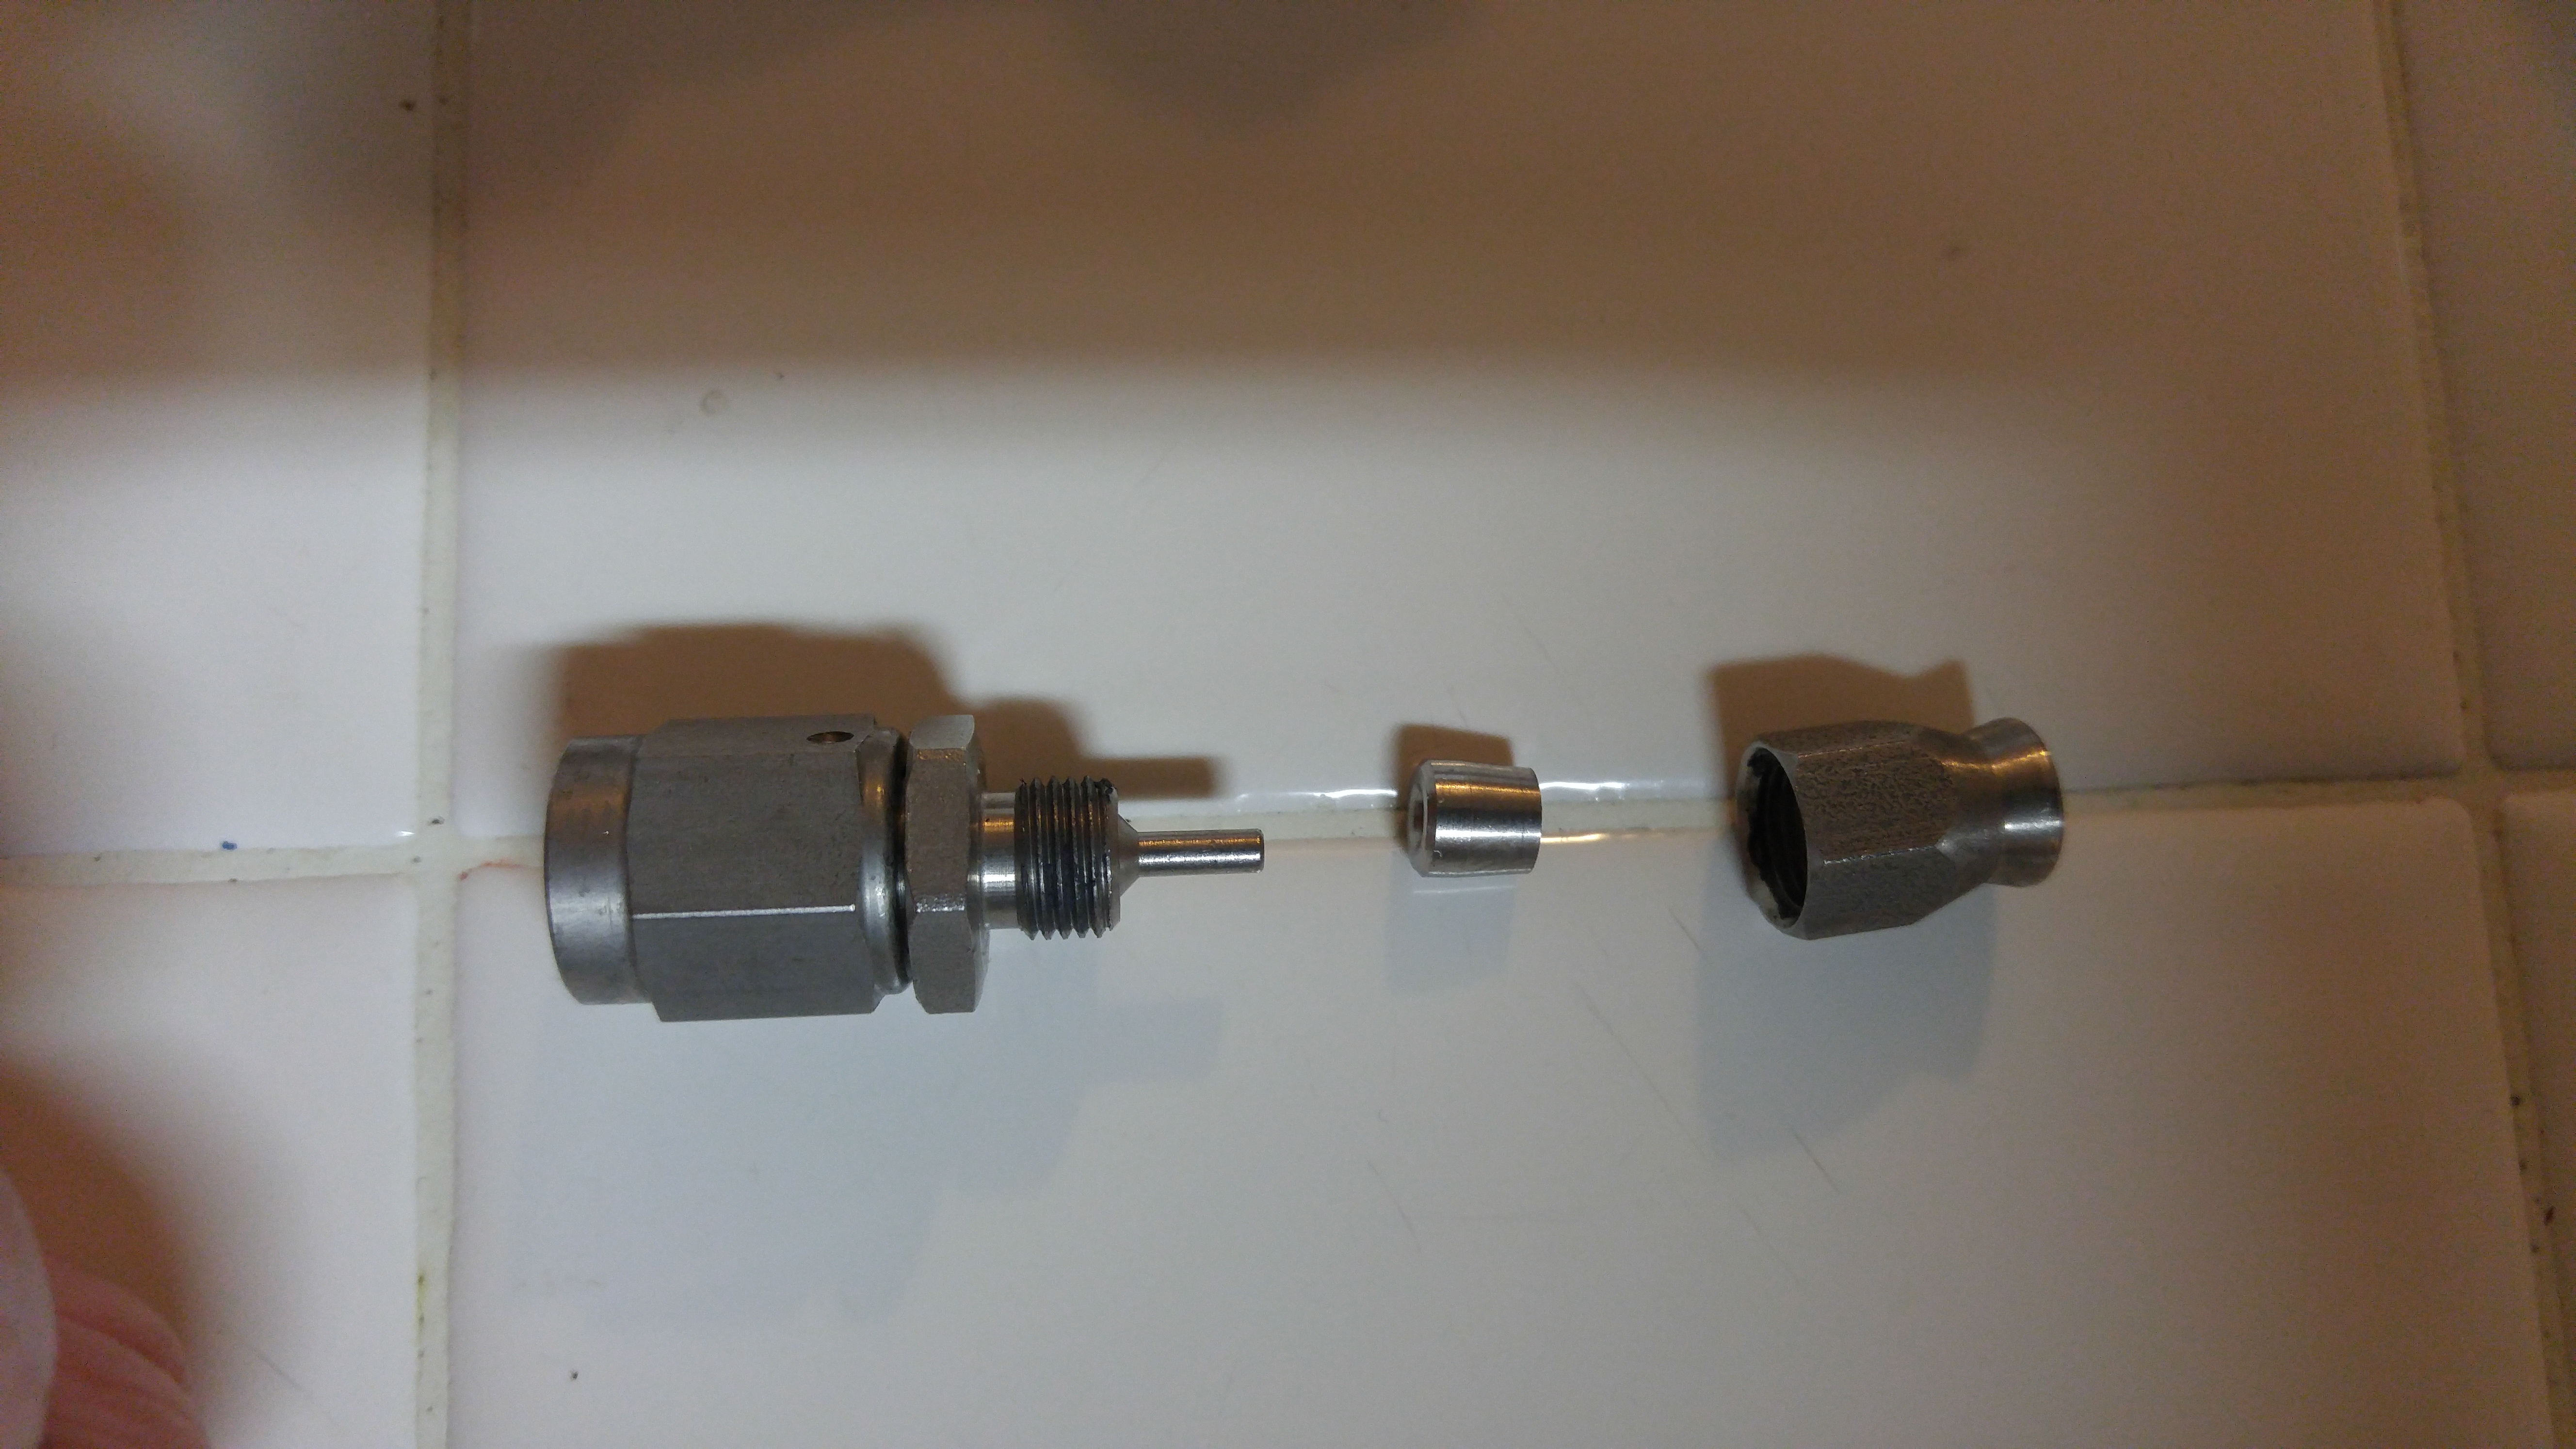
The disassembled fitting looks like this.
Remove the tape, install the fitting nut, use a pick to open the stainless braid to accept the olive.

Install the olive with the taper end behind the braid, ensure the "step" in the olive is butted against the teflon tube.
Assemble the fitting on the hose with the previously installed nut, apply tape behind the nut as an indicator that the hose doesn't back out.
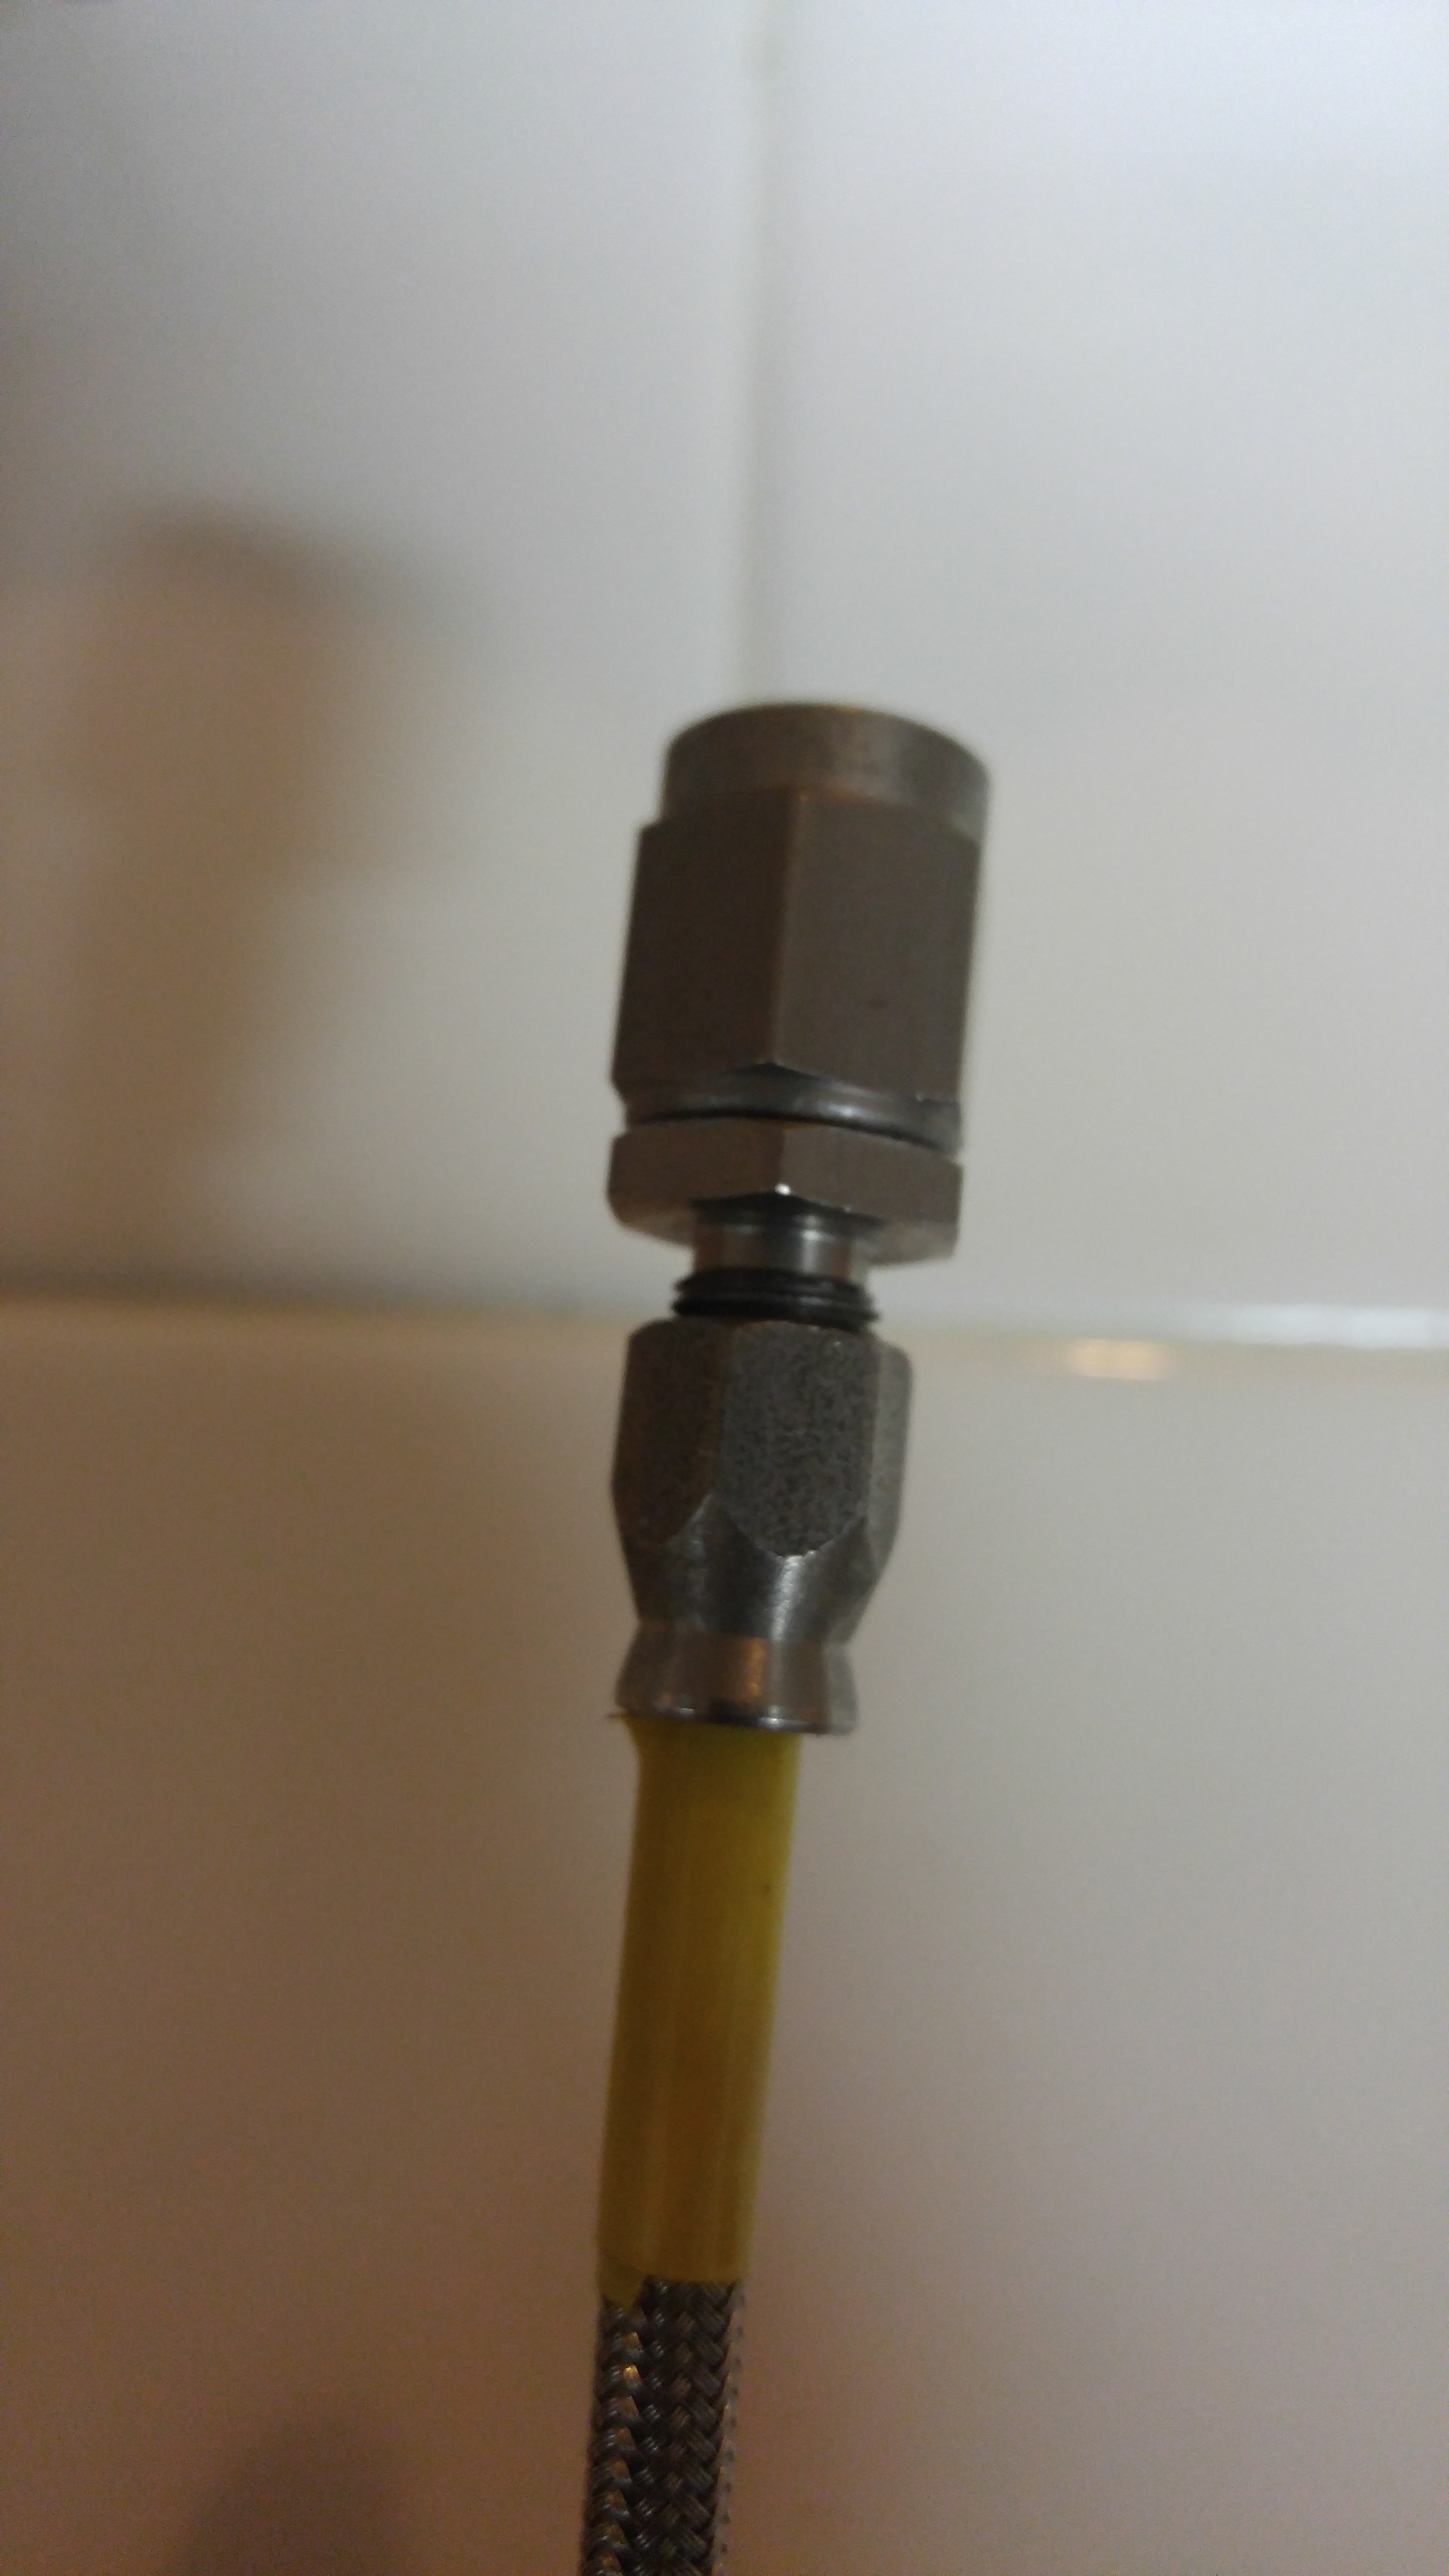
Tighten the fitting turning the nut and hose as a unit with the fitting body clamped in a vise, tighten until you have a .023 to .046 gap between the nut and the fitting. Easy as that!!!

Best Wishes: Mike
"An ill-assorted collection of poorly-matching parts, forming a distressing whole."
For my dual disc conversion I used Fat Bob fork legs in the stock mid glide triple clamps, XR1200 Nissin four piston calipers and master cylinder, and Harley 300mm floating rotors, so the conversion is all Harley-Davidson out of the parts or accessory catalogs. This conversion is not quite a bolt on as machining is required on the caliper mounting lugs to get everything to line up properly and custom length bolts to attach the calipers to the fork legs. The pad/rotor interface is perfect with the pad making contact with the rotor just below the chamfer at the edge the disc rotor, I was concerned about the pad fit as the XR1200 uses a 292MM rotor but this was not an issue.
So how do I get all this stuff to fit?
First measure the width of the caliper mounting bosses on both of the fork legs and the mounting bosses on both of the calipers. Arrange your measurements in left hand upper and lower and right hand upper an lower for both the legs and the calipers. Add each of the dimensions together by sets (caliper boss + fork leg boss = X, by position, right upper and lower, left upper and lower) and record this sum by position.
Next step is to assemble the fork legs in the triple clamps, the rotors on the front wheel mount the wheel in the forks, assemble and torque everything per the factory manual.
Grab your brake calipers and ensure the pads are fully retracted. Using plastic shim stock between the pads and the rotor, shim equally until the caliper won't fall off the rotor as shown below.

Rotate the caliper in a position where the bosses touch as shown below.

Measure the total height of each set of adjacent bosses for all four positions.
Subtract this measurement from the corresponding position measurement that was summed in the step above the photo, the results should agree with each other within .003 inches (if not you screwed up the measurement or you have a wonky rotor). You now have a left side result and a right side result, this is the amount of material that has to be milled off of the caliper mounting boss.

Disassemble your calipers marking everything left and right, haul your parts to the mill, take a deep breath and remove the amount of material that you identified in the measurements and your calipers will now bolt up with caliper/rotor geometry better than anything that the factory does.

And that is what it looks like completed, Super Brakes For A Super Glide.
And Bonus Information... Build your own brake lines.
The brake lines are fabricated from parts purchased from Earls Supply (Speed-Seal fittings and Speed-Flex hose). I did the assembly myself, Pressure tested to 2000 PSI using a drilled aluminum block to make the connection from a sprague pump to banjo fitting with crush washers and the other end of the line was sealed with a banjo bolt, crush washers, and tapped aluminum block. The assembly photos show -2 hose used for my oil pressure gage, the standard -3 hose is much easier to work with and the assembly is the same.
The assembly goes like this...
Mark line and cut, I used pliers designed for cutting bicycle brake cable.

Using duck bill pliers to form the end of the cut hose back to round, use an awl to correct the shape of the teflon hose


The disassembled fitting looks like this.

Remove the tape, install the fitting nut, use a pick to open the stainless braid to accept the olive.

Install the olive with the taper end behind the braid, ensure the "step" in the olive is butted against the teflon tube.

Assemble the fitting on the hose with the previously installed nut, apply tape behind the nut as an indicator that the hose doesn't back out.

Tighten the fitting turning the nut and hose as a unit with the fitting body clamped in a vise, tighten until you have a .023 to .046 gap between the nut and the fitting. Easy as that!!!

Best Wishes: Mike
"An ill-assorted collection of poorly-matching parts, forming a distressing whole."
Last edited by Nemosengineer; 07-05-2017 at 12:50 AM. Reason: Update
The following 2 users liked this post by Nemosengineer:
archergodwin (07-04-2017),
Ghost_13 (07-05-2017)
#5
07-05-2017, 12:29 AM
When Harley Built the XR1200 they chose a caliper built by Nissin whose basic design used on a variety of Honda sportbikes, so it was a very proven performance caliper raced for many years before it was configured to hang off a XR1200.
Its not a state of the art radial caliper, it is one of the best conventional calipers out there. When its set up with quality brake lines, even with the stock pads its a very good brake system, two fingers will haul a 650 lb. Dyna down from very high speed with great lever feel, powerful but not touchy.
It's the best performance caliper put on any Harley-Davidson ever from the factory.

: Mike
#7
07-05-2017, 10:04 PM

I've spent a lot of time mulling over brake issues with my single caliper FXDC (SG Custom) with spoke wheels.
Using a single XR calipers brings up an issue with the master cylinder m/c. The XR m/c is designed with a piston diameter for pushing two calipers, not one. The single caliper m/c for the standard H-D caliper has a piston a wee bit to large to power the single XR caliper. Apparently the stock H-D calipers have bigger pistons than either the H-D Brembo calipers or the XR Nissin calipers.
There are Sportster m/c's than have pistons as small as 1/2 inch that may work for the single XR or single Brembo caliper application.
In the mean time, I installed a 15" Ness Big Brake Rotor
http://www.arlenness.com/prodcat/big-brake-rotors.asp
along with a pair of EBC HH compound pads. My brakes are great now and I
am less inclined to seek ways of making the XR or Brembo calipers work on this bike.
In the past I bought and installed a pretty PM 6-piston caliper on the Super Glide Custom but the PM caliper was not as strong as the stock caliper ! The stock caliper has a larger pad sweep area. I went back to the stock caliper.
In my opinion, the front end looks cleaner with the single caliper and the upsrung weight is minimized.
.
Trending Topics
#8
07-06-2017, 12:24 AM
With your kind of horsepower, I would go straight to a dual disc conversion. If I had to do it over again I would start with the Low Rider legs and just do a factory setup with good pads and lines, it would save a lot of work and money and the only downside is you have to pull the lever a little harder.
I went with the XR setup because its a good match for where and how I ride and I thought it would be fun to do the conversion to be a little different than the next guy.
F86 has an excellent brake set up that he put together, HrdNox has a wonderful high end Brembo setup, I dont remember what Max Headflow runs for calipers on his bike but I do know there ferocious, Civera went with dual giant Ness Rotors. So all these guys have great brakes and everyone's setup is different, there are many ways to go with dual discs and they all have good things going for them. So I think the deciding factor is how you use your bike and how hard you push it. At 60 I still ride like an idiot, just like I did 27 years ago...

: Mike
#9
07-06-2017, 12:40 PM
Supporter
I definitely plan on doing dual disk at some point. I didn't think about the master cylinder compatibility issue, probably not worth my effort to just upgrade one caliper as a stopgap.
I was planning on doing the dual stock caliper setup, as off the Low Rider, but this looks like another option to definitely consider. Just wish I would have thought ahead a couple years ago when I bought chrome single disk sliders.
I was planning on doing the dual stock caliper setup, as off the Low Rider, but this looks like another option to definitely consider. Just wish I would have thought ahead a couple years ago when I bought chrome single disk sliders.


