Dyna Glide Models Super Glide, Super Glide Sport, Super Glide Custom, Dyna Glide Convertible, Super Glide T-Sport, Dyna Glide Police, Dyna Switchback, Low Rider, Street Bob, Fat Bob and Wide Glide.
Sponsored by:
Sponsored by:

Rear Sputhe, New Top Mount

Thread Tools
 
Search this Thread
 
  #21  
Old 08-10-2017, 04:20 PM
F86's Avatar
F86
F86 is offline
Outstanding HDF Member
Thread Starter
Join Date: Mar 2015
Location: Philly Suburbs
Posts: 2,840
Received 898 Likes on 599 Posts
Default

I'm anxious for a set too!!!
 
  #22  
Old 08-10-2017, 04:23 PM
cggorman's Avatar
cggorman
cggorman is offline
Extreme HDF Member
Join Date: Jun 2014
Location: NW Ohio
Posts: 11,448
Received 2,291 Likes on 1,710 Posts
Default

Do you email them periodically about it? If not, the added pressure might help.
 
  #23  
Old 08-10-2017, 04:34 PM
F86's Avatar
F86
F86 is offline
Outstanding HDF Member
Thread Starter
Join Date: Mar 2015
Location: Philly Suburbs
Posts: 2,840
Received 898 Likes on 599 Posts
Default

I have once, but I'll get back on it...
 
  #24  
Old 08-14-2017, 07:07 PM
cggorman's Avatar
cggorman
cggorman is offline
Extreme HDF Member
Join Date: Jun 2014
Location: NW Ohio
Posts: 11,448
Received 2,291 Likes on 1,710 Posts
Default

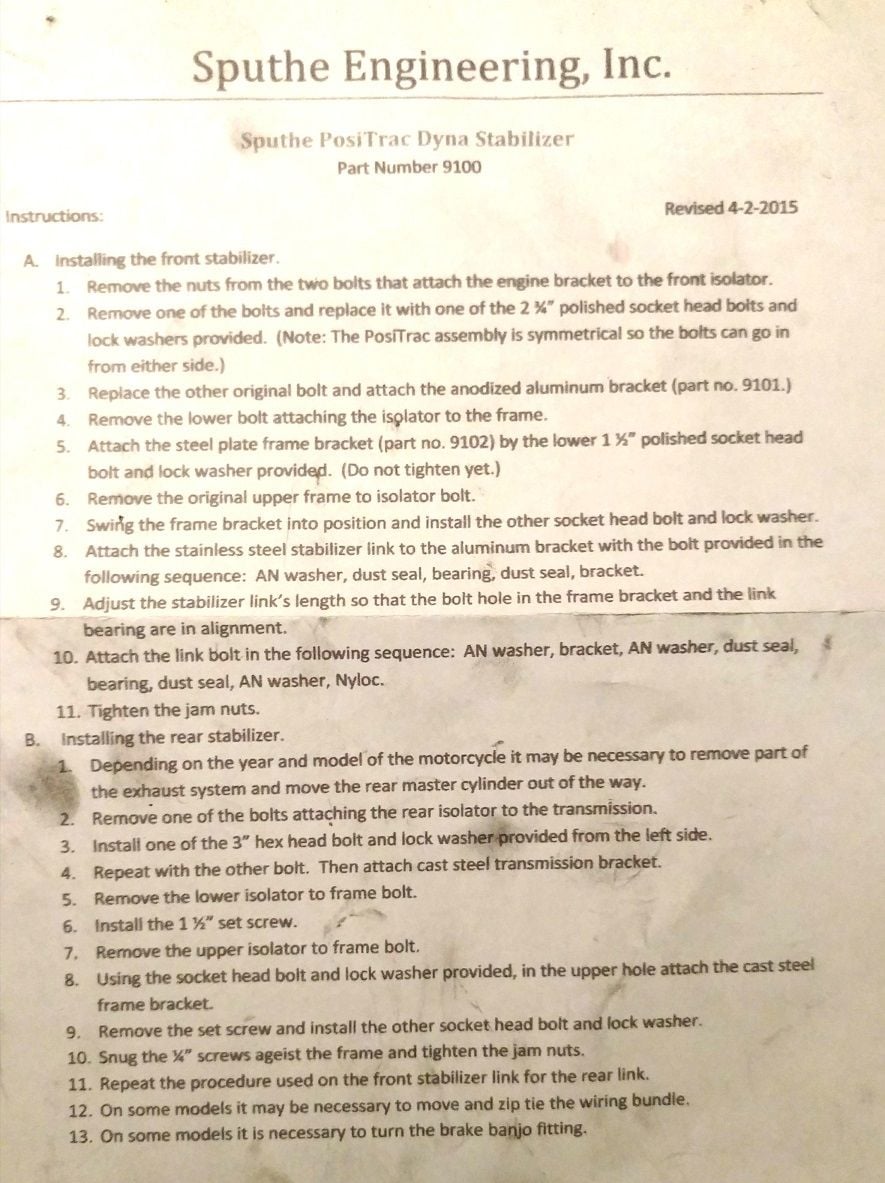
Tarik, Any chance you still have the installation instructions for your rear posi-trac?

I seem to have misplaced mine and I can't remember the purpose of the two small hex cap screws between the rear frame tubes.

Can you enlighten me?

TIA!
 
  #25  
Old 08-14-2017, 07:33 PM
F86's Avatar
F86
F86 is offline
Outstanding HDF Member
Thread Starter
Join Date: Mar 2015
Location: Philly Suburbs
Posts: 2,840
Received 898 Likes on 599 Posts
Default

Yeah, no problem! I'm still at work, but I'll take a picture as soon as I get home. The instructions weren't super helpful, though... They basically just snug up against the inside of the tubes and get locked in with jam nuts. I guess they may limit lateral movement, although the link itself does that...

There was also a threaded stud left over, which I couldn't begin to figure out...
 
  #26  
Old 08-14-2017, 07:51 PM
cggorman's Avatar
cggorman
cggorman is offline
Extreme HDF Member
Join Date: Jun 2014
Location: NW Ohio
Posts: 11,448
Received 2,291 Likes on 1,710 Posts
Default

Originally Posted by F86
Yeah, no problem! I'm still at work, but I'll take a picture as soon as I get home. The instructions weren't super helpful, though... They basically just snug up against the inside of the tubes and get locked in with jam nuts. I guess they may limit lateral movement, although the link itself does that...

There was also a threaded stud left over, which I couldn't begin to figure out...
Cool, thanks. I know I have the papers here somewhere, but they're probably buried under months of other parts boxes and stuff.

If memory serves, that stud was some kind of installation or alignment aid. I seem to remember it saying something about removing and discarding it after something or another was complete. I could be misremembering, tho. It happens more than I'd like.
 
  #27  
Old 08-14-2017, 10:23 PM
F86's Avatar
F86
F86 is offline
Outstanding HDF Member
Thread Starter
Join Date: Mar 2015
Location: Philly Suburbs
Posts: 2,840
Received 898 Likes on 599 Posts
Default

Here ya go, Chris... I see you were right about the "mystery stud." I somehow missed that. It probably would've made things a little bit easier! Oh well!

 
  #28  
Old 08-14-2017, 10:34 PM
cggorman's Avatar
cggorman
cggorman is offline
Extreme HDF Member
Join Date: Jun 2014
Location: NW Ohio
Posts: 11,448
Received 2,291 Likes on 1,710 Posts
Default

Lovely, Thanks!

That procedure is great if you're not replacing the isolator. Wouldn't have helped me. I put in a new one. Aligning those top two bolt holes was a real pain.

Out of curiosity, did you remove your master cylinder? If not, how did you hold those two nuts?
 
  #29  
Old 08-14-2017, 11:06 PM
F86's Avatar
F86
F86 is offline
Outstanding HDF Member
Thread Starter
Join Date: Mar 2015
Location: Philly Suburbs
Posts: 2,840
Received 898 Likes on 599 Posts
Default

It's funny you say that... I got a new isolator, thinking it was idiotic to be up in there and not replace one of unknown age... So the first thing I did was drop the old one out. I looked at it carefully next to the new one, and they were almost identical. No signs of sagging or anything... When I started putting it all back together, I just couldn't quite get all of the holes in the new one to line up... It was super close, but no cigar. I adjusted the scissor jack endlessly, used a pry bar, etc... but no dice. Finally I put the old one back in. All of the holes lined up right away, but it wasn't easy to get the first of the two transverse bolts to start threading into the Sputhe side mount. I got it, but it was a pain.

Yes, you're right... This would be super easy if you never took the mount out. Maybe I'll replace the mount next time I have the back wheel off and there's more room.

I didn't have to touch the rear MC or the banjo fitting, but I thought I would... I could reach all of the bolts right away, but it took some fiddling to get the new bracket in past it all... But it went...
 
  #30  
Old 08-14-2017, 11:07 PM
F86's Avatar
F86
F86 is offline
Outstanding HDF Member
Thread Starter
Join Date: Mar 2015
Location: Philly Suburbs
Posts: 2,840
Received 898 Likes on 599 Posts
Default

It's funny how instructions make a lot more sense when you read them after finishing the job...
 
The following 3 users liked this post by F86:
fxdlx (09-10-2017), fxdup (05-05-2020), GREENOHAWK69 (11-07-2018)


Quick Reply: Rear Sputhe, New Top Mount


All times are GMT -5. The time now is 10:02 AM.