Dyna 20mm Ammo Can Saddle Boxes, a DIY tutorial
#1
 09-05-2018, 05:15 PM


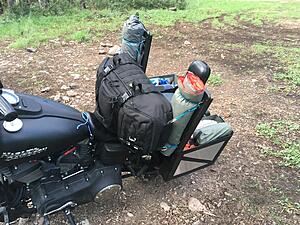
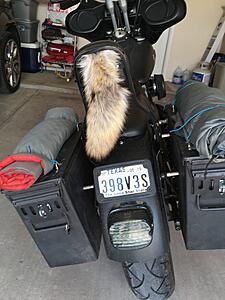
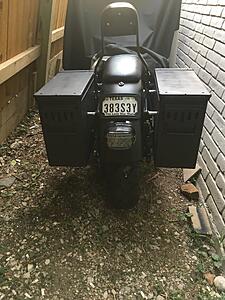
I recently purchased my first Harley and have enjoyed learning from the forum, so I wanted to post a tutorial about a little project I just finished. Bike is a 2010 FXDB Street Bob, and in preparation for an extended nomadic tour around the western states I wanted to outfit the bike with affordable/practical saddlebags. I know others have done something similar, but throughout the project I found myself "figuring as I go," so I hope this will be helpful should somebody want to do something similar in the future. See https://www.hdforums.com/forum/dyna-...ddle-bags.html and http://advrider.com/index.php?thread...-build.735892/ for some info that helped me get started. The boxes are currently off of the bike for service, so left me know if you'd like additional photos, measurements, or information.
Parts and configuration:
Tools:
Aside from the 1/2", 9/16" end hex wrenches for the hardware, I used an angle grinder (cut-off wheel, grinding wheel, flap sanding disc), as well as a dremel with cut-off wheels. I find it incredibly helpful to start your cuts with the dremel to establish a groove, then come through with the cut-off wheel on the angle grinder to finish the job. Sand paper, emery cloth, and a wire brush were used to prep for painting. Welding tools (I'm neither a welder nor plan to be, but I lucked out and found a guy repairing a fence down the street... $20 and to took care of it for me). Hammer and pry bar for removing excess support steel. Carpenters square was very helpful.
Planning and Measuring:
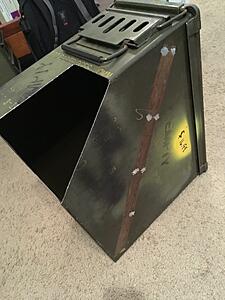
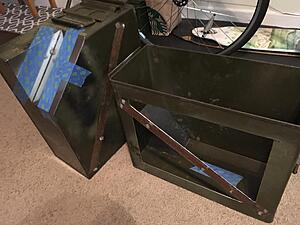
Before cutting into your ammo boxes, make a cardboard template for everything. A USPS Medium Flat Rate box unassembled is virtually a perfect size. Trim it to the size of the broad side of your ammo can if needed, and hold it to the fender support. You'll need to cut into the inside leading corner of both boxes to accommodate your shocks. I chose to leave the leading outside corner square to provide additional capacity. With the bike parked on flat ground and equipped with a 4' contractors level, I used an angle gauge to figure the angle of the shock. If I'm not mistaken, it was around 53 degrees, but you can figure this out with your template, compliments of USPS. Remember: your rear axle will swing upwards in an arcing motion, so give yourself some riggle room to accommodate suspension travel. If you're leaving the leading outside corner square, you'll need to decide when to stop your suspension cut-out. I ended up trimming around a couple inches off the inside corner of my box, and could have gotten away with less, thus maximizing box capacity. Save your templates because you'll use them again.
These boxes are heavy!
I knew this going into it, but each box weighs around 20 pounds and is made of 16 gauge steel. You can make them lighter by doing what I did:
Orientation and Alignment:
Once you've got the boxes measured, cut and finished, pull out those cardboard templates you saved and hold them against the bike parked on level ground. Start with the leading 3/8" hole, and giving yourself some riggle room mark where you'll mount it. Drill the 3/8" hole through the cardboard and mount the template to the fender support; tighten the bolt to hold the template in place. I used a level atop the template to find level. If your bike isn't parked on level ground, you can use your level to find the slope and match the template to the ground.
Mounting:
If you�ve followed my ramble to this point, figuring out how to bolt the boxes to your bike should be self evident. Use loctite where you think it's necessary. Check hardware and alignment with boxes loaded to ensure nothing has moved into a position where they will contact other moving parts.
Beware of swing arm movement:
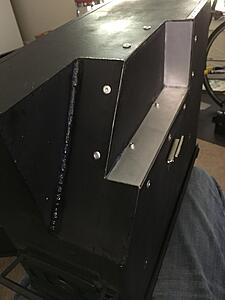
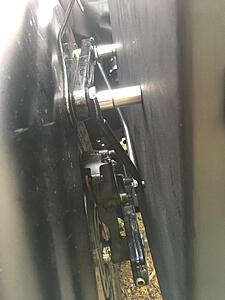
I initially mounted the saddle boxes making only recess cut-outs to accommodate the angle of the dyna shocks. I quickly found the rear axle nuts striking the inside bottom edge of the boxes. I removed the boxes and made another recess cut to accommodate the swing arm movement. If you look at my photos, I removed more than I needed. Your bike and application may vary. By this time, my �welder friend� was no longer working on the fence down the street, so I made to with: angle aluminum, rivets, RTV clear silicone, and some steel I removed from the boxes to make these swing arm recesses.
Not mentioned above: hinged lid, locking hardware:
I drilled a hole through the leading edge of the box and through the handle to place a bolt, thus hinging the front of the box. To allow the lid to rotate forward, a portion of the lip holding the lid in place needed to be trimmed; remove it completely and the lid will flop forward and rest on the top rear shock support. On the back, I attached the fixed portion of a hasp lock to use in concert with a padlock to security.

Parts and configuration:
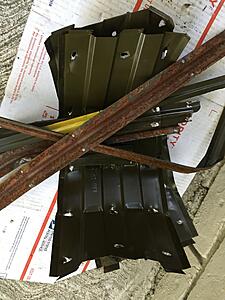
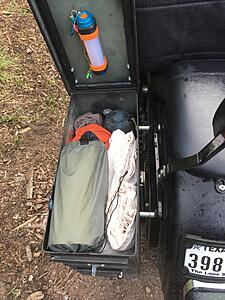
- Ammo cans. I chose the 20mm size given their capacity, measuring 18.75"L x 14.5"H x 8.25"W. Cost was around $40 for the pair at my local Army surplus shop.
- A couple 12" x 24" sheets of aluminum from the hardware store.
- Sheet of 22 gauge steel.
- One set of saddlebag support brackets for throw-overs. These came with my bike, but it looks like you can find decent ones for $25-40 online.
- Hardware. Everything bolts to the rear fender support. For each side, I used (1) 5/16 coarse thread bolt 3.5" in length to attach the rear; and (1) 3/8 coarse thread hex button head bolt 3" in length.
- Steel/chrome spacers. For the 5/16 bolt (tail end of the box) I used a 1" spacer and a 1/2" spacer stacked. For the 3/8" (leading end of the box) I used a 1" spacer and a 1/4" spacer stacked. (I determined these lengths by laying the saddlebag supports on my bench, and figuring the offset from the bottom to the top of the bracket; the �kick out� so to say).
- Washers and nuts. Easy to figure out... the 3/8" bolt threads into the fender support so no nut was necessary, but it did receive a flat and a lock washer under the head. The 5/16" bolt faces the opposing direction, coming out from inside the fender, so it received a 1 1/4" fender washer under the head inside of the fender, and a flat-, lock-washer, nut combo inside of the box.
Tools:
Aside from the 1/2", 9/16" end hex wrenches for the hardware, I used an angle grinder (cut-off wheel, grinding wheel, flap sanding disc), as well as a dremel with cut-off wheels. I find it incredibly helpful to start your cuts with the dremel to establish a groove, then come through with the cut-off wheel on the angle grinder to finish the job. Sand paper, emery cloth, and a wire brush were used to prep for painting. Welding tools (I'm neither a welder nor plan to be, but I lucked out and found a guy repairing a fence down the street... $20 and to took care of it for me). Hammer and pry bar for removing excess support steel. Carpenters square was very helpful.
Planning and Measuring:
Before cutting into your ammo boxes, make a cardboard template for everything. A USPS Medium Flat Rate box unassembled is virtually a perfect size. Trim it to the size of the broad side of your ammo can if needed, and hold it to the fender support. You'll need to cut into the inside leading corner of both boxes to accommodate your shocks. I chose to leave the leading outside corner square to provide additional capacity. With the bike parked on flat ground and equipped with a 4' contractors level, I used an angle gauge to figure the angle of the shock. If I'm not mistaken, it was around 53 degrees, but you can figure this out with your template, compliments of USPS. Remember: your rear axle will swing upwards in an arcing motion, so give yourself some riggle room to accommodate suspension travel. If you're leaving the leading outside corner square, you'll need to decide when to stop your suspension cut-out. I ended up trimming around a couple inches off the inside corner of my box, and could have gotten away with less, thus maximizing box capacity. Save your templates because you'll use them again.
These boxes are heavy!
I knew this going into it, but each box weighs around 20 pounds and is made of 16 gauge steel. You can make them lighter by doing what I did:
- Remove the diagonal side braces. Locate the spot welds, grind through them and then pop off the support brace. Careful in prying them off not to deform the main box.
- Remove the corrugated support layer of steel inside the lid. Same method as above.
- Remove steel and replace with sheet aluminum. Leaving the diagonal where the external support brace once lived, I ventilated the steel and attached the sheet aluminum on the inside. Permatex RTV clear silicone adhesive has a service temperature of around 450 degrees and has been solid so far.
- Once the inside leading corner was removed, I elected to use lighter 22 gauge steel instead of the existing 16 gauge steel.
Orientation and Alignment:
Once you've got the boxes measured, cut and finished, pull out those cardboard templates you saved and hold them against the bike parked on level ground. Start with the leading 3/8" hole, and giving yourself some riggle room mark where you'll mount it. Drill the 3/8" hole through the cardboard and mount the template to the fender support; tighten the bolt to hold the template in place. I used a level atop the template to find level. If your bike isn't parked on level ground, you can use your level to find the slope and match the template to the ground.
Mounting:
If you�ve followed my ramble to this point, figuring out how to bolt the boxes to your bike should be self evident. Use loctite where you think it's necessary. Check hardware and alignment with boxes loaded to ensure nothing has moved into a position where they will contact other moving parts.
Beware of swing arm movement:
I initially mounted the saddle boxes making only recess cut-outs to accommodate the angle of the dyna shocks. I quickly found the rear axle nuts striking the inside bottom edge of the boxes. I removed the boxes and made another recess cut to accommodate the swing arm movement. If you look at my photos, I removed more than I needed. Your bike and application may vary. By this time, my �welder friend� was no longer working on the fence down the street, so I made to with: angle aluminum, rivets, RTV clear silicone, and some steel I removed from the boxes to make these swing arm recesses.
Not mentioned above: hinged lid, locking hardware:
I drilled a hole through the leading edge of the box and through the handle to place a bolt, thus hinging the front of the box. To allow the lid to rotate forward, a portion of the lip holding the lid in place needed to be trimmed; remove it completely and the lid will flop forward and rest on the top rear shock support. On the back, I attached the fixed portion of a hasp lock to use in concert with a padlock to security.


#4
09-10-2018, 08:55 PM
Tourer


#6
02-15-2019, 02:59 PM
Moderator


Thread
Thread Starter
Forum
Replies
Last Post
Bill wallace
Shovelhead
11
07-29-2017 10:33 AM
zmotorsports
Dyna Glide Models
33
10-23-2015 08:30 AM
Rampant
Dyna Glide Models
1
08-18-2013 03:33 PM

