Front End Reborn
#11
 02-19-2019, 11:31 AM

Cruiser
#12
02-20-2019, 02:47 PM

 The seat was made by Sick Saddles. Ed does a very nice job. When I have the money I think I'm going to have him make me another seat. Last year he started making a King and Queen style seat that I wanted from day one but no one made for my bike.
#14
03-02-2019, 01:50 PM
All parts except for the brake hoses which I need to figure out length will be here next week. Originally I was going to ride the bike to my shop to do the work since there is a ton more room then in my garage but now that it's March winter has decided to show up. While I wait for the new cartridges to show up I decided to do what I can in my cramped messy garage.
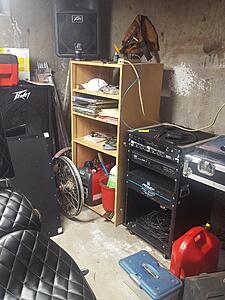
The one really nice thing about my garage is the sounds system.
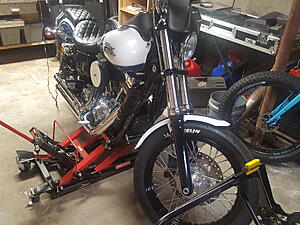
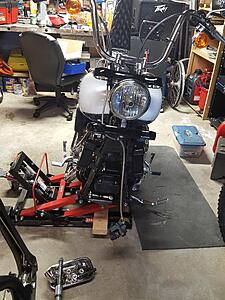
First step was to get the bike off the ground. and the wheel off.
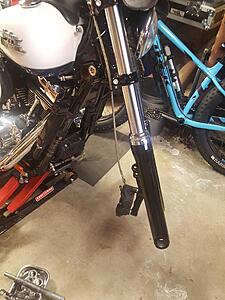
I didn't remove the forks yet but before we start we get a reference measurement of the ride height so when they are reinstalled they can be put back t the same spot. It's even more important since I am changing the internals. The fork length can change from stock to new. This measurement can be done easily in two different ways. Both are off the bottom triple. Either hook the top and measure to axle center or butt the bottom and measure to axle center. Which ever is easier just make sure to do it the same way when putting the forks back on. I chose to butt the bottom and measure down. We call this BLC. Bottom of Lower Clamp to axle center.

It happened to be 559mm on my bike.
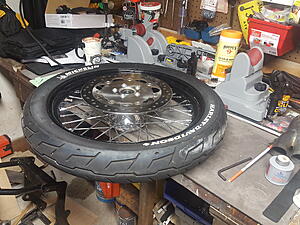
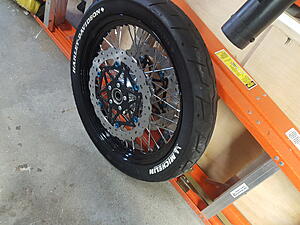
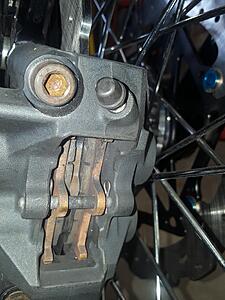
Todays task was to swap out brake rotors and then figure out what I need for new spacers for the calipers.
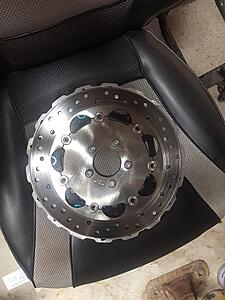
Rotor swap was pretty straight forward. With the wheel off and on the table the old rotor was removed.
Here is a comparison of the old and new rotors.
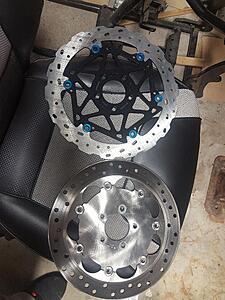
The new rotor on the bottom to show the size difference. The new rotors are 320mm.
New rotors installed. What was interesting was the torque spec was on the high end of my small torque wrench and the low end of my large torque wrench. And a pretty large range. Between 16 and 24 ftlbs.
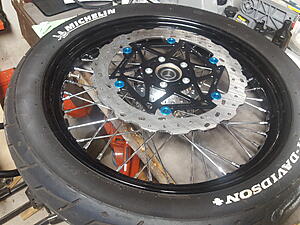
I couldn't really get the shot I was looking for here. One thing you want to do with wave type rotors is try to not align the petals on them. Here although it's difficult to see the petals do alternate.
Now the wheel is ready to go.
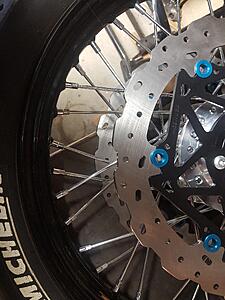
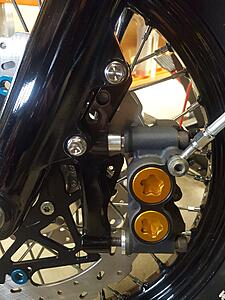
Wheel back on the bike to figure out bracket and caliper spacing.
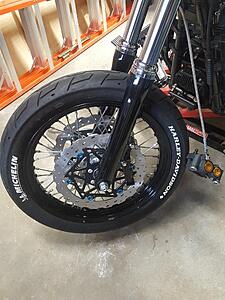
Luckily the spacing from fork to bracket remained the same. I expected this since they are the same thickness with no offset.
I also knew the calipers would have to move out a little bit because of the increased rotor diameter. Sadly it was a bit more then expected. Not a big deal but I do have to buy new longer bolts. Since I started this project with Ti I'm going to complete it with Ti so it's about $70 for the four bolts I need and I now have about $65 in bolts I'm not longer going to use.
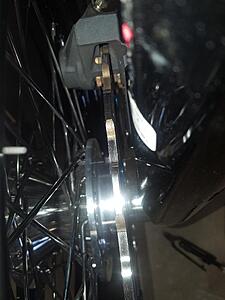
New spacer size I need to make.
It's spaced out so the entire rotor is used.
Just got the call from my shop. New Brembo Master is in. Will update soon.
The one really nice thing about my garage is the sounds system.

First step was to get the bike off the ground. and the wheel off.


I didn't remove the forks yet but before we start we get a reference measurement of the ride height so when they are reinstalled they can be put back t the same spot. It's even more important since I am changing the internals. The fork length can change from stock to new. This measurement can be done easily in two different ways. Both are off the bottom triple. Either hook the top and measure to axle center or butt the bottom and measure to axle center. Which ever is easier just make sure to do it the same way when putting the forks back on. I chose to butt the bottom and measure down. We call this BLC. Bottom of Lower Clamp to axle center.

It happened to be 559mm on my bike.
Todays task was to swap out brake rotors and then figure out what I need for new spacers for the calipers.
Rotor swap was pretty straight forward. With the wheel off and on the table the old rotor was removed.

Here is a comparison of the old and new rotors.

The new rotor on the bottom to show the size difference. The new rotors are 320mm.

New rotors installed. What was interesting was the torque spec was on the high end of my small torque wrench and the low end of my large torque wrench. And a pretty large range. Between 16 and 24 ftlbs.

I couldn't really get the shot I was looking for here. One thing you want to do with wave type rotors is try to not align the petals on them. Here although it's difficult to see the petals do alternate.

Now the wheel is ready to go.

Wheel back on the bike to figure out bracket and caliper spacing.

Luckily the spacing from fork to bracket remained the same. I expected this since they are the same thickness with no offset.

I also knew the calipers would have to move out a little bit because of the increased rotor diameter. Sadly it was a bit more then expected. Not a big deal but I do have to buy new longer bolts. Since I started this project with Ti I'm going to complete it with Ti so it's about $70 for the four bolts I need and I now have about $65 in bolts I'm not longer going to use.
New spacer size I need to make.

It's spaced out so the entire rotor is used.

Just got the call from my shop. New Brembo Master is in. Will update soon.
The following users liked this post:
F86 (03-02-2019)


#17
03-09-2019, 03:46 PM
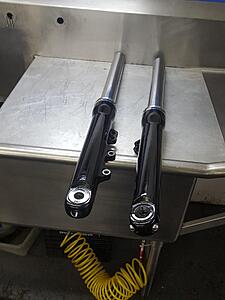
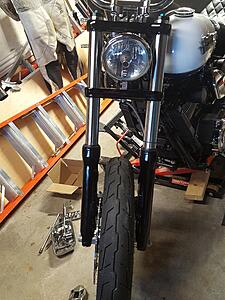
Got the forks rebuilt and put back on the bike today. At this point I'm just waiting for some hardware to show up so I can figure out my brake line lengths and finish this up. Here's the shots from today.
Bike in the air and forks off.
Stock forks getting ready to be taken apart.
After taking them apart and running them through the wash tank this is what you should end up with. One thing to be careful of here when taking them apart the metal preload spacers come out pretty quickly and they seem to have a nice edge on them. Never had a fork try to take a core sample from my hand before. All in all damper rod forks are pretty simple and easy to take apart.
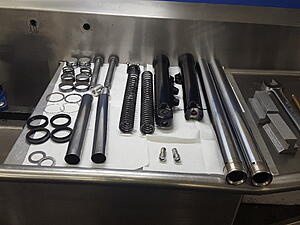
Here's a comparison of the stock spring which is the longer progressive wound spring to the new spring which is shorter and a straight rate.

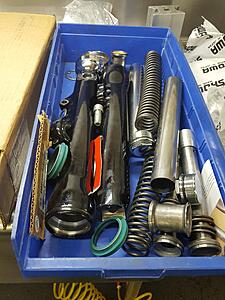
New parts laid out and I've started to reassemble.
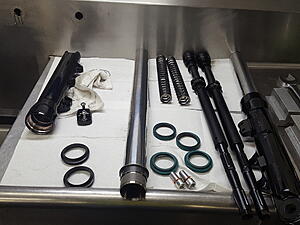
This is the pile of parts that do not get reused.
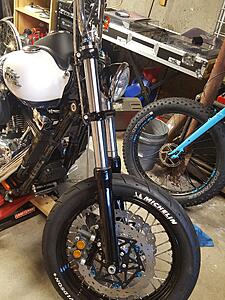
Forks assembled, home, and ready to go back on the bike
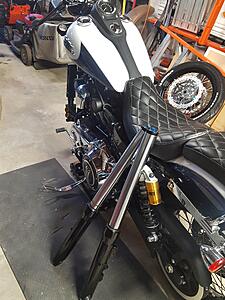
Now back on the bike and just about complete with my winter project.
Bike in the air and forks off.

Stock forks getting ready to be taken apart.

After taking them apart and running them through the wash tank this is what you should end up with. One thing to be careful of here when taking them apart the metal preload spacers come out pretty quickly and they seem to have a nice edge on them. Never had a fork try to take a core sample from my hand before. All in all damper rod forks are pretty simple and easy to take apart.

Here's a comparison of the stock spring which is the longer progressive wound spring to the new spring which is shorter and a straight rate.

New parts laid out and I've started to reassemble.

This is the pile of parts that do not get reused.

Forks assembled, home, and ready to go back on the bike

Now back on the bike and just about complete with my winter project.


#19
03-10-2019, 05:41 AM
I do have an advantage over most at getting this stuff done. I have access to a suspension shop that I used to work and race out of. Makes things a lot easier and quicker then doing the work in my garage.
#20
03-11-2019, 01:40 PM

Outstanding HDF Member
Hey James, you didn't happen to weigh one of your rotors before install, did you? I would be curious, now that I've weighed mine. According to the BrakeTech info, mine are 1mm thicker than yours, and 10mm larger in diameter. I'm wondering what that translates to in terms of weight. Just plain curiosity, not actually important...