* HOW TO * under fifty bux *

#42
 12-05-2007, 08:05 AM
Awesome ideas guys - thanks for the thread topic mud.
Here's a few obvious (but not mentioned yet) el cheapo mods:
remove reflectors (fishing line & Goo-Gone do a good job). FREE if ya fish and clean much, otherwise under $10.
remove tank badge/emblem if the stick-on type. FREE (use supplies from above!)
remove fender !!!!!! FREE or make money by selling your fender!
slide fork up into trees to lower front. FREE
stainless headlight visor. FREE if ya make it or under $10 at swap meet.
remove battery cover band, fill holes with round black auto interior trim push on covers. Under $3
#43
12-05-2007, 09:41 AM
For all us "outlawed" smokers. Tank pocket. Get a cigg. holder; approx $6. Remove the belt loop; free, cut a slit on the bottom between the leather, ( cut the stitching ) take a piece of .062" alu. about 3/4" longer than the pouch, same width as the inside and drill a clearence hole for the screw in the bottom of the dash. slightly bend the alum. 3/4" from the end with the hole. this will help to hold it down, slide it into the slot in the pouch. Now just screw it down on the dash. If you have a tank bra, you won't see the mount. cost is less than $8. H.D wants $80 for the same thing and it won't hold a lighter either, this one will.
#44
12-05-2007, 10:00 AM
Elite HDF Member
Join Date: Jun 2006
Location: Templeton California
Posts: 3,572
Likes: 0
Received 3 Likes
on
3 Posts
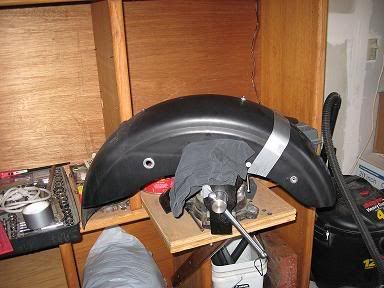
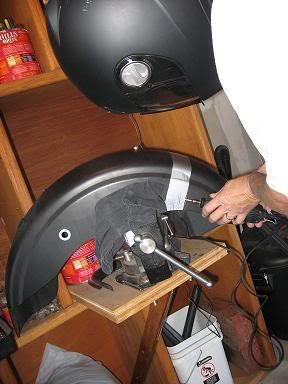
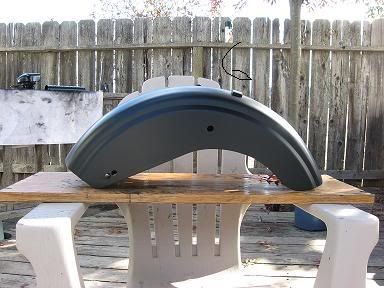
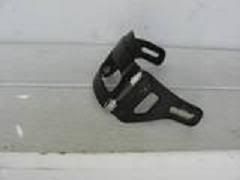
Might as well throw my front fender in there too, a dremmel bit, some JB weld and a can of Krylon Semi Flat Black gets ya a custom front fender for around $20.If you don't know what I'm talking about I removed the mounting bracket from my fender with a dremmel, filled the holes with JB Weld and re mounted the bracket with JB Weld to the front of the original mounting point.Like so.. I also slotted the mounting holes to give me more adjustability


#45
12-05-2007, 10:44 AM
ORIGINAL: Zimbob
For all us "outlawed" smokers. Tank pocket. Get a cigg. holder; approx $6. Remove the belt loop; free, cut a slit on the bottom between the leather, ( cut the stitching ) take a piece of .062" alu. about 3/4" longer than the pouch, same width as the inside and drill a clearence hole for the screw in the bottom of the dash. slightly bend the alum. 3/4" from the end with the hole. this will help to hold it down, slide it into the slot in the pouch. Now just screw it down on the dash. If you have a tank bra, you won't see the mount. cost is less than $8. H.D wants $80 for the same thing and it won't hold a lighter either, this one will.
For all us "outlawed" smokers. Tank pocket. Get a cigg. holder; approx $6. Remove the belt loop; free, cut a slit on the bottom between the leather, ( cut the stitching ) take a piece of .062" alu. about 3/4" longer than the pouch, same width as the inside and drill a clearence hole for the screw in the bottom of the dash. slightly bend the alum. 3/4" from the end with the hole. this will help to hold it down, slide it into the slot in the pouch. Now just screw it down on the dash. If you have a tank bra, you won't see the mount. cost is less than $8. H.D wants $80 for the same thing and it won't hold a lighter either, this one will.
#46
12-05-2007, 05:31 PM

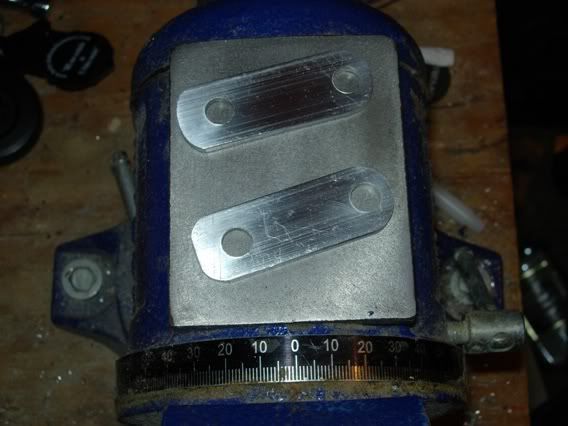
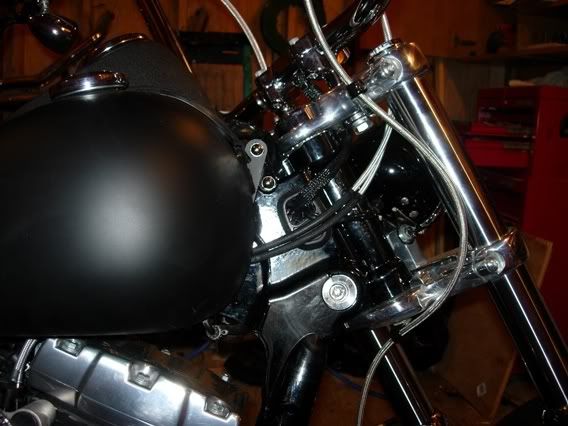
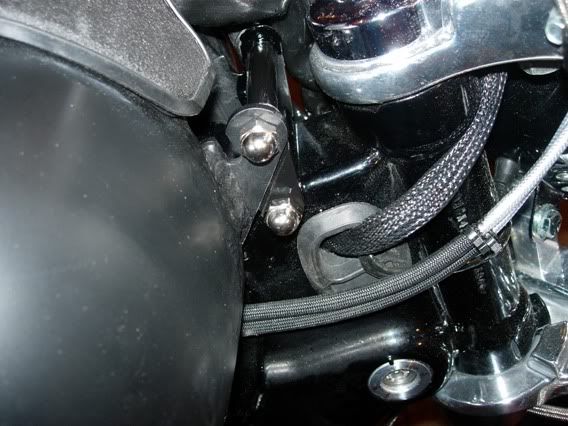
Tank Mod. Pictures aint that clear. Lotsa dust. And my lines in the backround look blue??? Frikin nikkon.
One pic thats not seen is the routingI did to the moddedplate to accomodate for clearance. The battery on mycameradied, and had to finish
'for the old lady threw a tantrum. (She's got me decorating for XMAS)
Real cheap mod.Raised the tank up 1 3/4". Took 2 hrs.
Materials:
One piece aluminum flat stock 1" x 3/16" Cost: $.0 (had it laying around in my shop)
One piece 1/2" Aluminun tube stock. Cost: $4.00 (lowes)
One 5/16" x 3 1/2" cap screw. Cost: .69c
Two 5/16" acorn nuts. Cost: $1.10
One can of spray paint. Cost $.0 (had it in my shop. Wish it was flat, not gloss)
Problems/complications...........F UCKIN' VENT HOSE,Wife. Other than that, real smooth Mod.
#47
12-05-2007, 05:34 PM

Banned
Join Date: Apr 2007
Location: Appling GA
Posts: 3,349
Likes: 0
Received 0 Likes
on
0 Posts
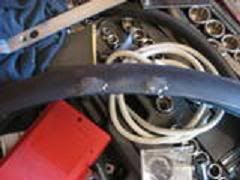
Parts were less than 10 bucks,2 30" 3/8s chrome over copperlav supply lines from Lowes, 6"
of 3/8 gas line some 3/8s clamps and some black drawtites... I took the line that reversed back into
the K&N off andjust added the 3/8s lav line to it there. I cut it after bending where it I wanted it
at the 90 angle back down to the brake line.Run another one from the rear and bend it till you like the fit and use the drawtites to connect the line to the frame ( make sure to dump the oil where it dont get on your tire). I laced mine under the brake line to keep it from moving or rattling.Trim the excess off the drawtights and no more oil in your filter...
[IMG]local://upfiles/30673/8A42494E3B7D45279C13A7F7BF54B5A2.jpg[/IMG]
[IMG]local://upfiles/30673/A01D491EDA43429B93FA62F33A1BF9C6.jpg[/IMG]
I cut the rear line off flush where the muffler mount ends because I installed hooker headerslast week. I added a short piece of gasline cut on a slant to keep the oilfoam away from my tires. Here is a pic. You cant really see the exit you have to bend down to see it.
[IMG]local://upfiles/30673/3290CE11ED7B4E898CC3BD2F9AE96091.jpg[/IMG]

#49
12-05-2007, 06:31 PM
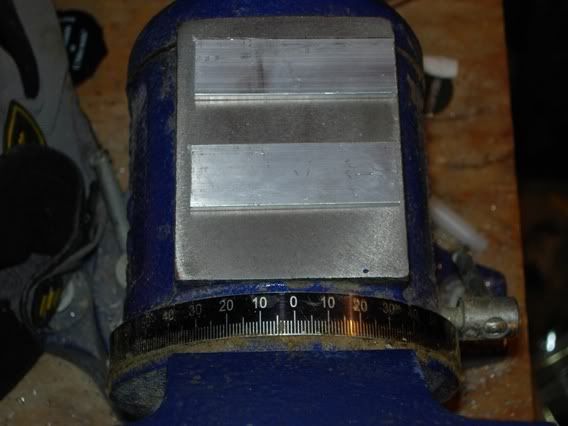
this is a simple mod for any one running an a/n big sucker or hd stage 1 air filter
if you are running one of these filter kits then you probly already noticed that the
front of the filter seems to be the only part that gets dirty and the rest stays that
nice redish color what i did was take a piece of paper cut to the inside of the filter
to get the holes in the right place i rotated the filter about 180 and drilled new 1/4"
holes now this gives you a nice clean surface for the incoming air just make sure that
you remove any metal shavings from the filter
[IMG]local://upfiles/22674/6240D882A34445DB9AA0C968C7E6D298.jpg[/IMG]
[IMG]local://upfiles/22674/7CC8BF8124A04E72A4895CDA1358D5A4.jpg[/IMG]
[IMG]local://upfiles/22674/3E78135005ED43CDB69CE1EB62856608.jpg[/IMG]
[IMG]local://upfiles/22674/3D96BE0CDEBA4BA29B16E6671A5CE5CB.jpg[/IMG]
[IMG]local://upfiles/22674/12B88A3E3B4246568F35BA03ECC92916.jpg[/IMG]
#50
12-05-2007, 06:56 PM

Tourer
Join Date: Oct 2007
Location: Scotland
Posts: 344
Likes: 0
Received 0 Likes
on
0 Posts
Great thread Mud as usual
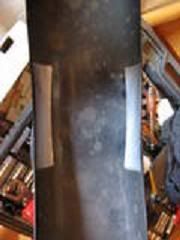
Heres one for blacked out top fork tubes
Get a length of 53mm plastic gutter tube from hardware store $4 -$6 , measure length from bottom of top yoke to top of bottom yoke , cut to size , cut down the back , wrap masking tape twice around tubes to stop rubbing , add a small spot of silicon onto the masking tape to stop cover from spinning , spread open the pipe , place over the fork tube and it will snap back into shape ..... a little polish and bob's your uncle !
Time 30 minutes ...cost pennies !!!!!