Intake Install guide...
#1
 07-09-2010, 04:10 AM

A friend has given me a Wimmer style 90 degree intake with top breathers to try out on my bike. he bought it and never used it!
No idea what brand the intake is or where it comes from, but it looks good, nicely made & good finish, and if it works better than the stock AC then nothing lost I guess.
Only issue is that it doesnt come with any instructions. Not that it is a difficult thing to put on, but it would be nice to know (or at least have a vague idea of) what order various washers, spacers and breathers go on just to save time messing about.
Does anyone have the wimmer install destructions for the 90 degree basic intake that they could scan and post here so that I can use it as guide please. The schematic link on the wimmer site is broken so I cant download it from there...
Once i get the intake on i will post pics.
Many thanks in advance!
he bought it and never used it!No idea what brand the intake is or where it comes from, but it looks good, nicely made & good finish, and if it works better than the stock AC then nothing lost I guess.
Only issue is that it doesnt come with any instructions. Not that it is a difficult thing to put on, but it would be nice to know (or at least have a vague idea of) what order various washers, spacers and breathers go on just to save time messing about.
Does anyone have the wimmer install destructions for the 90 degree basic intake that they could scan and post here so that I can use it as guide please. The schematic link on the wimmer site is broken so I cant download it from there...
Once i get the intake on i will post pics.
Many thanks in advance!
#2
07-09-2010, 08:28 AM
Road Warrior
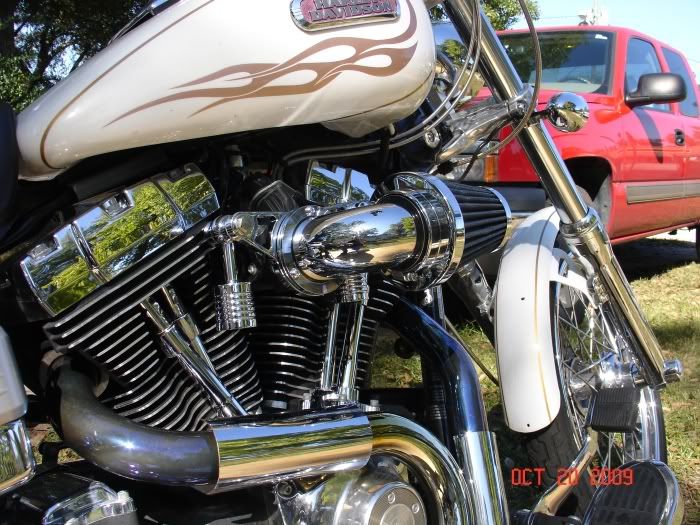
Here's how I did my K&N intake I picked up for $20.
It came with one of these type brackets... ... for a Sportster.
I cut the 'wings' off to use just the round part that bolts to the throttle body. I welded it to this black bracket which I made for a previous AC I had.


The crankcase breather tubes are automotive windshield washer tubing joined with a 'T' fitting & routed into the AC through a tight fitting hole drilled into the top of the elbow. I cut down the length of the stock breather bolts & used brass washers between the cylinder head & black bracket.

I know this may not answer your inquiry, but it might inspire your imagination for a creative solution.
This 90* intake has given me a noticable gain in preformance over the 'open' round Screaming Eagle type AC I had.

It came with one of these type brackets...
... for a Sportster.I cut the 'wings' off to use just the round part that bolts to the throttle body. I welded it to this black bracket which I made for a previous AC I had.
The crankcase breather tubes are automotive windshield washer tubing joined with a 'T' fitting & routed into the AC through a tight fitting hole drilled into the top of the elbow. I cut down the length of the stock breather bolts & used brass washers between the cylinder head & black bracket.
I know this may not answer your inquiry, but it might inspire your imagination for a creative solution.
This 90* intake has given me a noticable gain in preformance over the 'open' round Screaming Eagle type AC I had.
Last edited by 08fxdf43202; 07-09-2010 at 08:33 AM.
#5
07-09-2010, 08:59 AM
Club Member
Join Date: Feb 2008
Location: Passaic County, NJ
Posts: 11,474
Likes: 0
Received 23 Likes
on
18 Posts
Krazy...I have the same one except mine isn't pointed. It's flat.
I don't like it. Lots of blow-by with those breathers. Read: you will have a mess of oil on the right side of your bike after a long ride.
I went back to my SE stage 1 round cleaner.
Oh, and it's a puzzle. Just put it together. Mine came with no install sheet either. I emailed Wimmer because the a/c are practically the same. From their diagram, I was able to get it on. If I can find the email I'll send it to you.
#6
07-09-2010, 09:10 AM
Was a bit concerned about the oil thing myself as I have read other posts that mention it.
Having been inspired by 08fxdf43202's build i might look at seeing if I can fabricate breather pipes instead. He's got a neat solution there.
At the moment I have only the stock filter, so for a cost of almost nuthin' I should get some improvement over the stock.
If not then I have had some fun, got my hands dirty, and learnt something along the way
Thanx for the advice!
#7
07-09-2010, 09:27 AM
Club Member
Join Date: Feb 2008
Location: Passaic County, NJ
Posts: 11,474
Likes: 0
Received 23 Likes
on
18 Posts
I found the email. If you want the fullsize pdf, PM me your private email. Be happy to forward it. That's too small..... gimme a minute.
EDIT:
http://i64.photobucket.com/albums/h1...at102613AM.png
bigger.
EDIT:
http://i64.photobucket.com/albums/h1...at102613AM.png
bigger.
Trending Topics
#9
07-09-2010, 11:56 AM
Road Warrior
For 0 dollars... I'd cut the filter heads off their stems, rotate em straight up & rout rubber tubing through a hole in the top of the elbow.
Or, for $42.99... you could go with one of these kits: http://www.jpcycles.com/product/4000...000283&Ntk=All
... so you wouldn't have to mess up those nice lookin' filters
Or, for $42.99... you could go with one of these kits: http://www.jpcycles.com/product/4000...000283&Ntk=All
... so you wouldn't have to mess up those nice lookin' filters
#10
07-09-2010, 12:23 PM

Thread
Thread Starter
Forum
Replies
Last Post