How to: Replace broken shifter pawl spring.
#51
 04-08-2018, 04:17 PM


#52
04-21-2018, 05:15 AM

wow would that be the same amount of work to replace the shifter part on a 1982 iron head sportster?mine the splin gears where you attach the foot shift lever are striped and has some play in the shaft but the spring inside is fine,if i have to go threw all that to replace that part ,i think i would try the idea i had with drilling a hole and put a set screw
to hold the gear shift lever on.wow if thats the same proceedure i will say thanks in advance for your write up,and saving me the work,
ride to live,live to ride
to hold the gear shift lever on.wow if thats the same proceedure i will say thanks in advance for your write up,and saving me the work,
ride to live,live to ride
#53
09-06-2019, 07:04 PM

Stage I
Join Date: Apr 2015
Location: forest park
Posts: 1
Likes: 0
Received 0 Likes
on
0 Posts
You don't need to do 4/5ths of what you show here.
Leave the primary side of the bike alone completely except for remove the shift lever from the splines and flicking the circlip off the shaft (you will need a new circlip and preferably the seal too.
Pull the top off the tranny and remove the shifter assembly.
Remove the clutch mechanism cover and the trap door assembly (Use a puller or hide Mallet and replace the bearings before reassembly)
You can now wiggle the countershaft out of the way just enough to remove the shifter shaft assembly and get a magnet in there to remove any missing pieces.
Reassemble in reverse order but fit the seal and circlip before replacing the countershaft.
Its a fiddle but will save you 3-4 hours and a shitload of cash.
#54
01-03-2021, 01:24 AM

Stage I
Join Date: Jan 2021
Location: Australia
Posts: 1
Likes: 0
Received 0 Likes
on
0 Posts
[QUOTE=Spanners39;13188400]You don't need to do 4/5ths of what you show here.
Leave the primary side of the bike alone completely except for remove the shift lever from the splines and flicking the circlip off the shaft (you will need a new circlip and preferably the seal too.
Pull the top off the tranny and remove the shifter assembly.
Remove the clutch mechanism cover and the trap door assembly (Use a puller or hide Mallet and replace the bearings before reassembly)
You can now wiggle the countershaft out of the way just enough to remove the shifter shaft assembly and get a magnet in there to remove any missing pieces.
Reassemble in reverse order but fit the seal and circlip before replacing the countershaft.
Its a fiddle but will save you 3-4 hours and a shitload of cash.[/Quote
Is there anyway to do this on a 86 FXR
#55
07-05-2021, 09:35 PM

Intermediate
If you have some good insight, or correction, feel free to add your comments and i'll update the original post as i go. i am no expert, but simply like to fix what i can and research for the answer
i felt this may help someone in a similar situation. i bought this bike knowing the shifter pawl spring was broken. if your shift lever just falls down about 1" and won't return to the normal position, then the shifter pawl spring is likely broken. do not ride the bike anymore if this happens. The previous owner finished riding it to work by raising the shift lever back up to engage the next gear. that broken piece of metal from the spring is floating around in there and could chew up your gears.
the replacement spring is $3.50. however, be prepared to spend plenty more. i decided to replace the shifter pawl completely with a unit from Baker. I also purchased a baker heavy duty bearing to replace the spacer on the main shaft (see below). then gaskets, seals, oil, final drive belt (mine was done) and whatever else you find worn out will need to be tended to.
on to some tech: please utilize your harley service manual.
my motor was out, but that doesn't change anything. i also would have just pulled the case to do this on my work bench. but the pivot shaft is seized.... more work, haha.
first remove your primary. plenty of threads on that.
drain the trans oil
get the exhaust out of the way
oil lines may need to be moved
shift linkage
whatever else you have that will prevent the trap door from coming out
you'll need to make your own, or purchase a 1 7/8 socket to remove the nut for the drive pulley/sprocket
Attachment 526611
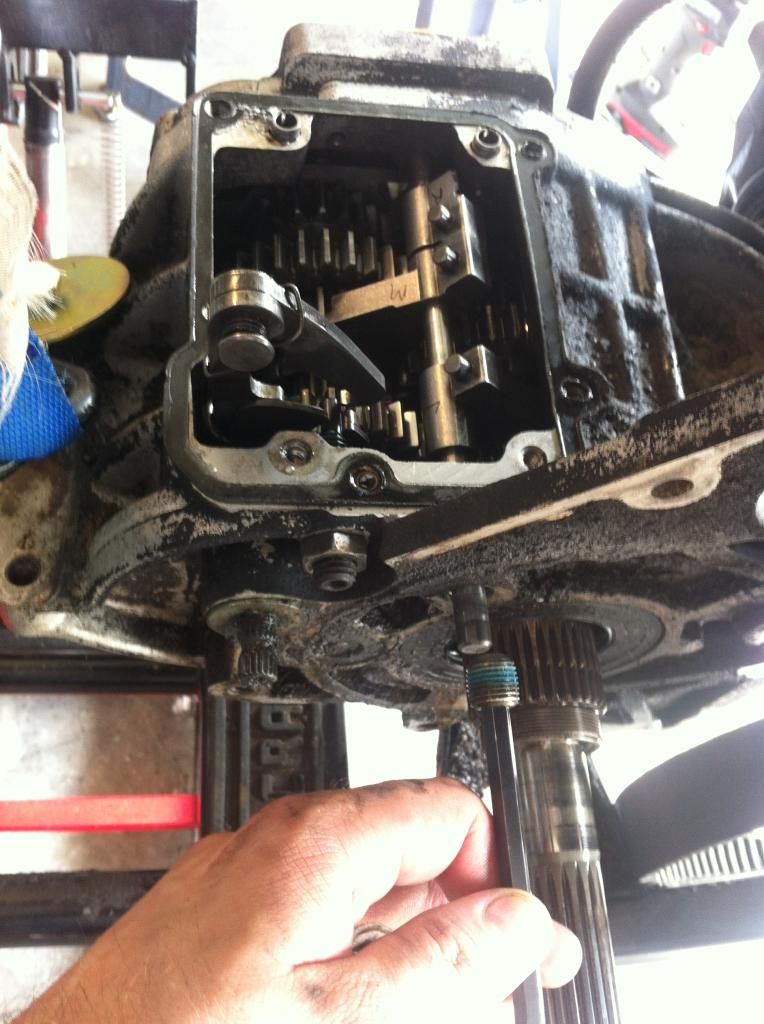
then you'll need a special puller to remove this spacer that's pressed on. These tend to walk in high power applications. if there's not approx 3/16" clearance behind the spacer to the seal, then it's walked and will be tough to remove. some choose to score it with a dremel and break it. but i didn't want to risk messing up the main shaft
Attachment 526612
next you can remove the side cover and top cover
Attachment 526613
now you can see why i'm going to replace all the bearings after this metal has been rolling around
Attachment 526614
Attachment 526615
undo the 4 bolts and take the shift cam out. be careful as the end caps can rotate and the bolts/washers can fall into the trans on re-assembly
Attachment 526613
now you'll see a good look at the shifter pawl. unfortunately the gears are in the way and it can't be removed yet
Attachment 526616
now is a good time to mark the shifter forks(left, right and middle). then pull this plug and you can remove the shifter fork shaft and shifter forks
now you can unbolt the trap door and the entire gear set will slide right out.
Attachment 526617
the main drive gear will still be in the trans case. a bunch of taps with a plastic mallet pushed mine out. then a large snap ring will allow you to remove the main shaft bearing. i forgot to get one. so re-assembly will be next weekend.
keep your parts organized and CLEAN CLEAN CLEAN them
Attachment 526618
Attachment 526619
and here's the culprit that caused all this
Attachment 526620
here's your empty case to clean up
Attachment 526621
and this is the bearing from baker to replace the spacer on the main shaft and fits in the inner primary.
Attachment 526622
the new shifter pawl unit
Attachment 526623
that's where i left off. putting it back together is just as simple. i'll update when it happens though.
thanks
mike
i felt this may help someone in a similar situation. i bought this bike knowing the shifter pawl spring was broken. if your shift lever just falls down about 1" and won't return to the normal position, then the shifter pawl spring is likely broken. do not ride the bike anymore if this happens. The previous owner finished riding it to work by raising the shift lever back up to engage the next gear. that broken piece of metal from the spring is floating around in there and could chew up your gears.
the replacement spring is $3.50. however, be prepared to spend plenty more. i decided to replace the shifter pawl completely with a unit from Baker. I also purchased a baker heavy duty bearing to replace the spacer on the main shaft (see below). then gaskets, seals, oil, final drive belt (mine was done) and whatever else you find worn out will need to be tended to.
on to some tech: please utilize your harley service manual.
my motor was out, but that doesn't change anything. i also would have just pulled the case to do this on my work bench. but the pivot shaft is seized.... more work, haha.
first remove your primary. plenty of threads on that.
drain the trans oil
get the exhaust out of the way
oil lines may need to be moved
shift linkage
whatever else you have that will prevent the trap door from coming out
you'll need to make your own, or purchase a 1 7/8 socket to remove the nut for the drive pulley/sprocket
Attachment 526611
then you'll need a special puller to remove this spacer that's pressed on. These tend to walk in high power applications. if there's not approx 3/16" clearance behind the spacer to the seal, then it's walked and will be tough to remove. some choose to score it with a dremel and break it. but i didn't want to risk messing up the main shaft
Attachment 526612
next you can remove the side cover and top cover
Attachment 526613
now you can see why i'm going to replace all the bearings after this metal has been rolling around
Attachment 526614
Attachment 526615
undo the 4 bolts and take the shift cam out. be careful as the end caps can rotate and the bolts/washers can fall into the trans on re-assembly
Attachment 526613
now you'll see a good look at the shifter pawl. unfortunately the gears are in the way and it can't be removed yet
Attachment 526616
now is a good time to mark the shifter forks(left, right and middle). then pull this plug and you can remove the shifter fork shaft and shifter forks

now you can unbolt the trap door and the entire gear set will slide right out.
Attachment 526617
the main drive gear will still be in the trans case. a bunch of taps with a plastic mallet pushed mine out. then a large snap ring will allow you to remove the main shaft bearing. i forgot to get one. so re-assembly will be next weekend.
keep your parts organized and CLEAN CLEAN CLEAN them
Attachment 526618
Attachment 526619
and here's the culprit that caused all this
Attachment 526620
here's your empty case to clean up
Attachment 526621
and this is the bearing from baker to replace the spacer on the main shaft and fits in the inner primary.
Attachment 526622
the new shifter pawl unit
Attachment 526623
that's where i left off. putting it back together is just as simple. i'll update when it happens though.
thanks
mike
#56
07-05-2021, 11:32 PM
Intermediate
#57
07-05-2021, 11:35 PM
Intermediate
I need to replace bushings In the swing arm. And think I should do it while fixin the trans if possible . I�ve never been this deep but Mike�s teaching will get me through the trani part. Now for your help, can you explain to me what you mean. And then I can conquer the both and possibly do some powder coat
#58
07-06-2021, 07:03 PM
Supporter
I need to replace bushings In the swing arm. And think I should do it while fixin the trans if possible . I�ve never been this deep but Mike�s teaching will get me through the trani part. Now for your help, can you explain to me what you mean. And then I can conquer the both and possibly do some powder coat
The isolator is the rubber drivetrain mounts on each side of the swingarm, #24 in the picture

#59
07-19-2023, 05:51 PM

Originally Posted by Spanners39
You don't need to do 4/5ths of what you show here.
Leave the primary side of the bike alone completely except for remove the shift lever from the splines and flicking the circlip off the shaft (you will need a new circlip and preferably the seal too.
Pull the top off the tranny and remove the shifter assembly.
Remove the clutch mechanism cover and the trap door assembly (Use a puller or hide Mallet and replace the bearings before reassembly)
You can now wiggle the countershaft out of the way just enough to remove the shifter shaft assembly and get a magnet in there to remove any missing pieces.
Reassemble in reverse order but fit the seal and circlip before replacing the countershaft.
Its a fiddle but will save you 3-4 hours and a shitload of cash.
Would I be able to carry this process out on my 2007 Road King ?
I really want to avoid playing with the primary and other bits and pieces. My only question is, how do you replace the shifter pawl seal (if needed) without removing the primary case...?
Last edited by bz78pl; 07-19-2023 at 05:59 PM.
#60
07-19-2023, 06:08 PM

Seasoned HDF Member
Originally Posted by Spanners39
You don't need to do 4/5ths of what you show here.
Leave the primary side of the bike alone completely except for remove the shift lever from the splines and flicking the circlip off the shaft (you will need a new circlip and preferably the seal too.
Pull the top off the tranny and remove the shifter assembly.
Remove the clutch mechanism cover and the trap door assembly (Use a puller or hide Mallet and replace the bearings before reassembly)
You can now wiggle the countershaft out of the way just enough to remove the shifter shaft assembly and get a magnet in there to remove any missing pieces.
Reassemble in reverse order but fit the seal and circlip before replacing the countershaft.
Its a fiddle but will save you 3-4 hours and a shitload of cash.
Would I be able to carry this process out on my 2007 Road King ?
I really want to avoid playing with the primary and other bits and pieces. My only question is, how do you replace the shifter pawl seal (if needed) without removing the primary case...?
You don't need to do 4/5ths of what you show here.
Leave the primary side of the bike alone completely except for remove the shift lever from the splines and flicking the circlip off the shaft (you will need a new circlip and preferably the seal too.
Pull the top off the tranny and remove the shifter assembly.
Remove the clutch mechanism cover and the trap door assembly (Use a puller or hide Mallet and replace the bearings before reassembly)
You can now wiggle the countershaft out of the way just enough to remove the shifter shaft assembly and get a magnet in there to remove any missing pieces.
Reassemble in reverse order but fit the seal and circlip before replacing the countershaft.
Its a fiddle but will save you 3-4 hours and a shitload of cash.
Would I be able to carry this process out on my 2007 Road King ?
I really want to avoid playing with the primary and other bits and pieces. My only question is, how do you replace the shifter pawl seal (if needed) without removing the primary case...?
It's not likely he'll see the post.
Your question will be better served if you start your own thread.
You can make reference to this thread if it helps you explain what you need
Good luck WP
The following users liked this post:
bz78pl (07-19-2023)