Jim G’s Motorcycle Trailering and RVing Adventure
#1
 04-12-2015, 11:51 PM


Purpose of this thread:
The purpose of this thread is to record my experiences in selecting, buying, outfitting, and using a cargo trailer to use for 3 purposes:
1. easily hauling one or both of my motorcycles,
2. garaging one or both of my motorcycles between rides, and
3. acting as a “dry RV” – a road trip “hotel room” where I can sleep and make very basic meals, but NOT have to deal with the hassles and issues associated with RV plumbing.
My hope is that other riders contemplating doing something similar can benefit from my experiences and errors, and so have a better experience as a result.
I will try to include many photos. To clarify the topics being discussed.
What this thread will cover:
This thread will ULTIMATELY cover each of the following topics and much more, but will likely take at least several months of separate individual postings within the thread, to do so:
Why a cargo trailer
Why certain trailer specifications
Why certain tow vehicle specifications
Where and how I shopped for and ordered a trailer
What was delivered versus what I ordered
Photos of my trailer as delivered
The drive home – how it handles, effect on tow vehicle fuel mileage, storage issues
Security
Protecting the interior plywood walls via polyurethane
Adding flooring with minimum effort
Installing a “no tie-down” motorcycle transport device
Using the trailer as a bike garage and transport system
Adding rigid foam insulation to the ceiling
Adding a clothes hanging system
Adding a work surface
Enclosing under the work surface for storage and utilities
Adding 120 volt power
Adding 12 volt power
Adding interior LED lighting
Adding heater and thermostat
Adding a bed
Adding (small) appliances
Adding a (small and portable) generator
Adding air conditioning
Adding enclosed overhead cupboard space
Adding a bottle-supplied mini-sink with bottle drain
Using the trailer as a dry RV
Road trips!
I have previously covered some elements of some of the above topics in a previous trailer thread, but that thread was focused on my then current work on the project and was not planned as a potential roadmap for others to use and improve themselves. In this thread, I will try to make it at least a starting point for others to improve, for a more complete end-to-end process, all in one thread.
What the first individual posting will cover
The following first individual posting will cover:
Why a cargo trailer
Why certain trailer specifications
Why certain tow vehicle specifications
Where and how I shopped for and ordered a trailer
What was delivered versus what I ordered
Photos of my trailer as delivered
Why I bought an enclosed cargo trailer
I had several reasons for wanting to buy an enclosed cargo trailer, that in the end integrated well:
- We live in a rented cabin in an RV resort, with no garage and a gravel and caliche driveway with a 7% grade, so a cargo trailer stored in the (flatter) designated storage area of the resort could act as a garage for one or both of the bikes
- I needed a better way of hauling the KTM to the nearest off-road riding areas with less time spent on “overhead” (e.g. loading and unloading and securing and unsecuring the KTM), better protection for the bike, and enabling me to stay overnight out of town without incurring hotel costs
- My wife and I had been planning how we could use a relatively inexpensive and simple cargo trailer instead of a costly and high maintenance RV for road trips. By eliminating the cost of hotels, we could vastly increase the number of days per year that we could afford to travel. By eliminating the high cost and high maintenance of a decent (not cracker box) RV, we could actually spend more time having fun instead of paying the high depreciation inherent in RVs and doing the maintenance associated with them (black water dumping, winterization, frequent repairs of plumbing & electrical systems, etc)
- With out cabin setup, and steep unfinished driveway, I had no clean and safe place to do motorcycle maintenance and modification work, especially work that would require multiple sessions to complete. A cargo trailer gives me sheltered, protected, and clean space to do work, without the stresses of needing to deal with weather, lighting, and keeping parts clean and organized when working outdoors
- A cargo trailer gives me a safe and clean way to transport bikes to and from dealerships for service work, regardless of weather or bike condition.
- I can’t do precision work, like cleaning a firearm, or reloading precision ammunition, or leave the supplies out to do so, in our cabin, because we have a cat who gets into just about everything. A trailer gives me a safe workshop!
Specifications:
The following are the specifications for the trailer I ordered, and the reasons for them. Note that some of these specs were NOT in my original list, but as I shopped and became at least a bit educated about cargo trailers, by both dealers and other trailer users, I added several specs .
6x12 size: This was a compromise between the better agility, driving visibility, lighter tow weight, superior tow vehicle fuel mileage, and lower cost of a small trailer, versus the fewer size and layout constraints, higher weight carrying capacity, and higher initial and ongoing costs of a larger trailer. The 6x12 size works for me and my budget, but your needs or wants might be very different.
Single Axle (“SA” in trailerspeak): Trailers come with single axles (“SA”), twin axles (TA”), or triple axles, depending upon their empty weight (which depends on their size) and upon the weight they are designed to be able to carry. For cargo trailers we motorcyclists are likely to be interested in, the rule of thumb for MOST axles is that each axle is good for carrying up to 3500 lb. Since I wanted to keep the weight of my trailer as low as its intended use would comfortably allow, and my target loaded weight was under 3000 lb, I wanted an “SA”.
V-nose: A V-nose, from MOST manufacturers (but not all) offers a little extra space beyond the nominal size of a given trailer, since it protrudes beyond the front of the nominal trailer size. That space is pretty ideal, as it turns out, in providing a surprising amount of counter space and storage space if outfitted correctly. It also supposedly improves aerodynamics enough to make a small favorable difference in fuel mileage, although many trailer owners who have owned V-nose, flat front, and trailers with rounded corners, insist that trailers with rounded corners do better on aerodynamics than V-nose trailers, and both are only marginally better than simple flat boxy trailers. There is broad agreement that the squarish back of the trailer and its frontal surface area have a much larger impact on aerodynamics than adding a V-nose, a slant nose, or rounded corners does. This is why you see semitrailer rigs with a “fairing” on the tractor to guide air up towards the roof of the trailer, and fold-out “wings” on the rear of the semitrailer to bring the airstream back in “gently” versus turbulently.
78" interior height: This was a tough decision for me. Most trailer experts will tell you that a trailer that stays under the overall height of the tow vehicle will both improve fuel mileage and minimize the effects of crosswinds and passing semitrailers. However, such a trailer behind a typical pickup truck needs to have an internal height of 4 ˝ feet or less, which was unacceptable to me. I wanted to be able to stand up and wlak normally within the trailer, which for my 5’9” height means a 6’ trailer. But my wife insisted on an interior height of 6 ˝ feet, to accommodate our sons, who are both over 6 feet in height. I suspect this extra height may really hurt our fuel mileage, but the point was non-negotiable with my wife.
Ramp rear door: Given that one of the primary uses for the trailer is hauling motorcycles, a ramp door is a necessity, unless an owner likes handling, storing, and securing separate ramps, and pushing or riding a bike up them. I don’t. Typical cargo trailers with ramps have ramps long enough to make for a very gentle slope to push or ride a bike up, and they can be easily extended even more by adding commercially available metal “flaps” that hang vertical with the ramp when the ramp is closed, but which can be flipped rearward to extend a ramp even more, and to enable even bikes with very low ground clearance to get into the trailer without dragging their frame tubes.
Side door: Theoretically, a side door is not essential, but when you are planning to go in and out of the trailer often, or to do more than just haul a bike or bikes in a trailer, a side door is a real convenience and a high priority safety feature. For my dry RV usage, a side door is an essential.
Recessed RV lock: If you intend to use a cargo trailer as a “hotel room” to sleep in, the normal “cam lock” locks on cargo trailers are a problem in multiple ways. First, you cannot lock the door from the inside, which means you will be sleeping with an unlocked door. Secondly, it is possible for a prankster or worse to lock you into the trailer viaa the cam lock, since it is impossible to open a cam lock form inside the trailer. This allows a thief to lock you in while he steals your bike if its parked outside for the night! A cam lock also does not allow you to close and latch the door at all after entering the trailer. The door will either be free to swing or need to be secured via a “hold open” accessory that you need to buy from an RV store. And, a cam lock is very slow and inconvenient to lock each time you leave the trailer. A recessed RV lock solves these problems. It gives you a lock and latch that are as convenient to use as a household doorknob. It gives you a set if keys. It allows you to close the door when inside the trailer and know it will not swing open. And it allows you to disable the cam lock by locking it in an “open” position, so no one can lock you in! For me, the recessed RV lock was an essential, fundamental to one of the primary uses of the trailer.
Torsion axle: A normal axle on a “standard” cargo trailer has a rigid one piece axle, steel leaf springs, and NO damping device whatsoever. A torsion axle, commonly called a “Torsen” axle after one of the main brand names, instead uses metal half axles with 90 degree bends whose ends are embedded in a tube essentially filled with rubber. When the trailer hits a bump, the 90 degree bend causes the axle to “twist” the rubber in the main tube, and that rubber provides both suspension and damping! Furthermore, each wheel has independent suspension. And finally, torsion axles provide a much smoother ride for the contents of the trailer. I wanted all these benefits, and so I wanted the torsion axle.
Electric brakes: By law in most states, a cargo trailer under 3000 lb does not require brakes. So, almost all trailers sold that have a GVWR of 3000 lb or less have no brakes as standard equipment. However, it makes good sense to have brakes on a trailer, especially as the weight gets higher and loads the tow vehicles brakes more and more. Both conventional axles and torsion axles can be equipped with electric brakes, which are controlled by a brake controller in the tow vehicle (see tow vehicle section below). Apparently, my wanting the combination of SA, torsion axle, and electric brakes was somewhat unusual, but for my usage it was pretty important, as I prefer to do road trips to areas that are hilly and mountainous.
EZ lube: Trailer wheel bearings are supposedly intended to be greased every 3000 miles or at least annually, whichever comes first. However, it is a time consuming chore at minimum, and impractical when doing a cross-country road trip from say Texas to Washington State and back. Trailers with the “EZ Lube” feature have an easily removable cap at the outer ends of each axle, which when removed, exposes a grease fitting. On this setup, 3 or 4 pumps from a grease gun every 2 or 3000 miles will apparently suffice between annual disassembly and inspection, and this is easy and convenient to do, even when on a transcontinental trip. For me, this was essential, as I don’t want to have to find a trailer shop to repack my bearings while on a long trip.
Radial tires: Radial tires deliver slightly better fuel mileage (less friction between tire plies), last longer, and are generally higher quality than bias ply tires, and usually only cost $100 per axle or so as an upgrade from the “lowest bid price” bias ply tires that come standard on most cargo trailers. The value versus cost equation looked good to me, and the higher quality of radial tires was also a big factor for me.
Alloy wheels: Alloy wheels add a lot of visual appeal, and are foten available as an option for just a couple hundred dollars. Nice wheels can really add pizzaz to a trailer. My wife and I both really like the alloy wheels that we spec’d for our trailer.
16" OC floor joists: Many cargo trailers come with 24” OC floor joists. This is fine when hauling evenly dispersed loads inside the trailer. However, when hauling a motorcycle, the weight is all concentrated on 2 points - the two wheel contact patches. When the trailer goes over a rough road, and the bikes’ momentum starts amplifying the effects of the road bumps, the point loads can get pretty large. 16” OC floor joists are not much extra cost, and add a lot of piece of mind. Furthermore, if the typical ľ “ plywood floor ever fails due to a hard impact or just deterioration over time, 16” floor joists spacing will ensure that the bike wheel does not drop right through the frame and head for the road surface, since no motorcycle wheel is as small in diameter as 16”! This was an inexpensive upgrade that I wanted.
12" OC walls: Most people do not realize that typical cargo trailer walls are NOT designed to support loads beyond their “frame” loads. The 16” OC, or even 24” OC wall framing used in most cargo trailers, coupled with the relatively thin 3/8” plywood inner skin, is intended only to handle the loads of the empty trailer itself plus modest side forces from cargo during driving. The walls are not designed to support cantilevered loads like cantilevered shelving or folding cantilevered beds or sofas, unless they were specifically framed at the factory to do so. Since I had to order my trailer long before working through all the interior build-out issues, I could not include in my order any specific reinforcement instructions. Instead, I found that specifying 12” OC walls was very inexpensive (around $100 as I recall), so I added that upgrade to at least strengthen the walls as a whole, so that I could add some modest internal loads without worrying about doing so.
3/4" treated plywood floor: ľ” treated plywood floors are pretty much standard on most cargo trailers, but it is always good to specify it, so I did, as some manufacturers apparently use 5/8” plywood or untreated plywood.
3/8" plywood walls: Again this is standard on most quality trailers, but I specified it anyway, since some manufacturers do use Ľ” plywood as “standard”. I didn’t want to get carried away by asking for thicker plywood, because plywood weighs about .38 lb per square foot per 1/8” of thickness, and there are about 200 square feet of interior plywood walls in my trailer. So, each 1/8” increase in thickness would add 76 lb to the trailer.
24" ATP stoneguard front: The front end of a trailer is subjected to a lot of road debris kicked up by the tow vehicle. Aluminum tread plate on the lowest 2 feet of its front end keeps the rocks from chipping the paint and denting the aluminum skin.
7-pin tow connector: Because my trailer has electric brakes, it gets a 7-pin round, versus 4-pin flat, plug to connect electrically with the tow vehicle. The 7-pin connection also enables the tow vehicle to transmit 12 volt power to the trailer for accessory uses.
Roof vent framed for RV air conditioner: I plan to add air conditioning in the future when funds permit (because when you buy AC, you also need to buy a complete 120 volt electrical system and a generator!). The trailer manufacturer offers a package for only $36 that reinforces and frames the roof framing for an overhead RV air conditioner, and also roughs in the wiring to the location from a nearby wall. I bought that bargain package!
Tongue jack: This is standard equipment on most trailers that have a tongue weight of more than maybe 50 lbs, but it’s always good to make sure! Since the tongue weight for a trailer is at least 10% of total trailer weight, a tongue jack is a necessity on any trailer that weighs over about 800 lb, and my 6x12 with its options surely does!
Rear fold-down jacks: These mount on the very rear of the trailer, on each side. They are pretty important, and really should be standard, not an option: they are all that prevents a SA trailer from tipping backwards when you and your bike start moving up or down the ramp! Naturally, I bought them! Besides, they only cost $75 per pair, installed. And they work MOSTLY quite well. I say mostly, because they work GREAT on reasonably flat ground, but if the ground beneath the rear of the trailer is high enough versus the ground under the tongue, the jack bodies become “too long” to swing down into position!
A 12-volt ceiling light with wall switch: This is a priceless feature, whether standard or an option. It draws power from the onboard battery that activates the electric brakes in the event the trailer becomes detached from the tow vehicle. That battery is kept charged by the trailer’s 7-pin connection with the tow vehicle. It is a great feature at night, or even in daylight when both of a trailer’s doors are closed and it either has no windows or has blinds in the windows for security reasons!
100% LED external lighting: I like the idea of zero maintenance lights, and the cost is modest.
Undercoated: This is standard on many trailer brands, but I was told so many times that anti-corrosion protection is important, even in dry southern state areas, that I made sure I ordered a trailer that has this feature.
Bright side trim: This option basically extends the appearance of the ATP stoneguard all the way around the trailer for the bottom 2 feet, except using bright mirror-like aluminum versus the tread plate pattern. If you are going to do only ONE thing to make a trailer look sharper, this is it!
2-tone back and yellow paint, with bright separator trim between black and yellow: This was a bold spec. I wanted a trailer that really stands out, that is highly visible for safety reasons, and that would be very hard for a thief to hide, transport, or sell. (Imagine the all-points-bulletin on this trailer if it is ever stolen ☺ ). This black and yellow combination, with the added bling of a six inch wide strip of bright aluminum between the two colors, really gets the job done!
2 of 30" wide x 15" high slider windows: There were several objectives here: get some light into the trailer even when the doors are all closed, get cross ventilation, and provide a way to see who is there when there is a knock on the door in a strange area far from home.
Windows 54" AFF (above floor level): There were a couple of reasons for specifying that the bottom of the windows be 54” above the finished floor level of the trailer. One was to prevent people outside the trailer from looking inside (54 AFF plus the roughly 18 inches from ground to floor level makes the bottom of each window 72” above ground level). The second will be explained later in this posting, but relates to keeping the window high enough that a motorcycle handlebar cannot accidentally smash window glass if the bike is accidentally leaned, or deflected by a road bump, into the side wall of the trailer!
2 of side wall vents: Gasoline tanks on motorcycles are vented, and also sometimes a fuel leak can occur on a motorcycle. This can result in gasoline vapor buildup inside a trailer. Trailer manufacturers offer an option that installs 2 manually openable/closable vents, one on the front upper street side, and the second on the lower rear curb side, that are effective in clearing any fumes, gasoline or otherwise, especially if the trailer is moving at all. This is a great safety feature, and also another source of general ventilation on a hot day.
Insulated walls and ceiling: There are multiple benefits to insulating the walls and ceiling. It makes both heating and air conditioning more practical, more effective, and less costly. It greatly reduces sound transmission into and out of the trailer. It dramatically reduces roof noise during rainstorms. These are all important things for a trailer that will act as a dry RV. It also strengthens the roof (provided you use foam insulation, not fiberglass).
I bought the factory wall insulation. But I did not buy the factory installed CEILING insulation primarily because a finished ceiling would also be part of the package, and I wanted to first wire the ceiling for overhead high illumination12 volt LED lights, and so I planned to do the insulation and ceiling myself inexpensively afterwards.
Triple tube 60" extended tongue: I added this to my order as a change order after I saw the increased strength of it and the increased length of it, during my trailer factory tour. The increased length makes backing the trailer up easier, keeps the tailgate from hitting the tongue jack when the tailgate is opened, improves the ride in the trailer by effectively extending its “wheelbase” (trailer axle to tow vehicle axle distance), reduces the potential for trailer sway, and reduces the impact of improper cargo loading that can result in insufficient tongue weight (because it gives the tow vehicle hitch more leverage over the trailer).
12 volt cigarette plug-in located inside V-nose, driver side, AFF 12": Because I use a CPAP in order to sleep at night, I need a 12 volt source of power to always be available. While I now have a highly portable rechargeable 12 volt lithium battery pack for the CPAP that can be recharged from the tow vehicle cabin’s 12 volt accessory outlet, as the result of a project unrelated to the trailer, I still always want to have an emergency alternate source in case the battery pack fails me. The factory was happy to quote a very modest price to add the 12 volt outlet powered by the trailer’s emergency battery that applies the trailer brakes if the trailer ever becomes disconnected from the tow vehicle while moving.
Aluminum one-piece roof upgrade: The standard roof on most cargo trailers is a multi-piece galvalume roof with multiple seams that are potential points of future leakage. In addition, galvalume is simply steel that has a thin coating of galvanizing material. A one-piece aluminum roof eliminates the seams, eliminates the potential for rusting, and is lighter to boot. I paid the extra for this feature.
Weight of the trailer: The empty weight of most 6x12 SA trailers with no options (a real stripper version) ranges from roughly 950 to 1100 lb. But some options each add significant weight. The predicted weight of my trailer, as predicted by the Plant Manager of the factory that ultimately built it, was 1200 to 1400 lb. As you will see later in this thread, he misled me. By a LOT. This is important, because the weight of a trailer affects how well it pulls, how well it handles (lighter is better in evasive maneuvers), how much it is affected by steep hills, and how much fuel it requires to pull it.
continued below . . .
Last edited by JimGnitecki; 04-12-2015 at 11:54 PM.
#2
04-12-2015, 11:52 PM
Why certain tow vehicle specifications
To pull a trailer with the above specs, I needed to ensure I had the right tow vehicle with the right options.
My tow vehicle, like the trailer, is a compromise that attempts to balance sometimes competing priorities or needs. My tow vehicle is a new 2014 Ford F150 Supercab pickup truck. Here are the key relevant specs:
- A long 145” wheelbase, to enhance stability (a longer tow vehicle wheelbase makes it harder for the trailer to destablize the tow vehicle if the trailer starts to fishtail or otherwise misbehave because of crosswinds or ice, etc)
- A heavy 5000 lb vehicle weight (tow vehicle weight greater than that of the trailer greatly enhances trailer stability, especially in crosswinds)
- A rated towing capacity (per proper latest independent SAE standard) of 6300 lb, which is far above the trailer’s actual loaded weight
- A factory trailer towing package that includes extra cooling, a proper heavy duty receiver hitch, trailer connection wiring, and both 4-pin and 7-pin receptacles
- A genuine Ford trailer brake controller that can automatically apply the correct amount of braking to the trailer at exactly the same time as the truck’s brakes, . The big advantage that the Ford factory controller has over any aftermarket controller, even the “best” ones that access the underdash diagnostic port, is that unlike ANY aftermarket controller, it has FULL access to the truck’s Ford computer system (not just the limited access available via the diagnostic port). This means that when the truck’s computer activates truck braking in support of stability control or traction control for example, the trailer brakes will be immediately activated along with the truck brakes.
Where and how I shopped for and ordered a trailer
Cargo trailers are very costly to ship long distances, because they are big and heavy but relatively low value. This has resulted in a marketplace in which a large number of regional trailer manufacturers each serve the area near them, usually just a few hundred square miles.
In recent times, many of these individual manufacturing facilities have been acquired by larger corporate entities (like Lark United, for example), but although they then are under “corporate” management, the individual factories within each corporation still sell primarily to their “local regional” area because of the transportation cost issue.
Furthermore, the vast majority of trailers are not sold direct, but rather through local independent trailer dealerships, who sell the trailers that are made in factories located within their regional area. It is fairly common for a dealership to handle multiple “brands’ of trailers from multiple factories.
While some trailers are sold online including on eBay, a realistic analysis of those sales shows that they too are regional, since the transportation cost becomes even more important when just ONE individual trailer is being sold and transported to one end buyer, versus multiple trailers being sold wholesale to a dealership who can arrange to have them transported “piggyback” on special trailers that carry several trailers at a time on one truck /trailer combination driven by just one driver.
Because of this, I focused on local dealerships located within a maximum of 100 miles from my home.
I also discovered that my list of specifications was extensive enough that it was impossible to find an already built trailer with all those features anywhere in a dealer’s inventory. I was told I need to order such a trailer, and that the lead-time at this point in time (late February), meant potentially a 4 to 6 week wait. The wait would become longer if I delayed ordering into March or April, as the trailer market is apparently very seasonal, with Spring being the “hot” sales time.
Although my trailer does not embody any truly unusual features, except the color scheme and its layout, it seems that most trailer buyers do not educate themselves that much about trailers before buying, due at least somewhat to the lack of good information available to buyers. In fact, that is why I undertook starting this thread. That lack of knowledge makes it relatively easy for trailer dealers to simply stock mostly truly bare trailers with only a small percentage having a lot of the features I listed, because most first time buyers don’t even KNOW what those trailers are “missing”, because no one ever told them that such features exist and can be quite important, depending upon the intended use of a trailer.
So, I shopped locally, and based on multiple conversations with multiple dealer reps and actual trailer owners, I assembled that list of features I wanted, and then asked for quotes. Based on some of the early quotes, and on sales people’s comments, I further refined the specifications to match my needs, my desires, and my budget.
I ended up buying from a local dealership that is part of a larger corporation that runs multiple dealerships and sells multiple different types of trailers, including cargo trailers, open utility trailers, flatbed trailers, car carriers, hydraulic dump trailers, agricultural trailers, etc.
I was offered a price that looked fair when compared to other quotes, and a delivery lead-time I could live with. I put about 20% down, and waited for the trailer to be built and delivered.
My dealership was Big Tex Trailers in Georgetown, Texas (a far north suburb of Austin, TX), and the trailer they sold me was built by Lark United at their McGregor, Texas plant, located about 45 miles from the dealership.
When I found out where the factory was located (about 100 miles away), I called and asked if I could get a plant tour, and was told that while the factory normally does not do that, the plant manager himself would be happy to take me on a detailed tour of the operation if I made an appointment. He ended up giving me a 2 ˝ hour detailed tour that showed me exactly how my trailer would be built.
I was very glad I did that too, as it was the plant tour that identified about 5 of the specs that I then added to the order as a change order, because they were so compelling when explained to me by the plant manager.
What was delivered versus what I ordered
My trailer was delivered to my dealer exactly six weeks after I ordered it. There were some surprises!
The first surprise was that it took that long, as the plant manager had told me when I took my plant tour, which was one week after placing the order, that my trailer would almost certainly be delivered far in advance of 4 to 6 weeks, in fact even potentially as soon as 2 weeks after the order was placed, and only 1 week after my plant tour. Apparently, the plant experienced some staffing issues, and this year’s market was also much stronger much sooner than anyone had expected.
The next surprise was what was actually built and delivered versus what I ordered.
As I started to inspect the trailer at the dealership before accepting delivery, I realized it had been built with only 1 window versus 2! There was a window on the curb side of the trailer, but not on the street side! This was a real issue for me, as I was counting on cross-flow ventilation and light from 2 windows, especially since the trailer will be used as a dry RV as well as a bike hauler. Now the trailer will in the future be equipped with an overhead RV air conditioning unit, but I can’t afford to add that enhancement right now, as it would cost about $1000 by itself, plus would require me to also spend another $1000 on a portable generator now instead of later, and also to provide a complete 120 volt power system now, which again is a future, not current, planned expense.
In addition, the window was only 48” AFF (above floor level) versus the 54” ordered. It APPEARED to have been located about 54” above the EXTERIOR bottom edge of the trailer (probably by an inexperienced employee not yet accustomed to the “AFF” terminology).
This lower window location was a problem. When I ordered my trailer, I planned right from the outset to use a motorcycle transport method that does not require tie-downs, so that I could maximize the actual usability of the interior space of the trailer. This, coupled with the very light weight of my KTM 2-stroke dirt bike, allows me to place the bike NOT along the centerline of the trailer, but rather right alongside the curb side wall.
The reason I had specified 54” (via a confirmed email exchange before the dealer submitted the order to the factory) was because one of my 2 current bikes, the KTM dirt bike, has a very high (over 50”) handlebar height due to its high ground clearance, and the handlebar end turns out to be adjacent to the window (unavoidable due to window width and bike length). This lower than ordered height introduced the possibility that the handlebar end could punch through the window glass when the trailer hits a road bump causing the bike to shake sideways even just a bit.
What the dealer and Lark factory did when the trailer was found to be not exactly what I ordered, is that they offered me two choices:
One was to not accept the trailer, and have the factory build a new trailer to the correct specs. Unfortunately, because we are now “in peak season” for cargo trailer sales, the new delivery date would be both unacceptable to begin with, and also highly likely to further slip.
The other choice was to accept the trailer as built but get a substantial discount off the price.
After discussing the situation with my wife, we decided to accept the trailer and take the discount, for a number of reasons, one being that we found a relatively simple solution to the window height problem: The Risk Racing Lock N Load transport device does NOT require the front wheel to face straight forward like a typical wheel chock would, so before locking down the Lock N Load for travel, I will simply turn the handlebar away from the window.
The next big surprise was the weight of the trailer – which I am SO glad I made the effort to get checked!
Recall from earlier in this thread that the Lark factory manager had predicted an empty as-built weight of 1200 to 1400 lb for my trailer.
My first clue that the actual weight might be considerably different was the tongue weight. I had brought an accurate digital bathroom scale to the dealership when picking up the trailer, and used that to measure the tongue weight. I suspected a surprise when even the combination of a dealership employee plus me found it hard to lift the tongue! Sure enough, the tongue weight turned out to be 183 lb!! This was a surprise since empty cargo trailers are normally designed by a trailer manufacturer to put 10% of their weight onto the tongue coupler.
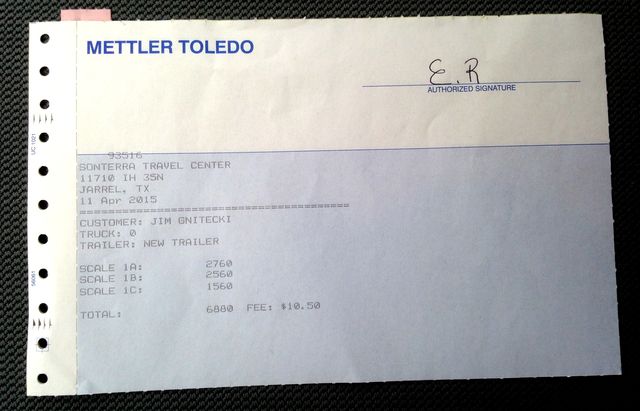
I had planned anyway to weigh the new trailer empty at a nearby truck stop with a certified multi-platform scale, and per that certified truck scale, I got the following actual weights:
My 2014 F150 pickup truck’s front axle weight: 2760 lb
My 2014 F150 pickup truck’s rear axle weight (including the trailer tongue weight): 2560 lb
My trailer’s axle weight (which does NOT include the tongue weight transferred to the F150 tow vehicle): 1560 lb.
To get the total trailer weight, I added the 1560 lb form the truck scale to the measured tongue weight of 183 lb, to get the total actual weight of the trailer: 1743 lb. This is almost 25% more than the HIGHEST weight prediction by the Lark plant manager!
The reasons for the higher than expected weight are probably simply related to the sheer number of options coupled with the factory’s apparent lack of ability to track the weights and interplay of individual options.
For example, my trailer has 4” high frame members, a feature normally associated with twin axle trailers. My trailer also has 16” OC floor framing versus the normal 24”, and 12” OC wall framing versus 16”. And 78” high walls add more weight than 72” walls.
There are also non-obvious weight contributors.
For example, a ramp door is heavier than “barn doors”, since it has to be able to support a lot of weight being rolled up or down it.
I have also learned that when a 2-tone paint job is selected, the factory does NOT build the trailer and then paint it. Rather, the factory uses aluminum sheeting for the skin of the trailer, that comes pre-coated with powder paint (VERY tough and durable powder paint that is basically sprayed on as a powder and then melted-on at 400 degrees). So, when a 2-tone finish is desired, the trailer is evidently built first with one color, and then the 2nd color is added, where appropriate, by cutting additional aluminum sheeting, pre-painted in that 2nd color, and mounting it atop the first color. This of course means that wherever the 2nd color appears, you have a double layer of aluminum skin. Furthermore, at least one trailer manufacturer automatically substitutes thicker sheeting whenever a 2-tone paint job is selected, since the thicker sheeting lays flatter because of its thickness, and thus looks better. Plus, on my trailer, there is a bright strip several inches wide that separates the black from the yellow colors, that adds yet more weight, as a THIRD layer.
In addition, the more brightwork trim that a customer adds, the more weight, since, like the 2-tone paint, the brightwork is added over top of the existing base layer aluminum. My trailer has a LOT of brightwork.
Why do I make such a big deal about the weight? Because weight is critical when loading and then towing a trailer! Using the Lark factory manager’s 1200 to 1400 lb predicted weight, and adding my “worst case scenario” additional weight of 750 lb of Harley-Davidson plus 750 lb of other stuff, my trailer would have weighed 2700 to 2900 lb loaded and ready to roll, fully equipped and furnished. Now, it could weigh as much as 3250 lb fully loaded worst case. Why is that important? Because the axle is rated to carry 3500 lb, which after factoring out the weight carried by the tow vehicle via the tongue weight, means the trailer axle will now carry as much as 2900 lb, or 83% of its capacity versus the 72% it would have carried had the Lark factory manager been correct.
My tow vehicle will now need to pull 350 lb more than the high end of what I had been told. While the 3250 lb potential maximum trailer weight is well within the 6300 lb. tow rating of the truck, it will still burn more fuel and be 5% slower on acceleration.
Photos of my trailer as delivered
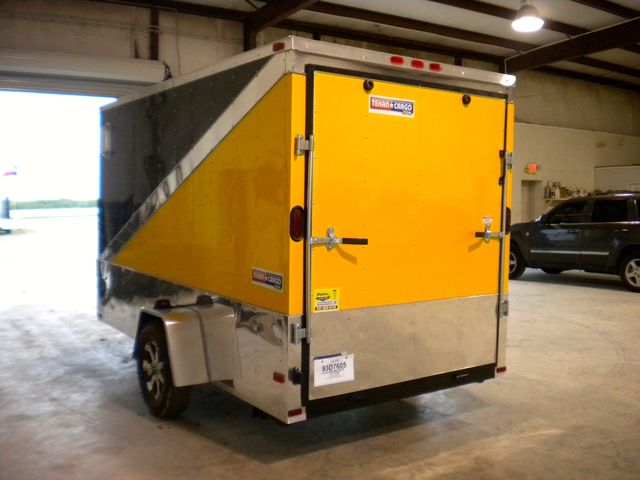
Here are photos of my trailer as actually delivered. Note that while the trailer was manufactured by Lark United, it was done so for Big Tex trailers, a chain of trailer dealerships, that mrkets the Lark cargo trailers as “Texan Cargo” trailers. This is the reason you see the “Texan Cargo” name on the trailer.
Here’a shot of it from the front curb side:

Here’s the rear:
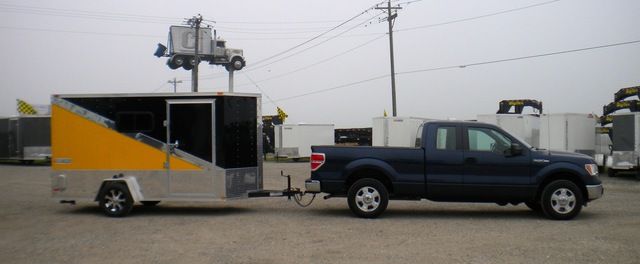
Here’s a profile shot of it attached to the truck:
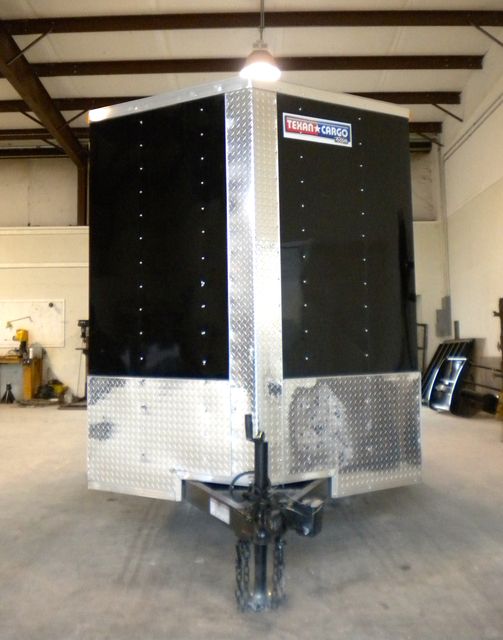
This photo shows the frontal view:
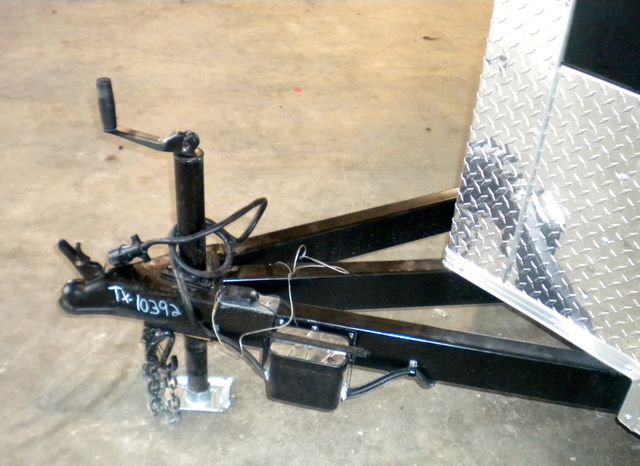
This one shows the extended tongue, the tongue jack, the coupler, and the emergency battery that applies the brakes if the trailer becomes separated from the tow vehicle:
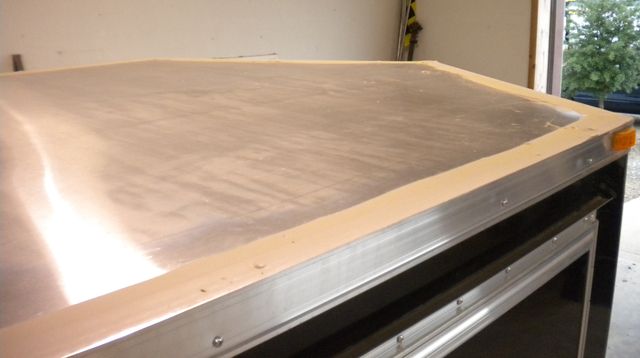
Here’s the one piece aluminum roof:
Here’s a view with the ramp down:
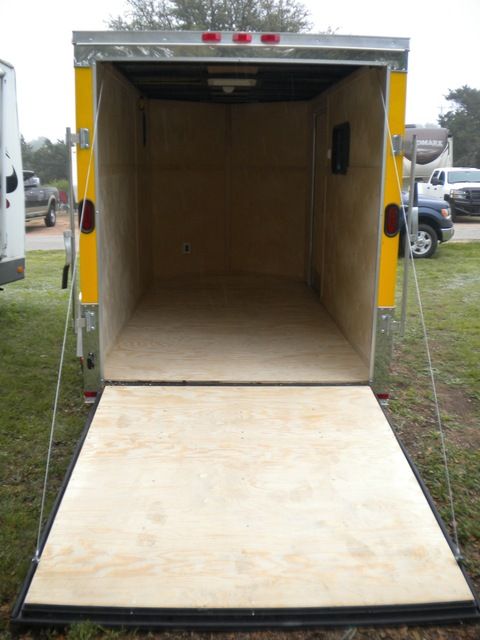
And a closer look into the interior as delivered:
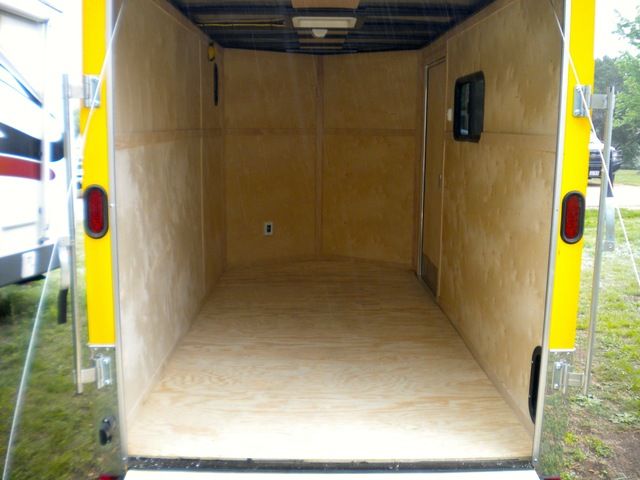
Notice the really nice way the plywood happens to be “figured”:

I know of course that this is simply low cost 3/8 plywood, but the fact that it is this nicely figured, and is so on ALL the sheets of plywood in the trailer, is an impressive “plus” for me. I like it enough that I am going to polyurethane the walls and not paint them.
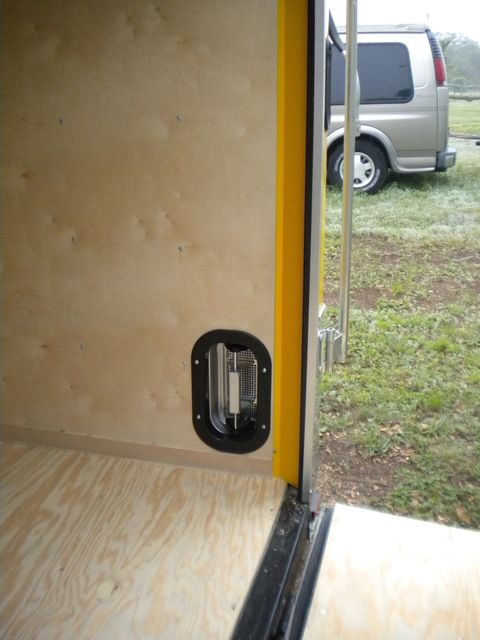
Here you can see the lower rear curb side vent:
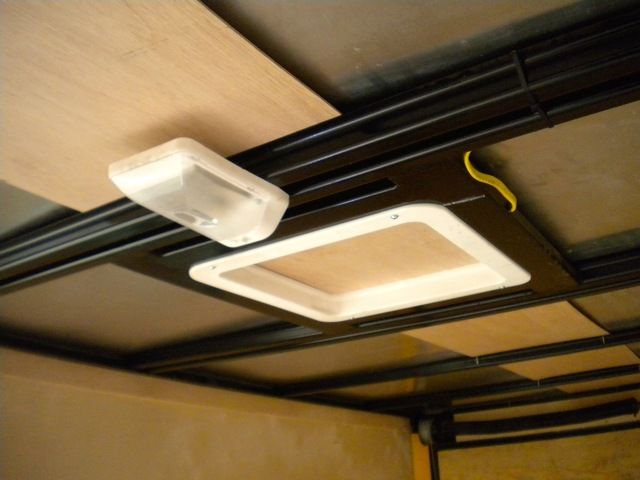
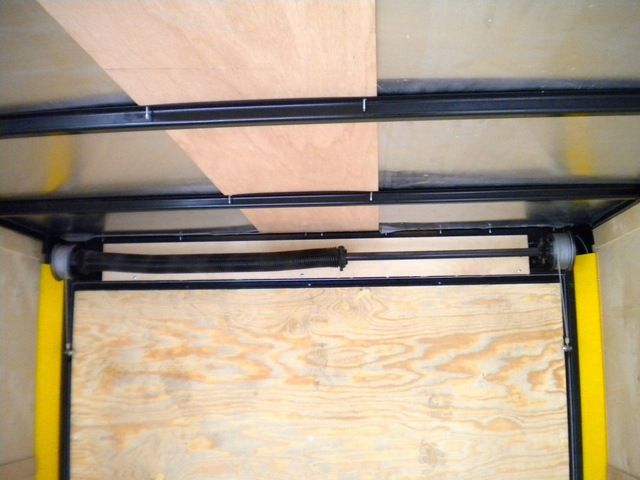
Here is the overhead light, the beefy framing for the future air conditioner (RV air conditioners typically weight 90 lb or more), and the roughed-in wiring for the AC:
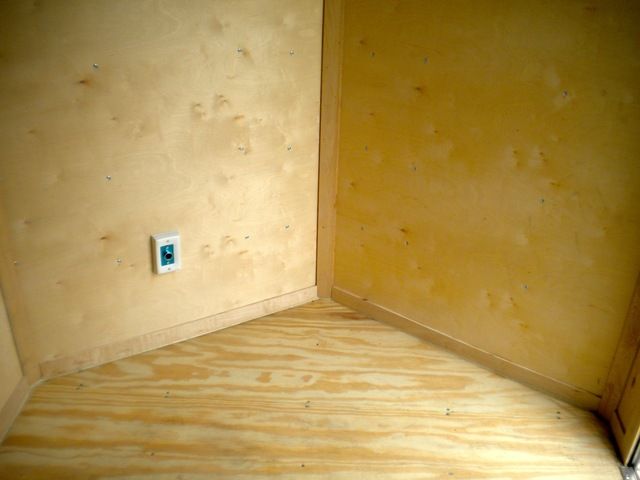
Here you see the 12 volt receptacle in the V-nose:
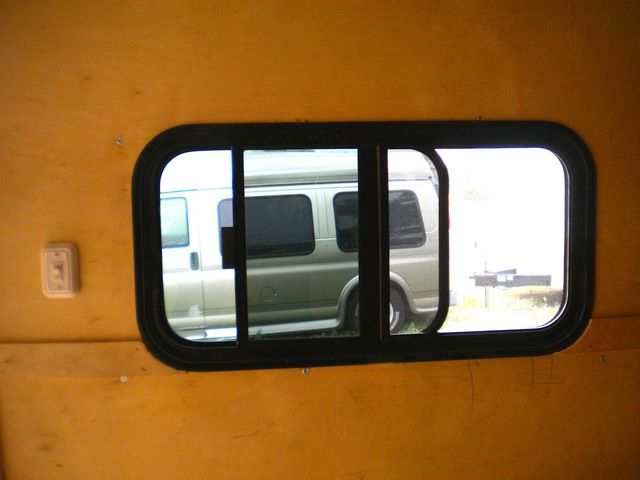
and here you see the slider RV window:
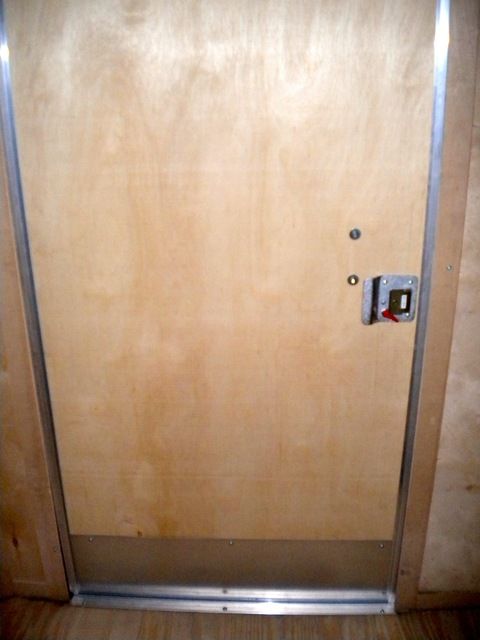
This photo shows that 36” wide door!
while this one shows the ceiling bows and the spring and cable system that makes the ramp a snap to raise and lower:
And here is the weigh ticket from the truck stop’s certified scale:
So, you can see I have been busy !
Next posting, I’ll describe the drive to and from the dealership, and everything I learned from that!
Jim G
To pull a trailer with the above specs, I needed to ensure I had the right tow vehicle with the right options.
My tow vehicle, like the trailer, is a compromise that attempts to balance sometimes competing priorities or needs. My tow vehicle is a new 2014 Ford F150 Supercab pickup truck. Here are the key relevant specs:
- A long 145” wheelbase, to enhance stability (a longer tow vehicle wheelbase makes it harder for the trailer to destablize the tow vehicle if the trailer starts to fishtail or otherwise misbehave because of crosswinds or ice, etc)
- A heavy 5000 lb vehicle weight (tow vehicle weight greater than that of the trailer greatly enhances trailer stability, especially in crosswinds)
- A rated towing capacity (per proper latest independent SAE standard) of 6300 lb, which is far above the trailer’s actual loaded weight
- A factory trailer towing package that includes extra cooling, a proper heavy duty receiver hitch, trailer connection wiring, and both 4-pin and 7-pin receptacles
- A genuine Ford trailer brake controller that can automatically apply the correct amount of braking to the trailer at exactly the same time as the truck’s brakes, . The big advantage that the Ford factory controller has over any aftermarket controller, even the “best” ones that access the underdash diagnostic port, is that unlike ANY aftermarket controller, it has FULL access to the truck’s Ford computer system (not just the limited access available via the diagnostic port). This means that when the truck’s computer activates truck braking in support of stability control or traction control for example, the trailer brakes will be immediately activated along with the truck brakes.
Where and how I shopped for and ordered a trailer
Cargo trailers are very costly to ship long distances, because they are big and heavy but relatively low value. This has resulted in a marketplace in which a large number of regional trailer manufacturers each serve the area near them, usually just a few hundred square miles.
In recent times, many of these individual manufacturing facilities have been acquired by larger corporate entities (like Lark United, for example), but although they then are under “corporate” management, the individual factories within each corporation still sell primarily to their “local regional” area because of the transportation cost issue.
Furthermore, the vast majority of trailers are not sold direct, but rather through local independent trailer dealerships, who sell the trailers that are made in factories located within their regional area. It is fairly common for a dealership to handle multiple “brands’ of trailers from multiple factories.
While some trailers are sold online including on eBay, a realistic analysis of those sales shows that they too are regional, since the transportation cost becomes even more important when just ONE individual trailer is being sold and transported to one end buyer, versus multiple trailers being sold wholesale to a dealership who can arrange to have them transported “piggyback” on special trailers that carry several trailers at a time on one truck /trailer combination driven by just one driver.
Because of this, I focused on local dealerships located within a maximum of 100 miles from my home.
I also discovered that my list of specifications was extensive enough that it was impossible to find an already built trailer with all those features anywhere in a dealer’s inventory. I was told I need to order such a trailer, and that the lead-time at this point in time (late February), meant potentially a 4 to 6 week wait. The wait would become longer if I delayed ordering into March or April, as the trailer market is apparently very seasonal, with Spring being the “hot” sales time.
Although my trailer does not embody any truly unusual features, except the color scheme and its layout, it seems that most trailer buyers do not educate themselves that much about trailers before buying, due at least somewhat to the lack of good information available to buyers. In fact, that is why I undertook starting this thread. That lack of knowledge makes it relatively easy for trailer dealers to simply stock mostly truly bare trailers with only a small percentage having a lot of the features I listed, because most first time buyers don’t even KNOW what those trailers are “missing”, because no one ever told them that such features exist and can be quite important, depending upon the intended use of a trailer.
So, I shopped locally, and based on multiple conversations with multiple dealer reps and actual trailer owners, I assembled that list of features I wanted, and then asked for quotes. Based on some of the early quotes, and on sales people’s comments, I further refined the specifications to match my needs, my desires, and my budget.
I ended up buying from a local dealership that is part of a larger corporation that runs multiple dealerships and sells multiple different types of trailers, including cargo trailers, open utility trailers, flatbed trailers, car carriers, hydraulic dump trailers, agricultural trailers, etc.
I was offered a price that looked fair when compared to other quotes, and a delivery lead-time I could live with. I put about 20% down, and waited for the trailer to be built and delivered.
My dealership was Big Tex Trailers in Georgetown, Texas (a far north suburb of Austin, TX), and the trailer they sold me was built by Lark United at their McGregor, Texas plant, located about 45 miles from the dealership.
When I found out where the factory was located (about 100 miles away), I called and asked if I could get a plant tour, and was told that while the factory normally does not do that, the plant manager himself would be happy to take me on a detailed tour of the operation if I made an appointment. He ended up giving me a 2 ˝ hour detailed tour that showed me exactly how my trailer would be built.
I was very glad I did that too, as it was the plant tour that identified about 5 of the specs that I then added to the order as a change order, because they were so compelling when explained to me by the plant manager.
What was delivered versus what I ordered
My trailer was delivered to my dealer exactly six weeks after I ordered it. There were some surprises!
The first surprise was that it took that long, as the plant manager had told me when I took my plant tour, which was one week after placing the order, that my trailer would almost certainly be delivered far in advance of 4 to 6 weeks, in fact even potentially as soon as 2 weeks after the order was placed, and only 1 week after my plant tour. Apparently, the plant experienced some staffing issues, and this year’s market was also much stronger much sooner than anyone had expected.
The next surprise was what was actually built and delivered versus what I ordered.
As I started to inspect the trailer at the dealership before accepting delivery, I realized it had been built with only 1 window versus 2! There was a window on the curb side of the trailer, but not on the street side! This was a real issue for me, as I was counting on cross-flow ventilation and light from 2 windows, especially since the trailer will be used as a dry RV as well as a bike hauler. Now the trailer will in the future be equipped with an overhead RV air conditioning unit, but I can’t afford to add that enhancement right now, as it would cost about $1000 by itself, plus would require me to also spend another $1000 on a portable generator now instead of later, and also to provide a complete 120 volt power system now, which again is a future, not current, planned expense.
In addition, the window was only 48” AFF (above floor level) versus the 54” ordered. It APPEARED to have been located about 54” above the EXTERIOR bottom edge of the trailer (probably by an inexperienced employee not yet accustomed to the “AFF” terminology).
This lower window location was a problem. When I ordered my trailer, I planned right from the outset to use a motorcycle transport method that does not require tie-downs, so that I could maximize the actual usability of the interior space of the trailer. This, coupled with the very light weight of my KTM 2-stroke dirt bike, allows me to place the bike NOT along the centerline of the trailer, but rather right alongside the curb side wall.
The reason I had specified 54” (via a confirmed email exchange before the dealer submitted the order to the factory) was because one of my 2 current bikes, the KTM dirt bike, has a very high (over 50”) handlebar height due to its high ground clearance, and the handlebar end turns out to be adjacent to the window (unavoidable due to window width and bike length). This lower than ordered height introduced the possibility that the handlebar end could punch through the window glass when the trailer hits a road bump causing the bike to shake sideways even just a bit.
What the dealer and Lark factory did when the trailer was found to be not exactly what I ordered, is that they offered me two choices:
One was to not accept the trailer, and have the factory build a new trailer to the correct specs. Unfortunately, because we are now “in peak season” for cargo trailer sales, the new delivery date would be both unacceptable to begin with, and also highly likely to further slip.
The other choice was to accept the trailer as built but get a substantial discount off the price.
After discussing the situation with my wife, we decided to accept the trailer and take the discount, for a number of reasons, one being that we found a relatively simple solution to the window height problem: The Risk Racing Lock N Load transport device does NOT require the front wheel to face straight forward like a typical wheel chock would, so before locking down the Lock N Load for travel, I will simply turn the handlebar away from the window.
The next big surprise was the weight of the trailer – which I am SO glad I made the effort to get checked!
Recall from earlier in this thread that the Lark factory manager had predicted an empty as-built weight of 1200 to 1400 lb for my trailer.
My first clue that the actual weight might be considerably different was the tongue weight. I had brought an accurate digital bathroom scale to the dealership when picking up the trailer, and used that to measure the tongue weight. I suspected a surprise when even the combination of a dealership employee plus me found it hard to lift the tongue! Sure enough, the tongue weight turned out to be 183 lb!! This was a surprise since empty cargo trailers are normally designed by a trailer manufacturer to put 10% of their weight onto the tongue coupler.
I had planned anyway to weigh the new trailer empty at a nearby truck stop with a certified multi-platform scale, and per that certified truck scale, I got the following actual weights:
My 2014 F150 pickup truck’s front axle weight: 2760 lb
My 2014 F150 pickup truck’s rear axle weight (including the trailer tongue weight): 2560 lb
My trailer’s axle weight (which does NOT include the tongue weight transferred to the F150 tow vehicle): 1560 lb.
To get the total trailer weight, I added the 1560 lb form the truck scale to the measured tongue weight of 183 lb, to get the total actual weight of the trailer: 1743 lb. This is almost 25% more than the HIGHEST weight prediction by the Lark plant manager!
The reasons for the higher than expected weight are probably simply related to the sheer number of options coupled with the factory’s apparent lack of ability to track the weights and interplay of individual options.
For example, my trailer has 4” high frame members, a feature normally associated with twin axle trailers. My trailer also has 16” OC floor framing versus the normal 24”, and 12” OC wall framing versus 16”. And 78” high walls add more weight than 72” walls.
There are also non-obvious weight contributors.
For example, a ramp door is heavier than “barn doors”, since it has to be able to support a lot of weight being rolled up or down it.
I have also learned that when a 2-tone paint job is selected, the factory does NOT build the trailer and then paint it. Rather, the factory uses aluminum sheeting for the skin of the trailer, that comes pre-coated with powder paint (VERY tough and durable powder paint that is basically sprayed on as a powder and then melted-on at 400 degrees). So, when a 2-tone finish is desired, the trailer is evidently built first with one color, and then the 2nd color is added, where appropriate, by cutting additional aluminum sheeting, pre-painted in that 2nd color, and mounting it atop the first color. This of course means that wherever the 2nd color appears, you have a double layer of aluminum skin. Furthermore, at least one trailer manufacturer automatically substitutes thicker sheeting whenever a 2-tone paint job is selected, since the thicker sheeting lays flatter because of its thickness, and thus looks better. Plus, on my trailer, there is a bright strip several inches wide that separates the black from the yellow colors, that adds yet more weight, as a THIRD layer.
In addition, the more brightwork trim that a customer adds, the more weight, since, like the 2-tone paint, the brightwork is added over top of the existing base layer aluminum. My trailer has a LOT of brightwork.
Why do I make such a big deal about the weight? Because weight is critical when loading and then towing a trailer! Using the Lark factory manager’s 1200 to 1400 lb predicted weight, and adding my “worst case scenario” additional weight of 750 lb of Harley-Davidson plus 750 lb of other stuff, my trailer would have weighed 2700 to 2900 lb loaded and ready to roll, fully equipped and furnished. Now, it could weigh as much as 3250 lb fully loaded worst case. Why is that important? Because the axle is rated to carry 3500 lb, which after factoring out the weight carried by the tow vehicle via the tongue weight, means the trailer axle will now carry as much as 2900 lb, or 83% of its capacity versus the 72% it would have carried had the Lark factory manager been correct.
My tow vehicle will now need to pull 350 lb more than the high end of what I had been told. While the 3250 lb potential maximum trailer weight is well within the 6300 lb. tow rating of the truck, it will still burn more fuel and be 5% slower on acceleration.
Photos of my trailer as delivered
Here are photos of my trailer as actually delivered. Note that while the trailer was manufactured by Lark United, it was done so for Big Tex trailers, a chain of trailer dealerships, that mrkets the Lark cargo trailers as “Texan Cargo” trailers. This is the reason you see the “Texan Cargo” name on the trailer.
Here’a shot of it from the front curb side:

Here’s the rear:

Here’s a profile shot of it attached to the truck:

This photo shows the frontal view:

This one shows the extended tongue, the tongue jack, the coupler, and the emergency battery that applies the brakes if the trailer becomes separated from the tow vehicle:

Here’s the one piece aluminum roof:

Here’s a view with the ramp down:

And a closer look into the interior as delivered:
Notice the really nice way the plywood happens to be “figured”:

I know of course that this is simply low cost 3/8 plywood, but the fact that it is this nicely figured, and is so on ALL the sheets of plywood in the trailer, is an impressive “plus” for me. I like it enough that I am going to polyurethane the walls and not paint them.
Here you can see the lower rear curb side vent:

Here is the overhead light, the beefy framing for the future air conditioner (RV air conditioners typically weight 90 lb or more), and the roughed-in wiring for the AC:

Here you see the 12 volt receptacle in the V-nose:

and here you see the slider RV window:

This photo shows that 36” wide door!

while this one shows the ceiling bows and the spring and cable system that makes the ramp a snap to raise and lower:

And here is the weigh ticket from the truck stop’s certified scale:

So, you can see I have been busy !
Next posting, I’ll describe the drive to and from the dealership, and everything I learned from that!
Jim G
Last edited by JimGnitecki; 04-12-2015 at 11:55 PM.
The following users liked this post:
FLshovelhead (08-23-2020)
#3
04-13-2015, 04:06 AM

#4
04-15-2015, 11:51 AM

Tourer
Join Date: Aug 2014
Location: East Texas
Posts: 331
Likes: 0
Received 0 Likes
on
0 Posts
#5
04-15-2015, 02:46 PM
Don't forget too that my trailer has an extended triple-beam tongue, which is notably longer than a standard tongue.
I have also learned that you should stop turning long before the battery has any possibility of hitting the tow vehicle's bumper! Once you crank the steering beyond a certain point, the trailer is going to try to jack-knife instead of doing what you want!
Jim G
#6
04-15-2015, 03:05 PM
Yesterday, I learned the value of a really good brake controller!
Recall that in the first posting on this thread, I talked about how the genuine Ford trailer brake controller has at least one big advantage over any aftermarket controller: It has access to ALL the information in the Ford vehicle computer, versus the aftermarket controllers which have access only to whatever data is required by Federal emission standards to be available via the diagnostic port.
Yesterday, I needed to take the trailer to a cabinetmaker friend’s woodworking shop for some countertop and shelf work in the V-nose of the trailer. The route included a 9 mile segment of road that is a motorcycle racer’s dream: all winding (no straight sections at all ever), very sharp turns, narrow pavement, and incredibly steep hills (located within Texas Hill Country). My top speed on this road was about 40 mph, and many sections required braking down to almost walking speeds. The road grades and simultaneous corners are so severe that the DOT has posted signs warning truckers that taking some of the corners at more than 15 mph can result in tip-over of the truck.
Now before driving that segment, I had already seen that the brake controller was working well. I could initially feel the trailer brakes actually applying a little “too much” force relative to the tow vehicle’s brakes (the trailer brake people call this “too much gain”), as evidenced by the first reaction to applying brake pedal pressure was the sensation that the trailer was retarding the truck.
But the Ford brake controller, like most aftermarket controllers, allows you to adjust “the gain” rather simply on a scale of “1” to “10”, where “1” is minimal gain and “10” is maximum gain. The default setting of the Ford controller, probably for liability reasons, is “10”. I simply adjusted the gain down to the most commonly recommended “5” setting, and that sensation disappeared.
But on that 9 mile segment, the Ford controller showed me what ELSE it can do that an aftermarket controller cannot. I had the “tow mode” engaged, which causes the vehicle computer to activate certain transmission behaviors. One of these behaviors is that whenever the Ford vehicle computer detected that I was going down a steep downhill and applying the brakes, it downshifted the engine pretty aggressively, often from fifth right down to second gear, to get the benefits of engine braking, which can be very important in a hilly or mountainous area to help keep the brakes cooler.
It was pretty interesting watching the vehicle computer using a much broader range of gears than it does on a more normal road, with the transmission staying in lower gears, 3rd thru 5th mostly, when climbing grades, but it was truly freaky to hear the engine rev up on down-hills, and see the transmission indicator show “2nd” and the tachometer show 3000 to 3500 rpm!
One other thing I don’t think I mentioned before is that the Ford brake controller is very visibly innocuous, compared to aftermarket controllers. After market controllers all hang externally on the dash, whereas the Ford controller simply replaces a plastic “placeholder” cubby in the dash, just between the steering wheel and the heater/AC controls.
As you can see in the photo below, it is not very apparent unless you are looking for it, to make an adjustment:
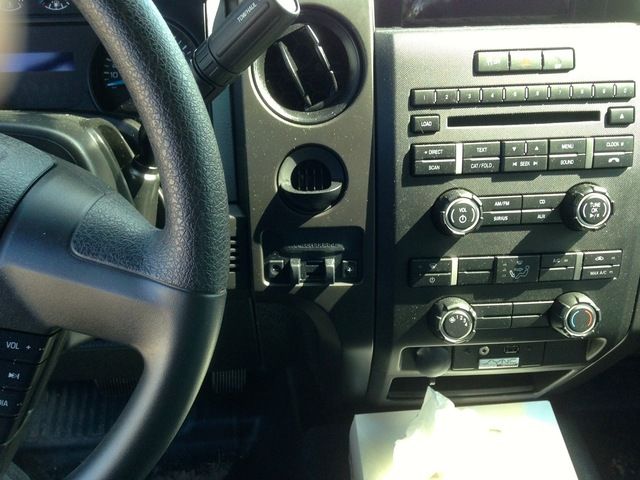
The only times I have thought of that you might touch the controller, after optimizing the gain ONCE, would be:
- When you want to adjust the gain to a different setting, to better balance the braking contribution of the trailer and the tow vehicle (if the trailer gain is too high, the trailer wheels can be locked up before the truck’s brakes are fully engaged, and if the gain is too low, the truck is forced to do some of the trailer braking)
- When you want to manually apply the trailer brakes withOUT applying the tow vehicle’s brakes. To do that, you squeeze the rightmost **** towards the fixed leftmost ****. You would only likely ever need to do this ii you are on snow or ice, and the trailer has started to slide off to one side, or the trailer has started to sway.
The Ford controller has a couple of other tricks too. When you start the truck with a trailer attached, the dashboard display shows “trailer connected”. When you adjust the gain, the display comes up to show you the current gain setting and it increments as you change the setting via the dashboard buttons.
Jim G
#7
04-15-2015, 04:00 PM
I was wondering the whole time my trailer was being built: What kind of tow vehicle fuel mileage will I get when towing this trailer with my 2014 F150 pickup truck.
Because of the tall 6 ˝ foot interior of my trailer, it’s overall external height is 96”.
The roof of my truck peaks at 75.2”.
So, this trailer, with its 6’6” interior height, rises 20.8” above the top of the truck! I have been told by multiple sources that it is the height that a trailer projects above the profile of the tow vehicle that affects fuel mileage most significantly.
I have been told, and have read, contradictory things about the relative fuel mileage of trailers with flat fronts, rounded fronts, V-fronts, and V-sloped fronts, so honestly did not know what to expect. I ordered the V-nose in the hope that it would favorably affect fuel mileage, and knowing that even if it did not, its extra sqauare footage would be useful to me!
Then of course there is also the weight of the trailer. 1743 lb is pretty heavy for a 6x12 single axle trailer I THINK, compared to what I SEE as “advertised” weights for 6x12 trailers, but then no one seems to publish the weight of highly optioned trailers like mine, so I am really without good comparative data.
On the day I picked up my new trailer, I did a reasonably precise experiment, which was blessed by pretty nice weather: temperature in the 60s and zero to barely 3 mph crosswind wind, for both the drive to the dealer 9without the trailer) and for the drive home (with the trailer attached).
On the way TO the dealer withOUT the trailer, holding 60 mph whenever possible, but slowing down and stopping for traffic lights as required:
The truck’s dash display showed 22.0 average mpg for the trip. This may seem like a high number to long-time pickup truck owners, but this truck has a pretty sophisticated variable valve timing, 4-valve per cylinder, 3.7 liter V6 engine that in a Ford Mustang car delivers an honest 31 mpg at 60 mph. The EPA rating for this truck is 17 city and 23 highway, and the truck routinely meets or beats these. In fact, during the drive to the dealership to pick up the trailer, the dash display actually hit 23.9 mpg 2/3 of the way through the trip but then fell of back to 22, likely because the crosswind, while only 0 to 3 mph, was almost a headwind for that specific section of the multi-directional route.
On the way FROM the dealership to home, with the trailer attached, with same target speed and same impediments but in the opposite direction:
The mpg was significantly lower. It also fluctuated a bit from interstate / tollway to suburban Texas Hill Country roads, but did not fluctuate with different conditions as much as you might expect.
The average MPG on the interstate & tollway portion of the trip, about 28 miles, was 13.4 mpg. This portion of the route while being interstate and tollway, nevertheless is located just within Texas Hill Country, and is unusually hilly for an interstate. I had the truck in “tow” mode for the trip home with the trailer, and that two mode was GREAT. It kept the truck’s transmission mostly in 6th, sometimes in 5th, and never below that. There was no “gear hunting”. When it made a change, it kept the new gear for quite a while each time until the road conditions allowed or required an upshift or downshift because something changed.
This segment was followed by 14 miles on suburban Texas Hill Country highways, with speed ranging from traffic light stops to about 55 mph, with rare opportunities to exceed 55 mph. The dash display for this segment showed 15.0 mpg.
That segment was followed by a 10 mile segment that included traffic light stops on average every 1 to 1/12 miles, and those traffic light stops affected the mpg along with the significant hills. The mpg was hurt enough that the average moved down from 15.0 to 13.8 mpg within that 10 miles.
So, the average MPG for the total 52 miles driving home was 13.6.
So, the trailer reduced the MPG to 62% of what the truck got withOUT the trailer that same morning on the same route.
I have no idea of whether this is “good” or ”bad” compared to other trailers of similar size and weight, but these are the results I got that day.
Subsequent mini fuel mileage tests as errand trips and circumstances allowed:
Home to FM 620, 5.5 miles, going downhill on an incredibly hilly road that delivery trucks struggle with to maintain 45 to 50 mph: 16.0 mpg
Home to Texas Farm-to-Market Road 2222, about 17 miles: 13.9 mpg
Intersection of FM620 & 2222 to West Road in Volente, Texas, about 9 miles of incredibly hilly and winding road posted at 40 mph and a motorcyclist’s dream, but slightly downhill net over the 9 miles: 13.9 mpg
The reverse route, West Rd to intersection of FM 620 & 2222, 9 miles of winding and hilly road but slightly UPhill: 12.9 mpg
Total West Rd, Volente, Texas to home, 26 miles of Texas Hill Country suburban driving: 12.9 mpg.
Tentative conclusion:
Based ONLY on the very limited testing summarized in this posting, over just a few days, I am tentatively drawing a few TENTATIVE CONCLUSIONS:
- I should probably plan on 13 to 13.5 mpg as a likely average
- Hills, speed changes, and stops DO adversely affect mpg obviously, but evidently can be compensated for by slightly lower target speeds. Notice that on my trip home with the new trailer, my mpg was actually BETTER on the suburban section of roads than on the interstate and tollway, even though the average speed was only slightly lower due to the traffic lights and speed limits that were as low as 50 mph briefly.
- My best strategy whenever mpg might be more important to me than time taken for a trip segment, might be to simply keep the target speed at 50 or 55 mph versus 60.
Remember too, that it is only the empty trailer that I am currently testing mpg with. Now my KTM dirt bike is not much of a load at around 230 lb for the bike plus 18 lb for the Lock N Load transport fixture, but I will also be adding riding gear and later sleeping gear and gear for “light” (microwave) cooking. It will be interesting to see how much extra WEIGHT affects the mpg.
Jim G
Trending Topics
#8
04-15-2015, 08:05 PM
Tourer
Join Date: Aug 2014
Location: East Texas
Posts: 331
Likes: 0
Received 0 Likes
on
0 Posts

Jim, my trailer is not much different than yours except for mine is a 7x12 V-nose single axle custom bike trailer finished out. My V-8 Tundra pulling it loaded with bike and gear gets an avg. of 11 to 13 mpg. Without the trailer the truck does an avg. of 16 to 19 mpg. I use a condor wheel chock that works great plus I have 9 D-rings that makes anything possible in securing the load.
#9
04-15-2015, 08:22 PM
Jim, my trailer is not much different than yours except for mine is a 7x12 V-nose single axle custom bike trailer finished out. My V-8 Tundra pulling it loaded with bike and gear gets an avg. of 11 to 13 mpg. Without the trailer the truck does an avg. of 16 to 19 mpg. I use a condor wheel chock that works great plus I have 9 D-rings that makes anything possible in securing the load.
The reasons I am going with a Lock N Load for the dirt bike, and a "Biker Bar" for the Harley is:
- Avoid having to use any tie downs, as they make large areas of a trailer unusable
- Enable placing the bike NOT centered in the trailer, but rather right beside the curb side wall (The 2 devices I mentioned above make that possible and secure), so that I have good use of about 3 feet of the trailer right BESIDE the motorcycle.
Jim G
#10
04-16-2015, 04:21 PM
I did a bit more work on the trailer the last couple of days, and also ran another MPG experiment.
First I applied the first coat of Minwax oil-based quick drying polyurethane to the walls and floor. The purposes are to protect the wood, make cleaning it easier, and improve the appearance (I love the look of the plywood walls, but felt I wanted the polyurethane to richen the color and add just a bit of sheen).
I used the “semi-gloss” version in order to get a sheen but not distracting shine. I used a 3/16” nap roller to cover large areas fast, and a high quality 4” natural bristle brush to do the tight spots and trim pieces, and to “tip off” the areas done by roller to remove any air bubbles.
Here is a photo, taken during the process, when the walls were complete but the floor was only partially done:
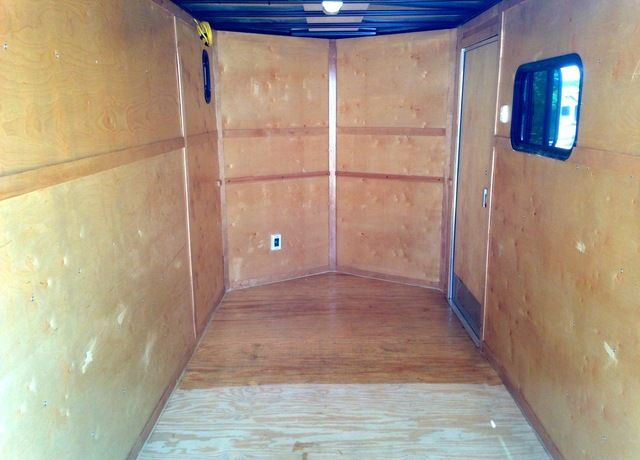
You can see the dramatic difference in color and richness that the poly makes.
This is just the first coat. I’ll still have to sand this coat mildly with 220 sandpaper (sandpaper made specifically for sanding between coats), and then add a light second coat. I’m told that will really bring out the pattern and sheen.
Next, I’ve been working with my cabinetmaker friend “Don” to add two shelves into the V-nose at the front of the trailer. The height of each was carefully selected to match normal kitchen cabinets. The base shelf is 36” above the floor, and the higher shelf is at about the same height as the bottom of typical kitchen upper cabinets. Later, both will be faced with some very special doors that I hope to be ready to describe in this thread in the future – if Don’s’s idea proves feasible.
Here is a photo of the shelves from near the rear of the trailer:
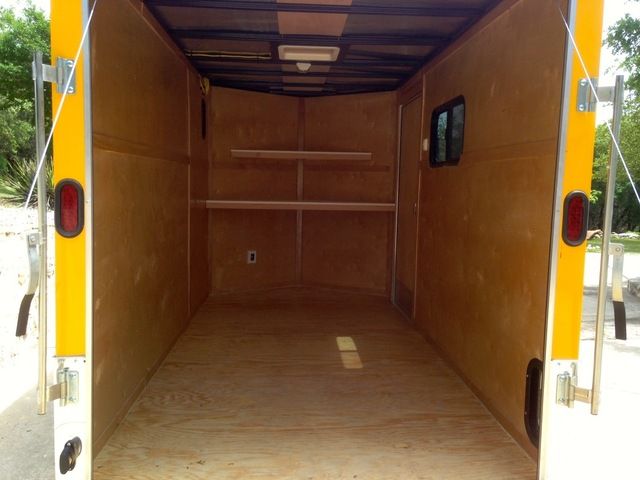
and here’s a closer look:

The wood trim along each front edge is cabinet grade oak, which has not yet been polyurethaned. The poly will bring out that trim’s glow.
The white countertop surface is a particularly robust countertop that can handle some abuse and is unaffected by solvents, etc. My cabinetmaker friend tells me that it can also be lightly SANDED if it gets scratched or otherwise damaged. So, it is perfect for the multi-function role I want the lower countertop to handle: desk, workbench, and microwave-cooking preparation surface.
The underlayer core for each shelf is plywood, for strength and lightness.
The weather turned really crappy again just an hour ago, with thunderstorms and incredibly high humidity, so it may be a day ior 2 before I can sand and apply the second coat of poly.
In the meantime, one more tidbit of fuel mileage information I can pass on: Today, I did a 10 mile segment pulling the trailer in Texas Hill Country, but this time made a conscious effort to keep the speed to a maximum of 50 mph (i.e. 50 mph whenever speed limit and traffic allowed it, and of course the normal traffic lights, about one every 2.5 miles. It made a VERY noticeable difference in indicated average mpg. The dash display showed 14.4 mpg at the end of the 10 miles. I guess speed makes more of a difference than I would even have guessed when pulling a high trailer.
Jim G