Shovel Chopper Build
#1
I have all the photos for my latest chopper build in a step by step format. It would be pic heavy, and I have all the manufacturing processes to show how it was done, not just the finished components.
It starts as a Harley, so it's technically admissible in this forum I guess.
Just curious if anyone wants to see a thread on it.
It starts as a Harley, so it's technically admissible in this forum I guess.
Just curious if anyone wants to see a thread on it.

Top Answer
11-10-2017, 11:15 AM
Short video of the first fire!
I built the motor into an 86", but have high compression (10.58 to 1) and dual plugged STD heads. I don't like opening up stock Harley cases for bigger jugs. I would rather do a reasonable bore/stroke (4.5 stroke, 3.5 bore) and HC/cam the thing.
This is a super lightweight chopper, and 2 strong guys can lift it up no problem. Frame is 2" up and with a 32 degree rake, so she's light and tight.
So I just slapped in the Dyna ignition, turned the Super E to all middle settings, and crossed my fingers. I still have to make a kicker pedal, so my foot slips off easy in the video. Idle wasn't set of course either.
Started it up for the first time in the parking lot of my shop. I just ran a fuel line and a funnel, had a battery on the ground, and started kicking.
She fired right up!
#2
#4
#5
#7


Here goes. I started with a 1979 Shovel that I picked up outside Pismo Beach, California. It was a basket, but all I was interested was getting the numbers and the title.
By the next day, the motor was completely disassembled, and I started the process of sanding and polishing the cases. I like to get the less glamorous, and just plain nasty work knocked out first. The castings are rough!
There is no easy way, it's just tedious and messy. Mostly it was hand sanded starting with 120 grit, and I used abrasive bits in an air tool. I didn't catalog my hours, but I would estimate that it took at least 10 to get it ready for polishing.


Next step was to get the mill built.
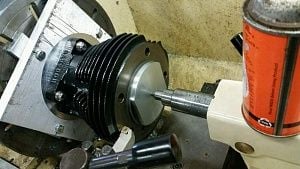
Here are some pics of trimming the jugs and bumping the compression ratio.
I start by mounting a plate to a flat chuck, then turning the face square on the plate once it's in the lathe. This ensures that my jugs are running totally true. I used S&S jugs, and I was extremely impressed with how true they were from the factory. This turned a sometimes difficult task into a relatively easy job.
You can also see that I made a spigot to insert into the jug's bore so that I maintain alignment.
Stroke is 4.5"
Bore is 3.5"
Cylinder Height is now 5.272"
Last edited by ChickinOnaChain; 05-15-2018 at 11:05 AM.
The following users liked this post:
qreawer (05-18-2020)
Trending Topics
#8
The following users liked this post:
GREENOHAWK69 (09-07-2018)
#9


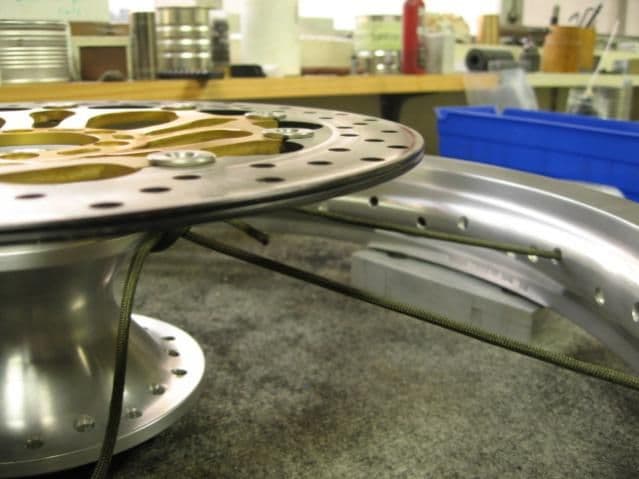
Building the front end. I got a Sportster hub, gutted it, and polished it. I wanted to run Brembo 320mm discs, and a Brembo caliper. I polished a Brembo caliper that I had in my stash, and got an aluminum 21" rim. I am a "no chrome" guy, and this build is no exception.
What I am showing is what I call the "string method". I am using 550 cord to mimic spokes so that I can establish caliper clearance. From experience, I always try to have at a minimum 0.125" of space between the caliper body and the spokes.
Spoked wheels will flex a little, and if you don't have adequate clearance, you can have the caliper impact the spokes under certain conditions.
I am going to make the front end as narrow as possible but have everything clear, so this will determine my triple clamp spacing.
Years ago, I built a triple clamp first on a build, and basically painted myself into a corner. My clearance for the braking system became a real nightmare. Lesson learned- always establish the caliper body to wheel spacing first!


Got my spacing, so it's time to make my triple clamps. This bike is a lightweight build, so everything is built to be purely functional and light.
The top pic is how I clamped it into one of my mills. I am using 39mm forks, and my offset is engineered to have "quicker" steering, but nothing too tight.
I made my handlebar clamps to seamlessly integrate with the top clamp, and used a central fastener and two 5/16" stainless dowels that are internal.
I made my own steerer from 17-4 Stainless (what I had around) and integrated it into the bottom clamp. It is threaded in, but I added the nut on the bottom to be extra cool.


Made my own front axle and nut from stainless steel. I sculpted the non nut side to follow the rod hole. It saves a tiny amount of weight, but it's really just to add that little detail.
Last edited by ChickinOnaChain; 05-15-2018 at 11:06 AM.
The following 3 users liked this post by Hannibal Smith:
#10


