2012 FatBoy Lo Build Thread – 2nd phase of mods – TONS of Pics! “How to’s” and tips
#1
 06-05-2015, 05:14 PM

Back at it again…
So here's a list of mods, then completed pics, then some of the process and a few how to's / tips and tricks i learned along the way.
recap of the first phase https://www.hdforums.com/forum/softa...-and-tips.html
1st phase list of mods I did when I first got the bike about a year ago….
2nd phase list of mods….
I’d like to say I’m done, but who knows…
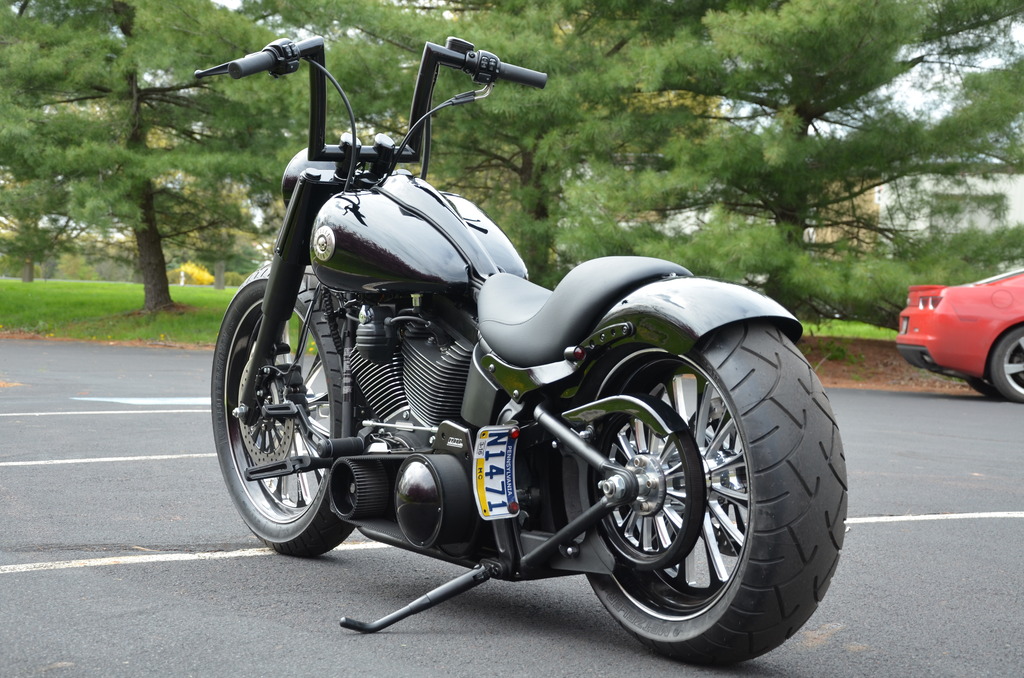
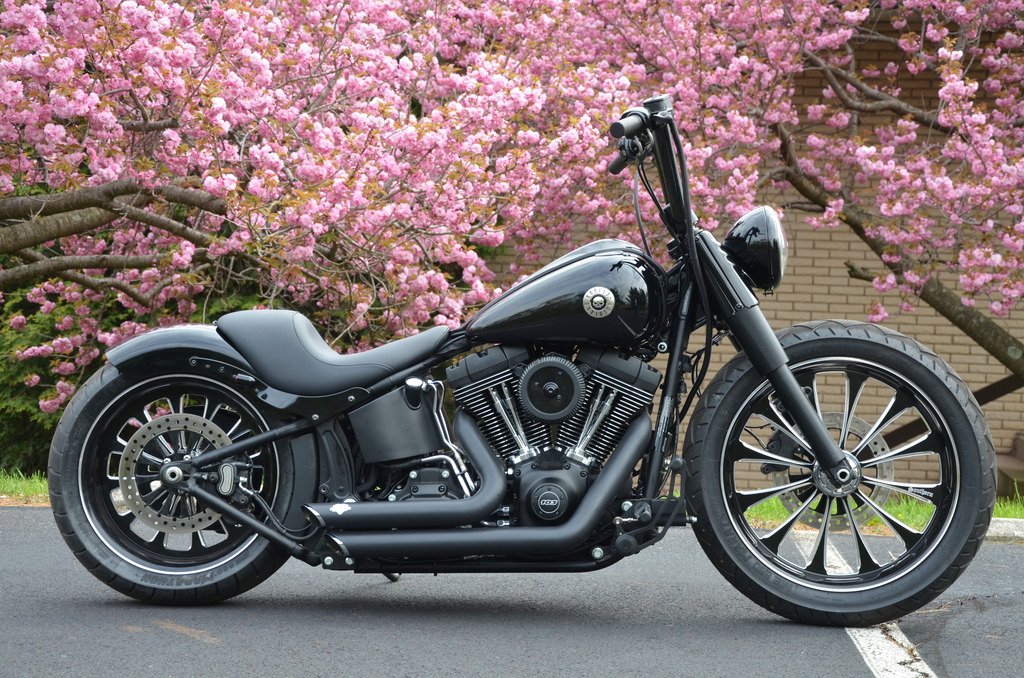
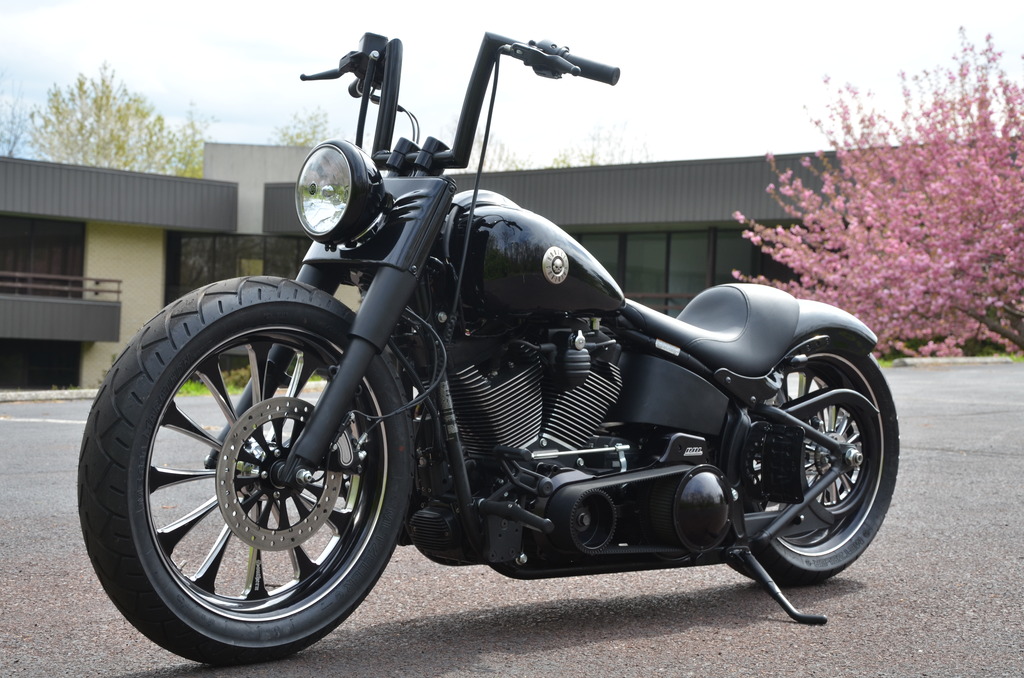
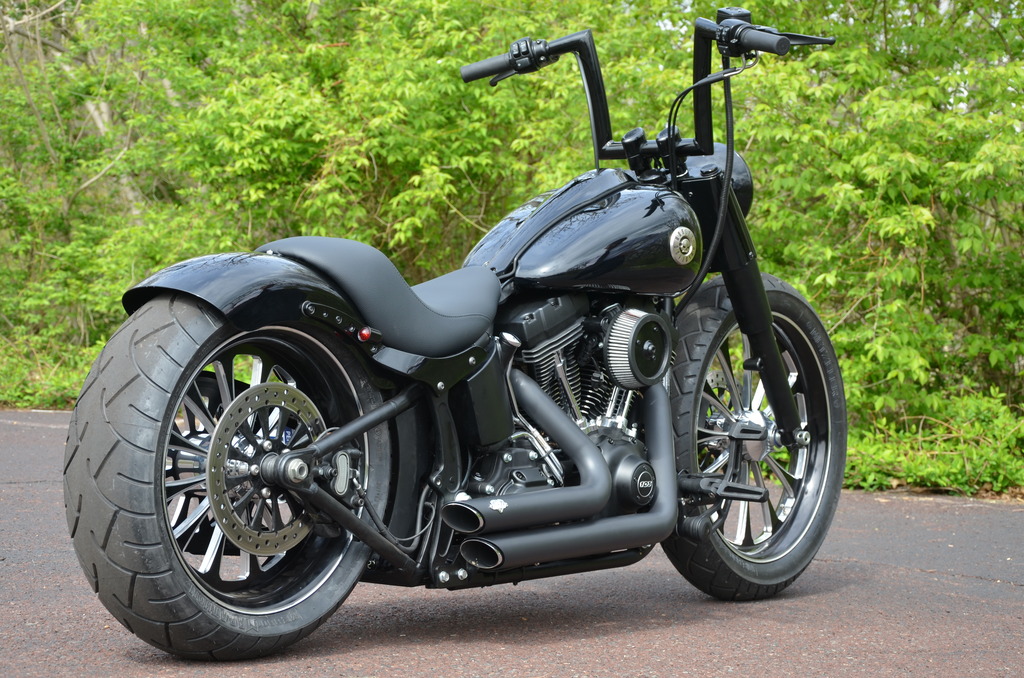
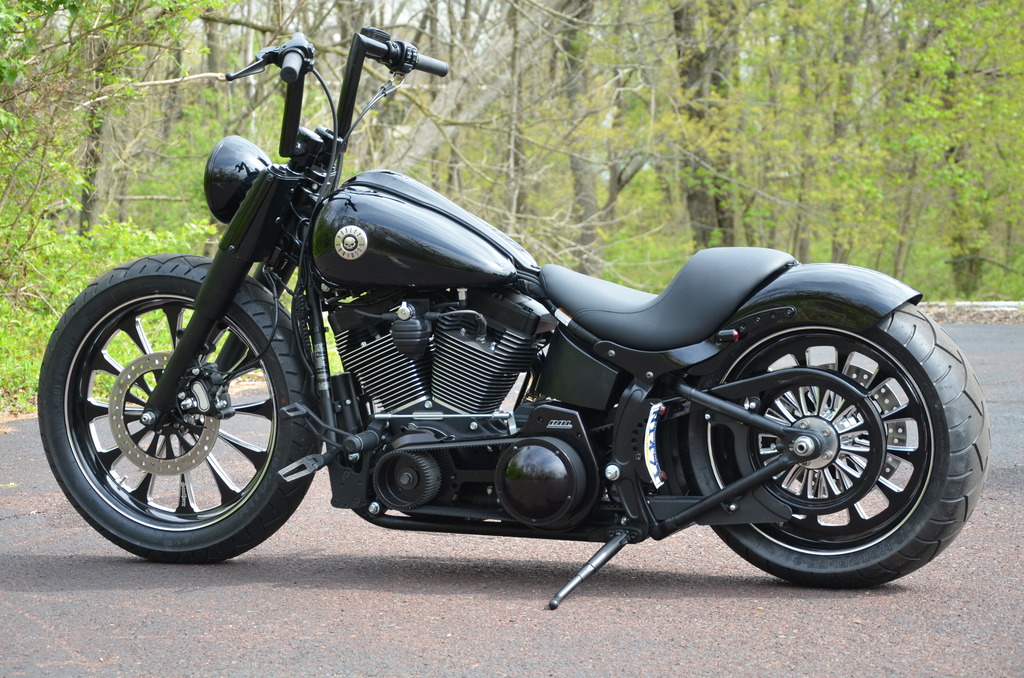

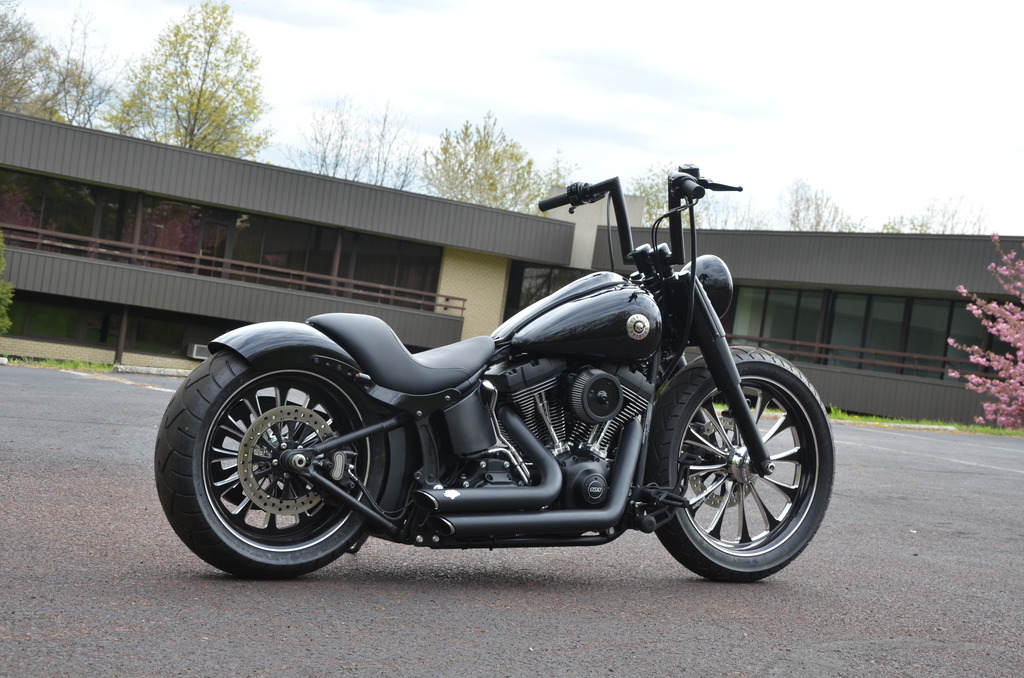
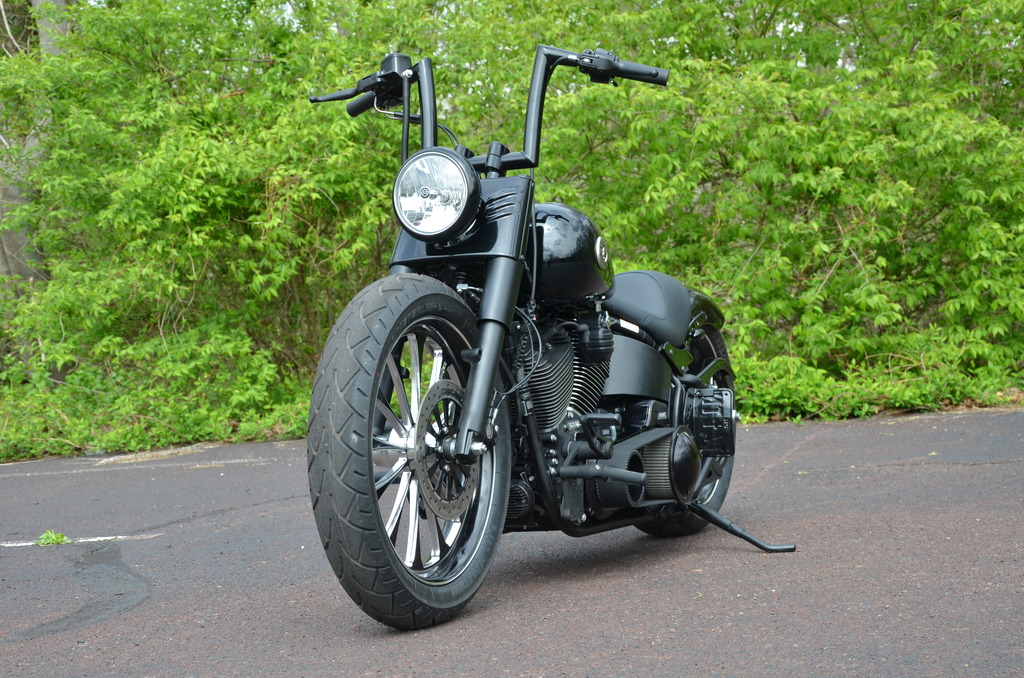

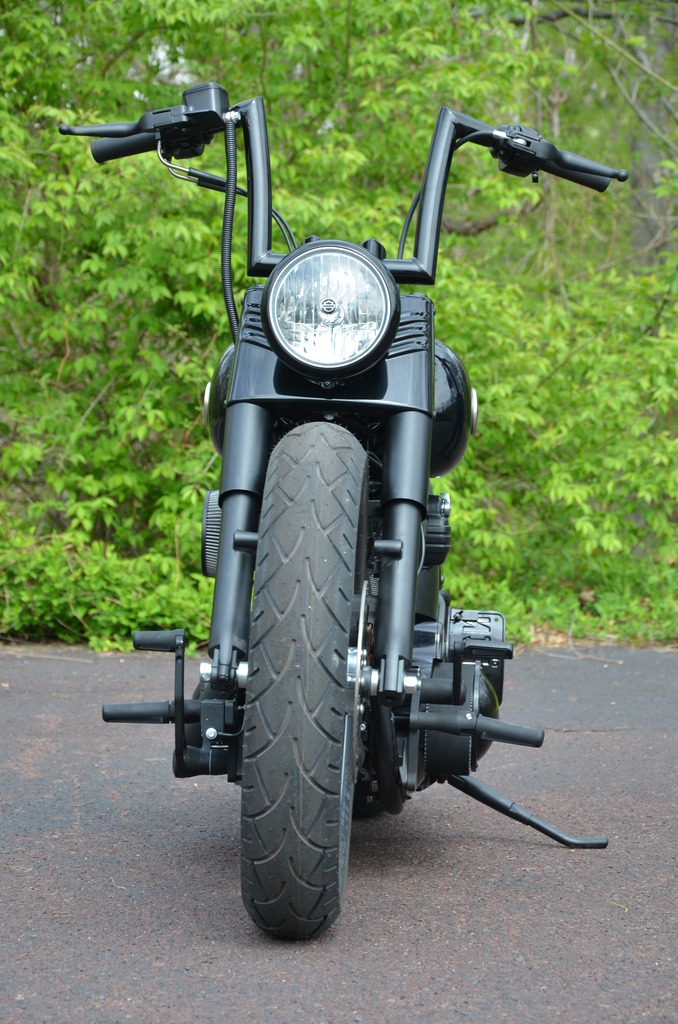
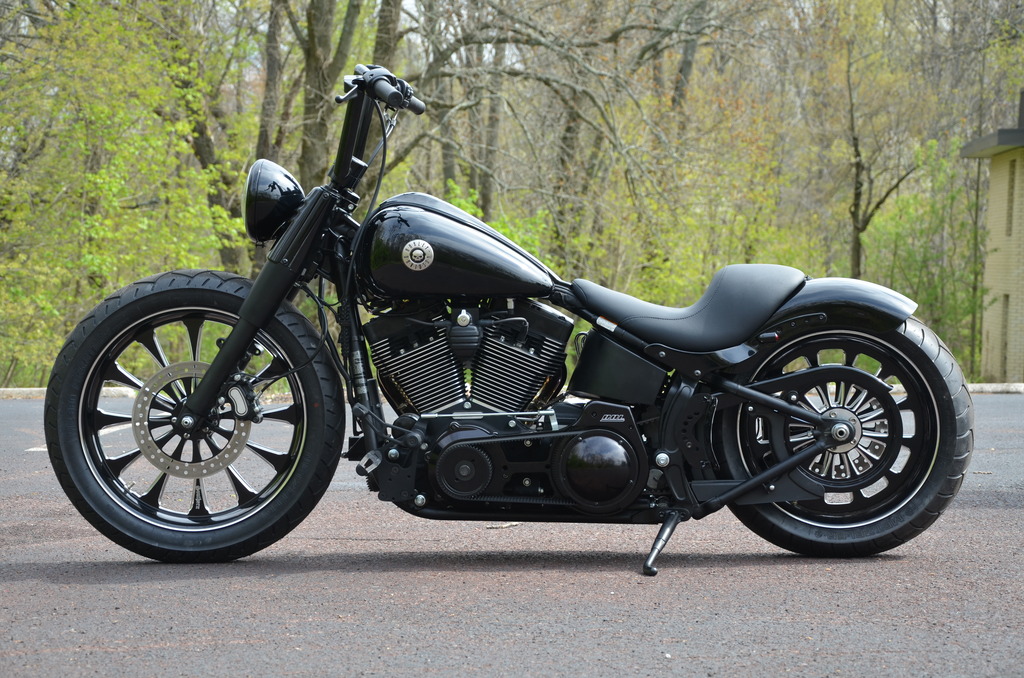
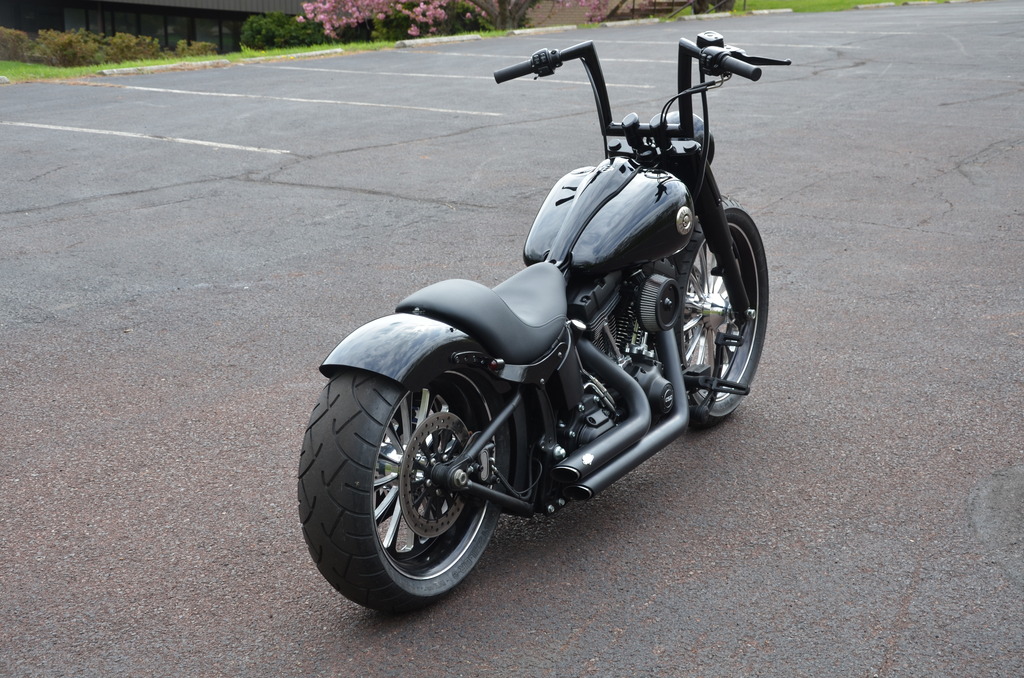
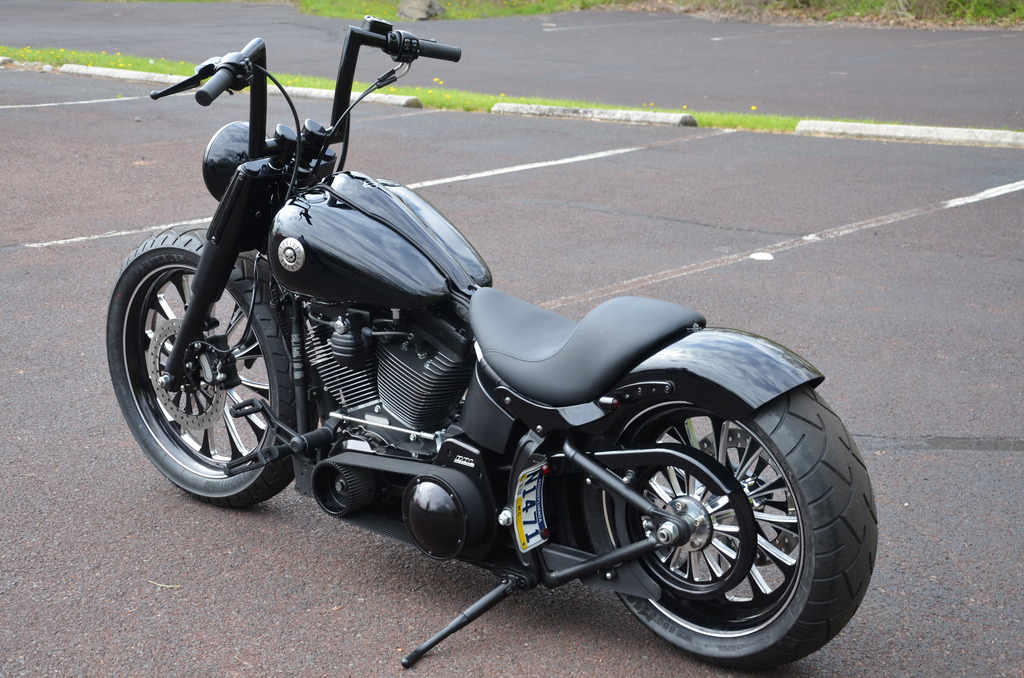
A few action shots
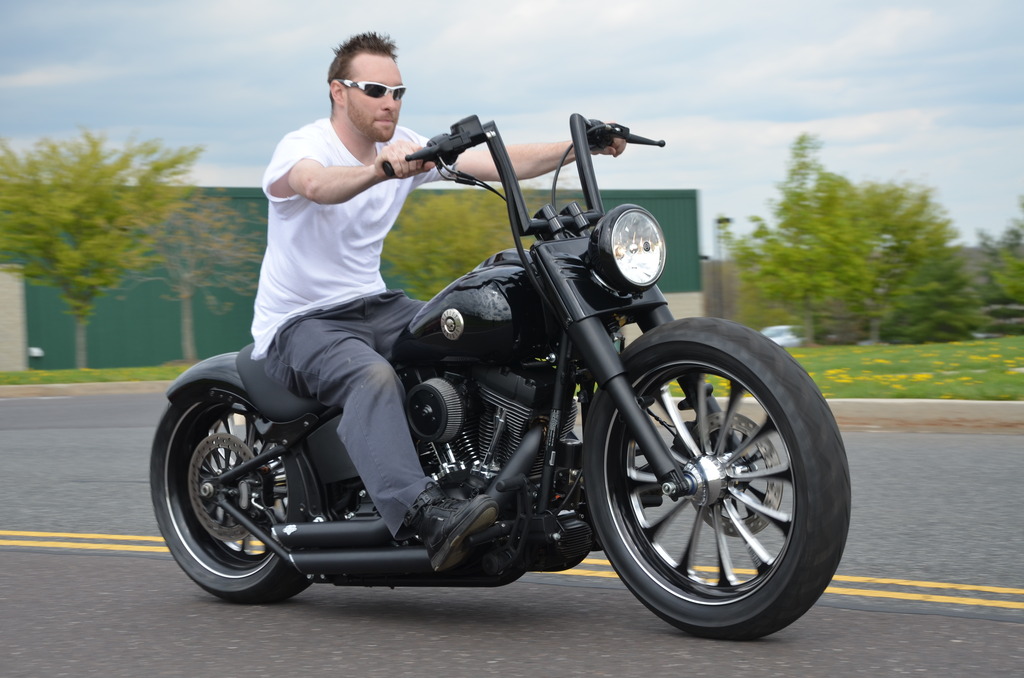

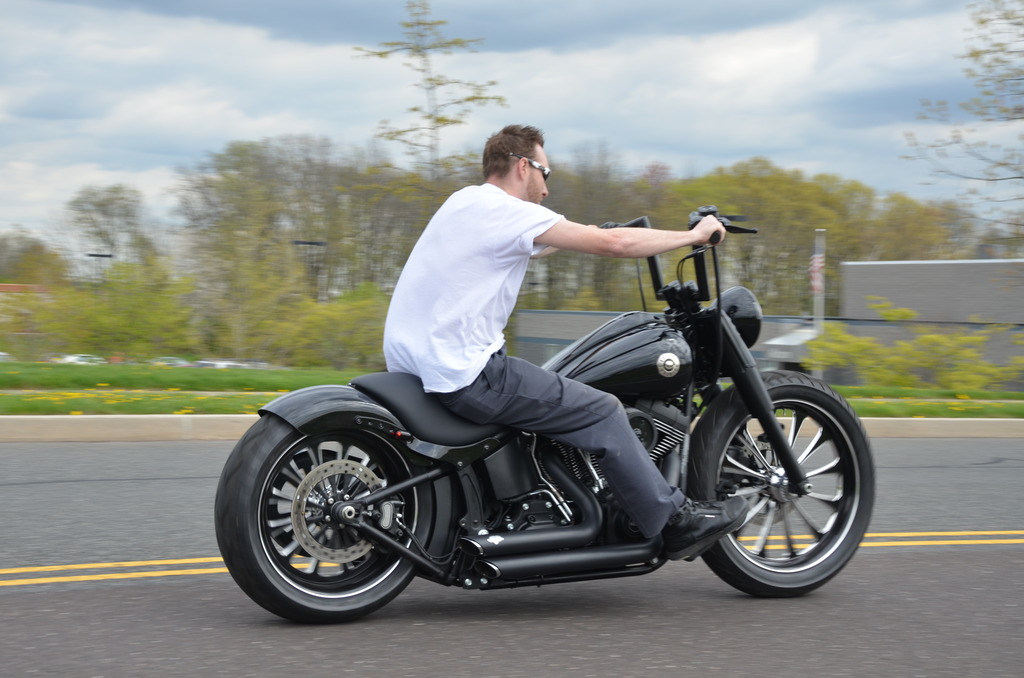
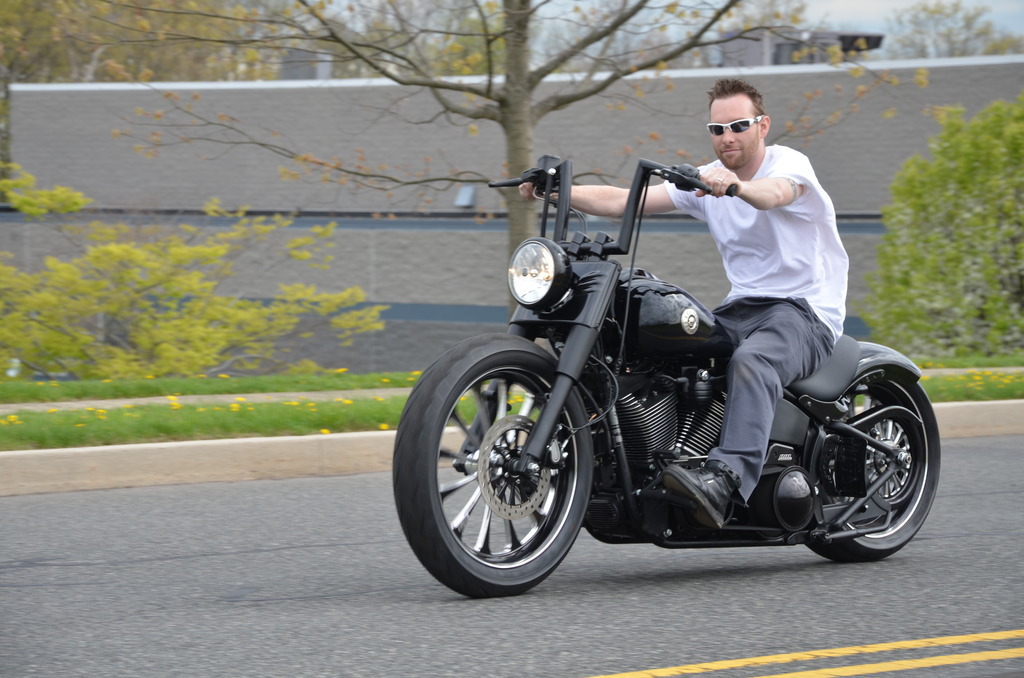
Before, During, And After

So here's a list of mods, then completed pics, then some of the process and a few how to's / tips and tricks i learned along the way.
recap of the first phase https://www.hdforums.com/forum/softa...-and-tips.html
1st phase list of mods I did when I first got the bike about a year ago….
- RSD Tracker Rear Fender Conversion Kit with Black Struts
- RSD Vintage Solo Seat
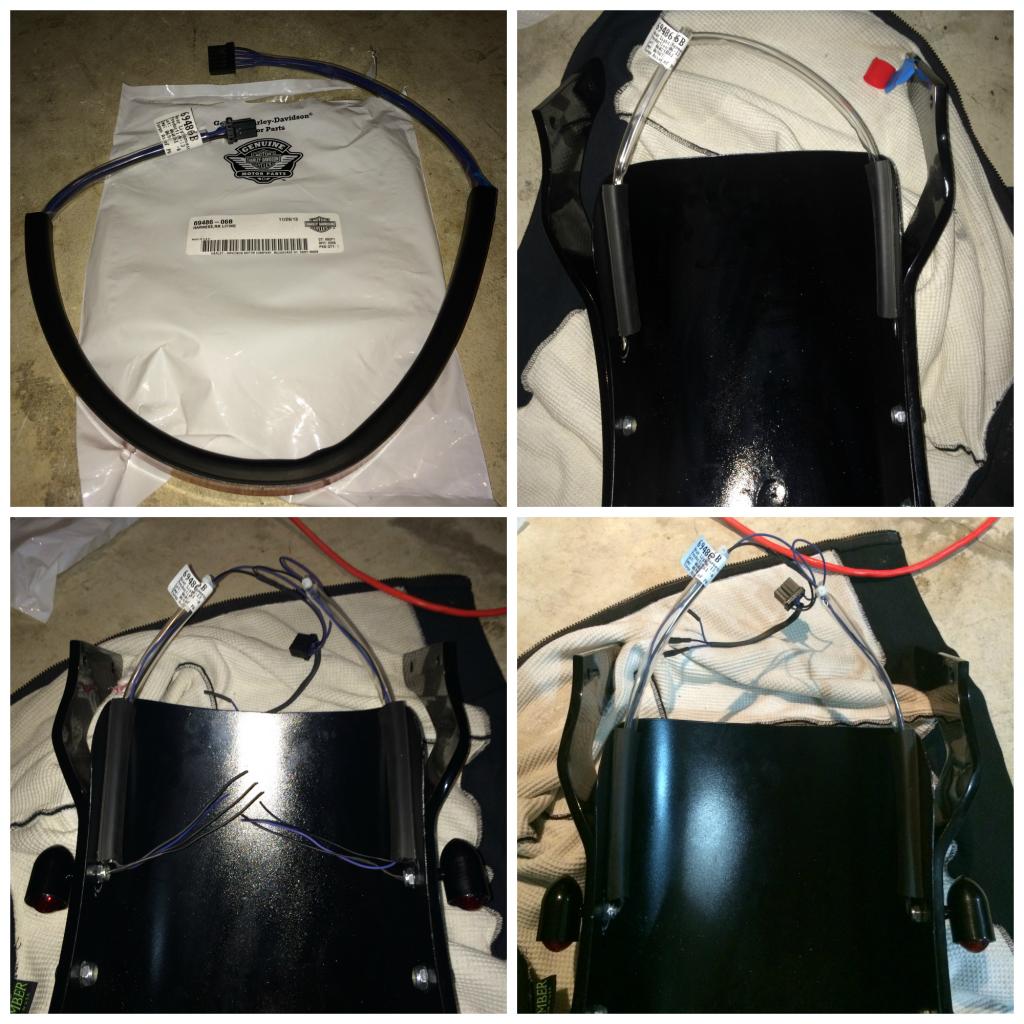
- Auto-Gem Baby Bullets lights (run / brake / signal)
- Auxiliary Brake Light/Running Light/Turn Signal Conversion Kit-69461-06D
- Homemade curved license plate mount (mounted to where the pass peg was)
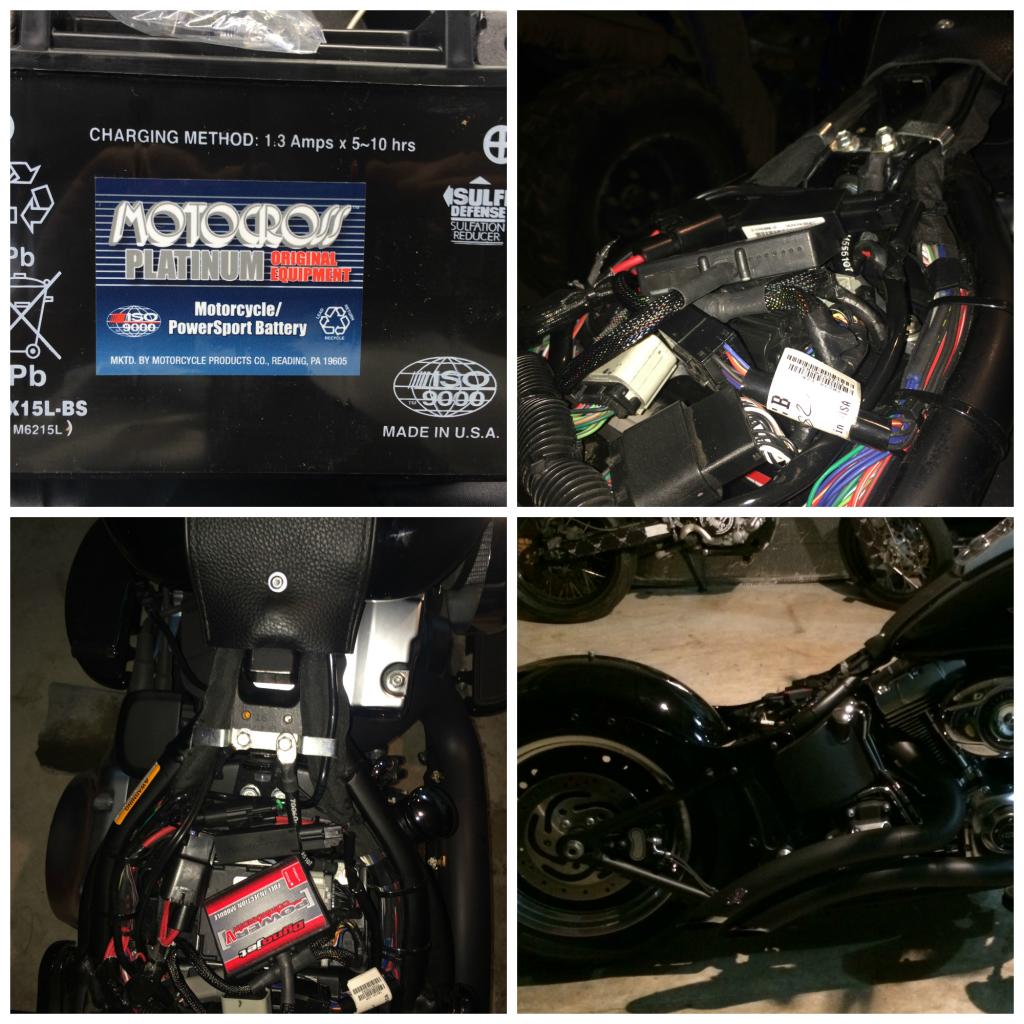
- smaller battery Yuasa YTX15L-BS)
- Arlen ness rear lowering kit
- V&H short shots
- screaming eagle stage one A/C (removed cover panted inside)
- power commander w/ custom A/F map
- CVO skull tank emblems
- Todd's Cycle Gloss Black 1 1/2 in. Strip Handlebar - 0601-2233
- Drag Specialties - Risers Big Buffalo 1.5"
- Longer custom made brake line
- removed passenger pegs
- removed front fender, mirrors, front signals, fork reflectors
- painted a few things with black engine enamel
- and probably some little things i missed
2nd phase list of mods….
- BDL Belt Drive 2-3/4" Open Belt Drive Black Anodized EVO-8SB (open primary)
- SMW (Southern Motorcycle Works) Elite "3D Cut" Black Legend Wheel Black Anodized and Contrast Cut billet aluminum ( 21” front, 18” rear)
- SMW Legend pulley
- SMW Legend rear rotor (I taped off and powder coated it to match wheels)
- SMW Legend front rotor (I taped off and powder coated it to match wheels)
- Metzeler ME 880 Marathon XXL Front Tire 140/70/21
- Metzeler ME 880 Marathon XXL Rear Tire 200/50/18
- Blackline Dash / console tank 71340-11
- Blackline Harley symbol / Trim Insert 72775-11
- Blackline Rubber molding 71576-08A (need 2)
- 5-16 x 18 X 5-8 round carriage bolt & 5-16 x 18 flange nut to mount Blackline Dash
- longer fuel line in case I ever want to do a tank lift
- Flush mount gas cap & gauge cap 75027-08C
- Blackline IGN SWITCH &FORK LOCK SET 71400077
- Blackline IGN COIL 31684-11 Grenade style coil with key
- Blackline Coil Wires 32001-08A (need 2)
- Blackline coil bracket - 16236-08A BRACKET, TOP ENGINE MOUNT
- DK Customs Coil Wire Extension
- Outlaw forward controls
- Custom extension made on rear brake line
- BK-Rider C01080252 41mm Lowering Tubes - FLH 20.25" tube length
- Progressive Drop in’s 10-2003
- Screamin' Eagle Fork Oil - 62600027
- Sending my seat out to extend the front to close the gap between the tanks
- Blacked out around 30 parts
- Black HD oil filter
- Amsoil 20w50
- Ride-On Tire Balancer and Sealant
- Golden Spectro Heavy Duty Platinum 6-Speed Transmission Lubricant 75W-140
- replace all gaskets Rocker covers - 17386-99A, Rocker housing - 16719-99B, 6 speed transmission cover, Cam cover - 25244-99A
- plus little things i probably missed
I’d like to say I’m done, but who knows…


A few action shots


Before, During, And After

The following 4 users liked this post by ADRENALINE RUSH:
#2
06-05-2015, 05:15 PM
In order to keep the full build together here’s the first phase…
Shocks…..
Obviously I needed to bring the fender closer to the tire! The stock ones has the fender sitting over 2" above the tire. I went as low as I could without bottoming out.
put them on a press to compress the springs in order to replace the bolts with longer ones.
Everything was so tight and almost impossible to get to. The bolts were high torqued with permanent Loctite, and not enough room to get a breaker bar under the bike, and only allowed less than a half-inch of turn for the wrench to move back and forth between the frame. Once the bolts were off the shocks they fully expanded and wouldn't fit out of the frame, was definitely a pain…
If I ever had to remove them again I would probably be able to do it way quicker, and would need to do 5 things first instead of figuring them out last. Torch to heat up the bolts/nuts, heavier hammer to hit the wrench to break the nuts loose, 3/4" ratcheting wrench (not a fixed box wrench), a pry bar to remove the shock, and more beer
After lowering check the belt to make sure it’s not rubbing were in goes into the primary and that there’s enough slack (a tight belt will perform and last longer than a loose belt). This is with the bike sitting on the ground on the jiff stand (kick stand) not on a lift or with you sitting on it. a good rule of thumb is that you should be able to grab the belt in the middle of its run and be able to twist it with your hand 45*
A good how to for installing lowering kit https://www.youtube.com/watch?v=W0IN...ature=youtu.be
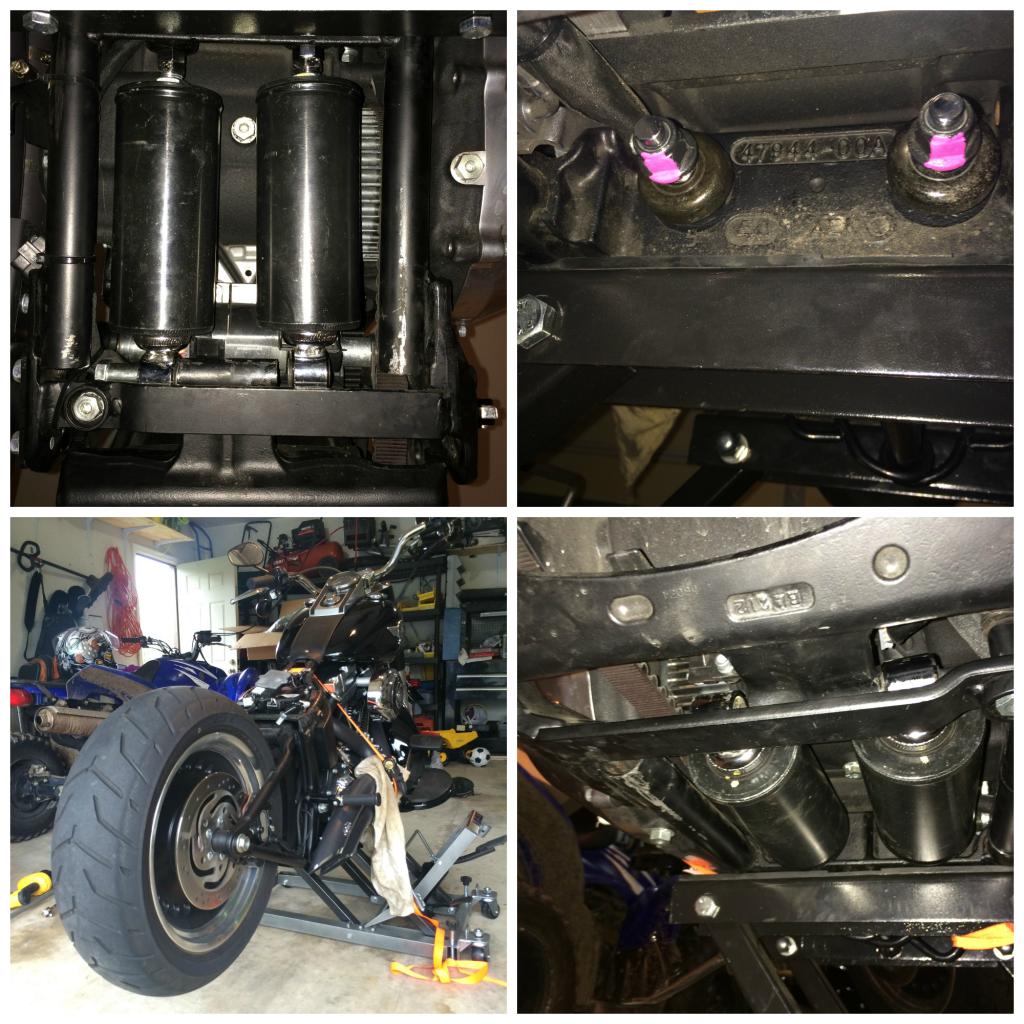
RSD Tracker fender kit and seat…

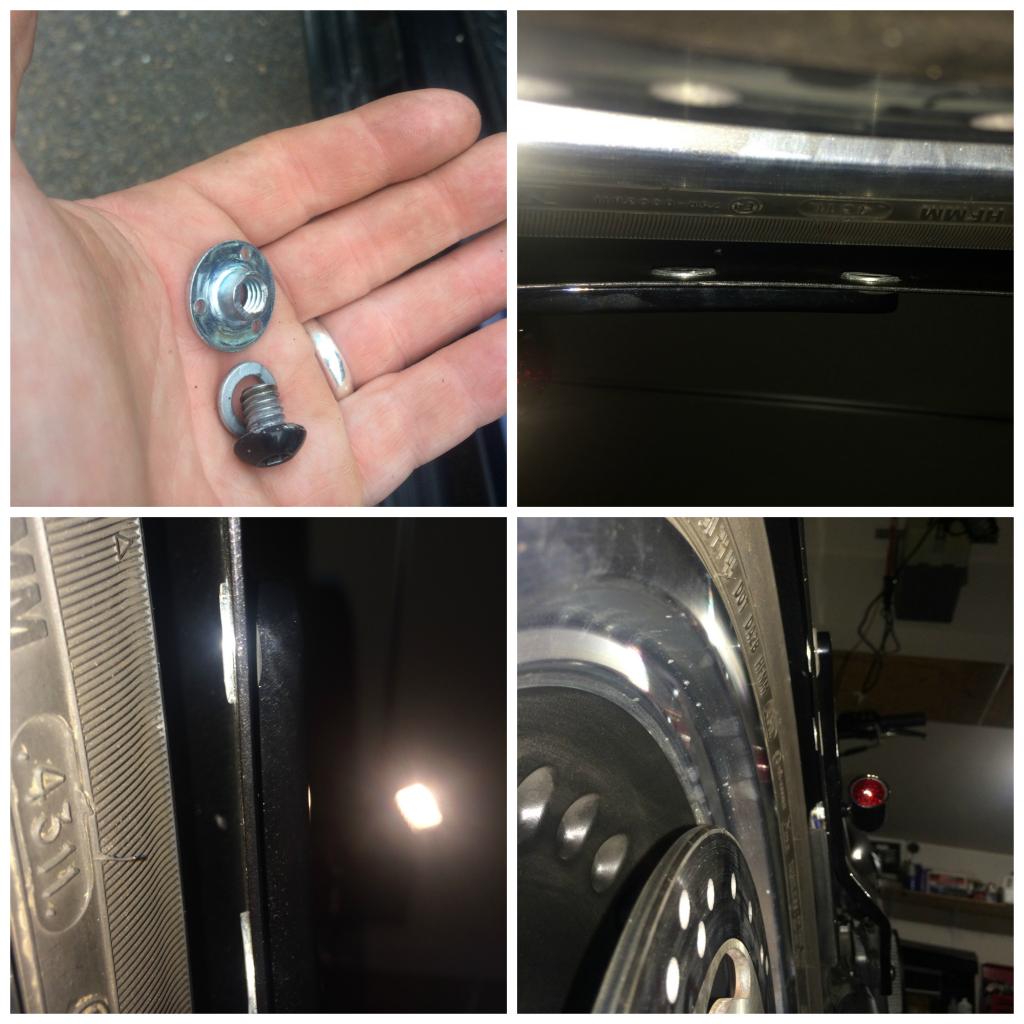
drilled a hole and welded a stud to mount the seat, once lowered i had to replace the sockethead fender bolts with shorter bolts (1/2" long) because the ones rsd provided were too close to the tire once it was lowered.
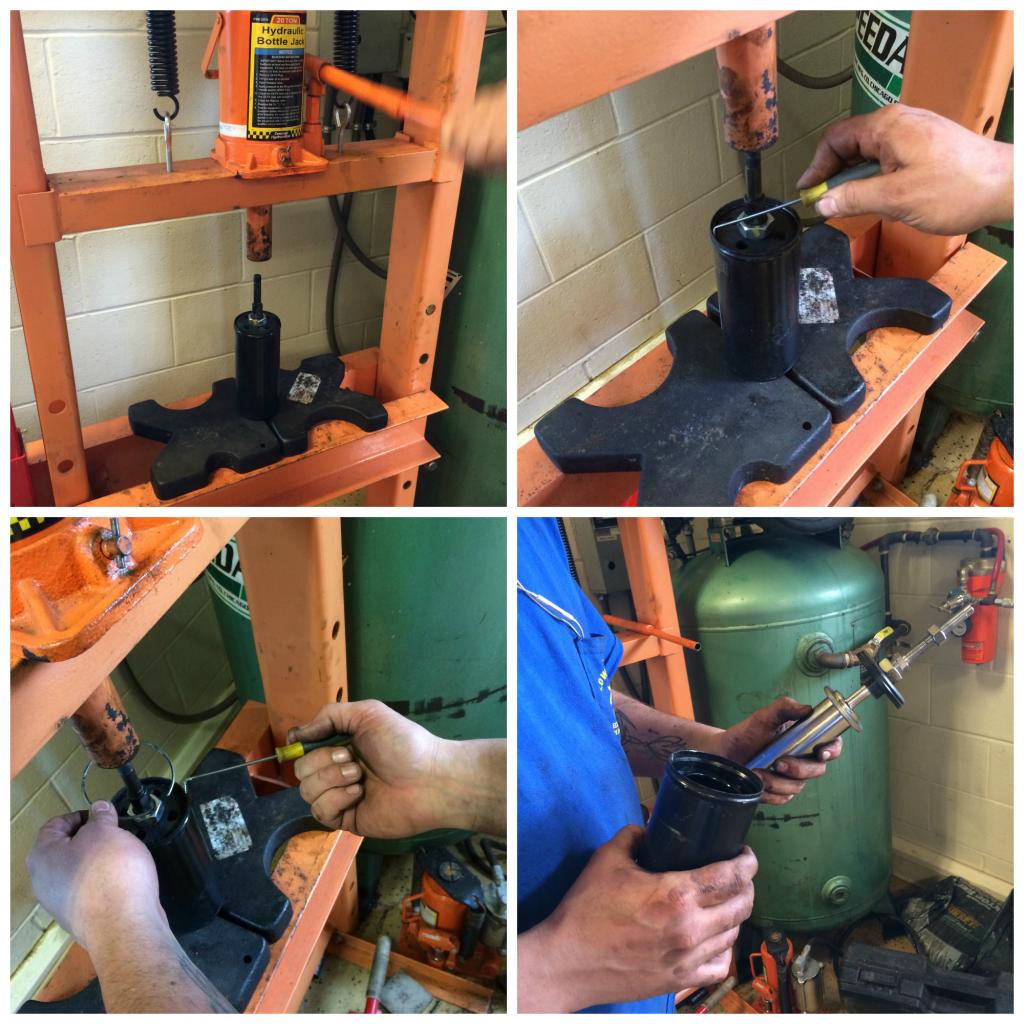
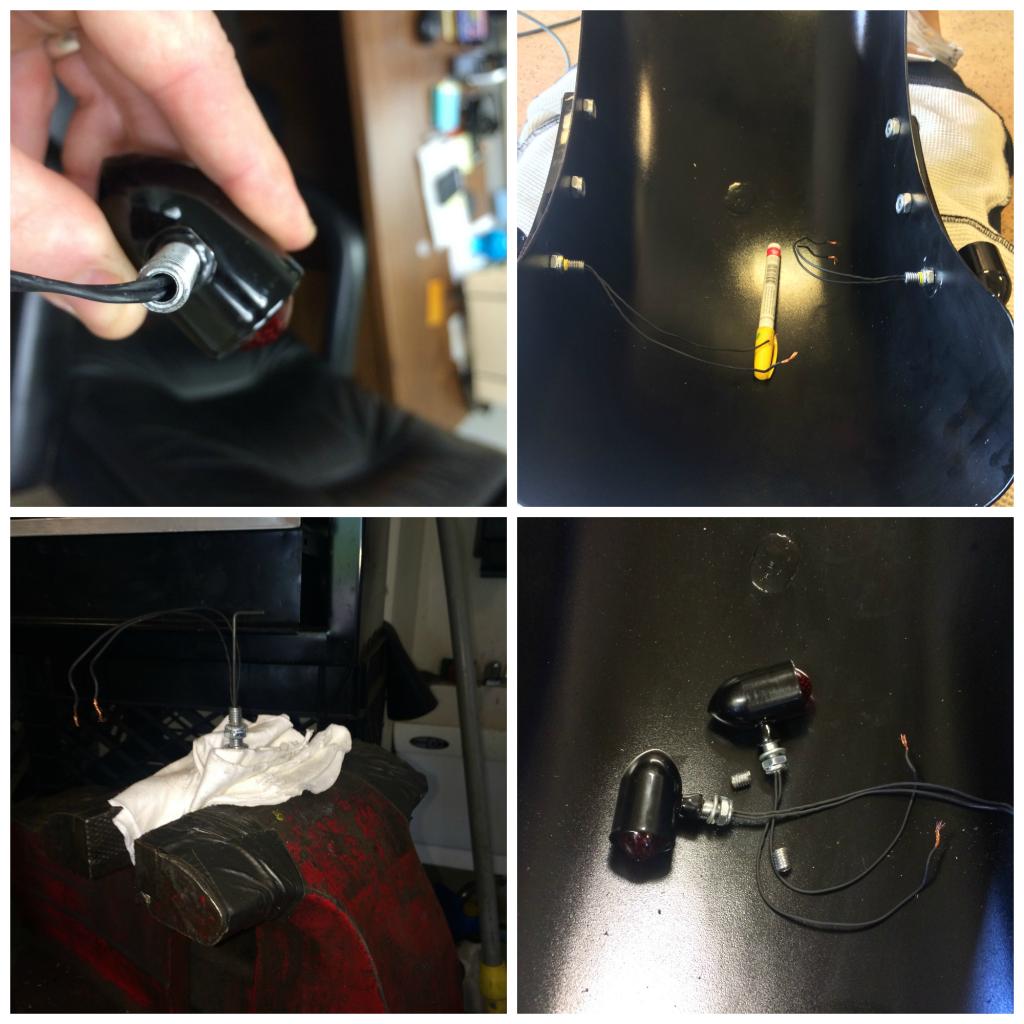
Don’t clamp it this way, I left hair line scratches in the first one (top one) because I clamped it by the housing. The 2nd signal was clamped by the stud and much easier to cut and left the housing untouched. Only down fall was I had to be more careful cutting because I couldn’t have the Allen key slid in it to protect the wires.
The new rear fender and seat required me to relocate the ECU, license plate, signals, brake light, a couple wire harnesses, battery, a handful other electronics and move around a few other miscellaneous things under the seat.
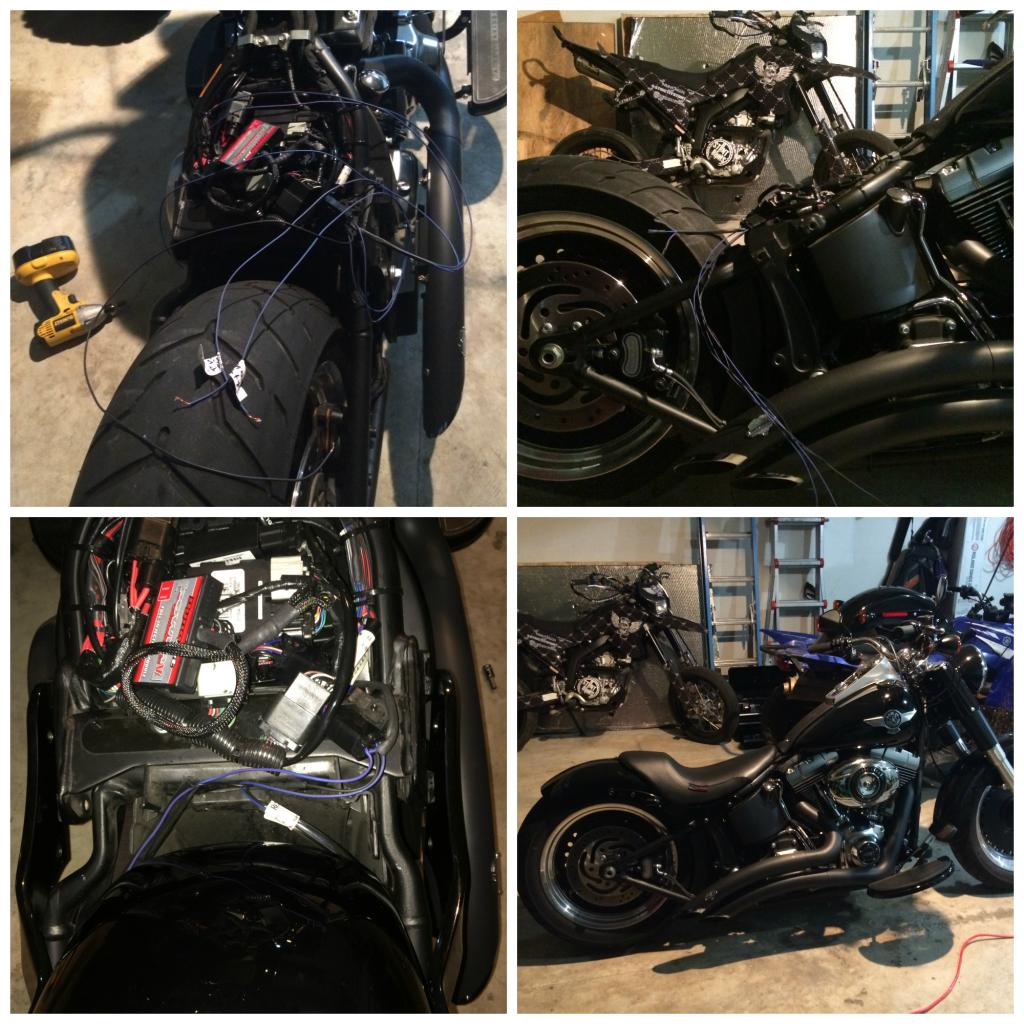
Also replaced stock battery with a smaller battery Yuasa YTX15L-BS, relocated some wires, ECU, and harness's.
After a few adjustments and test rides I needed to relocated the wires and the wire race way (moved them up deeper into the fender to clear the side of the tire, but also not too high or it would get hit by the top of tire when suspension bottoms out). There was a few test fits / rides and adjustments / changes… In the end I had to replace all the hardware again in order to clear the tire… I used The Hillman Group 5/16-in-18 Zinc-Plated Standard (SAE) Brad Hole Tee Nut & split lock washers & flat head cap screw bolts ( I also ended up having to replace the ˝ lock socket head bolts with an even shorter set up in order to clear the tire.
V&H short shots….
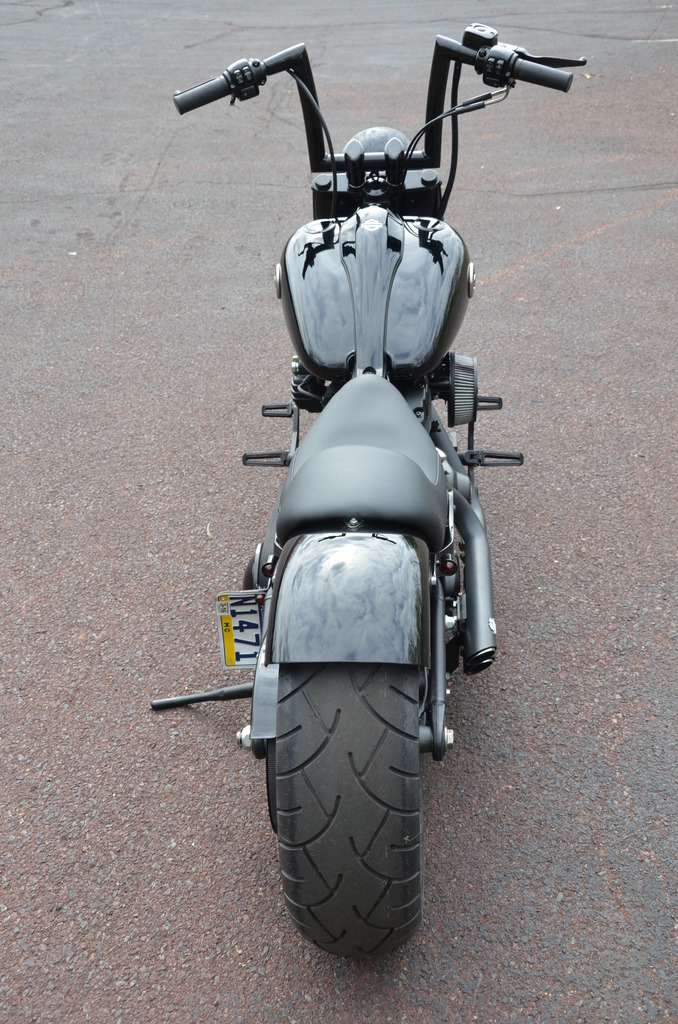
10” Todd’s Cycle Strip Bars 1.5” thick Fattys….
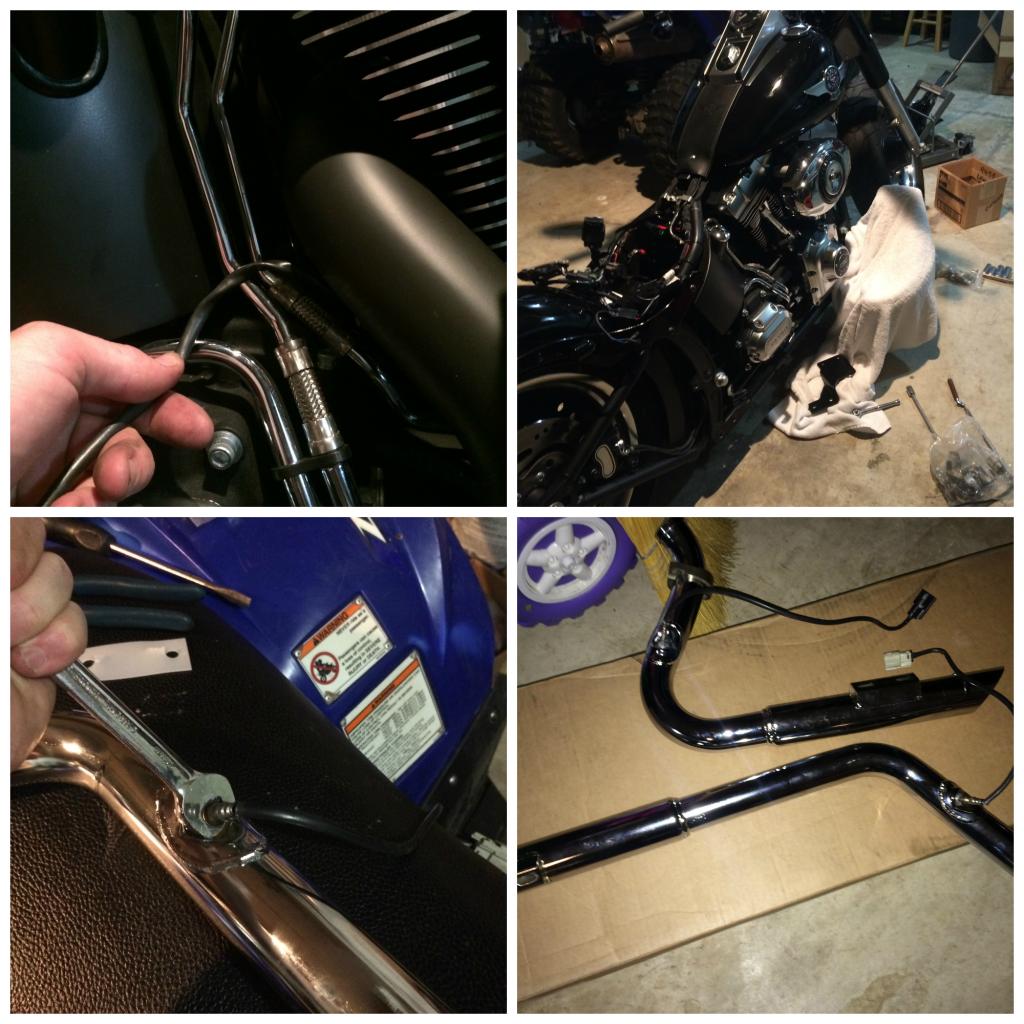
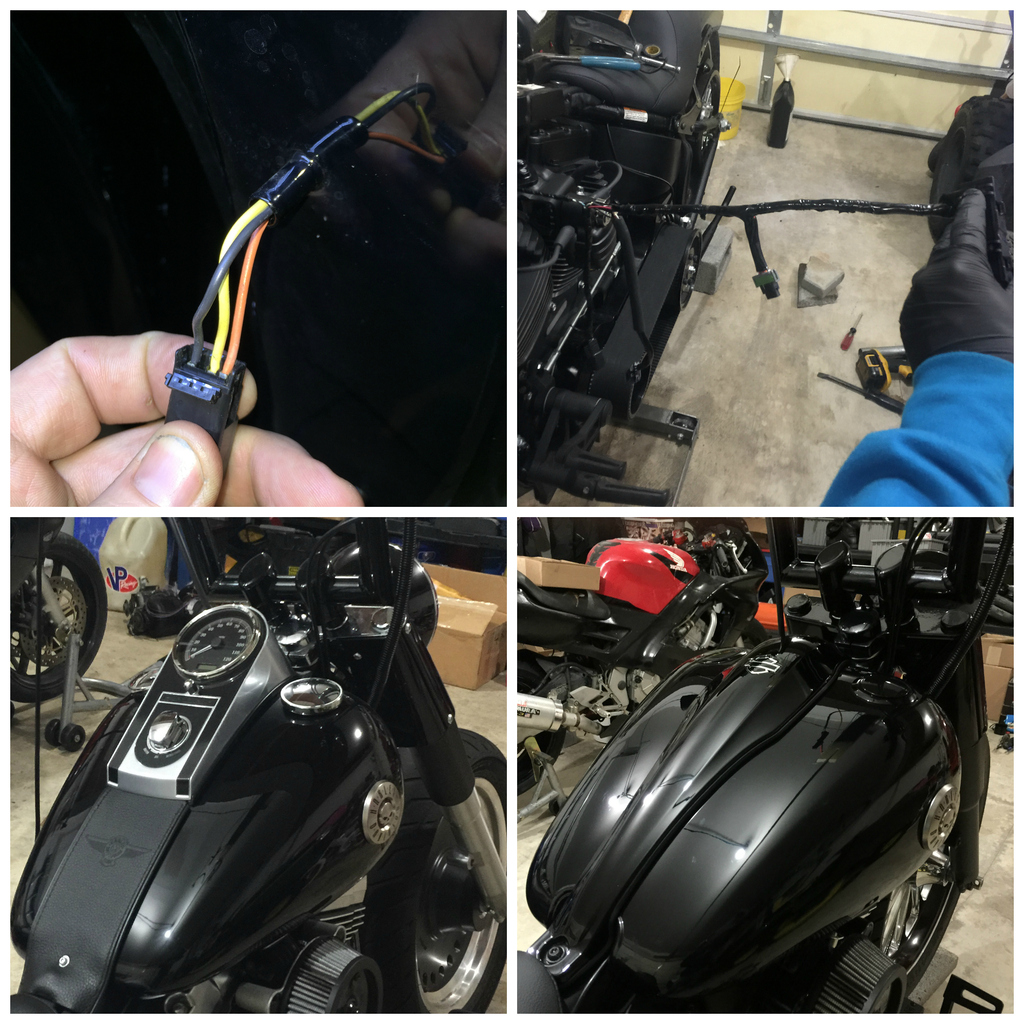
To get to the wires harness disconnects for each side of the controls (unbolt the tank in the front and the back, push up on the silver ring and disconnect the fuel line), then lift the tank up and slide it back as far as you can (should go back about 4”), lift up the rubber flap and you’ll see the connection points.
Since these are only 10" mini apes I was able to use my stock wires, clutch cable, and throttle cables.. the only thing I had to replace was the stock upper ABS brake line, needed a +4" line (I think if it was non ABS that would have worked too).
Fishing the lines – I tried everything (fish tapes, chain, thicker stranded wire, real long zip ties…ect). Finally took a thin, but strong rope and tied a nut to the end of it. let gravity do the work, flipping the bars around to get the nut to drop. Electrical taped the new wires and pulled them through. I had to keep tension on the string and slowly push a little bit at a time in order to finally get the new wires though.
I used a Motion Pro 08-0543 3/8" Mini Brake Bleeder… it worked awesome! Ive always hated bleeding brakes, but this made it way easier!!!!!
Bleeding ABS brakes – since I had to get a longer brake line I had to do some bleeding… DO NOT TURN THE IGNITION ON anytime until you are done because the ABS Valves will cycle!!!!!! If they cycle with line open or un bleed, then air could get in there. ABS is an electronically activated, the rest is hydraulically activated manually by the lever at master cylinder. So you shouldn’t have any problem bleeding the brakes the regular way (just as you would if it didn’t have ABS) as long as you don’t get any air in the ABS module / valve. Otherwise your ABS won’t work without a trip to the dealer for them to re-bleed your brakes for you while cycling the ABS valves using the HD Digital Technician.
I also had a local hydraulic shop make me a line, it was clear / silver and didn’t match the bike, that’s why there’s a wire loom covering it (it will be replace this winter). And in case anyone needed to know, our fittings for our banjo bolts on our brake lines are 7/16 x 24 & the fitting is 7/16 diameter (there was a lot of people on here who said 12mm, but that’s too loose).
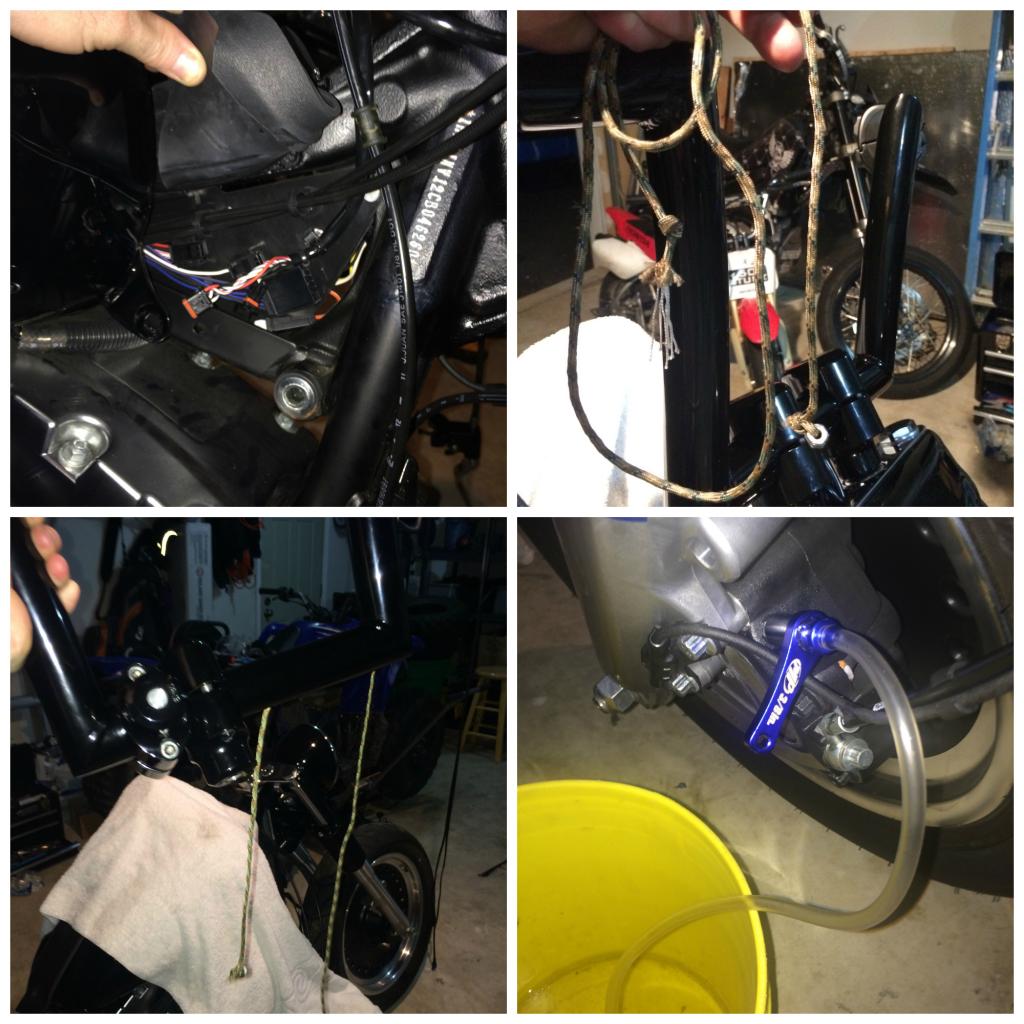
Plate relocation….
replaced the passenger rear peg with a custom license plate bracket
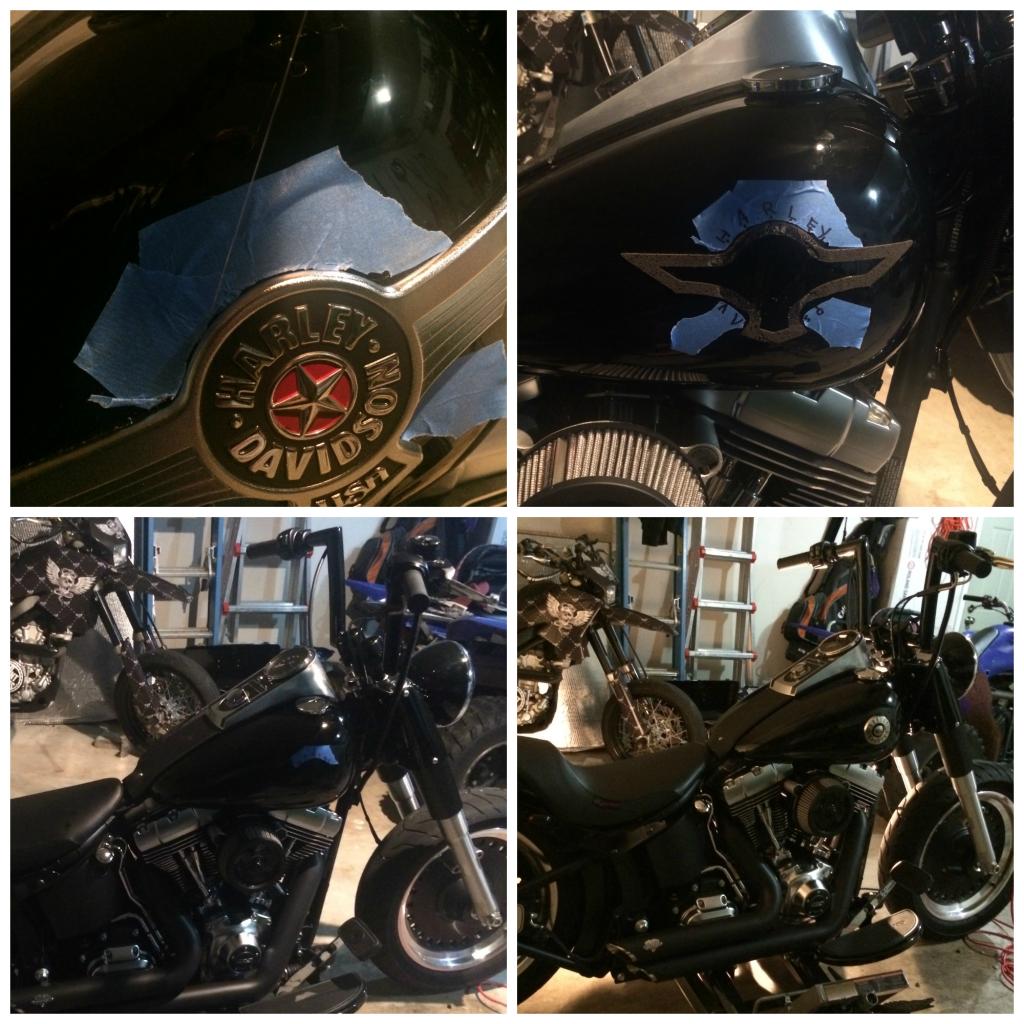
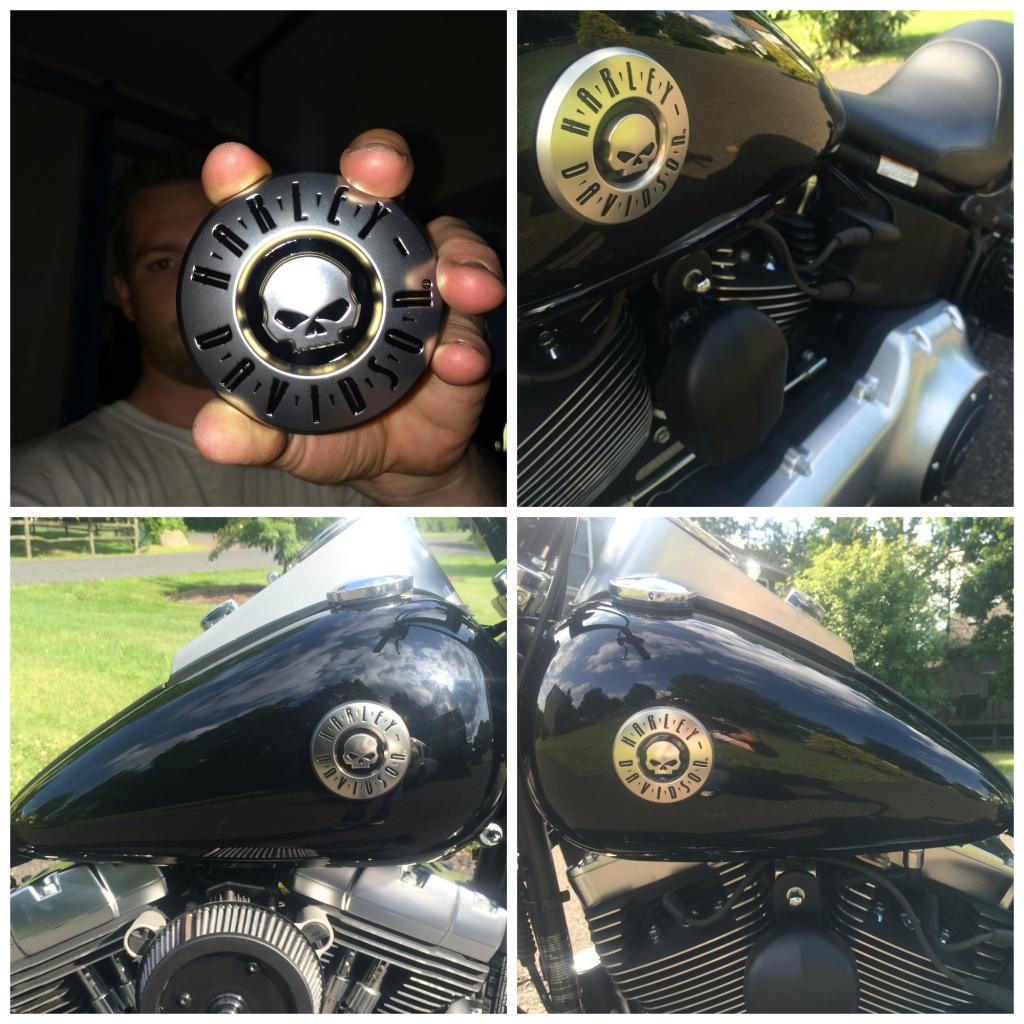
Had to swap out the tank emblem….
Taped it off because I wanted the circle part of the emblems in the same spot. I used fishing line to get the badge off, then terminator & WD40 to the rest off, then wipe off with rubbing alcohol before installing new emblems
Shocks…..
Obviously I needed to bring the fender closer to the tire! The stock ones has the fender sitting over 2" above the tire. I went as low as I could without bottoming out.
put them on a press to compress the springs in order to replace the bolts with longer ones.
Everything was so tight and almost impossible to get to. The bolts were high torqued with permanent Loctite, and not enough room to get a breaker bar under the bike, and only allowed less than a half-inch of turn for the wrench to move back and forth between the frame. Once the bolts were off the shocks they fully expanded and wouldn't fit out of the frame, was definitely a pain…
If I ever had to remove them again I would probably be able to do it way quicker, and would need to do 5 things first instead of figuring them out last. Torch to heat up the bolts/nuts, heavier hammer to hit the wrench to break the nuts loose, 3/4" ratcheting wrench (not a fixed box wrench), a pry bar to remove the shock, and more beer
After lowering check the belt to make sure it’s not rubbing were in goes into the primary and that there’s enough slack (a tight belt will perform and last longer than a loose belt). This is with the bike sitting on the ground on the jiff stand (kick stand) not on a lift or with you sitting on it. a good rule of thumb is that you should be able to grab the belt in the middle of its run and be able to twist it with your hand 45*
A good how to for installing lowering kit https://www.youtube.com/watch?v=W0IN...ature=youtu.be


RSD Tracker fender kit and seat…

drilled a hole and welded a stud to mount the seat, once lowered i had to replace the sockethead fender bolts with shorter bolts (1/2" long) because the ones rsd provided were too close to the tire once it was lowered.


Don’t clamp it this way, I left hair line scratches in the first one (top one) because I clamped it by the housing. The 2nd signal was clamped by the stud and much easier to cut and left the housing untouched. Only down fall was I had to be more careful cutting because I couldn’t have the Allen key slid in it to protect the wires.

The new rear fender and seat required me to relocate the ECU, license plate, signals, brake light, a couple wire harnesses, battery, a handful other electronics and move around a few other miscellaneous things under the seat.

Also replaced stock battery with a smaller battery Yuasa YTX15L-BS, relocated some wires, ECU, and harness's.
After a few adjustments and test rides I needed to relocated the wires and the wire race way (moved them up deeper into the fender to clear the side of the tire, but also not too high or it would get hit by the top of tire when suspension bottoms out). There was a few test fits / rides and adjustments / changes… In the end I had to replace all the hardware again in order to clear the tire… I used The Hillman Group 5/16-in-18 Zinc-Plated Standard (SAE) Brad Hole Tee Nut & split lock washers & flat head cap screw bolts ( I also ended up having to replace the ˝ lock socket head bolts with an even shorter set up in order to clear the tire.

V&H short shots….
- unplug o2 sensors from the connectors remember the cable routing (NEVER UNBOLT THEM PLUGGED IN). front O2 sensor under the front of the bike (easy to get to). Rear O2 sensor is a little harder, take off the seat mine was there behind the battery, but I also have an smaller battery (you may need to remove your stock battery to access this connector on a stock bike. It goes through a hole in the bottom of the battery pan.
- remove old exhaust
- install sensors on new exhaust (DONT FORGET ANTI-SIEZE for the O2 Sensor threads) &
- install exhaust (don’t fully tighten flange)
- re-run wire for connect o2 sensors plugs and reconnect
- When installing exhaust flange torque for the nuts on the studs are 100-120 in lbs. alternate back-and-forth from side to side while tightening to ensure the flange seats properly.

10” Todd’s Cycle Strip Bars 1.5” thick Fattys….
To get to the wires harness disconnects for each side of the controls (unbolt the tank in the front and the back, push up on the silver ring and disconnect the fuel line), then lift the tank up and slide it back as far as you can (should go back about 4”), lift up the rubber flap and you’ll see the connection points.
Since these are only 10" mini apes I was able to use my stock wires, clutch cable, and throttle cables.. the only thing I had to replace was the stock upper ABS brake line, needed a +4" line (I think if it was non ABS that would have worked too).
Fishing the lines – I tried everything (fish tapes, chain, thicker stranded wire, real long zip ties…ect). Finally took a thin, but strong rope and tied a nut to the end of it. let gravity do the work, flipping the bars around to get the nut to drop. Electrical taped the new wires and pulled them through. I had to keep tension on the string and slowly push a little bit at a time in order to finally get the new wires though.
I used a Motion Pro 08-0543 3/8" Mini Brake Bleeder… it worked awesome! Ive always hated bleeding brakes, but this made it way easier!!!!!
Bleeding ABS brakes – since I had to get a longer brake line I had to do some bleeding… DO NOT TURN THE IGNITION ON anytime until you are done because the ABS Valves will cycle!!!!!! If they cycle with line open or un bleed, then air could get in there. ABS is an electronically activated, the rest is hydraulically activated manually by the lever at master cylinder. So you shouldn’t have any problem bleeding the brakes the regular way (just as you would if it didn’t have ABS) as long as you don’t get any air in the ABS module / valve. Otherwise your ABS won’t work without a trip to the dealer for them to re-bleed your brakes for you while cycling the ABS valves using the HD Digital Technician.
I also had a local hydraulic shop make me a line, it was clear / silver and didn’t match the bike, that’s why there’s a wire loom covering it (it will be replace this winter). And in case anyone needed to know, our fittings for our banjo bolts on our brake lines are 7/16 x 24 & the fitting is 7/16 diameter (there was a lot of people on here who said 12mm, but that’s too loose).

Plate relocation….
replaced the passenger rear peg with a custom license plate bracket

Had to swap out the tank emblem….
Taped it off because I wanted the circle part of the emblems in the same spot. I used fishing line to get the badge off, then terminator & WD40 to the rest off, then wipe off with rubbing alcohol before installing new emblems


#3
06-05-2015, 05:15 PM
BDL Belt Drive 2 3/4" Shorty Open Belt Drive (anodized black)
One of my favorite mods I did to the bike, but also probably the hardest to do… here’s a few snap shots of the process and a few links that helped me out. Pics make it look easier than it was…
BDL has some good how to video’s to help installing there belt drive
https://www.youtube.com/channel/UCSh...kIOBOMAeextsvA
Instructions….
http://img.jpcycles.com/staticwebfil...df/603-980.pdf
Bearing press instruction
http://bakerdrivetrain.com/wp-conten...-V2-081712.pdf
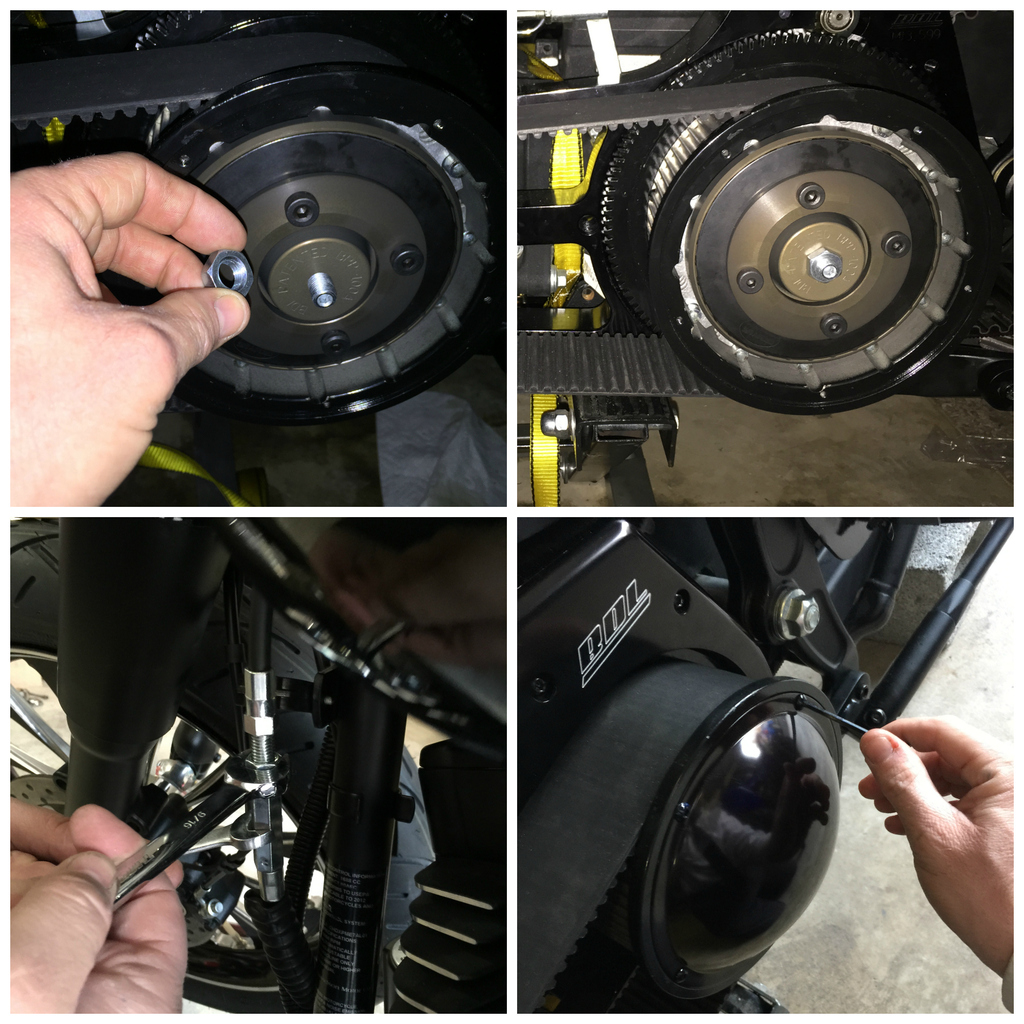
[B] Removal of the stock primary...
Cut a small piece of wood or use a locking device to hold the sprockets in place, even a little movement could prevent it from easily breaking loose. As usual heat definitely helps (I only used the torch on the compensator nut, not the clutch hub nut).
Keep in mind the Clutch Hub nut is left hand thread, but the compensator is normal. Normal being right hand thread (AKA righty tighty / lefty loosey).
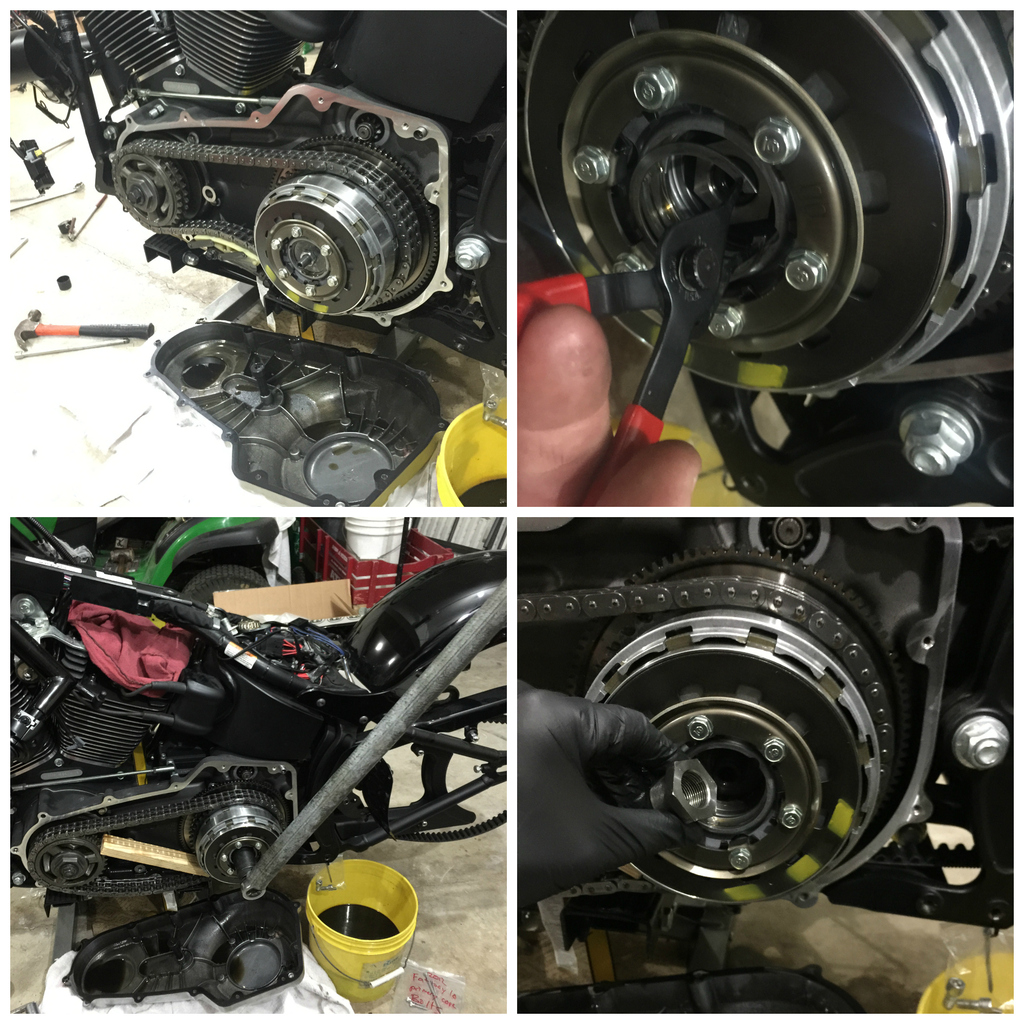
The starter was definitely another head ache! After doing it once the hard way I will definitely be removing the oil tank next time. I was successful in removing it and reinstalling it with a socket extension combined with a 6” allen key socket extension & using a super long Ľ” allen key. It was really on there so heating up where the bolt threaded in helped a lot.
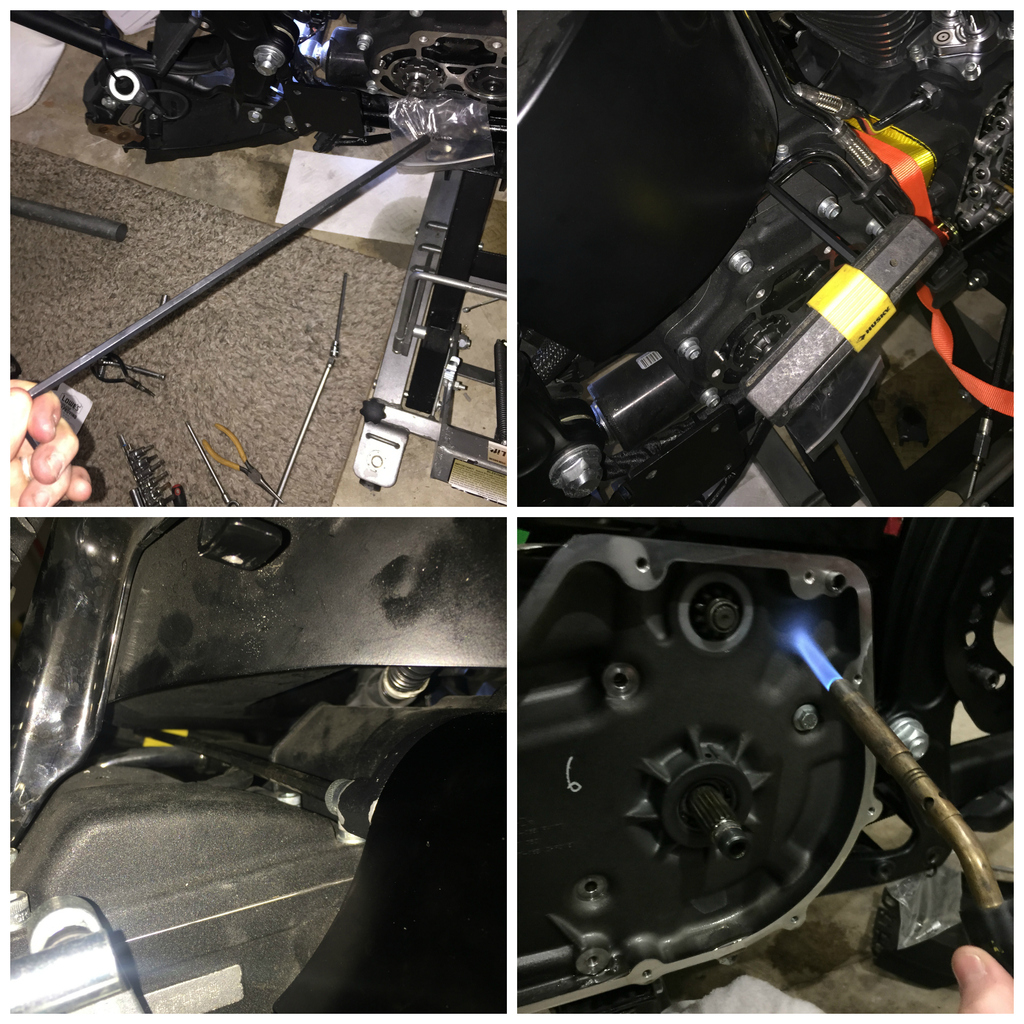
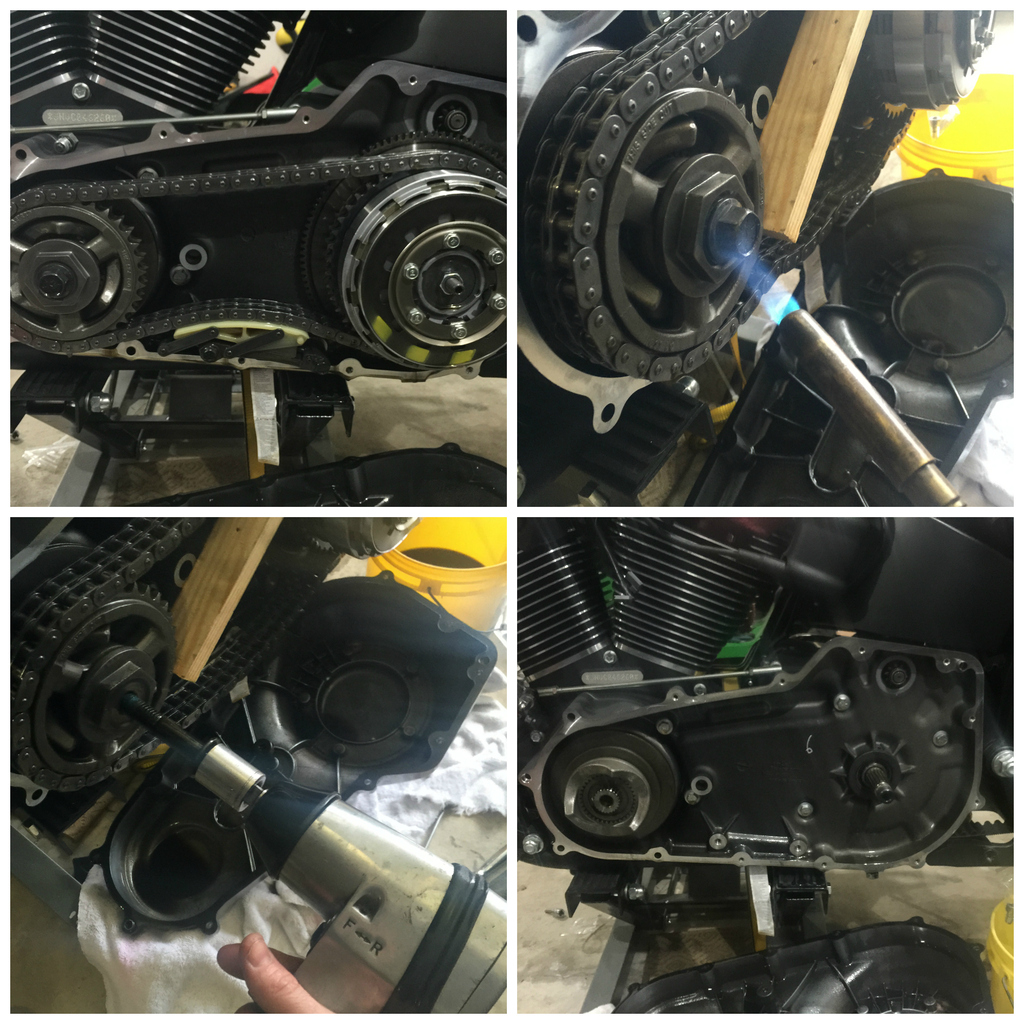
[B] HOW TO REMOVE RACE
Unless you want to buy a Harley Big Twin Transmission Mainshaft Bearing Inner Race Puller / removal tool. Carefully score the inner primary bearing race in line with the shaft using a grinder or dremel. Cut almost all the way through, but in order to protect the shaft, do not go all the way through. Then using a cold chisel or flat head screw driver and hammer, strike the race at the score line. Since the inner race is hardened steel, it will crack at the score line. This will provide enough expansion to be able to slide the race off.
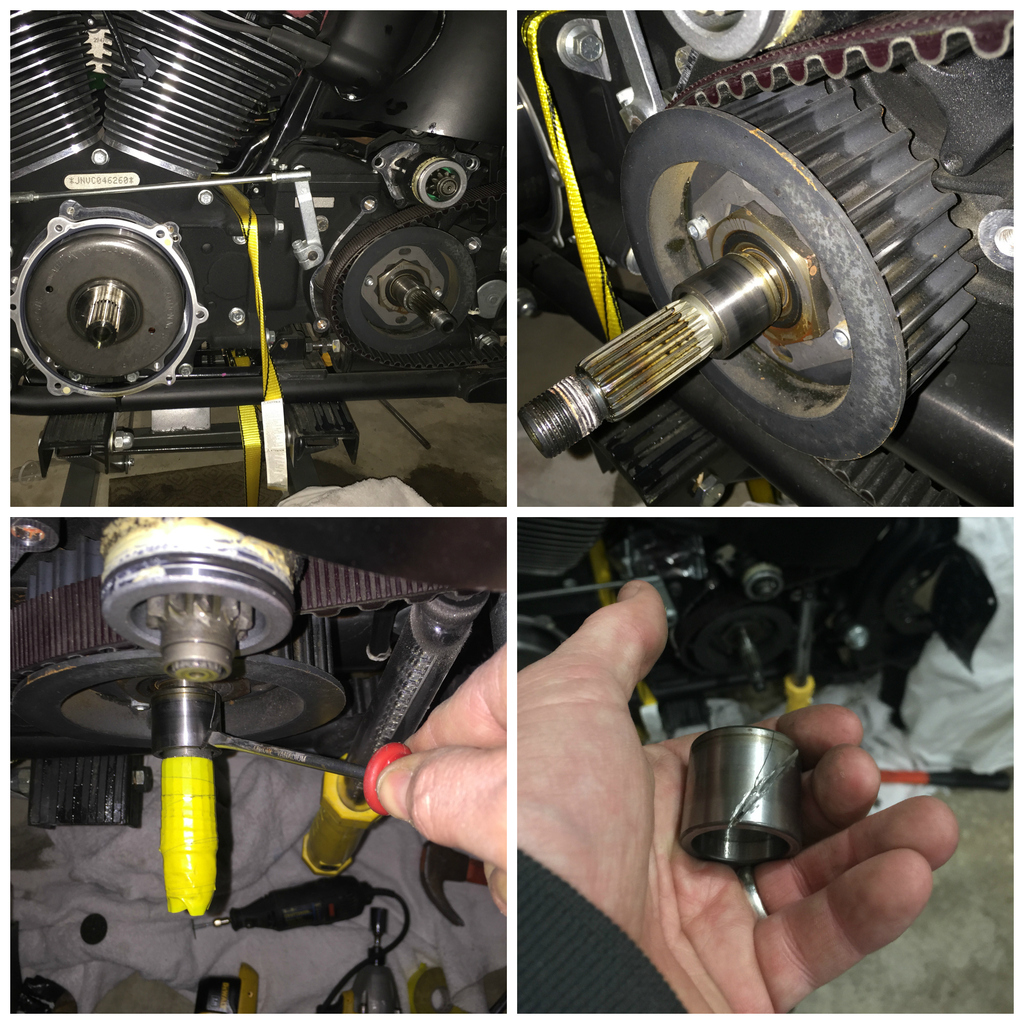
the rest was pretty straight forward, but at times some parts were a little intimidating and pressing the bearing was a pain and difficult to get it to sit level on the press and go in perfectly straight.
Don’t forget to reinstall the gasket on the motor behind your plate, line up and hand tight the starter, then torque your bolts same order and torque the service manual says for the original bolts, then toque your starter bolts
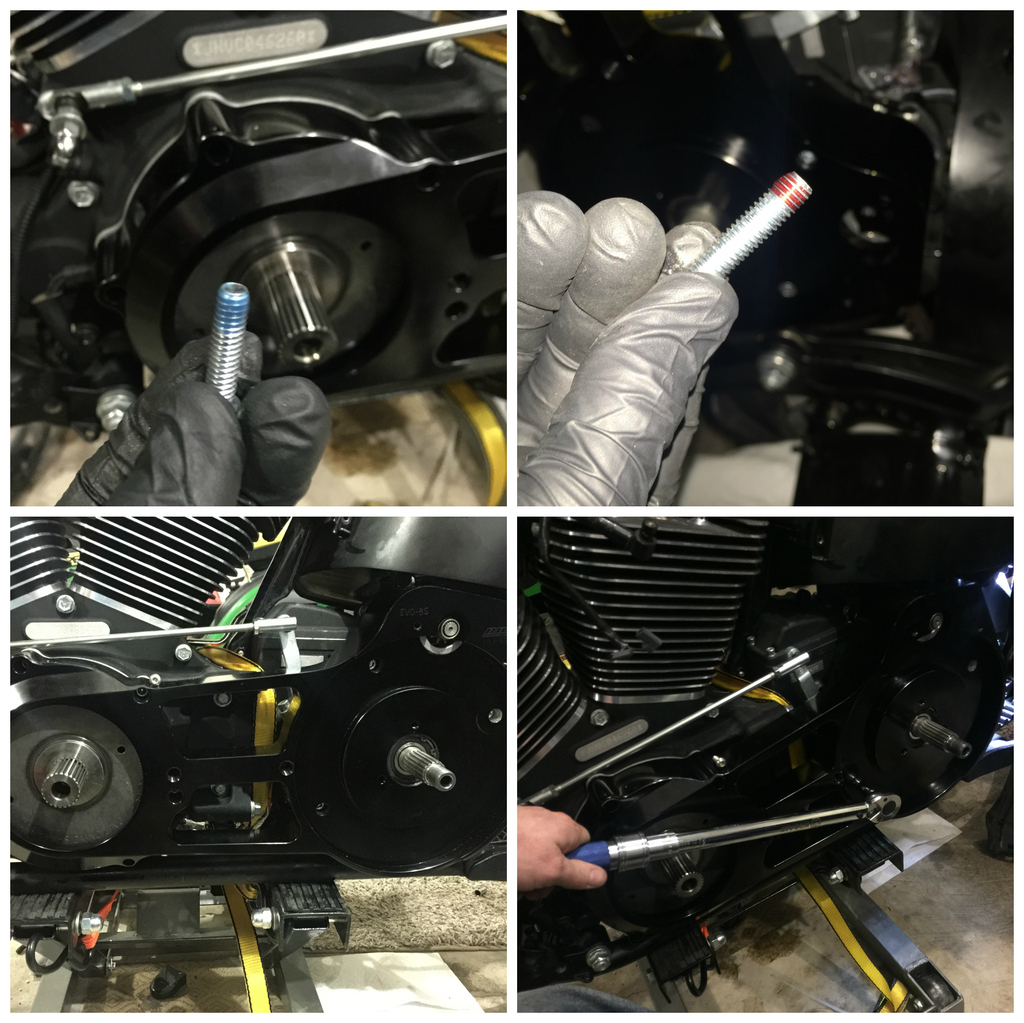
The belt should go on with the sprockets (then run your nut up in there and don’t forget the Red Loctite has instructed!) and properly torque the nuts. Then put the clutch plates in, along with the bearing lock up set up.
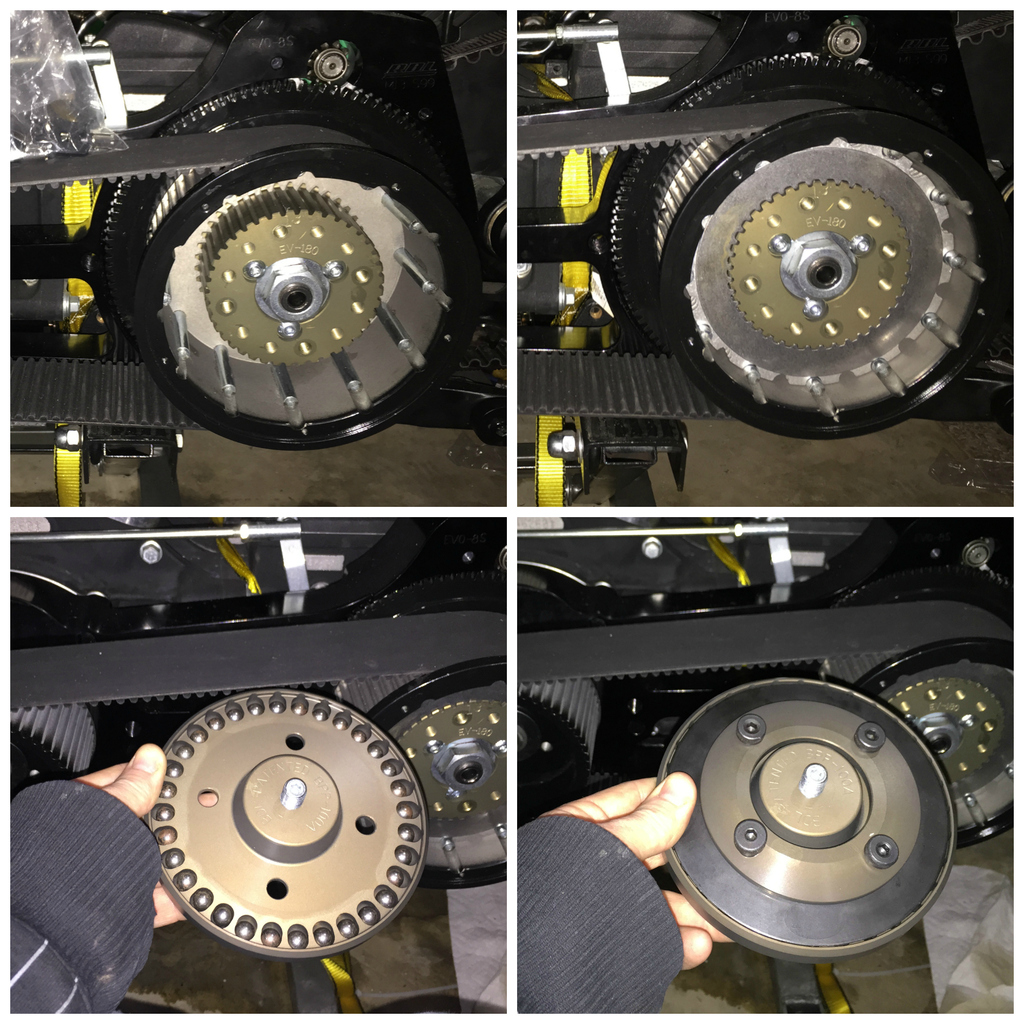
Loosing up the clutch cable and install clutch adjusting screw & jam nut. Properly adjust everything and install cover. It took me a few try’s to get it properly adjusted
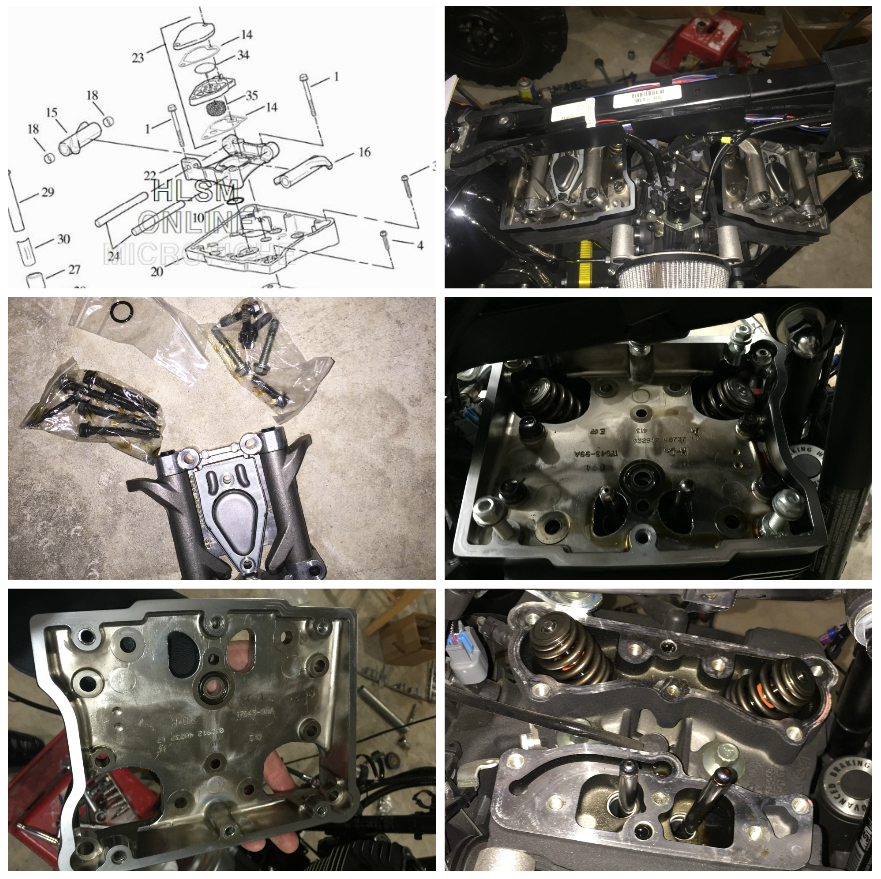
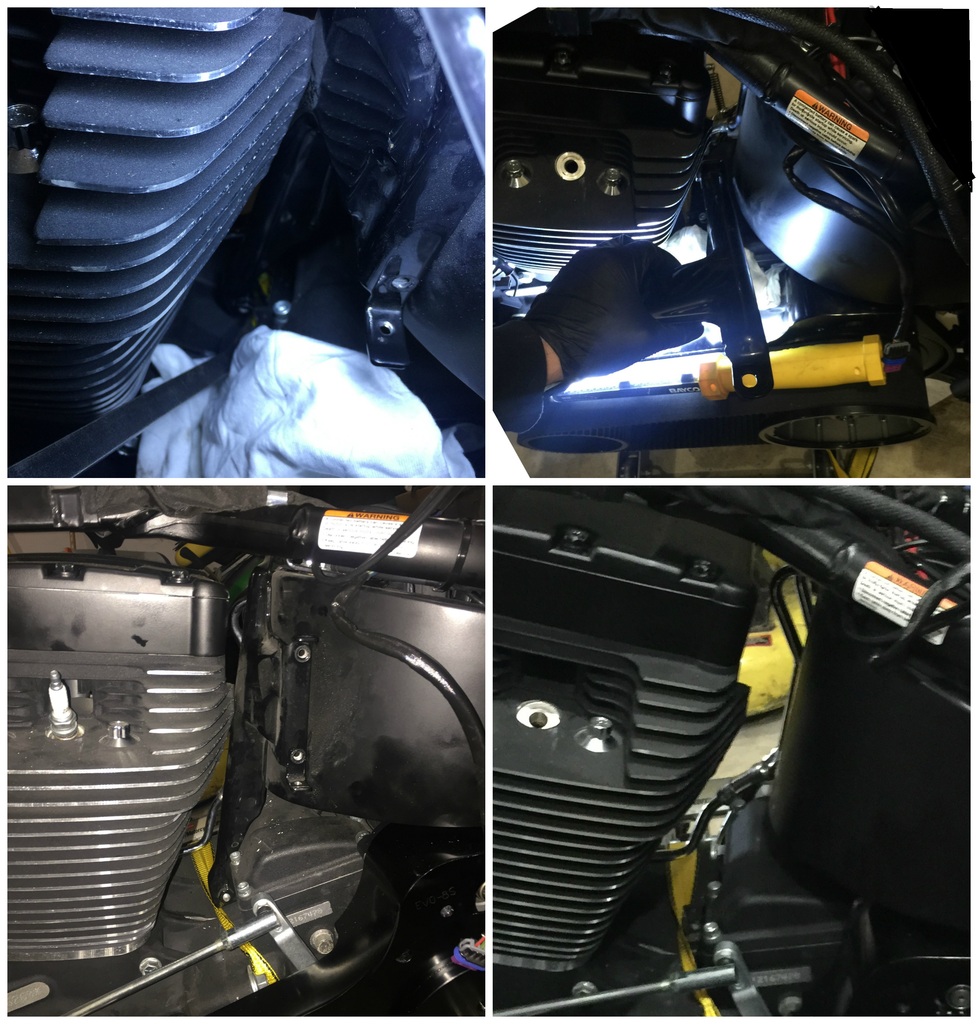
Rocker Box’s
Rocker Boxes…. A lot of areas were pretty tight and hard to get to, But they definitely came apart easier then they went back together.
This video helped for how to reinstall rocker boxes (removal is the same, but in reverse)
[url="https://www.youtube.com/watch?v=5a3JTuZ-8Qw"[/url]
 [/URL]
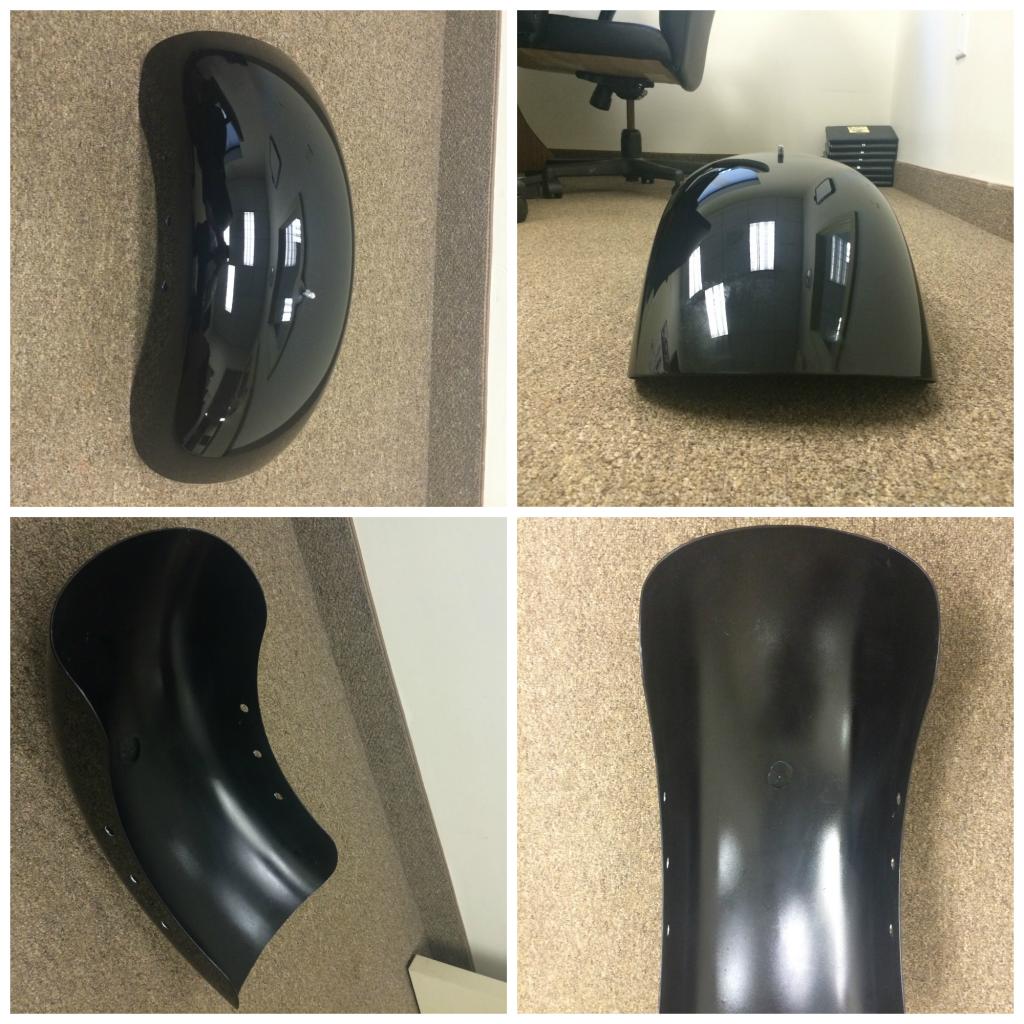
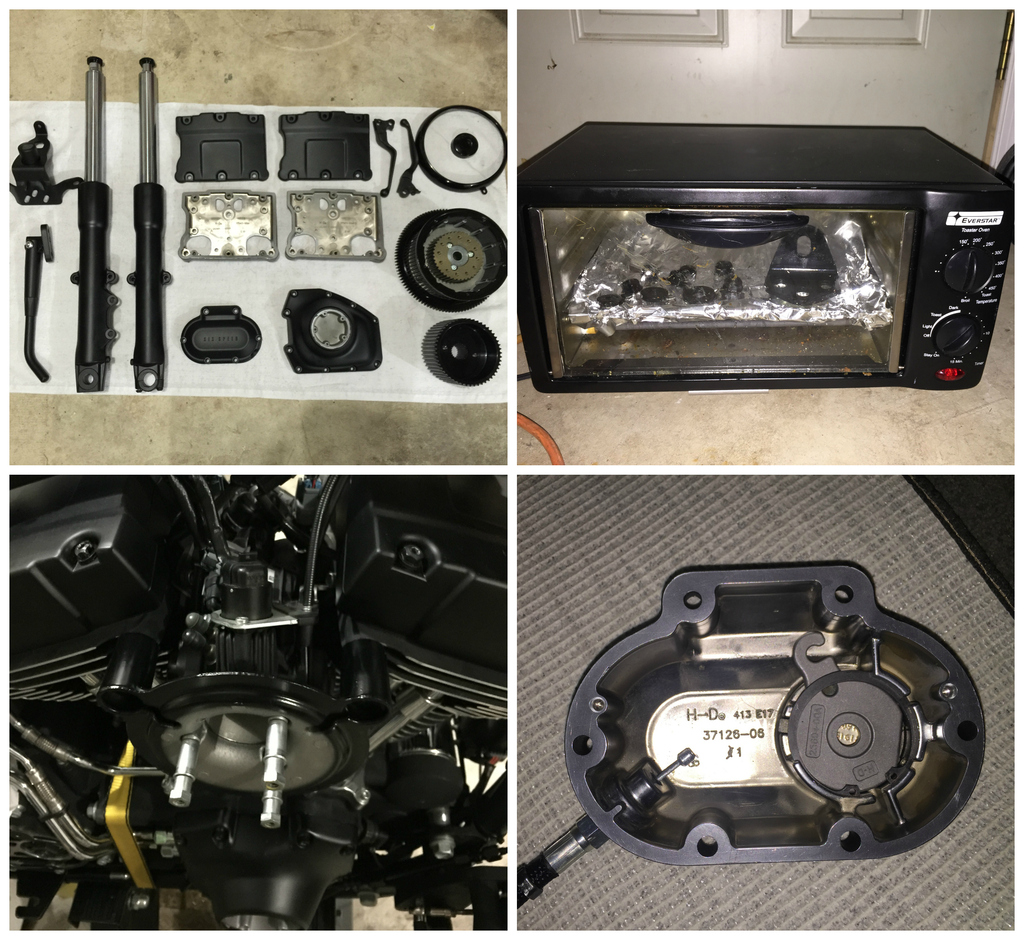
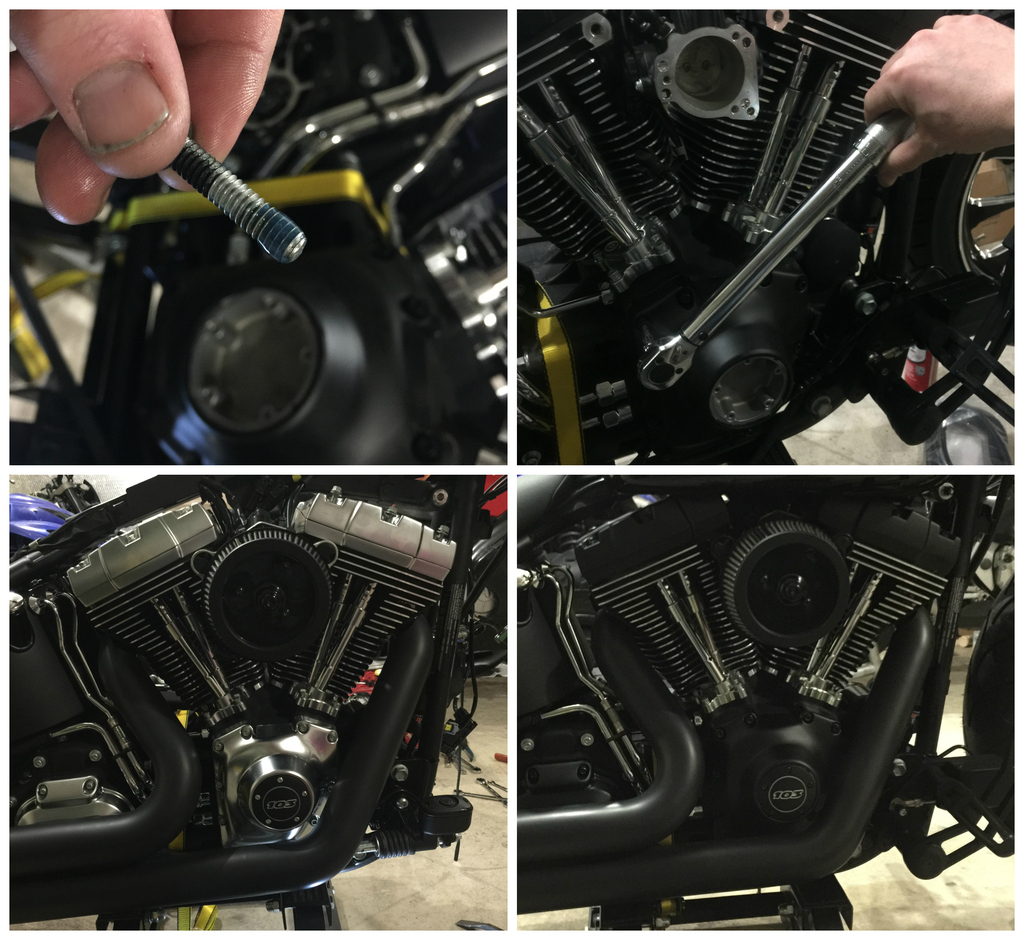
[SIZE="3"] Blacked out! I wanted to do the top half and the wheels gloss black and the bottom half matte black [/SIZE]
Powder and Paint Cure / bake parts (Mostly powder coat, some paint)
Most of all the blacked out parts were powdered matte black or gloss black by Zig at ZRZ Powder Coating. For some of the small parts I used Rustoleum self-etching primer, then Rustoleum engine enamel (500 F spray paint) flat and gloss black spray paint. Then I cured / baked them in a small oven for 30-40 min or so at 200*
Gloss Black
Matte / Flat Black
Here are a few pics of the paint and powder. There was lots of other stuff not pictured.
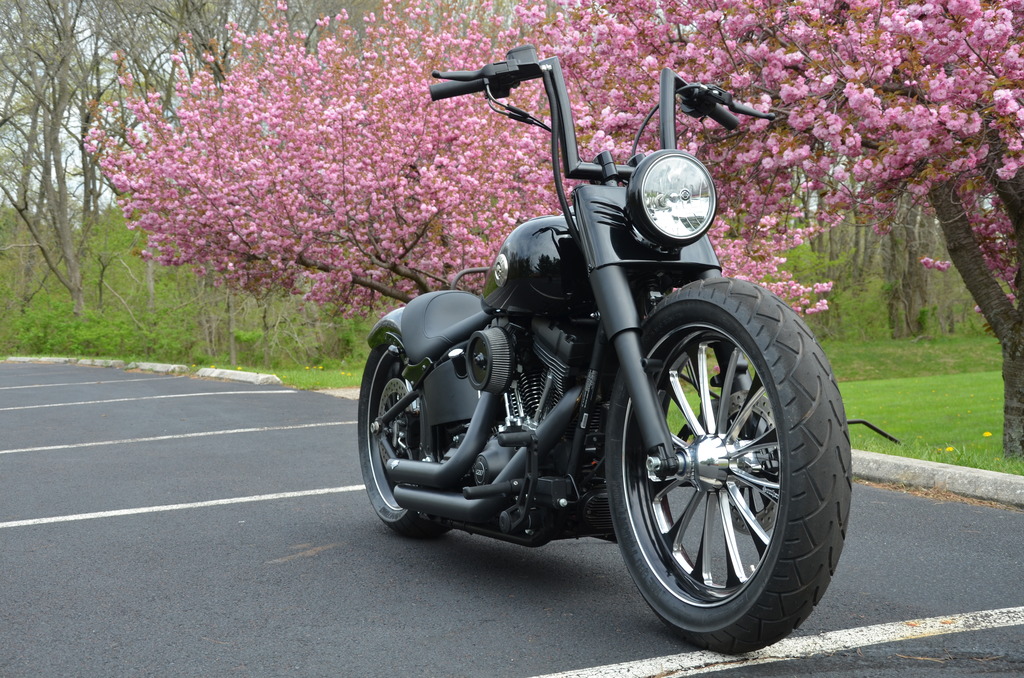
Front End Slam …..
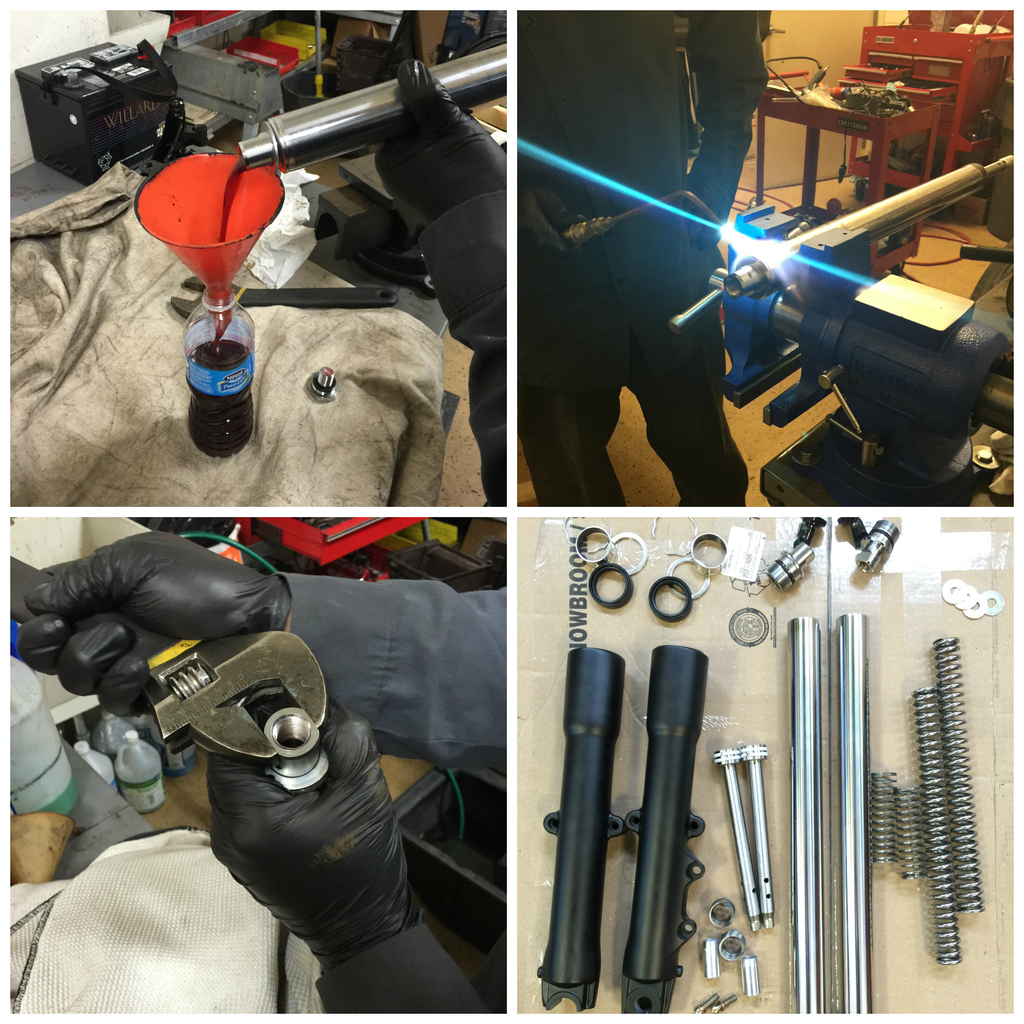
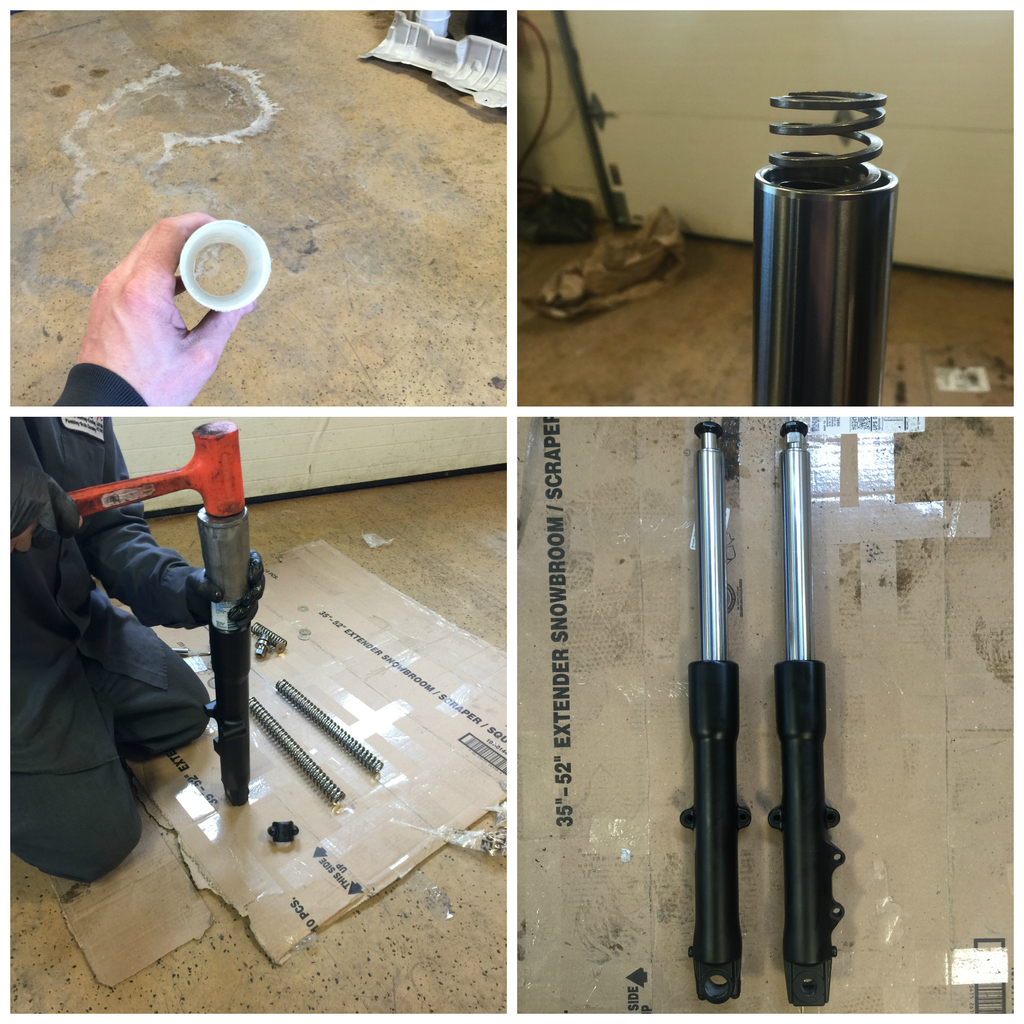
I got DBI FLT 1997-later 20.25 fork tubes (2” lower than stock Fatboy for tubes), and 10-2003 Progressive Drop In springs. After removing the DBI springs and dropping in the progressive drop ins i decided to keep the white PVC spacer out since the compensation springs were already sticking a decent amount (i'm keeping them in case i decide to add a little, but don't think there's any room to add any spacing). so i just used the main spring and the compensation spring from the progressive drop in kit, and screaming eagle heavy duty fork fluid (half a bottle in each side).
After putting everything back together on the bike and lowering the bike to ground, the progressive springs gave me an additional 1 3/4" drop once the weight of the bike was sitting one them. That’s 3 3/4“ total drop, maybe a tad more (but it was pretty close).
Although It does has very limited travel, the stiffness of the ride isn’t much worse than the rear. Obviously im going for looks over comfort, but I’m bottom out on most bumps so I will be adding Race Tech valves or Ricor valves very soon! Other than that it rides great on regular roads (as long as you avoid any bumps or holes in the road).
This is a good how to video for disassembly and reassembly of forks…
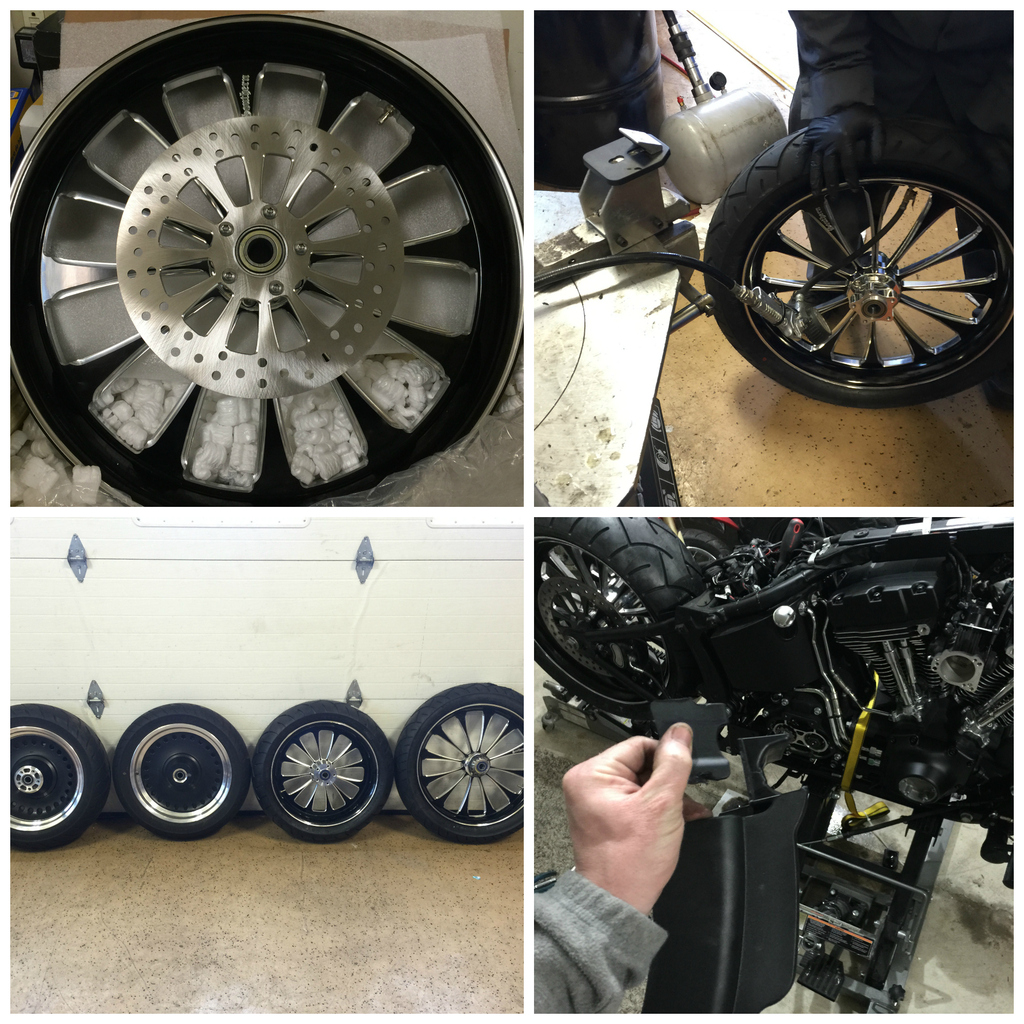
SMW Wheels
Big thanks to Randy at Southern Motorcycle Works for talking to me on the phone and working with me to figure a few different methods of payments. He was a great guy to talk to and makes great quality wheels! http://www.southern-mc.com/
I had to cut some of the splash guard to get the wheels to fit (to stop the rubbing)
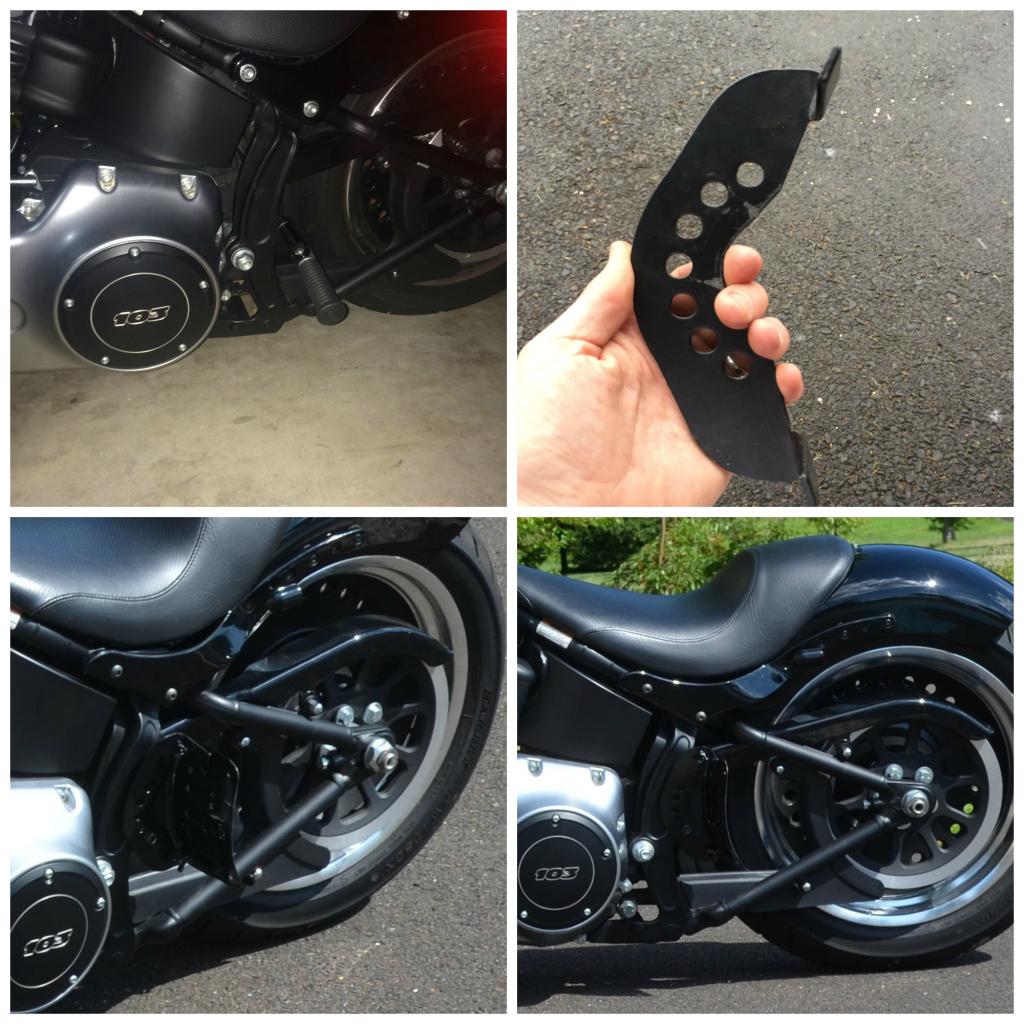
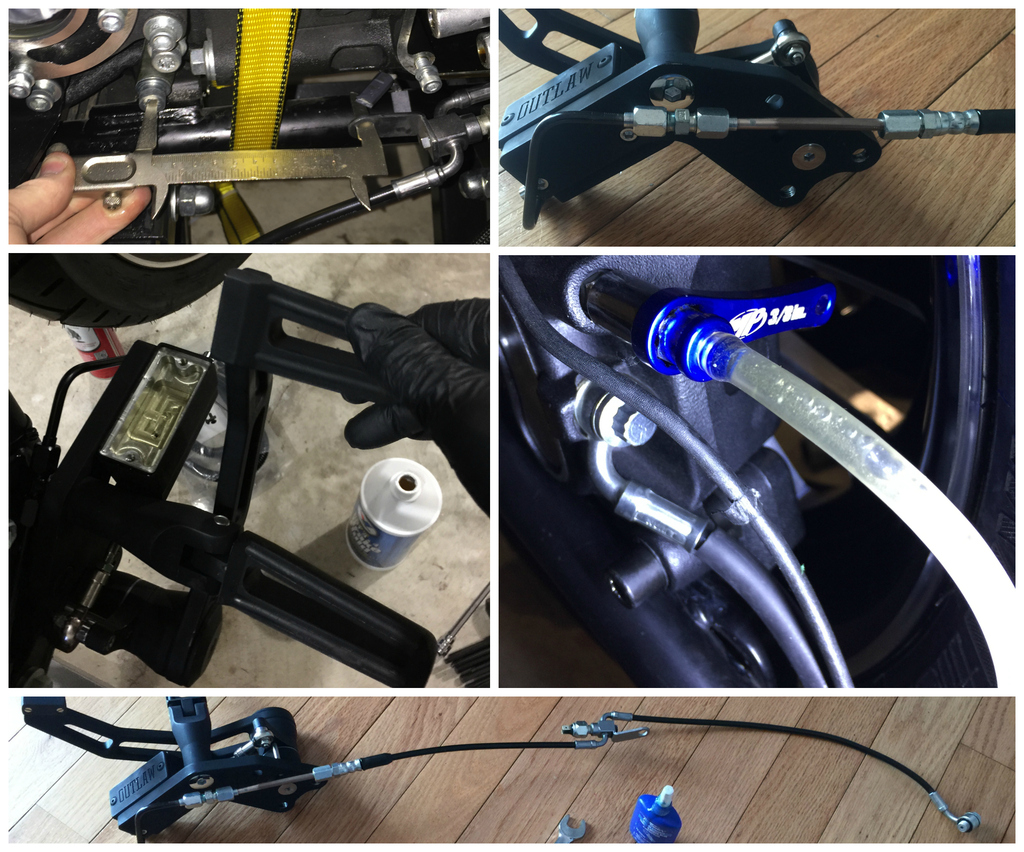
Forward Controls
I really like the style of these controls, but I’m not a huge fan of the finish… I think I might get them re-powdered next winter. They are very adjustable so you can get lever position that fits you best. I didn’t realize until after the photo shoot that there was an adjuster screw on the inside of the pegs to raise or lower the angle of the peg (that’s why in some of the pics the left peg is angled down)
when i switched from floor boards to forward controls (non extended) and it was still too short. i wanted to use my stock line from the abs module to the master. I measured how much longer I needed the line (i think it was a little over 4'), so I went to a local hydraulics supply house / shop. I had them crimp a fitting to the flexible end and flare the other end that was cut. Then to extend it, i added an extended piece of hard tube (flared on either side) with compression fittings on either end. Then painted black!
How to remove rear brake switch wires… there is no release clip, just gently pull off with needle nose plyers (do not attempt to twist or pry off with screw driver)
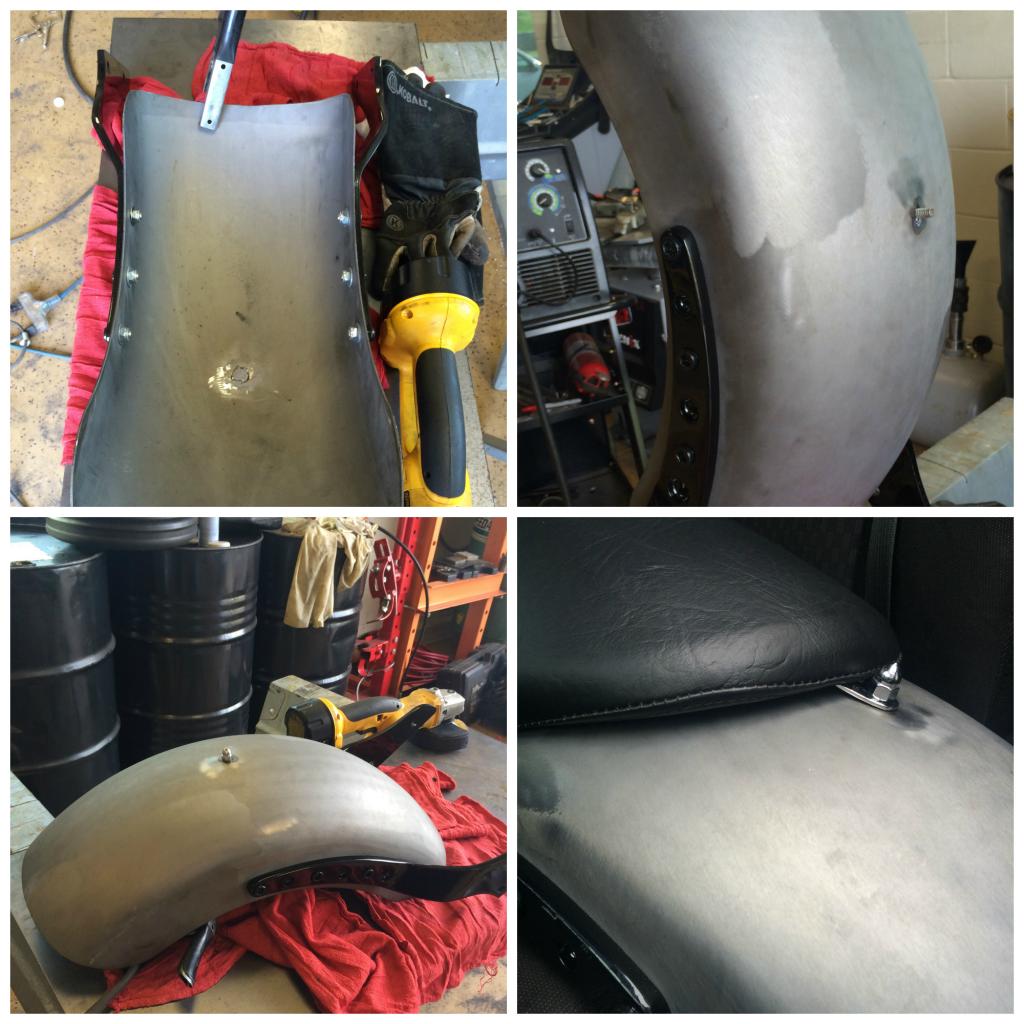
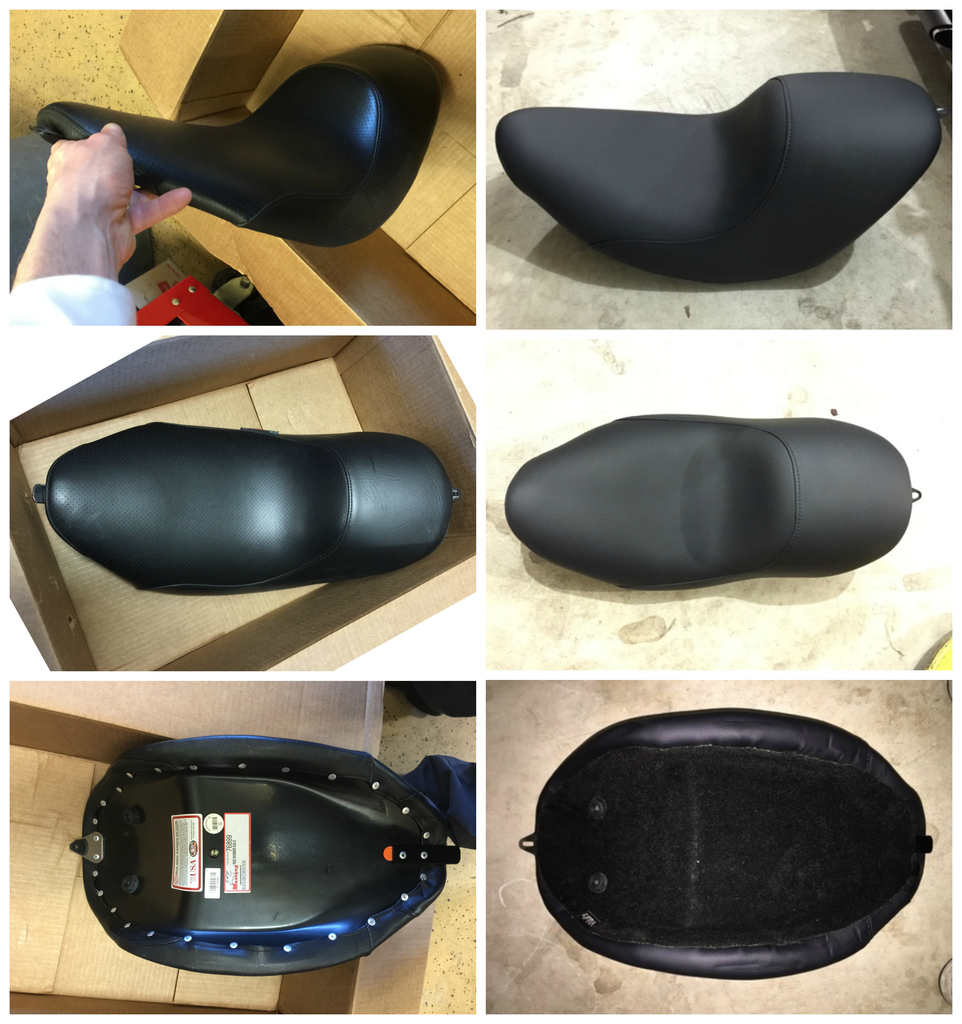
Sending my seat out to extend the front to close the gap between the tank
Big thanks to DynaJ on hdforums for hooking it up with the custom seat job! I shipped it out to him and he personally took it to Vidal's Custom Motorcycle Seats and worked with them to get the seat reworked how I wanted it. Thanks Jason!!! I really appreciate the help!!!
Added about 3” of foam to push me forward, a little on the sides to close up the gaps between the frames rail, and an inch or 2 to the front to close the gap between the tank and the seat. Nice job, fit and finish turned out great!!!
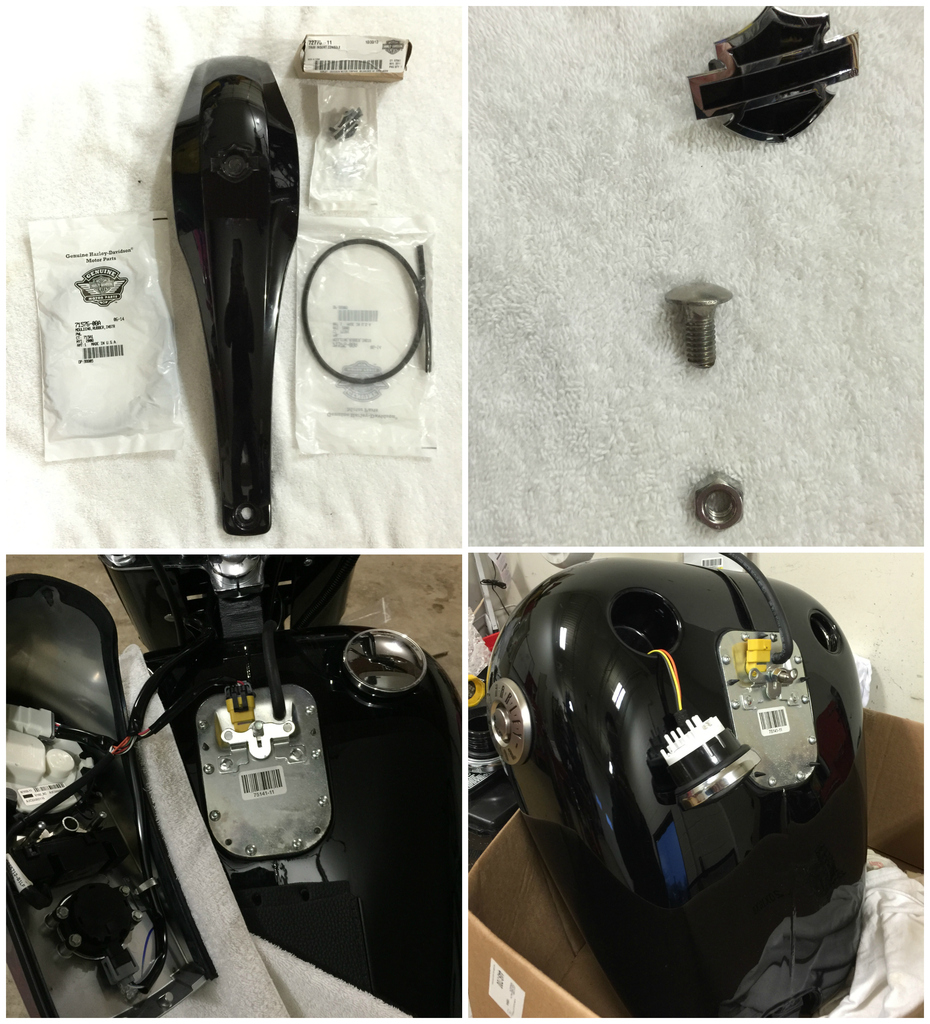
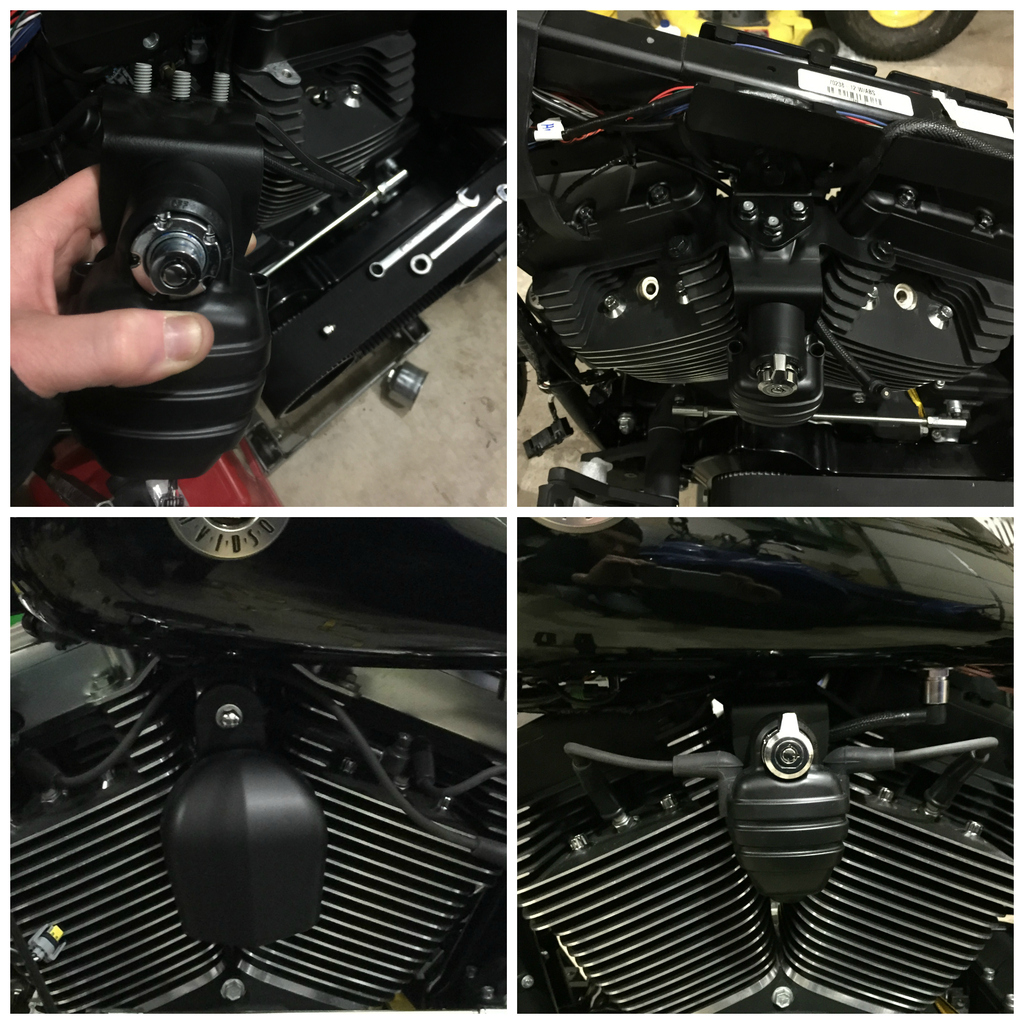
Blackline Conversion – Dash with Flush Mount Caps, the Coil & Ignition relocation, and horn removal
The blackline dash was pretty straight forward, the caps were a little harder because you want the black ring to align perfect and you have to do the wiring for the gas gauge (but they came with great directions from Harley).
The coil, wires, ignition, fork lock were a little more involved, but the wiring for everything was probably the biggest pain.
I wanted really clean it up so instead of moving the horn to where to old coil was, I decided to remove the entire bracket. it had to pry it out a little bit in order to remove it.
I would eventually like to get a Speedo / Tach, Indicator / Dummy lights, and Horn back on there. The original stock speedo was 4 1/2“, I think I will try to make a 3 3/8“ speedo (the same one used on the blackline so its plug and play), and make a bracket to mount it somewhere on the bike (maybe a rocker mount or a bar / triple mount or something, not sure yet….)
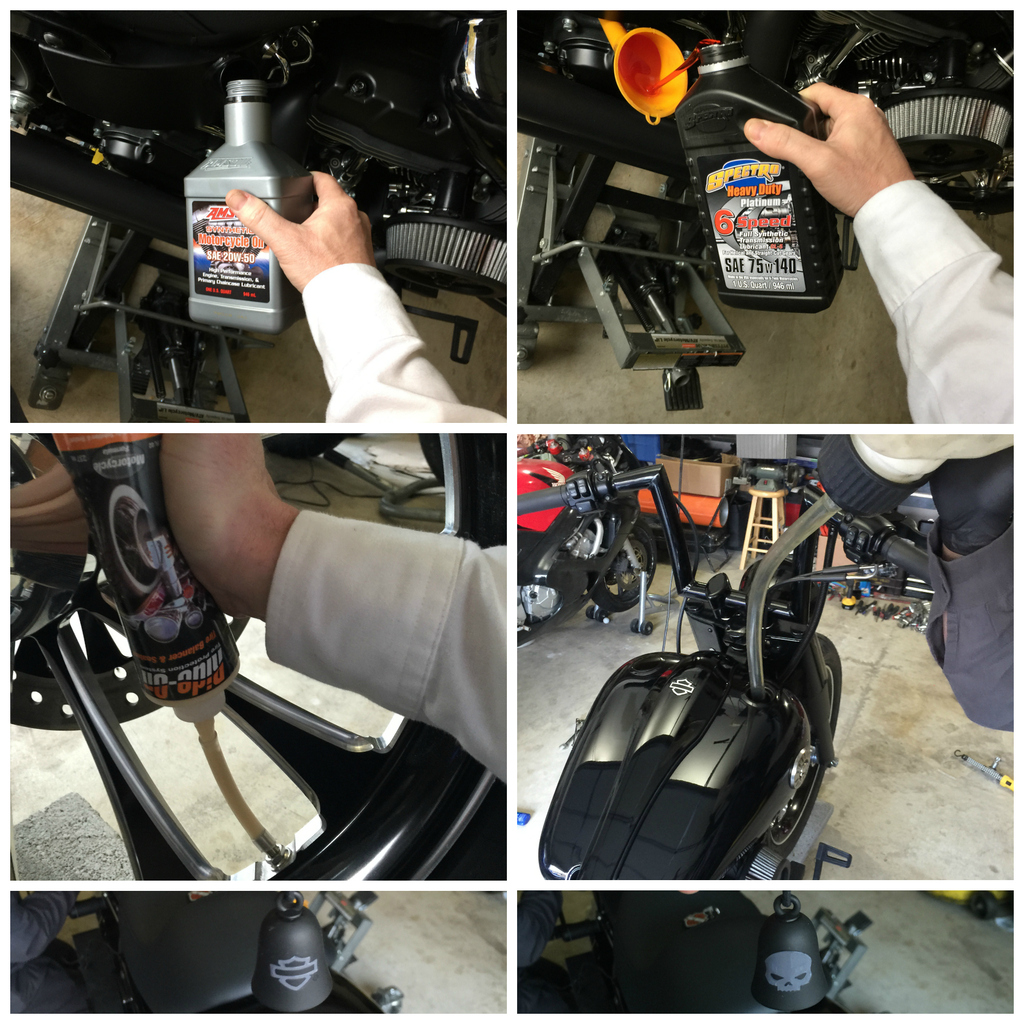
Finishing touches… adding the right fluids and Gremlin Bell from my buddy Eric who helped with some of my build
And for the finishing touches…. I’m an amsoil guy, so I had to lube it up with amsoil 20w-50! For the transmission fluid I thought the spectro heavy duty platinum 6 speed 75w-140 was best. For the wheels and tires I went with “Ride On” tire Sealant & Balancer (didn’t want to put any weights). Then obviously some fresh fuel.
The gremlin bell was given to me by a good friend Eric, who always has my back and also helped me with some of the build. Thanks man, some of this couldn’t have been done with out you!
One of my favorite mods I did to the bike, but also probably the hardest to do… here’s a few snap shots of the process and a few links that helped me out. Pics make it look easier than it was…
BDL has some good how to video’s to help installing there belt drive
https://www.youtube.com/channel/UCSh...kIOBOMAeextsvA
Instructions….
http://img.jpcycles.com/staticwebfil...df/603-980.pdf
Bearing press instruction
http://bakerdrivetrain.com/wp-conten...-V2-081712.pdf
[B] Removal of the stock primary...
Cut a small piece of wood or use a locking device to hold the sprockets in place, even a little movement could prevent it from easily breaking loose. As usual heat definitely helps (I only used the torch on the compensator nut, not the clutch hub nut).
Keep in mind the Clutch Hub nut is left hand thread, but the compensator is normal. Normal being right hand thread (AKA righty tighty / lefty loosey).


The starter was definitely another head ache! After doing it once the hard way I will definitely be removing the oil tank next time. I was successful in removing it and reinstalling it with a socket extension combined with a 6” allen key socket extension & using a super long Ľ” allen key. It was really on there so heating up where the bolt threaded in helped a lot.

[B] HOW TO REMOVE RACE
Unless you want to buy a Harley Big Twin Transmission Mainshaft Bearing Inner Race Puller / removal tool. Carefully score the inner primary bearing race in line with the shaft using a grinder or dremel. Cut almost all the way through, but in order to protect the shaft, do not go all the way through. Then using a cold chisel or flat head screw driver and hammer, strike the race at the score line. Since the inner race is hardened steel, it will crack at the score line. This will provide enough expansion to be able to slide the race off.

the rest was pretty straight forward, but at times some parts were a little intimidating and pressing the bearing was a pain and difficult to get it to sit level on the press and go in perfectly straight.
Don’t forget to reinstall the gasket on the motor behind your plate, line up and hand tight the starter, then torque your bolts same order and torque the service manual says for the original bolts, then toque your starter bolts

The belt should go on with the sprockets (then run your nut up in there and don’t forget the Red Loctite has instructed!) and properly torque the nuts. Then put the clutch plates in, along with the bearing lock up set up.

Loosing up the clutch cable and install clutch adjusting screw & jam nut. Properly adjust everything and install cover. It took me a few try’s to get it properly adjusted

Rocker Box’s
Rocker Boxes…. A lot of areas were pretty tight and hard to get to, But they definitely came apart easier then they went back together.
This video helped for how to reinstall rocker boxes (removal is the same, but in reverse)
[url="https://www.youtube.com/watch?v=5a3JTuZ-8Qw"[/url]
[/URL][SIZE="3"] Blacked out! I wanted to do the top half and the wheels gloss black and the bottom half matte black [/SIZE]
Powder and Paint Cure / bake parts (Mostly powder coat, some paint)
Most of all the blacked out parts were powdered matte black or gloss black by Zig at ZRZ Powder Coating. For some of the small parts I used Rustoleum self-etching primer, then Rustoleum engine enamel (500 F spray paint) flat and gloss black spray paint. Then I cured / baked them in a small oven for 30-40 min or so at 200*
Gloss Black
- Headlight bezel
- Triple tree
- Fork caps
- Steering stem cap
- Front rotor
- Rear rotor
- Belt drive pulleys
- Metal to extend hard brake line
- Lots washers, nuts, & bolts
- Probably some other stuff I missed
Matte / Flat Black
- Rocker covers
- Six speed transmission cover
- Engine cover
- Screamin' Eagle Air cleaner
- Fork lowers
- Levers
- Center coil engine mount brackets
- Rear mount Kick stand
- Lots washers, nuts, & bolts
- Probably some other stuff I missed
Here are a few pics of the paint and powder. There was lots of other stuff not pictured.


Front End Slam …..
I got DBI FLT 1997-later 20.25 fork tubes (2” lower than stock Fatboy for tubes), and 10-2003 Progressive Drop In springs. After removing the DBI springs and dropping in the progressive drop ins i decided to keep the white PVC spacer out since the compensation springs were already sticking a decent amount (i'm keeping them in case i decide to add a little, but don't think there's any room to add any spacing). so i just used the main spring and the compensation spring from the progressive drop in kit, and screaming eagle heavy duty fork fluid (half a bottle in each side).
After putting everything back together on the bike and lowering the bike to ground, the progressive springs gave me an additional 1 3/4" drop once the weight of the bike was sitting one them. That’s 3 3/4“ total drop, maybe a tad more (but it was pretty close).
Although It does has very limited travel, the stiffness of the ride isn’t much worse than the rear. Obviously im going for looks over comfort, but I’m bottom out on most bumps so I will be adding Race Tech valves or Ricor valves very soon! Other than that it rides great on regular roads (as long as you avoid any bumps or holes in the road).
This is a good how to video for disassembly and reassembly of forks…


SMW Wheels
Big thanks to Randy at Southern Motorcycle Works for talking to me on the phone and working with me to figure a few different methods of payments. He was a great guy to talk to and makes great quality wheels! http://www.southern-mc.com/
I had to cut some of the splash guard to get the wheels to fit (to stop the rubbing)

Forward Controls
I really like the style of these controls, but I’m not a huge fan of the finish… I think I might get them re-powdered next winter. They are very adjustable so you can get lever position that fits you best. I didn’t realize until after the photo shoot that there was an adjuster screw on the inside of the pegs to raise or lower the angle of the peg (that’s why in some of the pics the left peg is angled down)
when i switched from floor boards to forward controls (non extended) and it was still too short. i wanted to use my stock line from the abs module to the master. I measured how much longer I needed the line (i think it was a little over 4'), so I went to a local hydraulics supply house / shop. I had them crimp a fitting to the flexible end and flare the other end that was cut. Then to extend it, i added an extended piece of hard tube (flared on either side) with compression fittings on either end. Then painted black!
How to remove rear brake switch wires… there is no release clip, just gently pull off with needle nose plyers (do not attempt to twist or pry off with screw driver)

Sending my seat out to extend the front to close the gap between the tank
Big thanks to DynaJ on hdforums for hooking it up with the custom seat job! I shipped it out to him and he personally took it to Vidal's Custom Motorcycle Seats and worked with them to get the seat reworked how I wanted it. Thanks Jason!!! I really appreciate the help!!!
Added about 3” of foam to push me forward, a little on the sides to close up the gaps between the frames rail, and an inch or 2 to the front to close the gap between the tank and the seat. Nice job, fit and finish turned out great!!!

Blackline Conversion – Dash with Flush Mount Caps, the Coil & Ignition relocation, and horn removal
The blackline dash was pretty straight forward, the caps were a little harder because you want the black ring to align perfect and you have to do the wiring for the gas gauge (but they came with great directions from Harley).
The coil, wires, ignition, fork lock were a little more involved, but the wiring for everything was probably the biggest pain.
I wanted really clean it up so instead of moving the horn to where to old coil was, I decided to remove the entire bracket. it had to pry it out a little bit in order to remove it.
I would eventually like to get a Speedo / Tach, Indicator / Dummy lights, and Horn back on there. The original stock speedo was 4 1/2“, I think I will try to make a 3 3/8“ speedo (the same one used on the blackline so its plug and play), and make a bracket to mount it somewhere on the bike (maybe a rocker mount or a bar / triple mount or something, not sure yet….)


Finishing touches… adding the right fluids and Gremlin Bell from my buddy Eric who helped with some of my build
And for the finishing touches…. I’m an amsoil guy, so I had to lube it up with amsoil 20w-50! For the transmission fluid I thought the spectro heavy duty platinum 6 speed 75w-140 was best. For the wheels and tires I went with “Ride On” tire Sealant & Balancer (didn’t want to put any weights). Then obviously some fresh fuel.
The gremlin bell was given to me by a good friend Eric, who always has my back and also helped me with some of the build. Thanks man, some of this couldn’t have been done with out you!

Last edited by ADRENALINE RUSH; 10-26-2015 at 03:56 PM.
#4
06-05-2015, 05:28 PM
#5
06-05-2015, 05:38 PM

#6
06-05-2015, 06:33 PM
OP you have almost the same taste as i do. I just bought a FL front end for my night train and will be installing it once i get back in the states. the only difference between my bike and yours when i am done will be my rear fender/seat choice and bars. my only question is what your going to do for a speedo. i used a sportster speedo for my bike with the black line dash
#7
06-06-2015, 07:19 AM
Road Warrior
Trending Topics
#8
06-08-2015, 01:40 PM
And yeah, if your serious, i can help out. it was definitely an involved process but a lot simpler than it looks. i used the lowers from my stock forks (powder coated them), then bought DBI fork tubes (shorter than stock) and progressive lowering springs. i unscrewed the tops of the DBI fork tubes, dumped out the springs that came with them, then just dropped the shorter progressive ones in. then screwed the tops back on, dropped them into my stock lowers, put the seal in (used an empty caulk tube and a hammer to push the seal in), then put the little clip in to hold it all together.
OP you have almost the same taste as i do. I just bought a FL front end for my night train and will be installing it once i get back in the states. the only difference between my bike and yours when i am done will be my rear fender/seat choice and bars. my only question is what your going to do for a speedo. i used a sportster speedo for my bike with the black line dash
Thanks, so do i!!! with all that travel removed from the suspension, the big tire seems to help smooth out the ride (and I think it looks good too)