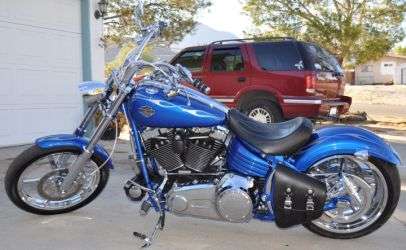
Finally got my bag mount finished!
#1
I know this has been done before but I mine was a little different.
First I got some aluminum diamond plate to add some support for the bag. I traced out a pattern and cut it out. Then I marked the holes to mount the bags and drilled the holes.

My Leatherworks 312 bag has a pocket inside that I wanted to keep so I had to use two seperate peices on the inside of the bag.


I used some stainless steel #10 screws and locknuts to attach the plates to the bag.

I made a bracket out of 1/8"X1/2" stainless flat stock and polished it to a mirror finish. This serves as the third mounting point for support.


My mounting points were the existing locations on the swingarm, upper and lower belt guards. I found some 5/16"X1.5" long rod couplings and cut them to the needed lengths. Then mounted the bag with stainless 5/16" button head bolts.


The bag is rock solid. The rod couplings keep the bag just far enough away from the bike so when I raise/lower the Shotgun shock the bag doesn't rub anywhere. The rod couplings also allow me to remove the bag easily with an allen wrench.
Let me know what you think.
First I got some aluminum diamond plate to add some support for the bag. I traced out a pattern and cut it out. Then I marked the holes to mount the bags and drilled the holes.

My Leatherworks 312 bag has a pocket inside that I wanted to keep so I had to use two seperate peices on the inside of the bag.


I used some stainless steel #10 screws and locknuts to attach the plates to the bag.

I made a bracket out of 1/8"X1/2" stainless flat stock and polished it to a mirror finish. This serves as the third mounting point for support.


My mounting points were the existing locations on the swingarm, upper and lower belt guards. I found some 5/16"X1.5" long rod couplings and cut them to the needed lengths. Then mounted the bag with stainless 5/16" button head bolts.


The bag is rock solid. The rod couplings keep the bag just far enough away from the bike so when I raise/lower the Shotgun shock the bag doesn't rub anywhere. The rod couplings also allow me to remove the bag easily with an allen wrench.
Let me know what you think.
Last edited by harleyheaven; 09-19-2011 at 10:51 AM.
#3
Instead of using plate inside the bag, I used fender washers, (large diameter with a small hole in the center) to secure the bag to the plate mount.
I used a 12"x12" piece of diamond plate and had enough material to leave a lower belt guard mounting point.
Your stainless piece works, it was just a lot less work for me leave an extended piece on the plate.
I used a 12"x12" piece of diamond plate and had enough material to leave a lower belt guard mounting point.
Your stainless piece works, it was just a lot less work for me leave an extended piece on the plate.
#4
Instead of using plate inside the bag, I used fender washers, (large diameter with a small hole in the center) to secure the bag to the plate mount.
I used a 12"x12" piece of diamond plate and had enough material to leave a lower belt guard mounting point.
Your stainless piece works, it was just a lot less work for me leave an extended piece on the plate.
I used a 12"x12" piece of diamond plate and had enough material to leave a lower belt guard mounting point.
Your stainless piece works, it was just a lot less work for me leave an extended piece on the plate.
My bag is 1/4" or so away from the swingarm and that makes the bag about 2" away from the lower mount.
How did you deal with the distance from the bag to the lower mount? Did you put a offset in the extended piece or extend the bolt out that far?
#5
#6
Using the fender washers still allows use of the inner pocket.
I need to make a new mount now to shift the bag back into a normal position.
I'm going to use an axle mount instead of the swingarm mounting point for the Roto-Plate.
That will allow me to mount the Alloy Arts flush passenger pegs.
This time I'll take pictures to help anyone interested in how I mounted it.
#7
Trending Topics
#8
#10


