2012 FatBoy Lo Build Thread – First phase of mods – TONS of Pics! “How to’s” and tips
#1
 07-26-2014, 02:40 PM

check out the new updated 2nd phase!!!!!!!!!!!
https://www.hdforums.com/forum/softa...l#post14088070
when i got this bike a few months ago i promised myself i would leave the bike alone until winter, but i couldn't help myself...
here's a list of mods, then completed pics, then some of the process and a few how to's / tips and tricks i learned along the way.
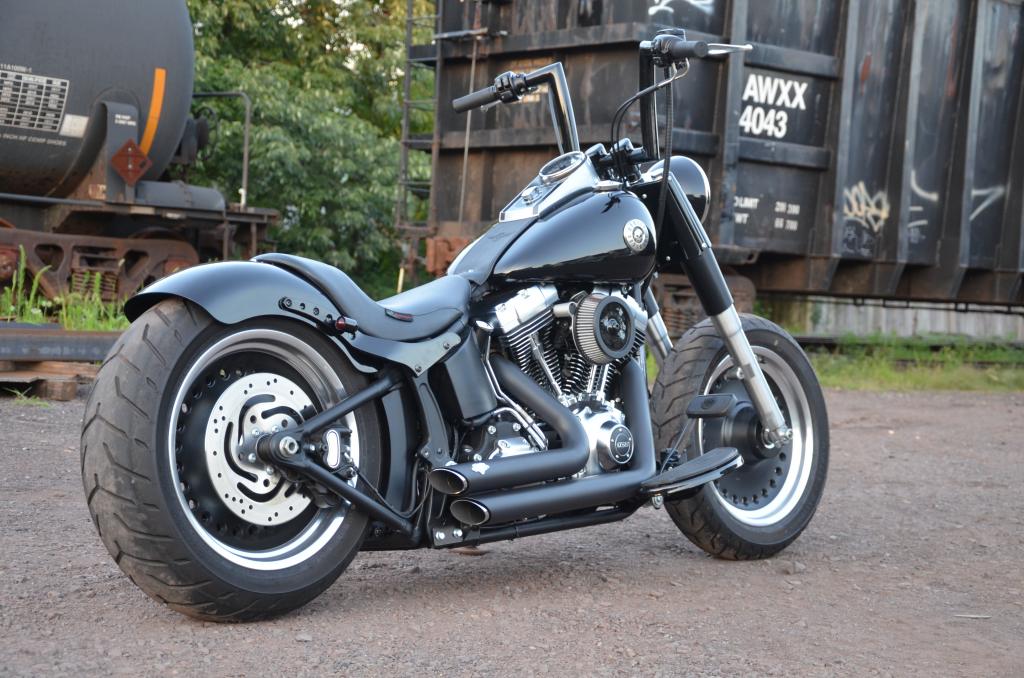
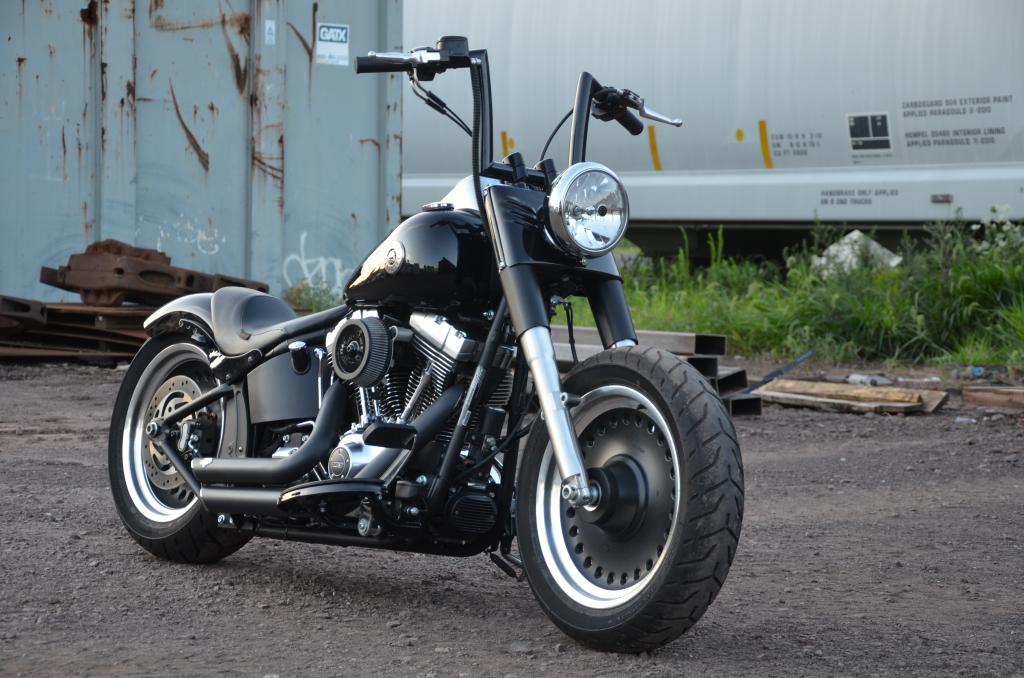
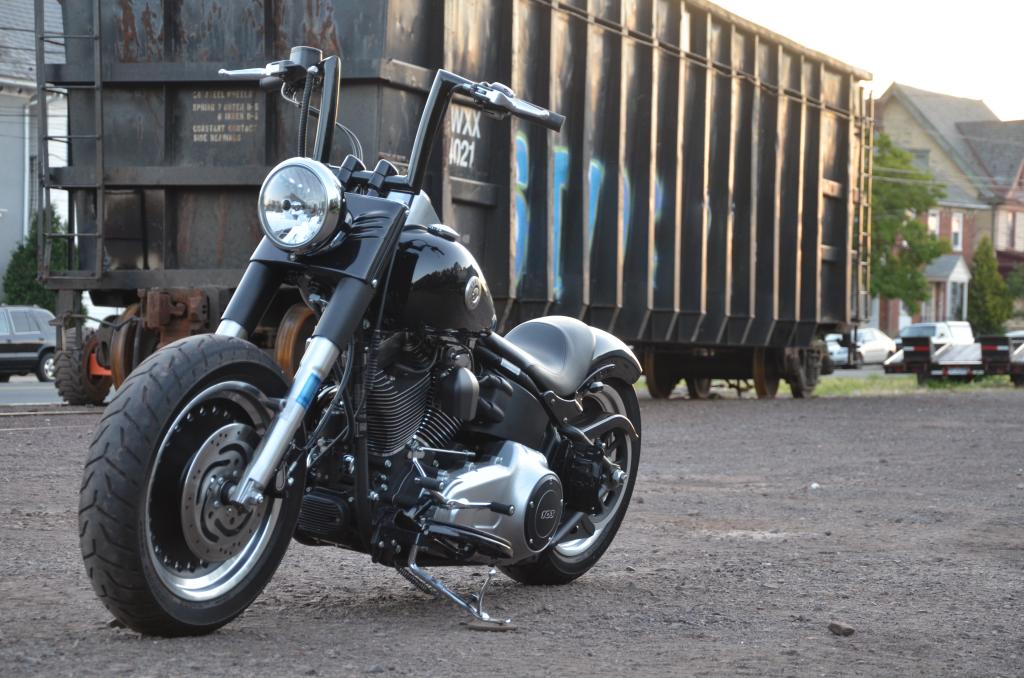
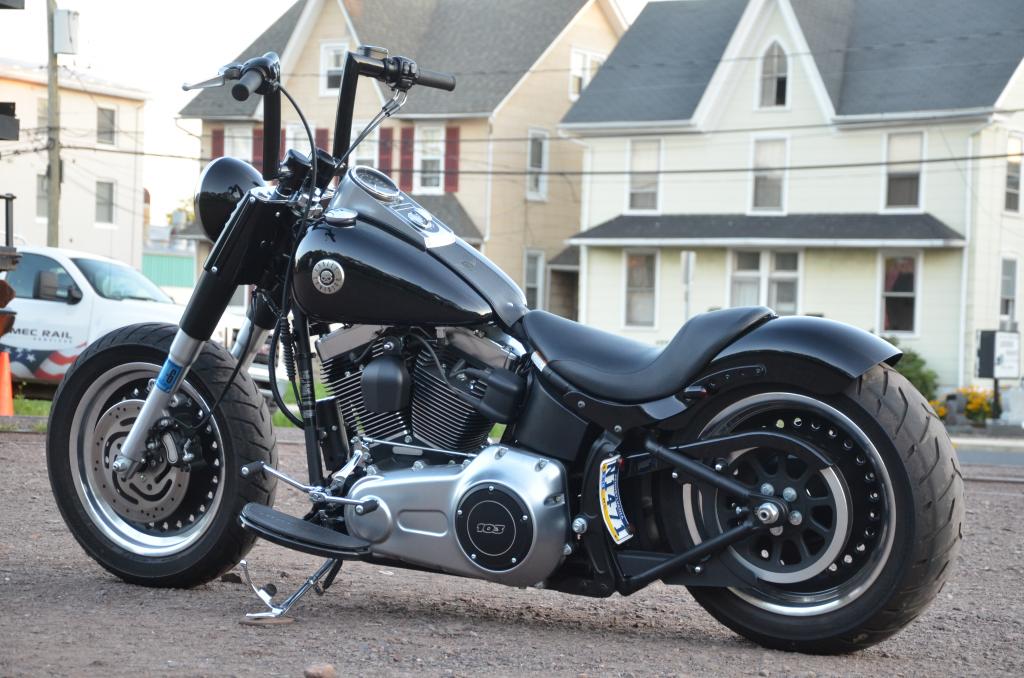
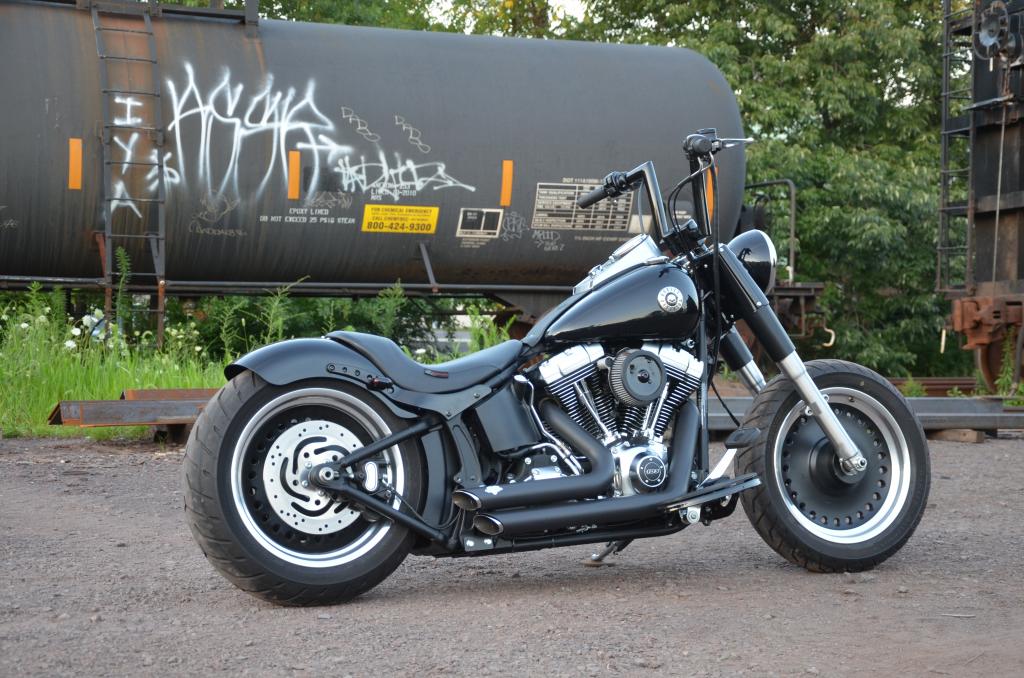
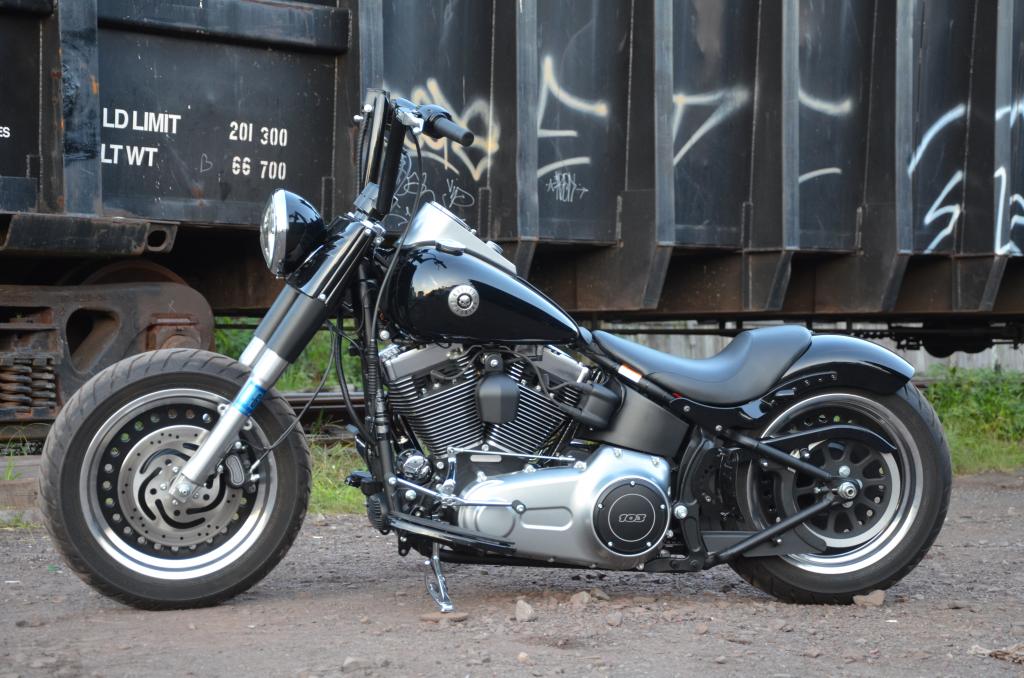
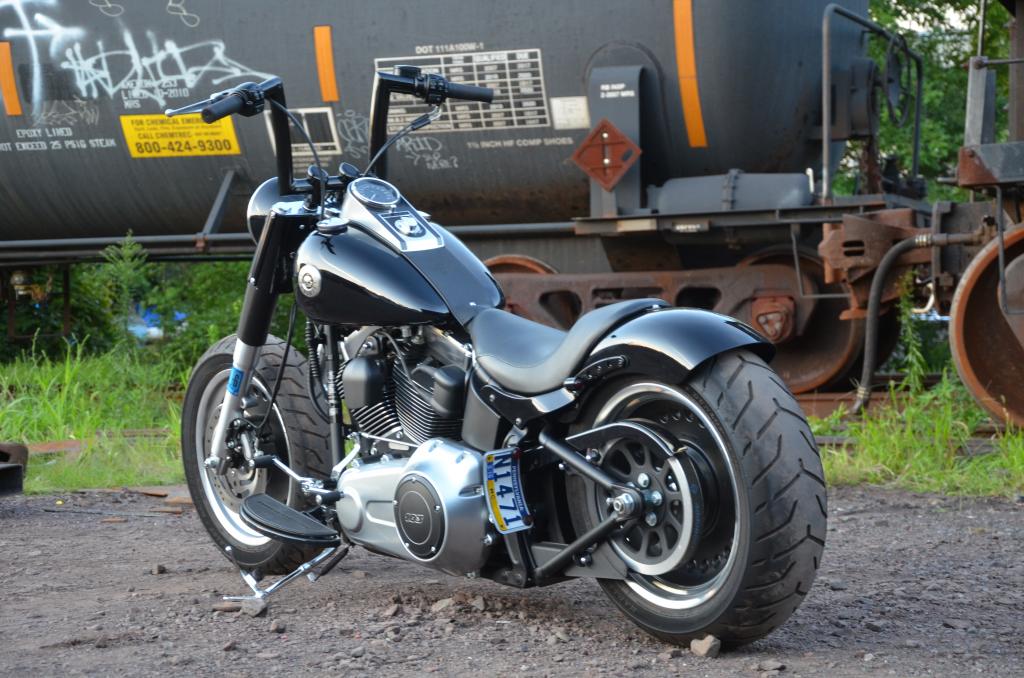
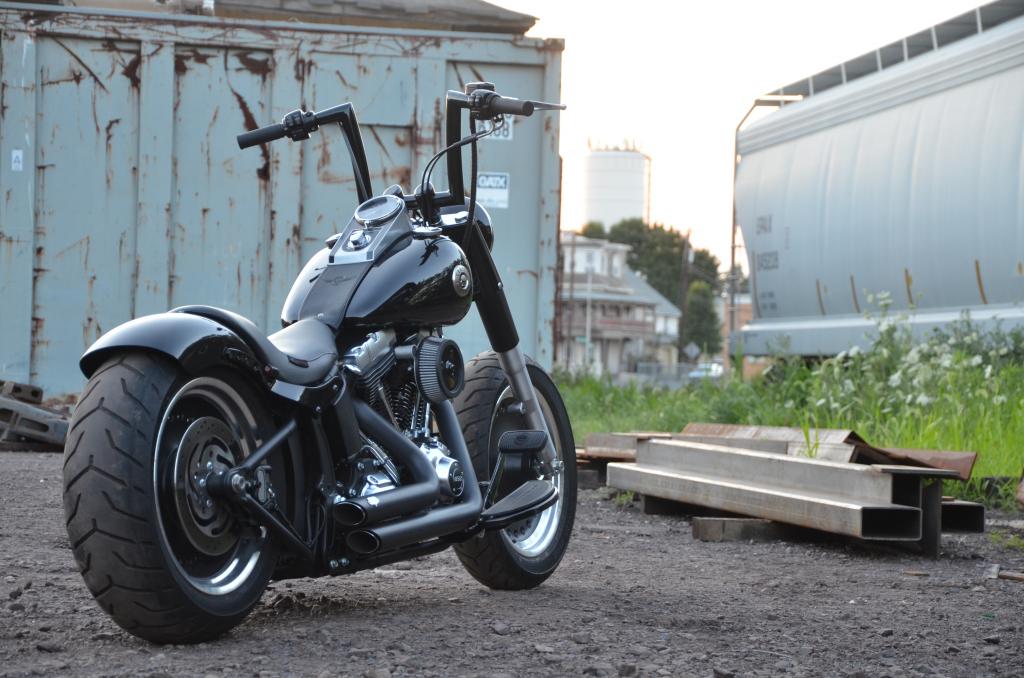
Here’s a list of things done to it so far….
Pretty much done till winter, then some blackout begins powder coating and anodizing... Levers, lower forks, Speedo / tach housing, rocker covers, brake pedal bar, some nuts & bolt heads, kick stand / jiffy stand, shifter, engine covers …ect. also realized by looking at the pics i need to relocate my horn.
I have a long list of mods id still like to do like new wheels (18x5.5 rear & 21x3.5 front), open primary, forward controls, led headlight, digital gauges, RSD air cleaner, and possibly shotgun shock and lots of other little things.
https://www.hdforums.com/forum/softa...l#post14088070
when i got this bike a few months ago i promised myself i would leave the bike alone until winter, but i couldn't help myself...
here's a list of mods, then completed pics, then some of the process and a few how to's / tips and tricks i learned along the way.
Here’s a list of things done to it so far….
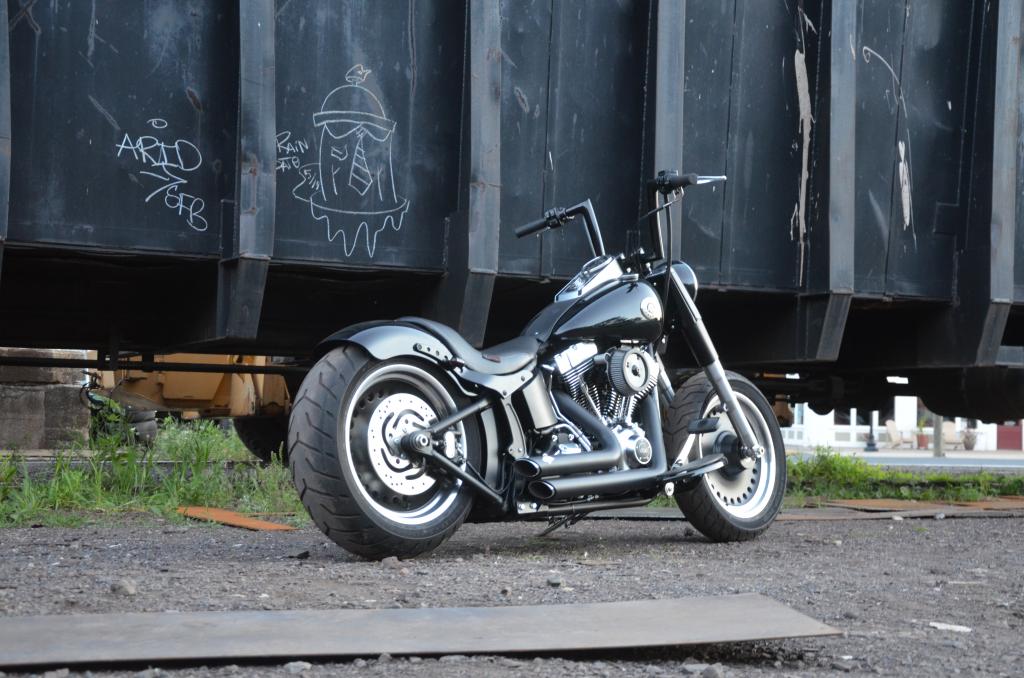
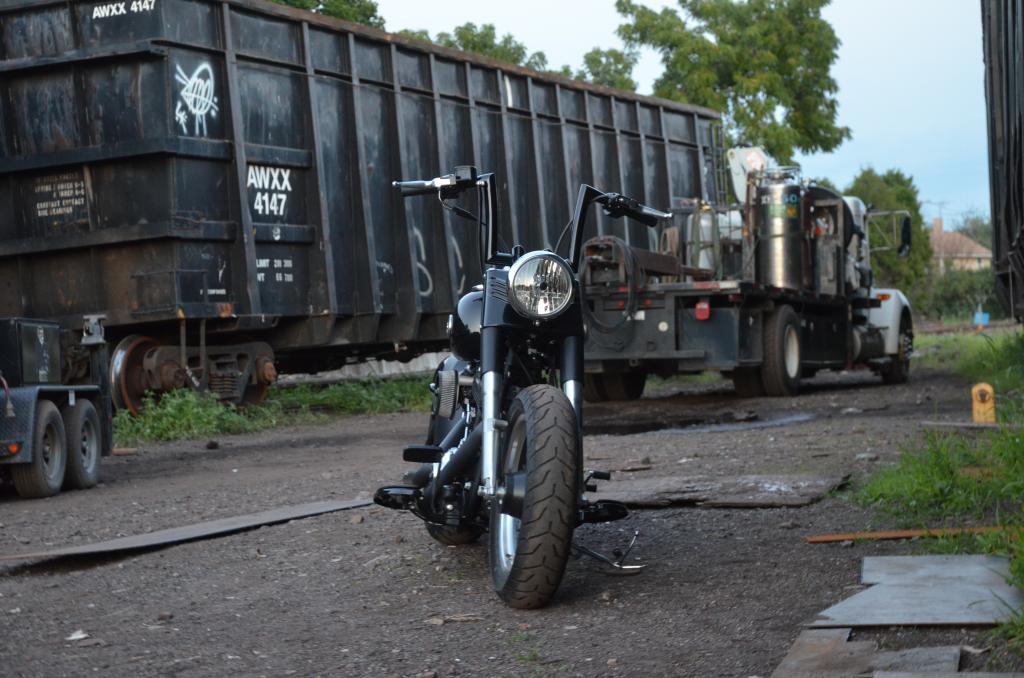
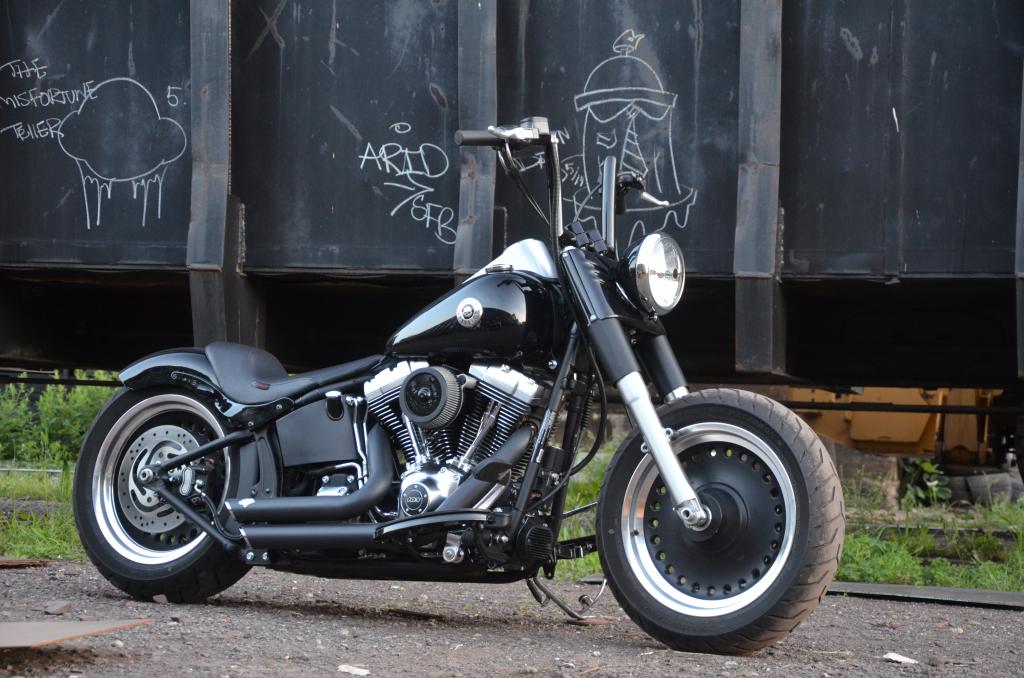
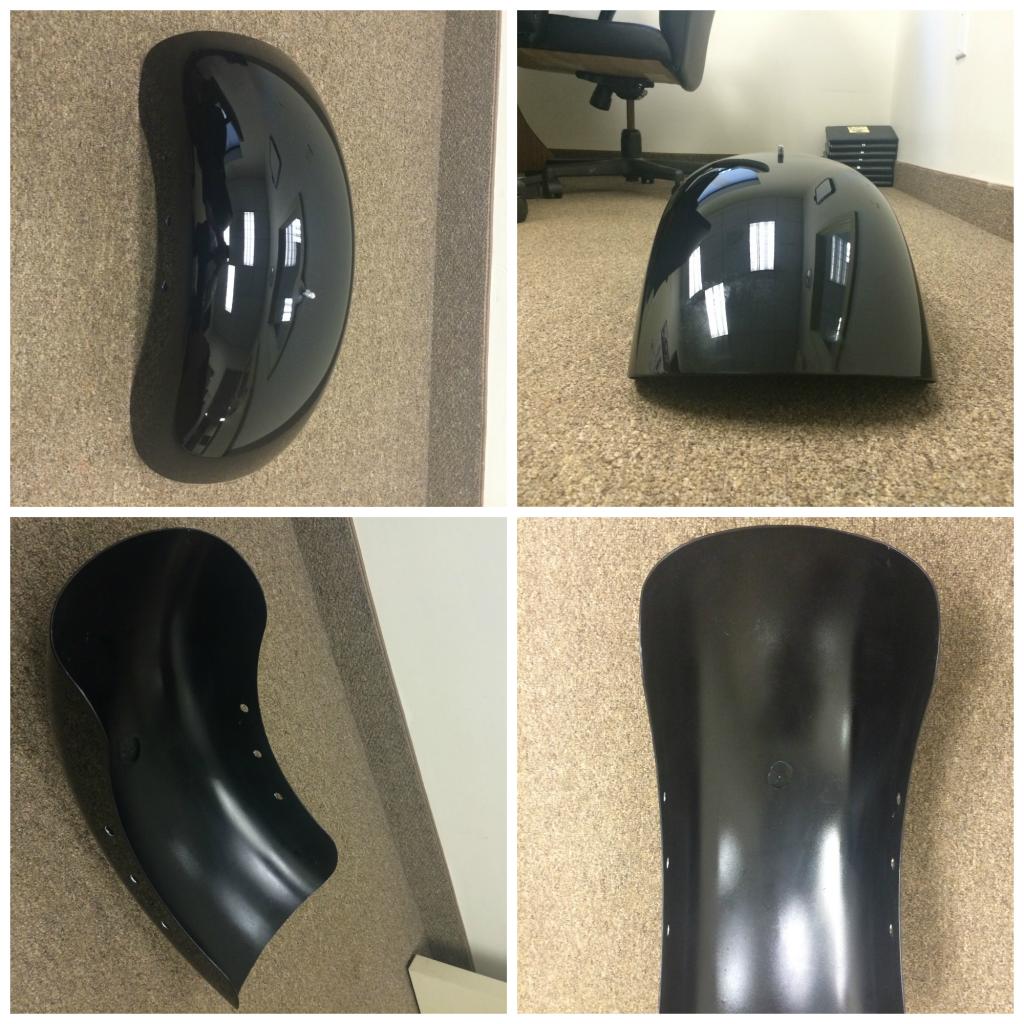
- RSD Tracker Rear Fender Conversion Kit with Black Struts
- RSD Vintage Solo Seat
- Auto-Gem Baby Bullets lights (run / brake / signal)
- Auxiliary Brake Light/Running Light/Turn Signal Conversion Kit-69461-06D
- Homemade curved license plate mount (mounted to where the pass peg was)
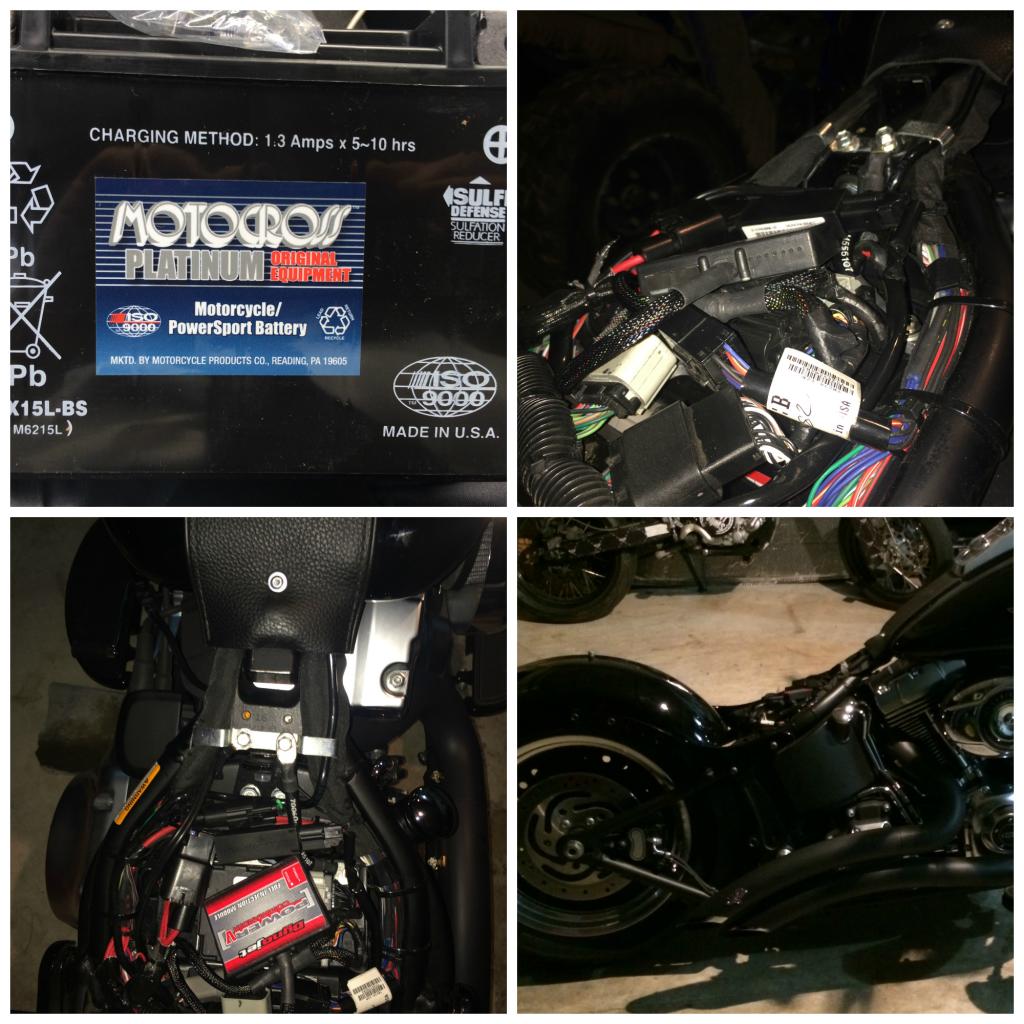
- smaller battery Yuasa YTX15L-BS)
- Arlen ness rear lowering kit
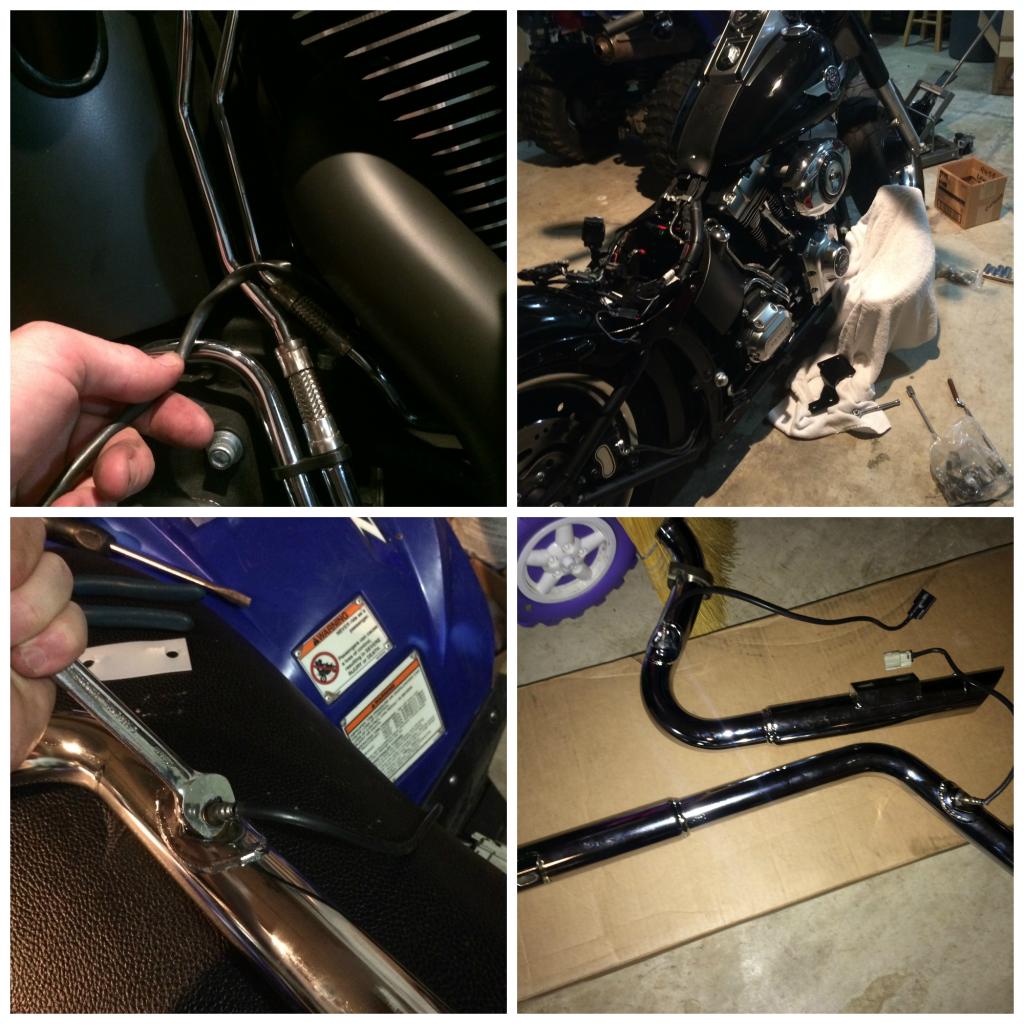
- V&H short shots
- screaming eagle stage one A/C (removed cover panted inside)
- power commander w/ custom A/F map
- cvo skull tank emblems
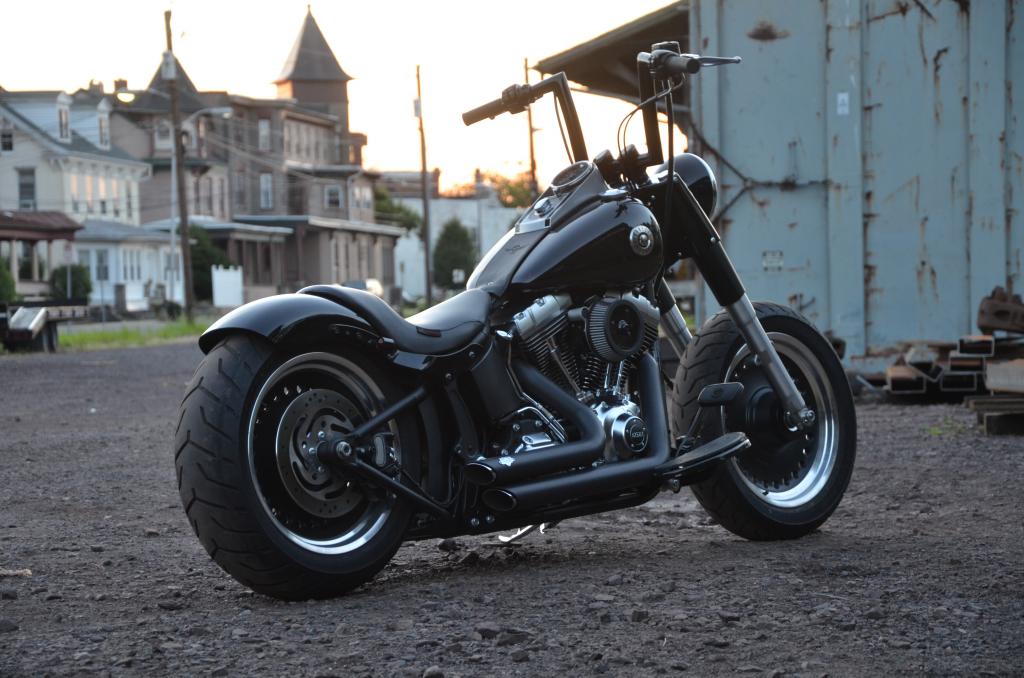
- Todd's Cycle Gloss Black 1 1/2 in. Strip Handlebar - 0601-2233
- Drag Specialties - Risers Big Buffalo 1.5"
- Longer custom made brake line
- removed passenger pegs
- removed front fender, mirrors, front signals, fork reflectors
- painted a few things with black engine enamel
- and probably some little things i missed
Pretty much done till winter, then some blackout begins powder coating and anodizing... Levers, lower forks, Speedo / tach housing, rocker covers, brake pedal bar, some nuts & bolt heads, kick stand / jiffy stand, shifter, engine covers …ect. also realized by looking at the pics i need to relocate my horn.
I have a long list of mods id still like to do like new wheels (18x5.5 rear & 21x3.5 front), open primary, forward controls, led headlight, digital gauges, RSD air cleaner, and possibly shotgun shock and lots of other little things.


Last edited by ADRENALINE RUSH; 06-05-2015 at 05:21 PM.
#2
07-26-2014, 02:41 PM
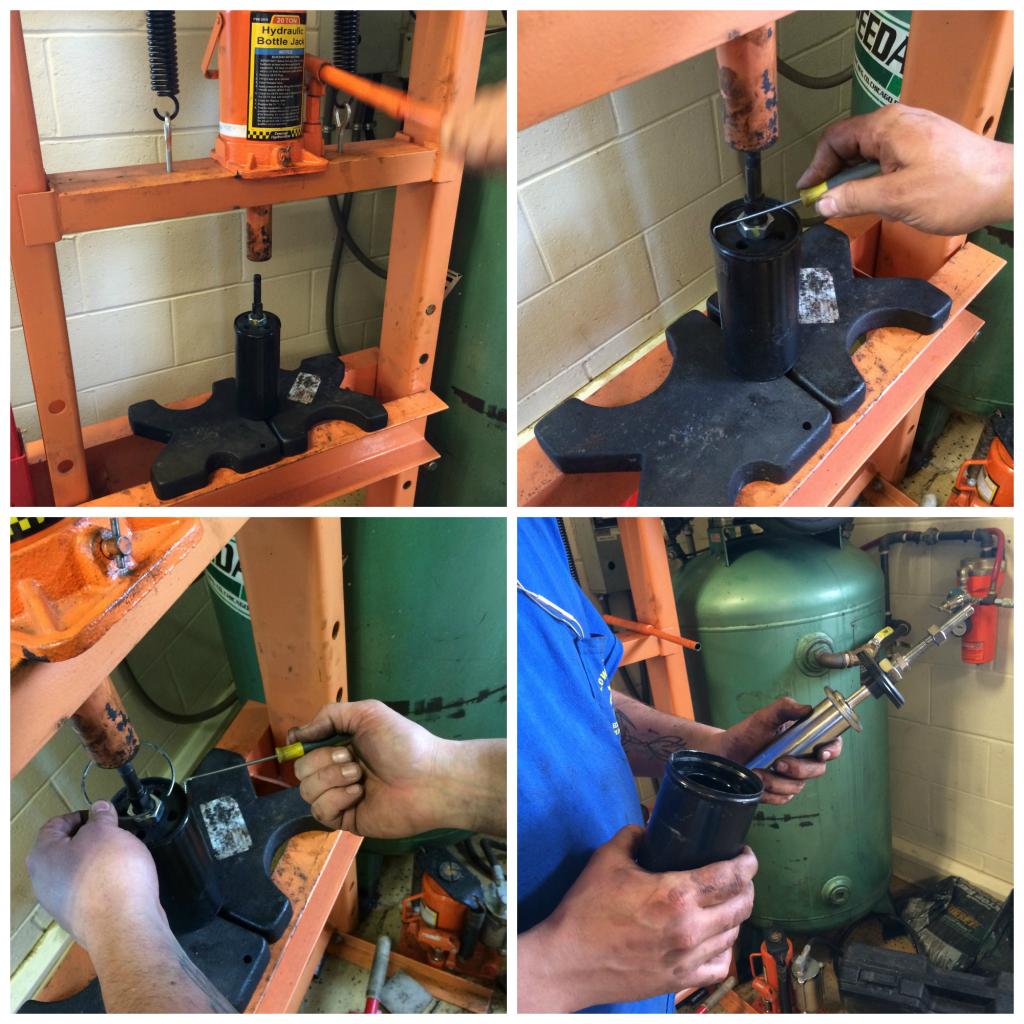
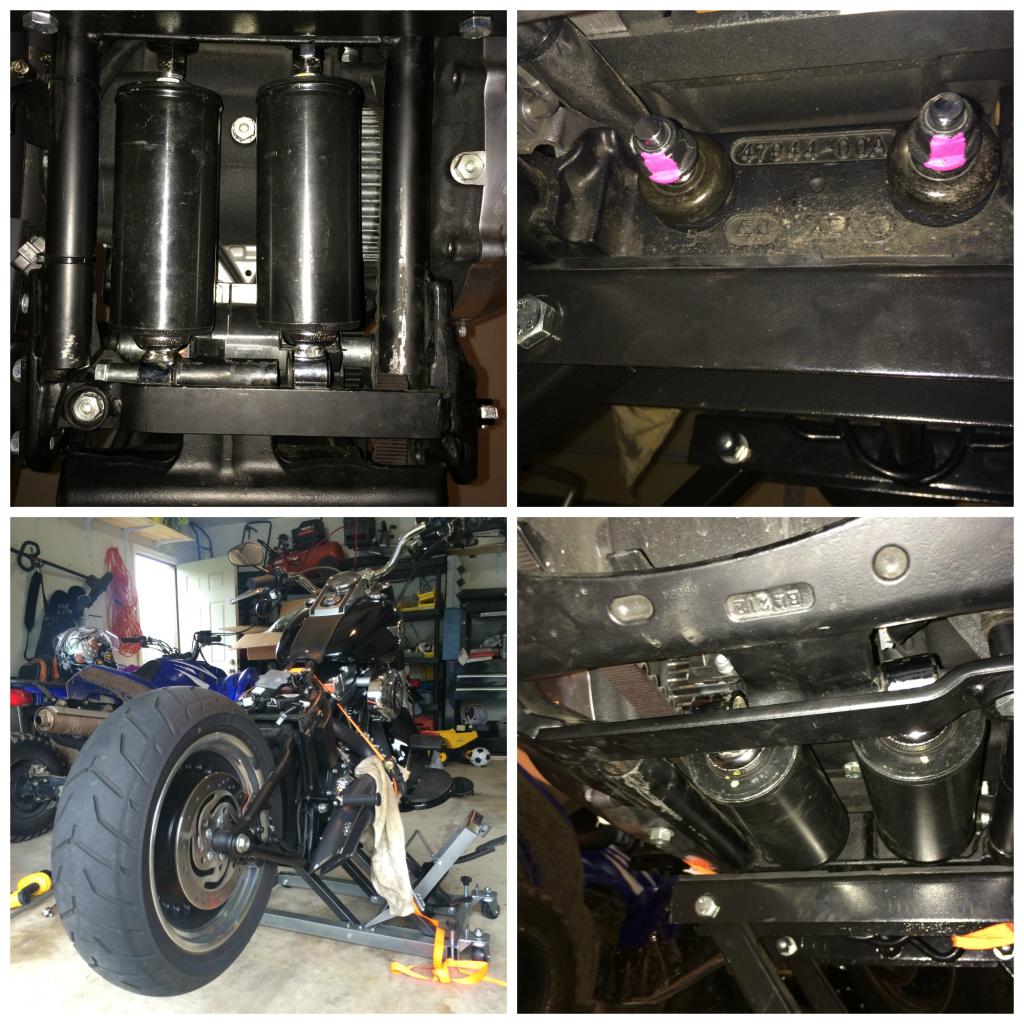
Shocks…..
Obviously I needed to bring the fender closer to the tire! The stock ones has the fender sitting over 2" above the tire. I went as low as I could without bottoming out.
put them on a press to compress the springs in order to replace the bolts with longer ones.
Everything was so tight and almost impossible to get to. The bolts were high torqued with permanent Loctite, and not enough room to get a breaker bar under the bike, and only allowed less than a half-inch of turn for the wrench to move back and forth between the frame. Once the bolts were off the shocks they fully expanded and wouldn't fit out of the frame, was definitely a pain…
If I ever had to remove them again I would probably be able to do it way quicker, and would need to do 5 things first instead of figuring them out last. Torch to heat up the bolts/nuts, heavier hammer to hit the wrench to break the nuts loose, 3/4" ratcheting wrench (not a fixed box wrench), a pry bar to remove the shock, and more beer
After lowering check the belt to make sure it’s not rubbing were in goes into the primary and that there’s enough slack (a tight belt will perform and last longer than a loose belt). This is with the bike sitting on the ground on the jiff stand (kick stand) not on a lift or with you sitting on it. a good rule of thumb is that you should be able to grab the belt in the middle of its run and be able to twist it with your hand 45*
A good how to for installing lowering kit https://www.youtube.com/watch?v=W0IN...ature=youtu.be
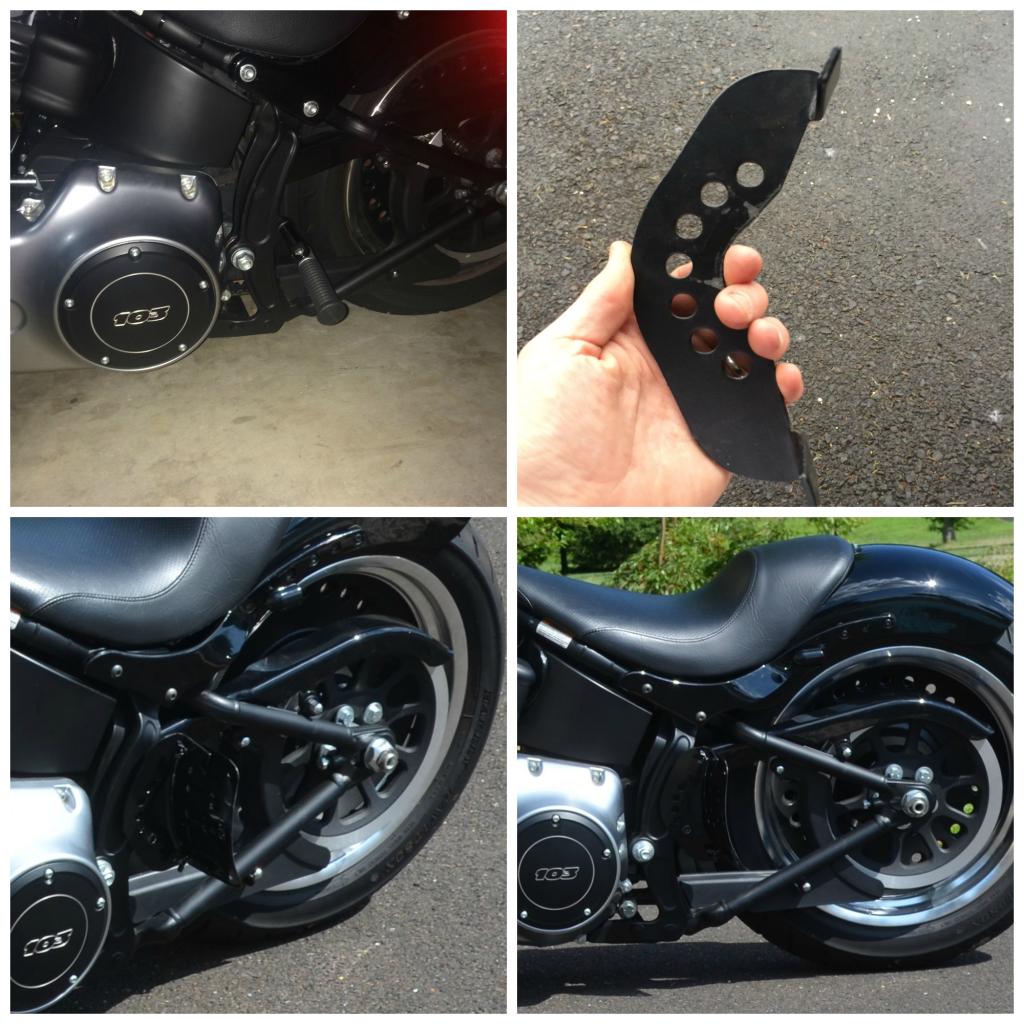
RSD Tracker fender kit and seat…
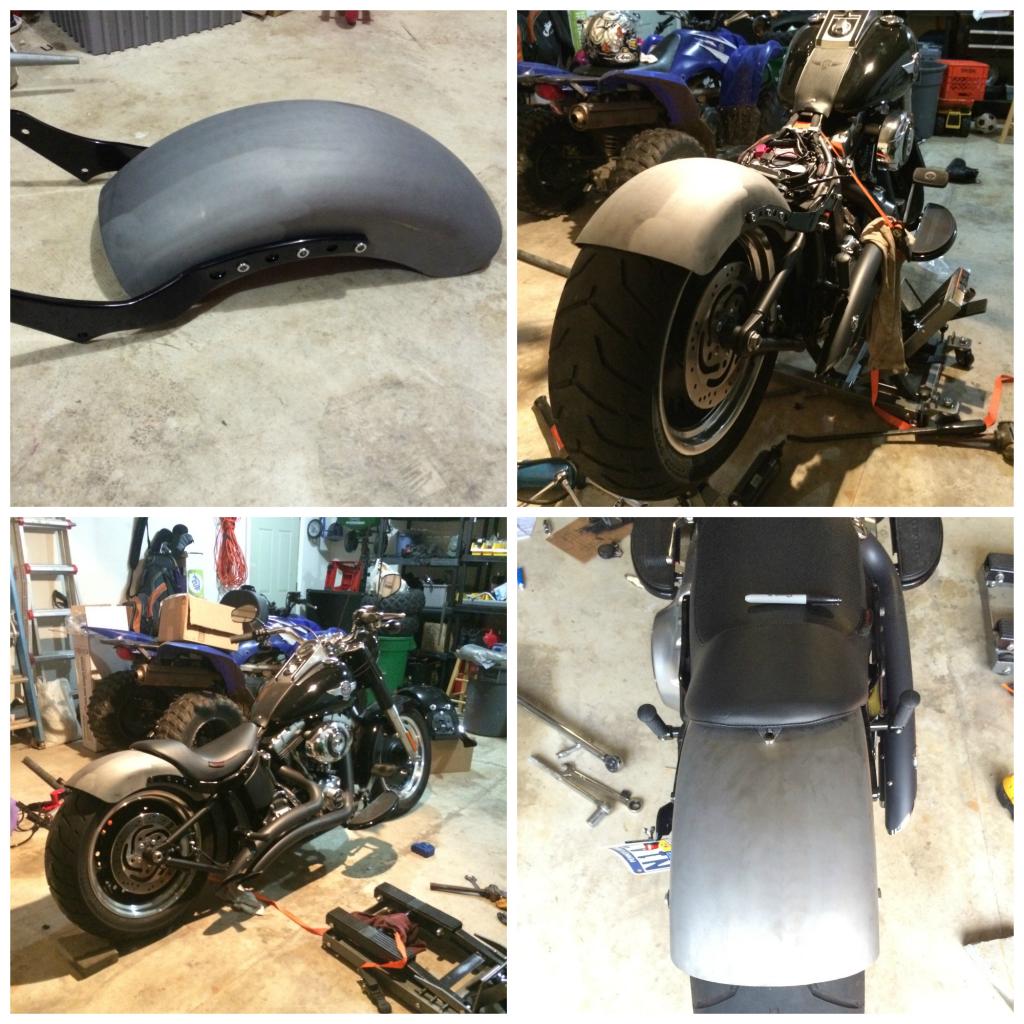
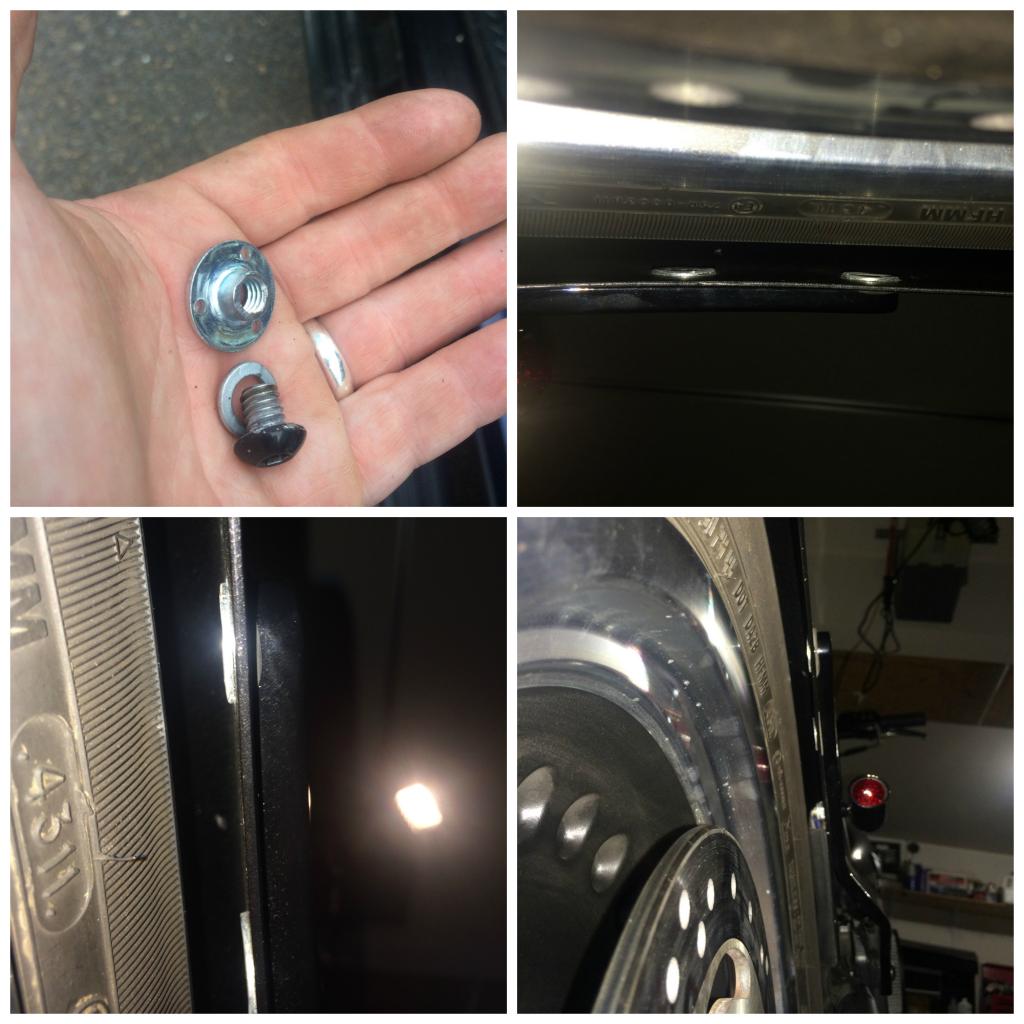
drilled a hole and welded a stud to mount the seat, once lowered i had to replace the sockethead fender bolts with shorter bolts (1/2" long) because the ones rsd provided were too close to the tire once it was lowered.
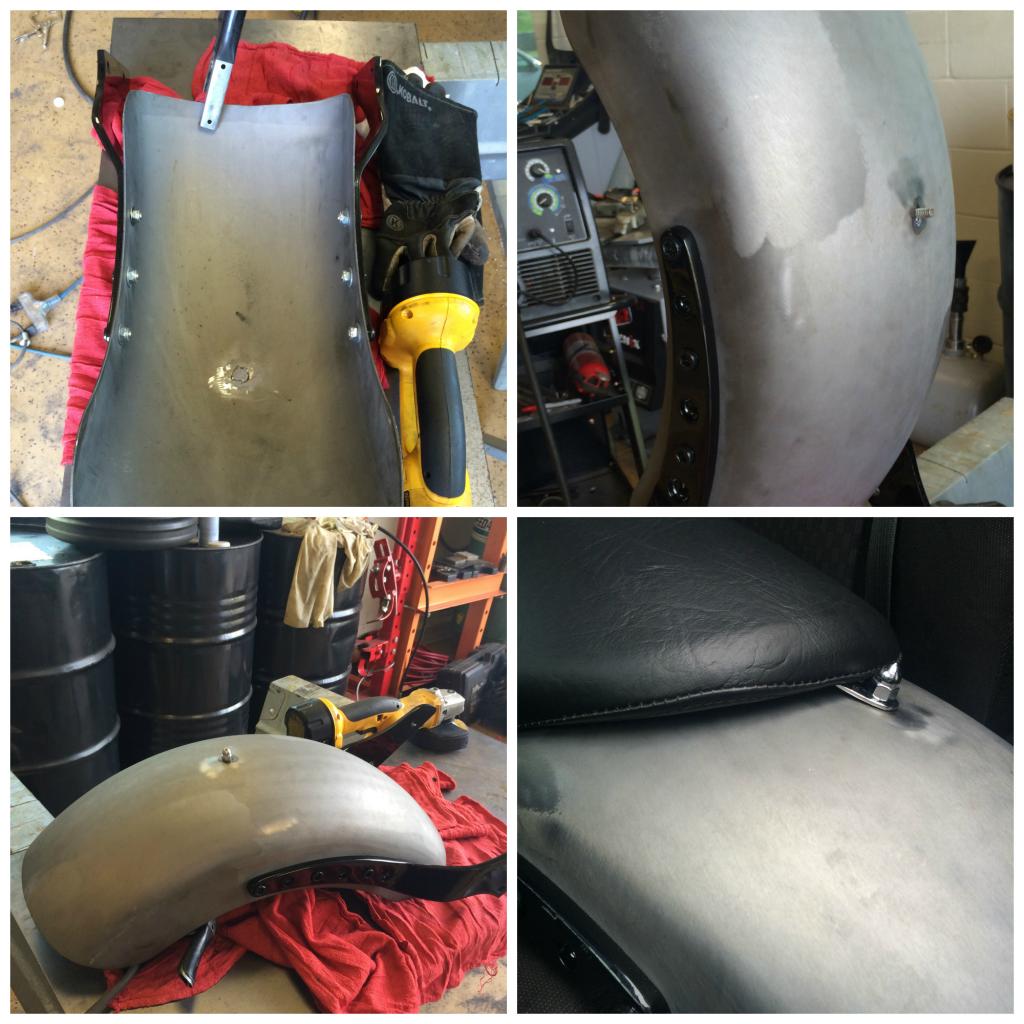

Don’t clamp it this way, I left hair line scratches in the first one (top one) because I clamped it by the housing. The 2nd signal was clamped by the stud and much easier to cut and left the housing untouched. Only down fall was I had to be more careful cutting because I couldn’t have the Allen key slid in it to protect the wires.

The new rear fender and seat required me to relocate the ECU, license plate, signals, brake light, a couple wire harnesses, battery, a handful other electronics and move around a few other miscellaneous things under the seat.
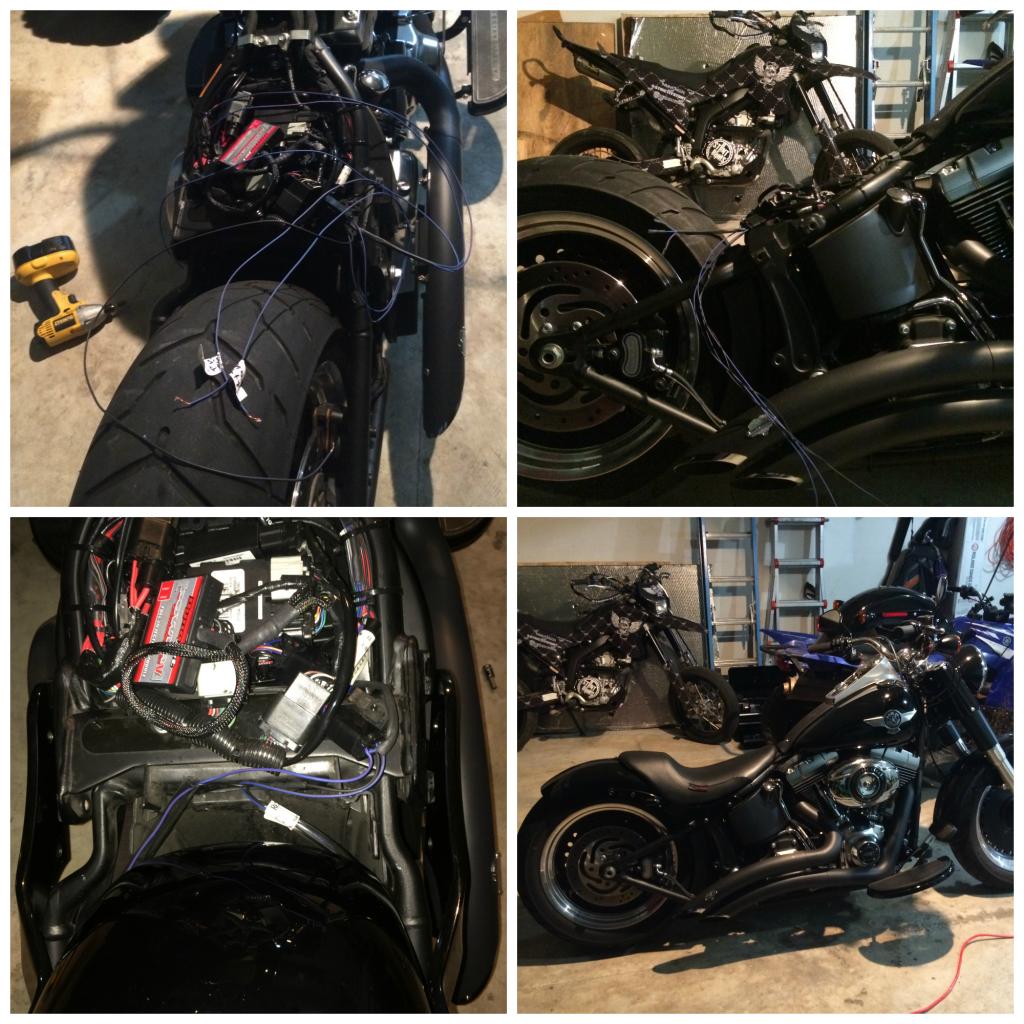
Also replaced stock battery with a smaller battery Yuasa YTX15L-BS, relocated some wires, ECU, and harness's.
After a few adjustments and test rides I needed to relocated the wires and the wire race way (moved them up deeper into the fender to clear the side of the tire, but also not too high or it would get hit by the top of tire when suspension bottoms out). There was a few test fits / rides and adjustments / changes… In the end I had to replace all the hardware again in order to clear the tire… I used The Hillman Group 5/16-in-18 Zinc-Plated Standard (SAE) Brad Hole Tee Nut & split lock washers & flat head cap screw bolts ( I also ended up having to replace the ˝ lock socket head bolts with an even shorter set up in order to clear the tire.
V&H short shots….
10” Todd’s Cycle Strip Bars 1.5” thick Fattys….
To get to the wires harness disconnects for each side of the controls (unbolt the tank in the front and the back, push up on the silver ring and disconnect the fuel line), then lift the tank up and slide it back as far as you can (should go back about 4”), lift up the rubber flap and you’ll see the connection points.
Since these are only 10" mini apes I was able to use my stock wires, clutch cable, and throttle cables.. the only thing I had to replace was the stock upper ABS brake line, needed a +4" line (I think if it was non ABS that would have worked too).
Fishing the lines – I tried everything (fish tapes, chain, thicker stranded wire, real long zip ties…ect). Finally took a thin, but strong rope and tied a nut to the end of it. let gravity do the work, flipping the bars around to get the nut to drop. Electrical taped the new wires and pulled them through. I had to keep tension on the string and slowly push a little bit at a time in order to finally get the new wires though.
I used a Motion Pro 08-0543 3/8" Mini Brake Bleeder… it worked awesome! Ive always hated bleeding brakes, but this made it way easier!!!!!
Bleeding ABS brakes – since I had to get a longer brake line I had to do some bleeding… DO NOT TURN THE IGNITION ON anytime until you are done because the ABS Valves will cycle!!!!!! If they cycle with line open or un bleed, then air could get in there. ABS is an electronically activated, the rest is hydraulically activated manually by the lever at master cylinder. So you shouldn’t have any problem bleeding the brakes the regular way (just as you would if it didn’t have ABS) as long as you don’t get any air in the ABS module / valve. Otherwise your ABS won’t work without a trip to the dealer for them to re-bleed your brakes for you while cycling the ABS valves using the HD Digital Technician.
I also had a local hydraulic shop make me a line, it was clear / silver and didn’t match the bike, that’s why there’s a wire loom covering it (it will be replace this winter). And in case anyone needed to know, our fittings for our banjo bolts on our brake lines are 7/16 x 24 & the fitting is 7/16 diameter (there was a lot of people on here who said 12mm, but that’s too loose).
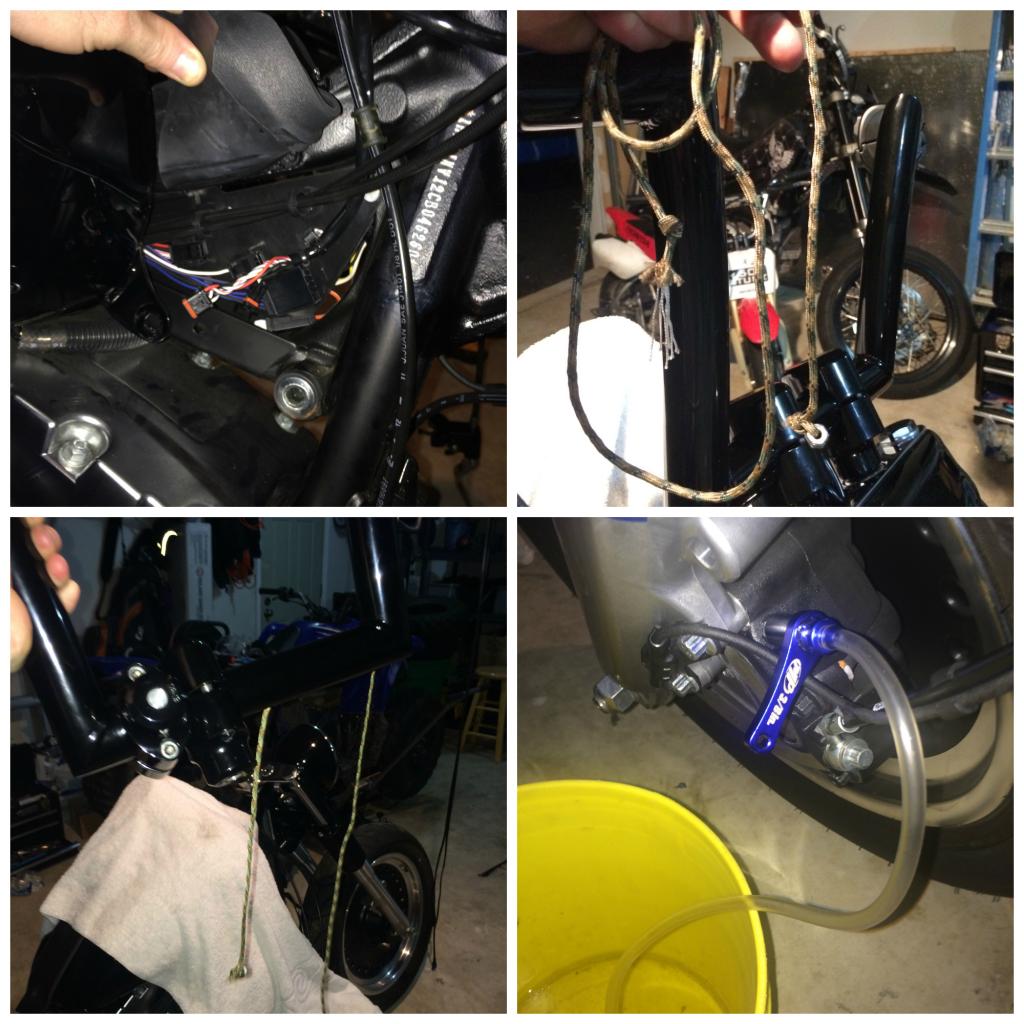
Plate relocation….
replaced the passenger rear peg with a custom license plate bracket
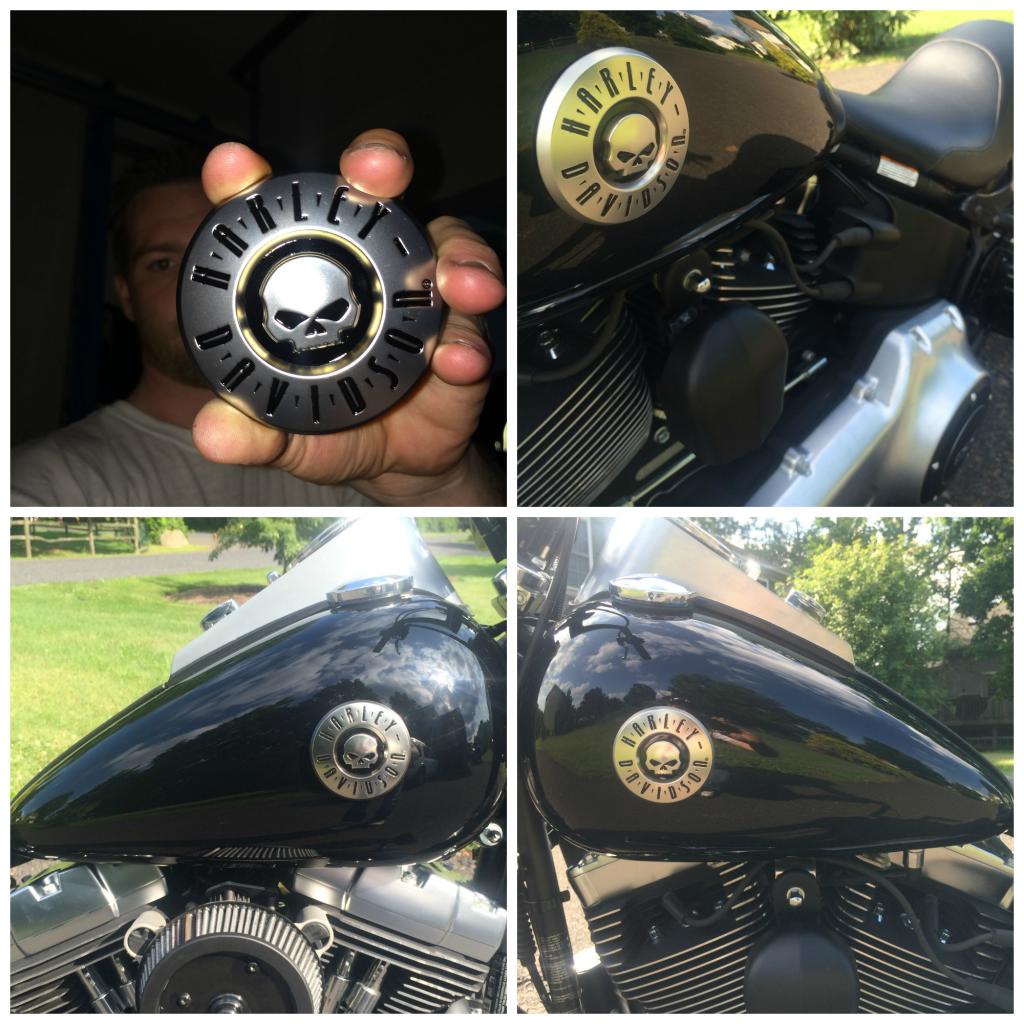
Had to swap out the tank emblem….
Taped it off because I wanted the circle part of the emblems in the same spot. I used fishing line to get the badge off, then terminator & WD40 to the rest off, then wipe off with rubbing alcohol before installing new emblems
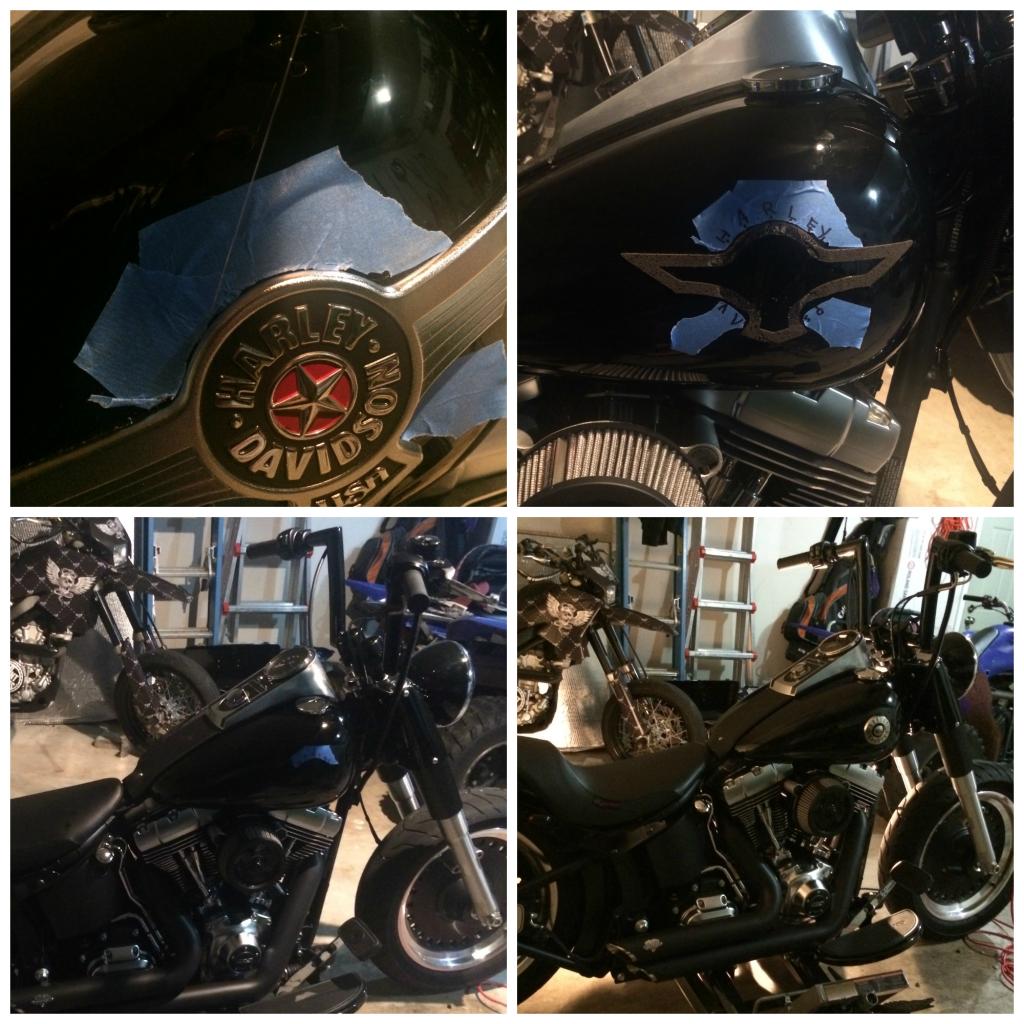
and that's pretty much it!
Obviously I needed to bring the fender closer to the tire! The stock ones has the fender sitting over 2" above the tire. I went as low as I could without bottoming out.
put them on a press to compress the springs in order to replace the bolts with longer ones.
Everything was so tight and almost impossible to get to. The bolts were high torqued with permanent Loctite, and not enough room to get a breaker bar under the bike, and only allowed less than a half-inch of turn for the wrench to move back and forth between the frame. Once the bolts were off the shocks they fully expanded and wouldn't fit out of the frame, was definitely a pain…
If I ever had to remove them again I would probably be able to do it way quicker, and would need to do 5 things first instead of figuring them out last. Torch to heat up the bolts/nuts, heavier hammer to hit the wrench to break the nuts loose, 3/4" ratcheting wrench (not a fixed box wrench), a pry bar to remove the shock, and more beer
After lowering check the belt to make sure it’s not rubbing were in goes into the primary and that there’s enough slack (a tight belt will perform and last longer than a loose belt). This is with the bike sitting on the ground on the jiff stand (kick stand) not on a lift or with you sitting on it. a good rule of thumb is that you should be able to grab the belt in the middle of its run and be able to twist it with your hand 45*
A good how to for installing lowering kit https://www.youtube.com/watch?v=W0IN...ature=youtu.be


RSD Tracker fender kit and seat…

drilled a hole and welded a stud to mount the seat, once lowered i had to replace the sockethead fender bolts with shorter bolts (1/2" long) because the ones rsd provided were too close to the tire once it was lowered.


Don’t clamp it this way, I left hair line scratches in the first one (top one) because I clamped it by the housing. The 2nd signal was clamped by the stud and much easier to cut and left the housing untouched. Only down fall was I had to be more careful cutting because I couldn’t have the Allen key slid in it to protect the wires.

The new rear fender and seat required me to relocate the ECU, license plate, signals, brake light, a couple wire harnesses, battery, a handful other electronics and move around a few other miscellaneous things under the seat.

Also replaced stock battery with a smaller battery Yuasa YTX15L-BS, relocated some wires, ECU, and harness's.
After a few adjustments and test rides I needed to relocated the wires and the wire race way (moved them up deeper into the fender to clear the side of the tire, but also not too high or it would get hit by the top of tire when suspension bottoms out). There was a few test fits / rides and adjustments / changes… In the end I had to replace all the hardware again in order to clear the tire… I used The Hillman Group 5/16-in-18 Zinc-Plated Standard (SAE) Brad Hole Tee Nut & split lock washers & flat head cap screw bolts ( I also ended up having to replace the ˝ lock socket head bolts with an even shorter set up in order to clear the tire.

V&H short shots….
- unplug o2 sensors from the connectors remember the cable routing (NEVER UNBOLT THEM PLUGGED IN). front O2 sensor under the front of the bike (easy to get to). Rear O2 sensor is a little harder, take off the seat mine was there behind the battery, but I also have an smaller battery (you may need to remove your stock battery to access this connector on a stock bike. It goes through a hole in the bottom of the battery pan.
- remove old exhaust
- install sensors on new exhaust (DONT FORGET ANTI-SIEZE for the O2 Sensor threads) &
- install exhaust
- re-run wire for connect o2 sensors plugs and reconnect

10” Todd’s Cycle Strip Bars 1.5” thick Fattys….
To get to the wires harness disconnects for each side of the controls (unbolt the tank in the front and the back, push up on the silver ring and disconnect the fuel line), then lift the tank up and slide it back as far as you can (should go back about 4”), lift up the rubber flap and you’ll see the connection points.
Since these are only 10" mini apes I was able to use my stock wires, clutch cable, and throttle cables.. the only thing I had to replace was the stock upper ABS brake line, needed a +4" line (I think if it was non ABS that would have worked too).
Fishing the lines – I tried everything (fish tapes, chain, thicker stranded wire, real long zip ties…ect). Finally took a thin, but strong rope and tied a nut to the end of it. let gravity do the work, flipping the bars around to get the nut to drop. Electrical taped the new wires and pulled them through. I had to keep tension on the string and slowly push a little bit at a time in order to finally get the new wires though.
I used a Motion Pro 08-0543 3/8" Mini Brake Bleeder… it worked awesome! Ive always hated bleeding brakes, but this made it way easier!!!!!
Bleeding ABS brakes – since I had to get a longer brake line I had to do some bleeding… DO NOT TURN THE IGNITION ON anytime until you are done because the ABS Valves will cycle!!!!!! If they cycle with line open or un bleed, then air could get in there. ABS is an electronically activated, the rest is hydraulically activated manually by the lever at master cylinder. So you shouldn’t have any problem bleeding the brakes the regular way (just as you would if it didn’t have ABS) as long as you don’t get any air in the ABS module / valve. Otherwise your ABS won’t work without a trip to the dealer for them to re-bleed your brakes for you while cycling the ABS valves using the HD Digital Technician.
I also had a local hydraulic shop make me a line, it was clear / silver and didn’t match the bike, that’s why there’s a wire loom covering it (it will be replace this winter). And in case anyone needed to know, our fittings for our banjo bolts on our brake lines are 7/16 x 24 & the fitting is 7/16 diameter (there was a lot of people on here who said 12mm, but that’s too loose).

Plate relocation….
replaced the passenger rear peg with a custom license plate bracket

Had to swap out the tank emblem….
Taped it off because I wanted the circle part of the emblems in the same spot. I used fishing line to get the badge off, then terminator & WD40 to the rest off, then wipe off with rubbing alcohol before installing new emblems


and that's pretty much it!

The following users liked this post:
aroacha5446 (05-09-2017)


#6
07-27-2014, 10:23 AM

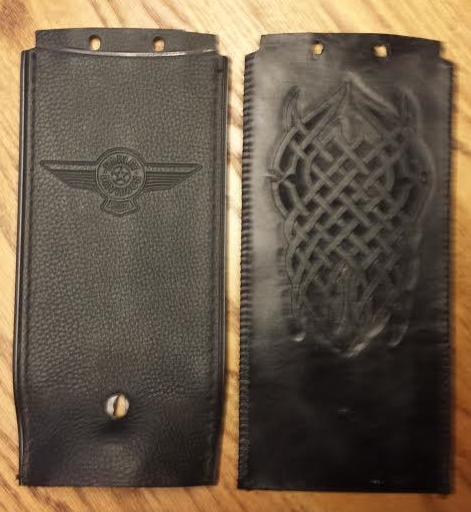
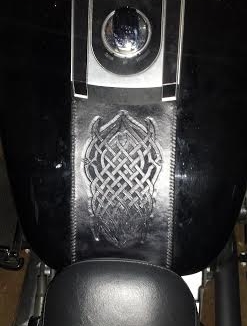
Looks great with a lot of thought and effort going into it. I love a bike that flows together, and you're doing a nice job of pulling this one off.
As you understand, the devil's in the details. You're also obviously capable of doing a lot of things yourself. The tank bib looks out of place now, since it both literally and figuratively comes up short. I recently made a new one for my wife's Lo. You could do one that is longer to flow into/under the seat, and customize if you wanted to at the same time.
Pics of the one I did for her:
#7
07-27-2014, 01:03 PM

Trending Topics
#9
07-28-2014, 09:13 AM

2nd Gear
Join Date: Jul 2014
Location: Minden, Nevada
Posts: 6
Likes: 0
Received 0 Likes
on
0 Posts
#10
07-28-2014, 01:24 PM
I really dig the license plate relocation. I always loved those fenders. Really shows off the 200mm rear. Now what you need is this:
https://i.imgur.com/IZLUNCY.jpg
https://i.imgur.com/IZLUNCY.jpg
too bad i don't have $8500, that 131" motor would be insane!!!!
Looks great with a lot of thought and effort going into it. I love a bike that flows together, and you're doing a nice job of pulling this one off.
As you understand, the devil's in the details. You're also obviously capable of doing a lot of things yourself. The tank bib looks out of place now, since it both literally and figuratively comes up short. I recently made a new one for my wife's Lo. You could do one that is longer to flow into/under the seat, and customize if you wanted to at the same time.
As you understand, the devil's in the details. You're also obviously capable of doing a lot of things yourself. The tank bib looks out of place now, since it both literally and figuratively comes up short. I recently made a new one for my wife's Lo. You could do one that is longer to flow into/under the seat, and customize if you wanted to at the same time.