Posting the steps to replace your fork slider or when replacing fork seal (took me about 2 hrs wrenching time). Fork is basically the same for most motorcycles but bolt/screw sizes and torque may differ based on specific bike and model:
REMOVAL OF FORK MARK POSITION OF THE FORK TUBE WITH MARKER LIFT FRONT OF BIKE
REMOVE CALIPER (10mm 12 pt Socket) REMOVE PINCH BOLT ON FORK SLIDER (8mm Allen & 9/16 open-end wrench) REMOVE FRONT AXLE (15/16 6 pt Socket) REMOVE FRONT FENDER (if necessary) REMOVE WHEEL (BE SURE TO NOTE POSITION OF SPACER ON AXLE) BREAK TOP CAP AND BOTTOM DAMPER SCREW (Do not remove) LOOSEN TRIPLE TREE BOLTS SLIDE FORK DOWN OUT OF TRIPLE TREE
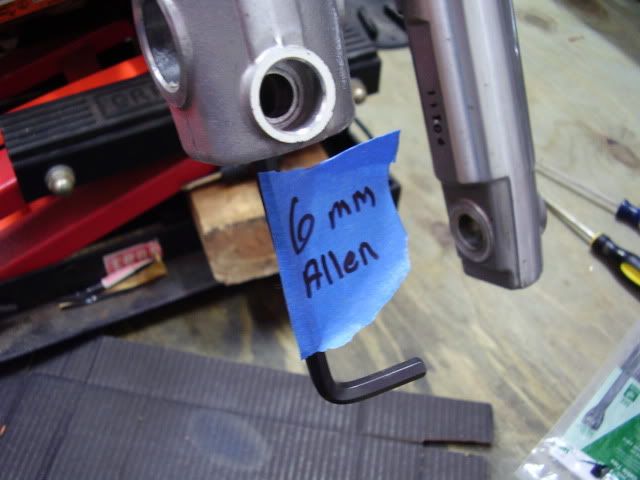
REMOVAL OF SLIDER REMOVE DRAIN SCREW TO DRAIN OIL REMOVE BOTTOM SCREW (6mm Allen) REMOVE FORK CAP (Wrap with rag with downward pressure when unscrewing for safety) REMOVE FORK SPACER, SPRINGS, and DAMPER TURN OVER AND PUMP REMAINING OIL OUT OF SLIDER REMOVE TOP CHROME COVER, DUST SHIELD, AND RETAINING RING SEPARATE FORK TUBE AND DAMPER FROM SLIDER WITH OUTWARD HAMMER ACTION CLEAN TUBE WITH DRY CLOTH REMOVE FORK SLIDER COMPONENTS AND PLACE ASIDE IN ORDER OF REMOVAL HELPFUL TIP: When removing the old fork seal, mark the top and make note of which way is up. Both sides of the seal look very similar so easy to install the wrong way.
FORK SLIDER COMPONENTS ORDER OF INSTALL FROM BOTTOM UP Slide below parts from TOP of fork tube 1BUSHING TOP COLLAR Tap down with fork driver 2WASHER 3FORK SEAL Tap down until groove for retaining ring is visible 4RETAINING RING 5DUST SHIELD (HAND-FIT DOWN) 6TOP CHROME COVER
FILL FORK OIL AND PREPARE FOR INSTALL REMOVE, INSPECT, AND OIL BOTTOM BUSHING (STOPPER) SLIDE FORK TUBE ALL THE WAY DOWN SLIDE FORK DAMPER AND TUBE INTO NEW SLIDER INSTALL BOTTOM SCREW& DRAIN PLUG FILL FORK OIL (12.3 OZ - may be different for other models) PUMP SLIDER TUBE 8-10 TIMES TO REMOVE AIR SLIDE TUBE ALL THE WAY UP INSTALL SPRINGS AND SPACER INSTALL FORK CAP (Use the fork cap socket with a short extension to push down and turn) INSTALLATION OF SLIDER INSTALL FORK SLIDER INTO TRIPLE TREE(To the mark you made in the first step) TORQUE TRIPLE TREE BOLTS TORQUE FORK CAP INSTALL FRONT FENDER(if you had to remove) INSTALL FRONT WHEEL WITH SPACERS INSTALL AND TORQUE FRONT AXLE INSTALL AND TORQUE FORK PINCH BOLT INSTALL AND TORQUE CALIPER TORQUE SPECS FRONT AXLE 60-65 FT LBS USE 7/16 BAR or LARGE SCREWDRIVER TO HOLD AXLE WHILE TORQUING
PINCH BOLT 21-27 FT LBS
CALIPER BOLT (USE ANTISEIZE) 38 FT LBS
FORK OILTYPE E 12.3 OZ May differ for different models
Taking fork tubes and sliders apart is very messy. You'll think you got all the oil out, then a bunch more will pour out all over you.
Yup, be sure to work over an oil pan or something that will catch/absorb the oil. I let mine sit upside down for a while before I took the tube out. And be sure to install the bottom screw and drain plug before you fill....obvious but a simple thing to forget. LOL
Nice write up. Listing the torque values for your bike, is a nice touch.
I use the same one-leg-of-the-jack method for lifting the front of my Sportster.
Different models, and different model years, have slightly different springs/spacers. When my '05 Custom was factory stock, it didn't have any spacers and only one, long spring, per leg. Older Sportsters have little drain screws at the bottom of the fork legs, but newer models, do not. Refer to a shop manual for your model and year, of course.
Not to hijack, but I thought I'd add some pics:
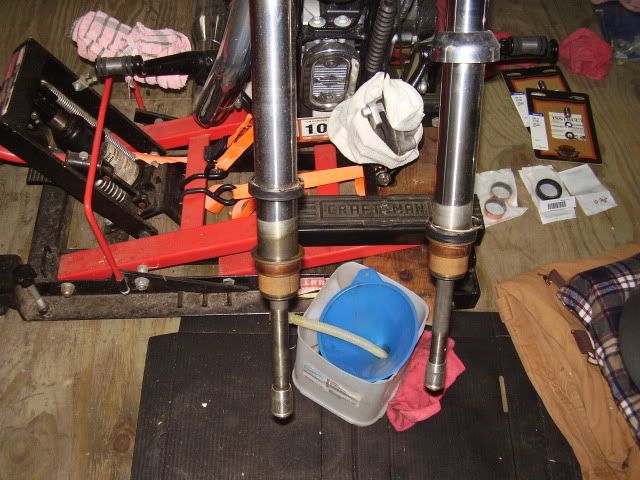
Tie your caliper up with zip ties. Don't let it hang by the hose. You can see my caliper, wrapped in a white rag, hanging from a series of looped zip ties. The square, tall, plastic jug (with the blue funnel resting in it) is what I held under the drain port while removing the drain screws and pumping the fork oil out.
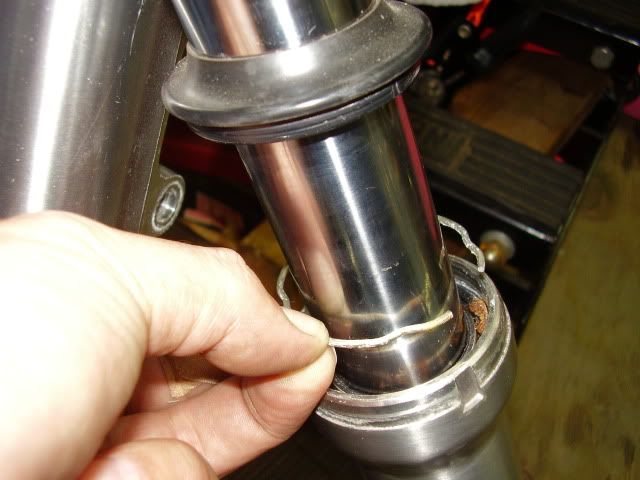
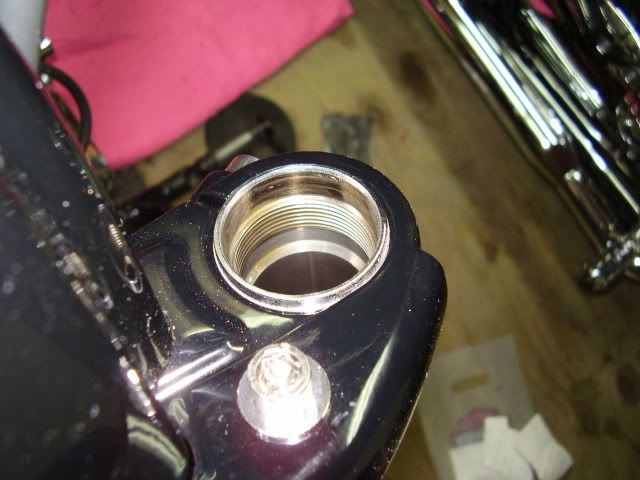
The rubber dust shield (located under the shiney metal cap mentioned below) and c-clip. A lot of times those c-clips are pretty oxidized. Wire brush them clean or get new ones. The oil seal is directly under the c-clip (you can see a brown rust stain from the oxidized c-clip on the seal)
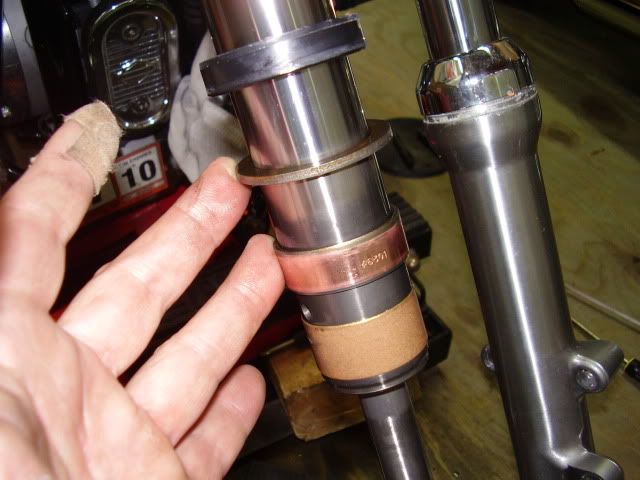
The innerds. That top, black ring is the oil seal (not to be confused with the rubber dust shield that is directly under the shiney metal cap seen here on the right leg)
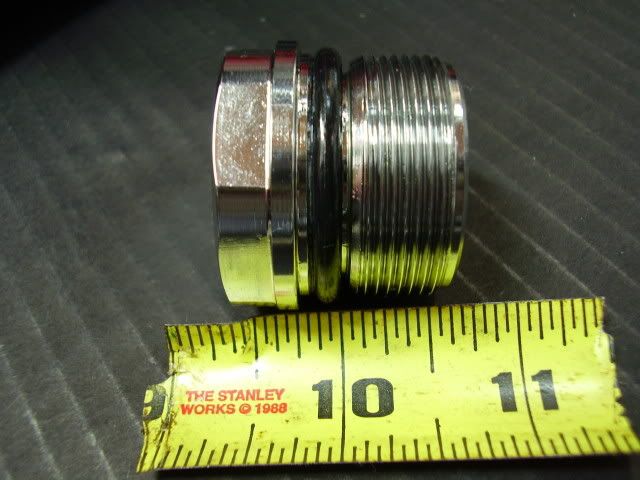
These sockets work great for the tube cap. Notice the o-ring to prevent scratches and the rounded corners to help prevent cracking the chrome. It's a 1 3/8" socket that's shallow to allow working under your mounted handlebars. I think mine is from Motion Pro ("MP 08-0139" stamped on side) available through Dennis Kirk, Drag Specialties, etc.
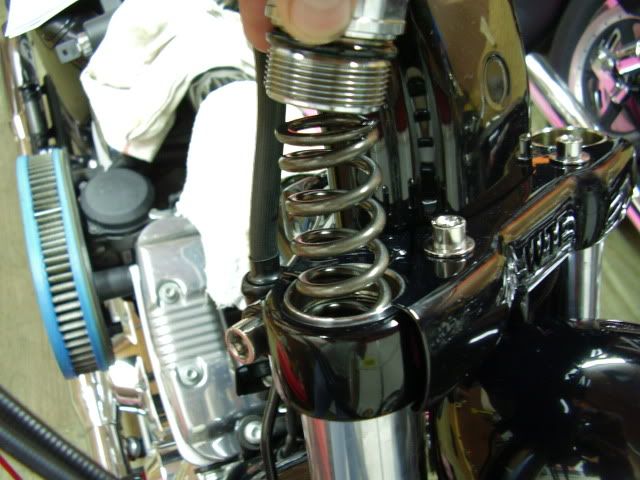
How much thread you got before that top nut takes your eye out. It's not terrible, but it is under tension:
Put down card board or newspaper. When you drain the oil, it'll go everywhere unless you pump the leg s-l-o-w. Hold a bucket under it, moving it in motion with the leg, while you pump (assuming your bike has drain screws in the lower legs).
When you're ready to seperate the lower leg from the fork tube, use a slide-hammer type action and they'll pop apart. Start out easy before you get Medieval on it.
After removing the damper rod bolt out of the bottom, I take the fork tubes out of the triple clamps. It's easier (good time for a turn signal relocation). I bought a fork seal driver because I knew I'd be doing more than one set. Years ago, on my old Honda, I used an appropriately sized PVC pipe to set the seals. In addition to new seals, you'll want new upper and lower bushings while you're in there (they last for about 15k-20k miles but I didn't want to do it twice). Get new drain screw crush washers, too. I always get new damper tube screws and their crush washers.
Nice write up. Listing the torque values for your bike, is a nice touch.
I use the same one-leg-of-the-jack method for lifting the front of my Sportster.
Different models, and different model years, have slightly different springs/spacers. When my '05 Custom was factory stock, it didn't have any spacers and only one, long spring, per leg. Older Sportsters have little drain screws at the bottom of the fork legs, but newer models, do not. Refer to a shop manual for your model and year, of course.
Not to hijack, but I thought I'd add some pics:
Tie your caliper up with zip ties. Don't let it hang by the hose. You can see my caliper, wrapped in a white rag, hanging from a series of looped zip ties. The square, tall, plastic jug (with the blue funnel resting in it) is what I held under the drain port while removing the drain screws and pumping the fork oil out.
The rubber dust shield (located under the shiney metal cap mentioned below) and c-clip. A lot of times those c-clips are pretty oxidized. Wire brush them clean or get new ones. The oil seal is directly under the c-clip (you can see a brown rust stain from the oxidized c-clip on the seal)
The innerds. That top, black ring is the oil seal (not to be confused with the rubber dust shield that is directly under the shiney metal cap seen here on the right leg)
These sockets work great for the tube cap. Notice the o-ring to prevent scratches and the rounded corners to help prevent cracking the chrome. It's a 1 3/8" socket that's shallow to allow working under your mounted handlebars. I think mine is from Motion Pro ("MP 08-0139" stamped on side) available through Dennis Kirk, Drag Specialties, etc.
How much thread you got before that top nut takes your eye out. It's not terrible, but it is under tension:
Put down card board or newspaper. When you drain the oil, it'll go everywhere unless you pump the leg s-l-o-w. Hold a bucket under it, moving it in motion with the leg, while you pump (assuming your bike has drain screws in the lower legs).
When you're ready to seperate the lower leg from the fork tube, use a slide-hammer type action and they'll pop apart. Start out easy before you get Medieval on it.
After removing the damper rod bolt out of the bottom, I take the fork tubes out of the triple clamps. It's easier (good time for a turn signal relocation). I bought a fork seal driver because I knew I'd be doing more than one set. Years ago, on my old Honda, I used an appropriately sized PVC pipe to set the seals. In addition to new seals, you'll want new upper and lower bushings while you're in there (they last for about 15k-20k miles but I didn't want to do it twice). Get new drain screw crush washers, too. I always get new damper tube screws and their crush washers.
Very nice write-up and pics. I did see your thread before starting my job.
Did you remove the slider with the tubes still on the bike i.e. still clamped to the triple tree? It seemed easier to work with the fork tube/slider off the bike....and I am all for easier. How was it doing it that way?
After draining the oil, loosening the damper tube screws (6mm Allen) and removing the fork tubes' top caps, I take the assemblies out of the triple trees, then, dislodge the lower legs from the fork tubes. I think it's easier and safer than trying to get the lowers off while the bike is on a jack.
At about 25,000 miles, while it's that far apart, it's not much more to remove the triple clamps to inspect/grease/replace the neck bearings.
I think I stuck the tubes back in the clamps for pics and to keep them off my work bench.
Those chrome lowers, look great. Nice job.
Last edited by HarleyScuba; 06-11-2016 at 08:00 PM.
Reason: nunya
After draining the oil, loosening the damper tube screws (6mm Allen) and removing the fork tubes' top caps, I take the assemblies out of the triple trees, then, dislodge the lower legs from the fork tubes. I think it's easier and safer than trying to get the lowers off while the bike is on a jack.
At about 25,000 miles, while it's that far apart, it's not much more to remove the triple clamps to inspect/grease/replace the neck bearings.
I think I stuck the tubes back in the clamps for pics and to keep them off my work bench.
Those chrome lowers, look great. Nice job.
Thanks.
Ahh, you just drained and removed the top cap while on the bike....that makes sense...looked like you did the job while it was on your bike...my bad. I just "loosened" the bottom damper screw and the top cap while on the bike for leverage, then removed the entire assembly..Same difference.
Another important step to remember (added helpful tip in steps above)...make sure you note which side of the fork oil seal is up. Both sides of the seal look very similar and it is easy to install it the wrong way which will likely result in a leak. A helpful hint is to mark the top of the old seal so if you drop the seal, you will still know which way is up.
Here is a useful video from delboy garage that was also helpful. Also used a premium fixmyhog video which I believe requires membership and the service manual for torque specs. Each video was a little different in the order and way certain steps were performed...for example, fixmyhog drained oil from the oil plug while on the bike and delboy drained from the top of the tube when off the bike (which does not require removal of drain plug). I prefer to drain when off the bike...less messy. https://video.search.yahoo.com/video...t=mozilla&tt=b
Of course when only changing fork oil, all you need to do is remove the drain plug and top cap while on the bike. There is a new (to me) top cap with an inner screw on the market that keeps the spring/spacer in place and allows access to fill oil....something like this: http://www.ebay.com/itm/DBI-39mm-For...item20fe100045

 06-10-2016, 08:26 PM