Been tinkering away on the bike since I bought it. Posted some MOD's in their own threads, some in the What Did You Do To Your Sportster Today thread, and some weren't documented at all.
Consolidating all of that stuff here, and I will post any/all future things here.
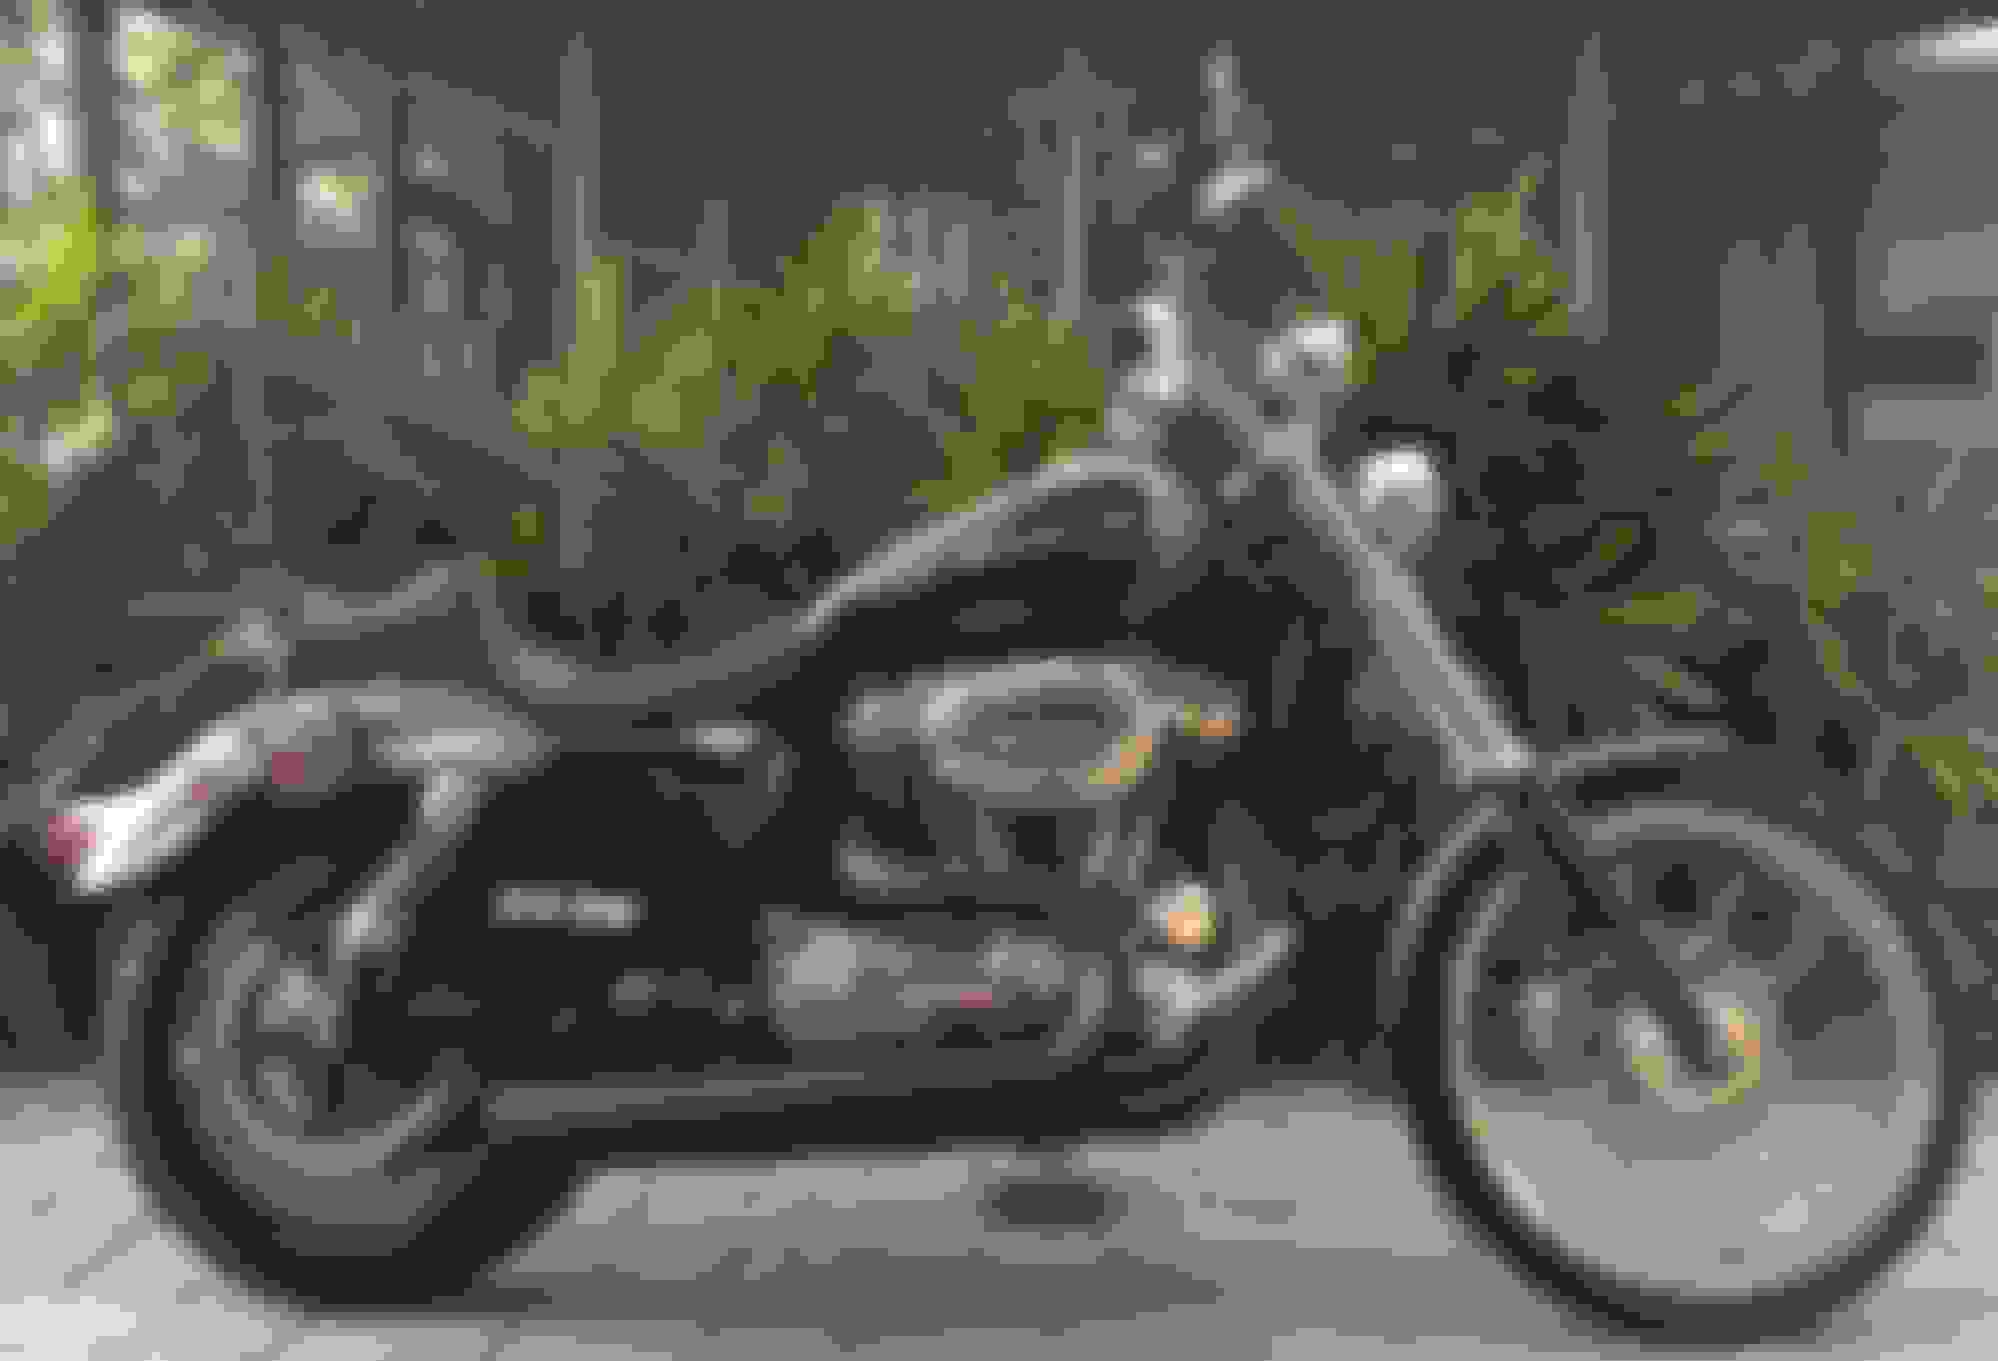
Day I bought it from Craigslist: Starting point
Currently:
Right Side
Left Side
All work done by me, outside in the FL heat. I'm new to wrenching, so if you are too, know that it's not as hard as it seems. Just get a manual, research and give it a try. I am working with a limited budget so I do my best to find deals and I sell all take off parts to fund future upgrades. I know many people keep stock parts, but I don't plan to sell the bike, and clutter is the enemy.
Table of Contents:
First service - New to me used bike, wanted good baseline.
Fuel Controller and Air Cleaner - After establishing service was up to date I focused on making sure the "stage 1" it came with was right
LED lighting - H4 LED bulb, second LED headlight, LED turn signals, R/B/T, and load balancer
The previous owner couldn't provide proof of 10k service (bike had just under 12k when I got it). I started by taking off the giant windshield etc, getting a Factory Service Manual, watching a lot of Delboy's Garage on youtube, reading through this forum, and doing a 5k service. I planned to do another 5k service at 15k miles even though it would be less than 5k between services. Just wanted a good clean starting point.
Being new to Harley's, and relatively new to bikes in general (had a vintage Honda CM400 I sold for the Sporty), I figured it was also a good way to familiarize myself with my new toy:
Oil change (Syn3)
Primary/Trans Oil change (Syn 3)
Adjusted clutch
Checked primary chain
Checked drive belt
New Spark Plugs (NGK Iridiums)
New Brake Pads (Lyndall's front and rear)
New Brake Fluid
New tires front/rear (Commander II's) - Came with the OEM tires - low miles, but being 7+ years old it seemed wise to replace.
Last edited by deadrubberboy; 01-04-2017 at 01:43 PM.
With the service now "up to date" I turned my focus to reliability.
The previous owner didn't know if the bike had been tuned at all. He bought from dealer with SE intake, and V&H Short Shots already installed. It seemed to run fine, but I had concerns it was lean or generally not running "optimally". So, I started researching fuel controllers and learning about "stage 1".
I found the FuelMoto Micro EFI controller fit my needs/budget. I didn't notice any changes with it, but felt confident the bike was no longer "lean". However my MPG dropped significantly, and after comparing notes with others on the forum I ended up with a PowerVision about 6 months later. I wish I had just been more patient and saved up for a PV to begin with.
The PowerVision's auto tune gave me back some MPG, gave me more confidence that the tune was "right" and provided extra gauges/info about the bike. While I don't keep it on the bike when I'm not tuning (for aesthetic reasons), since I'm doing my own wrenching I like the info, being able to read/clear codes etc.
Next I replaced the SE Air Cleaners paper element with a K&N and made a DIY breather hose.
I don't have pics with the cover off, but all I did was get some 3/4" hose and a T connector. I removed the rubber hoses that come with the A/C that redirect the blow by back into the throttle body:
Example I found on web
I connected my new hose to each of those, joined with the T connector. Next, I drilled out a hole in the back plate and ran the hose out and to the ground on the left side of bike right where the gas tank vents down to the ground. This keeps clean cool air going into the engine and prevents it from sucking up hot air/oil. Keeps your pistons cleaner and engine happier. Some folks use a filter or catch can vs. letting the oil drip to ground. I've noticed VERY little oil coming out, and my old Honda was setup this way from factory so it's fine by me.
New breather hose coming out of back plate
Check out DK's site for more info on why this is a good MOD and to see pics of dirty pistons etc
Now that I was confident the bike was running well, and would be for long time I started looking into safety upgrades. They say "loud pipes save lives" , but statistics tell me being seen is more important than being heard.
I went with LED's everywhere. They're brighter, use less power and I don't have to worry about replacing them, although I still do pre-ride checks.
H4 drop in LED replacement bulb. Goes in the same as a regular bulb - takes 5 minutes. Make sure you get one that has LED's on both sides so that it lights up the entire shell. These work better than stock and I'm happy with it, but they scatter the light pretty crazy. I'm considering one of the knock off Daymakers, but I don't think the look of it would go with the rest of my bike.
LED Tail light - went with this because it was CHEAP, looked stock with a lower profile and it would allow for my R/B/T module to "flash" quickly unlike a standard bulb. Just remove the old one, connect up the new wires and you're done. Maybe 10 minutes. So far I have no complaints with it at all.
Happy with the results. Instead of using the positaps it came with, I wired and heat shrinked onto the stock wires/connectors so I can plug/unplug the stock clip if needed in the future, and to avoid the added "bulk" of the positaps.
Kit comes with everything you need and easy instructions. They even provide silver colored zip ties, the stainless looking wire braid/loom, and a disposable pen to clean surface before exposing the 3m tape on back (they also zip tie in addition to the tape).
Pictures pretty much tell the story. White running lights that switch to amber signal. I'm really happy with them so far. No more "ears" on front of bike, they are bright, especially at night (see pics), and the color matches my LED headlight bulb temprature.
Pics:
Bike off
Running lights - day
Right turn signal - day
Running lights - night
Left turn signal - night
Undecided if during the day they are more or less visible than the stock lights. At night they are FAR brighter. Even if they appear less "bright" during the day vs. stock, they wrap around so should be noticeable from more angles? I'm a satisfied customer.
Rear Signals - I really wanted to go with Custom Dynamics for the rears as well, but they just weren't in the budget. Instead, I went with cheap drop in LED replacement bulbs. Just like the tail light, I've seen mixed reviews, but they are far brighter than stock, allow for rapid flashing on brake with R/B/T and have been flawless for me. I tried multiple bulbs and none would "seat" all the way into the housing. The bulbs were too "wide" at the base, so I ended up using a dremel to enlarge the holes around the socket some. Worked great and with the lenses on you can't even tell. *Side note I also swapped the yellow OEM lenses with Red for use as both turn/brake lights.
Rear socket enlarged
Load Equalizer - Required if you are going go LED for all 4 turn signals signals. Just front or just rears won't be an issue, but if you don't both without a load equalizer of some kind your signals will flash rapidly and your security key light could come on. Plug and play into the stock harness under the seat.
Run/Brake/Turn - a.k.a. Smart Triple Play. Enables the rear turn signals to act as Signals/Running lights and Brake lights as you wish. I have signals and center brake act as running, and rapidly flash on brake. When braking while simultaneously using turn signal only the center brake light flashes rapidly, while the turn signal flashes steady DOT signal pattern. Plug and play into stock harness under seat.
Liking the old school stacked headlight look, and inspired by DaneM's setup I got a small Bates style housing to use as a second headlight. It's smaller so I had a challenge finding an H4 LED small enough to fit in it. Most were too long (80mm or longer due to fan/heatsink etc). I ended up going with an H4 LED fog light bulb.
I used a Drag Specialties headlight mount that I shaved a bit off of to make it fit. I used Krylon stained glass paint to make it yellow for an old school look and to mask the fact that the light color temp was slightly different than my main headlight. It doesn't provide much usable driving light, but looks good, and makes me more visible to other drivers. My hope is that the unusual stacked yellow/white light combo makes it even more eye catching for extra safety.
Wired top light to only come on when High Beam is selected
Last edited by deadrubberboy; 01-04-2017 at 10:33 AM.
I wanted to do a tank lift and coil relocation, but I didn't want to see the coil hanging off the side of bike. Since my bike came with a cowbell horn cover and liked how "Harley" that looked I opted to relocate the horn and put the coil under the cow bell. Plus, I couldn't justify spending money on this stuff. After nervously cutting the bracket that holds the coil/ignition (I wanted to keep ignition in stock location near fork lock because it just makes sense to me) I used some aluminum stock I had left over from making my seat mounting bracket (more on that later).
Originally Posted by deadrubberboy
DIY coil relocation under the cow bell...
Coil under cow bell. Using stock wires. Second long wire donated to me from awesome forum member
Coil under cow bell
DIY tank lift. Since the custom has the low slung speedo and I can't afford to change that, I was limited in how much I could lift the tank. The off the shelf products were all too tall. I found some metal adapters that came with a TV wall mount I had on hand that were the perfect height. Plug and play with no drilling/modifying required! It looks just right to me with the larger tank/line to the seat.
Originally Posted by deadrubberboy
Tank clearance
Last edited by deadrubberboy; 01-04-2017 at 10:37 AM.
After relocating my coil to under the cow bell I needed to move my horn. I got an "OEM Replacement Car horn" from Advance Auto to put in the front down tube area like the non Custom models. After making up a bracket for the down tubes I ended up finding a place to stash the stock horn. Since the OEM horn was so cheap I figured I'd try to wire both up. It works!
Now I get simultaneous high tone "Meep!" from the new horn, and low tone "Honk!" from the original. Combined they're pretty loud.
New Horn "Meep!"
old horn from under Cowbell "Honk!"
Notes: my lower horn bracket recently vibrated itself apart, so I'll be making a new one. The upper/front mount I made did the same so I bought the DK custom mount. I'd still like to mount a mini air horn, but I haven't found a good place to mount it hidden. Even the "mini" ones are big and ugly. I've seen some people take them apart and run hoses, so I might do that eventually.
4/11/2017 Update:
Had a scrap piece of aluminum left over from another project. It's thick and ridged and happened to have a hole in it that fit the OEM horn well. I used it to mount the secondary (low tone OEM horn from under cowbell) horn underneath the bike. Time will tell how it holds up, but so far so good. The black stuff coating the bolts is Suguru. It's a mold-able rubber the internet kids love. I used it on the top of the bracket to avoid metal on metal vibrating noise and had left over (once you open the pack it's use it or lose it) so I put it on the nuts in place of locktight since I forgot about locktight until it was already on.
It ain't pretty but if you see it, it means I'm currently running you over.
The combo of both horns is LOUD. So again, it's not a looker, but if you're underneath here seeing it, that's on you man. Shoulda' got out of the way. I ride it, I don't hide it til show day.
Last edited by deadrubberboy; 04-11-2017 at 02:48 PM.
Reason: Update on horn mount
I'd been wanting a "king/queen" style seat. Hard to locate due to the ECM being under the seat (limits options for any aftermarket seat). A few manufactures said they could modify their seats to accommodate, but that put the price WAY out of my range (close to 500$).
Then my battery died. I opted for a tiny Battery Tender lithium ion battery. In addition to saving a lot of weight it allowed me to move the ECM to the battery compartment. No cutting, or anything. The new battery is super small so I just unplugged the ECM, routed the wire to the battery box and plugged it in there. I then cut a thin piece of plastic to cover the hole in the fender where it was. The seat covers it, but I didn't like it just "open" under there.
Originally Posted by deadrubberboy
I found a seat I liked the look of at a swap meet for less than $100. Guy claimed it was "new old stock" but I called BS. It has a fiberglass pan and cheap vinyl cover, but it looks great!
It came with screws underneath in front and rear, so I figured I could fab brackets (I use that word loosely - total noob, and just winged it as I went along).
Problem I found when I got it home: with 4.5 Gallon tank it was too long.
First, I made the rear bracket to lock that in. Next, I started trimming the nose with a dremel. Still need to do some finishing touches, but overall I'm happy with it.
Here's some before/progress/after pics:
Next, I got a sissy bar made by Edward Richie. I sent pictures/measurements and he did a great job. It "hugs" the back of the seat perfectly, helping my ghetto rear bracket I made do it's job.
Thankfully, my lovely wife is way smarter than me, and has an infinitely better eye for design/detail. She talked me into getting it in black vs chrome. That was the best decision at the time and has proven better and better as I've tweaked the rest of the bike more.
Made a quick and dirty (no measurements!) back pad to take my wife on a ride. It's been on the todo list for a while, but was low priority since she's understandably nervous being on it.
Put cardboard on there, traced with sharpie, freehanded a circular saw on plywood, cut some foam with my pocket knife, wrapped and staple gunned a cover with material from Hobby store, and finally screwed in some eyehooks and ziptied it on. About 1 hour total time invested.
She enjoyed the ride, so I'll take the time to make a nicer one eventually.
Material matches close enough
Gotta love the zip ties. It's only on the bike when she joins me anyway, and that's rare.
Upgraded the front suspension with a Progressive drop in spring replacement. Easy upgrade. You just remove the top caps pull out the old springs, put in the new springs and cut the supplied PVC spacers to get your preferred sag set.
Tools that help with the job but aren't strictly required - fork nut socket, and if you're changing the fork fluid, (since you've got it open) this oil level tool is clever.
For the rear I went with 13" Progressive 412's. I'm over 6' tall, so the added height and extra travel is nice. I'm also under 200lbs so I went with the standard springs vs. the "heavy duty". Not the best ride out there, but it was a huge improvement over stock. Never realized I was hugging the tank with my knees over speed bumps and stuff until I didn't have to anymore.
This was intimidating, but turned out to be a simple install. Jacked up the rear, removed the old shocks. Then adjusted height of jack (rear wheel now on ground since there's no shocks holding swingarm up) until the new shocks holes lined up. Done.
Later, I decided to extend the front forks 4"'s. I wanted a bit of stretched look, and little bit of rise. Didn't get crazy with 6+ over, although it was tempting. I'm really happy with how the 4 over came out. I like the fork tube only (no rake) look. It's inspired by the old "Norcal style" bikes.
This was the most stressful thing I've done to the bike. I was really nervous taking the forks apart, and I rounded out the Allen head that holds the dampers at the bottom most part of one of the forks. I had to drill it out and get a new screw (replaced them both as a matter of course).
Install - jack front of bike and secure it. Remove the tire, fender, and forks. Take the guts out of the fork tubes and transfer them to new tubes. Replace seals (a.k.a. rebuild the forks) while you're in there, and replace the fork oil. There's a debate on how much oil to use with the extended tubes. I opted to follow the factory measurement and it feels fine to me. I also took my old PVC spacers out (referenced above) and cut new ones adding 4"'s. Put it all back where you found it, step back and enjoy.
Pictures of install:
Before
Wheel and Fender off
Forks out. Springs are in the box/bucket in foreground to collect oil and keep things clean
After
I only needed a longer brake line. Everything else pretty much lifted up the same ratio. The process is outlined in the FSM really well, and Delboy's garage has a great video showing the internals and how to make your own seal setting tool out of PVC.

 01-03-2017, 02:46 PM