
2003 Sportster Transformation - Project
#1
 08-20-2011, 11:27 PM

Join Date: Oct 2010
Location: New England
Posts: 54
Likes: 0
Received 0 Likes
on
0 Posts
Background: My wife purchased a 2003 Sporty a few years back. At that time my softail was a bit sick and required some TLC (still waiting...bought a Road King instead of finishing) and I put quite a few miles on the Sportster and acquired a great affinity for it.
She has since wanted to trade it it for a new 48, but it's been difficult to justify it when she has put very few miles on the 2003 (only 8,000) and needs a new car instead.
So for a wedding gift [bonus points] - I decided to strip her bike down and "clean" it up a bit on a stretched budget.
As many of you know - Chrome sucks - it pits, rusts, flakes, swirls, and best way to clean is to ride, and with the long New England winters, it's not always an option. So I made an effort to remove all "extra" chrome from the bike and strip, grind and paint. I also covered up any stained aluminum - Window was broke on the garage a few years back and the neighborhood cats found it necessary to get under the bike cover spray the bike all winter long
I chose not to powder coat because I did not have time to run a new service to the garage for a junker oven for a single project.
Details:
2003 - Sportster XLH1200 Custom
Day 1:

Check out those sweet buckhorns...and yes that is snow on the ground.
After a few years...we have some mods

Intake: Cheap Midwest Motorcycles Foam
Exhaust: Cheap Midwest Motorcycles Turndowns w/black header wrap
Forward Controls: Cheap China Chrome ISO ones.
Carb: Stage 1 Jets
Fork Bag: HD
Rear Shocks: Progressive 10.5
---- Transformation ----
New Tins: Stock 3G Tank, Replacement Rear Fender, 2010 Dyna Front Fender (Not on)
Air Cleaner: Drilled Chrome Aircleaner (for Bendix/Kehein) Custom mounted for new style flange.
Exhaust: Same - removed the pitting and flaking chrome. DEI Black High-temp silicone.
Front Shocks: 15w Oil, Stripped and painted with VHT Wrinkle
Rotors: Painted with DEI Black Satin, Hi-temp paint
Triple Trees: Painted with VHT Wrinkle, drilled for headlight mount
Headlight: New Black Classic Style Headlight, custom polished aluminum mount - removed the visor
Gauges: Moved to Tripe Trees versus risers
Bars: 10" mini apes
Mirrors: Cheap Ebay Black Oval Mirrors (horrible)
Grips: Rubber bobber style
Valve Covers: Painted Upper and Lower (VHT Wrinkle), Polished Middle
Forward Controls: Cheap China ones, stripped, cleaned and painted with VHT Wrinkle
Seat: La Rosa Solo Spring (custom stained)
Seat Mount: Midwest Motocycle (modified, build custom nose extension to work with LaRosa)
Rear Fender: Chopped - tail light removed
Lighting: Kuryakyn Run/Brake/Turn w/Load Equalizer (DOA out of box, new one on the way)
Flashers: Stock, painted semi gloss black
Saddle Bag: LaRosa Sporstster (2004+ [work fine]).
Rear Shocks: Painted Progressives (VHT)
Wheels: Stock Painted (Black Semi with Wheel Coating)
Covers: Cam, Primary, Sprocket - painted with VHT wrinkle
Covers: Points, Derby - color matched to tank
Flasher Relocation: Moved to triple trees, painted black [chrome was flaking off out of box]
Clutch: Easy Clutch Mod
Jiffy Stand: 883Hugger
Fluids: Shockproof Light Weight - Primary, Mobil-1 V-Twin - Engine
Spark: NGK Iridium
Gaskets: All new

Starting the strip
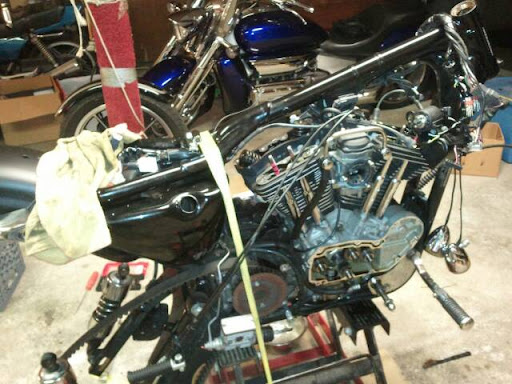
Stripped Down

Cutting the replacement fender

Stripping the forks

Derby - VHT Wrinkle Wet

VHT Hardened

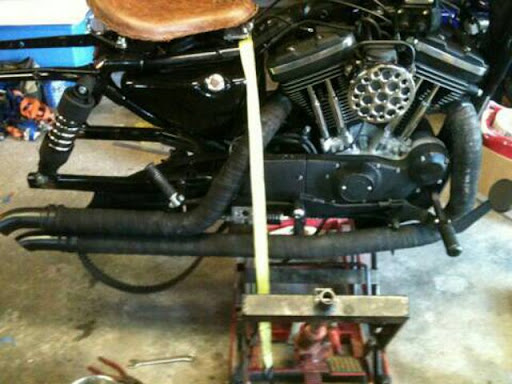
Front End on

Mocking up
DEI - Silicone Black Satin Paint on Pipes/Wrap

Wheels Sprayed to look like 883 Iron

On the bike

Original Tank Color - Had a hard time spraying the bass boat gold flake. Went different route.

Back on the ground

The other side

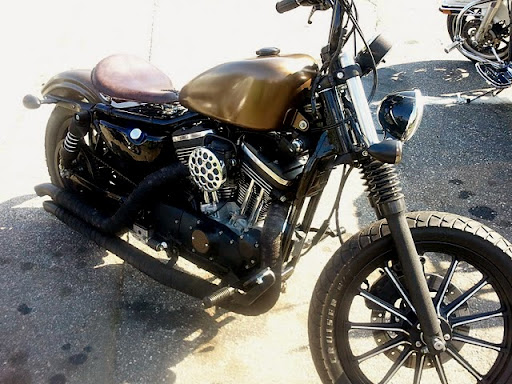
Gong for the rebirth ride.

Near finished product - need to still add the emblems
Notes:
VHT Wrinkle is picky. Did not work well on everything. Perhaps it was the temperature, humidity, prep, or a number of combinations. It is durable, but should have gone with the Gloss or Semi-gloss.
DEI High Temp Silicone Paint: Paint is awesome. A bit soft when not cured. It lays well, dries fast, and does its job.
Cam Timing: It is tricky to get right. Make sure that it lines up perfectly. If it looks a little off...it is.
Painting Chrome: Expect it to come off.
Painting Bass-boat flake: Use the right gun. 2.5mm or larger. Else you will simply waste paint and time.
Keep some 1/4" aircraft aluminum stock around...always has some uses.
She has since wanted to trade it it for a new 48, but it's been difficult to justify it when she has put very few miles on the 2003 (only 8,000) and needs a new car instead.
So for a wedding gift [bonus points] - I decided to strip her bike down and "clean" it up a bit on a stretched budget.
As many of you know - Chrome sucks - it pits, rusts, flakes, swirls, and best way to clean is to ride, and with the long New England winters, it's not always an option. So I made an effort to remove all "extra" chrome from the bike and strip, grind and paint. I also covered up any stained aluminum - Window was broke on the garage a few years back and the neighborhood cats found it necessary to get under the bike cover spray the bike all winter long
I chose not to powder coat because I did not have time to run a new service to the garage for a junker oven for a single project.
Details:
2003 - Sportster XLH1200 Custom
Day 1:
Check out those sweet buckhorns...and yes that is snow on the ground.
After a few years...we have some mods
Intake: Cheap Midwest Motorcycles Foam
Exhaust: Cheap Midwest Motorcycles Turndowns w/black header wrap
Forward Controls: Cheap China Chrome ISO ones.
Carb: Stage 1 Jets
Fork Bag: HD
Rear Shocks: Progressive 10.5
---- Transformation ----
New Tins: Stock 3G Tank, Replacement Rear Fender, 2010 Dyna Front Fender (Not on)
Air Cleaner: Drilled Chrome Aircleaner (for Bendix/Kehein) Custom mounted for new style flange.
Exhaust: Same - removed the pitting and flaking chrome. DEI Black High-temp silicone.
Front Shocks: 15w Oil, Stripped and painted with VHT Wrinkle
Rotors: Painted with DEI Black Satin, Hi-temp paint
Triple Trees: Painted with VHT Wrinkle, drilled for headlight mount
Headlight: New Black Classic Style Headlight, custom polished aluminum mount - removed the visor
Gauges: Moved to Tripe Trees versus risers
Bars: 10" mini apes
Mirrors: Cheap Ebay Black Oval Mirrors (horrible)
Grips: Rubber bobber style
Valve Covers: Painted Upper and Lower (VHT Wrinkle), Polished Middle
Forward Controls: Cheap China ones, stripped, cleaned and painted with VHT Wrinkle
Seat: La Rosa Solo Spring (custom stained)
Seat Mount: Midwest Motocycle (modified, build custom nose extension to work with LaRosa)
Rear Fender: Chopped - tail light removed
Lighting: Kuryakyn Run/Brake/Turn w/Load Equalizer (DOA out of box, new one on the way)
Flashers: Stock, painted semi gloss black
Saddle Bag: LaRosa Sporstster (2004+ [work fine]).
Rear Shocks: Painted Progressives (VHT)
Wheels: Stock Painted (Black Semi with Wheel Coating)
Covers: Cam, Primary, Sprocket - painted with VHT wrinkle
Covers: Points, Derby - color matched to tank
Flasher Relocation: Moved to triple trees, painted black [chrome was flaking off out of box]
Clutch: Easy Clutch Mod
Jiffy Stand: 883Hugger
Fluids: Shockproof Light Weight - Primary, Mobil-1 V-Twin - Engine
Spark: NGK Iridium
Gaskets: All new
Starting the strip
Stripped Down
Cutting the replacement fender
Stripping the forks
Derby - VHT Wrinkle Wet
VHT Hardened
Front End on
Mocking up
DEI - Silicone Black Satin Paint on Pipes/Wrap
Wheels Sprayed to look like 883 Iron
On the bike
Original Tank Color - Had a hard time spraying the bass boat gold flake. Went different route.
Back on the ground
The other side
Gong for the rebirth ride.
Near finished product - need to still add the emblems
Notes:
VHT Wrinkle is picky. Did not work well on everything. Perhaps it was the temperature, humidity, prep, or a number of combinations. It is durable, but should have gone with the Gloss or Semi-gloss.
DEI High Temp Silicone Paint: Paint is awesome. A bit soft when not cured. It lays well, dries fast, and does its job.
Cam Timing: It is tricky to get right. Make sure that it lines up perfectly. If it looks a little off...it is.
Painting Chrome: Expect it to come off.
Painting Bass-boat flake: Use the right gun. 2.5mm or larger. Else you will simply waste paint and time.
Keep some 1/4" aircraft aluminum stock around...always has some uses.


#6
08-21-2011, 06:41 AM
Elite HDF Member
#7
08-21-2011, 06:56 AM
Road Warrior
Trending Topics
#8
08-21-2011, 08:33 AM
Join Date: Oct 2010
Location: New England
Posts: 54
Likes: 0
Received 0 Likes
on
0 Posts
I tried talking her into moving the dumb gauges. I was gong to put them on the down tubes - but being s stubborn woman, didn't want them moved out of eye range.
Missed a picture: Rear
Used a 2004+ HD side license plate bracket....Works fine on the 2003, had to extend some wiring. I removed the guts from the brake light and mounted it to the front side of the rear fender; directly under the flasher module. Had to extend the wiring, but easy enough for a clean mod.

Orange sled is mine...traded the road king last year
Missed a picture: Rear
Used a 2004+ HD side license plate bracket....Works fine on the 2003, had to extend some wiring. I removed the guts from the brake light and mounted it to the front side of the rear fender; directly under the flasher module. Had to extend the wiring, but easy enough for a clean mod.
Orange sled is mine...traded the road king last year
