
DIY Maintenance Swingarm Bearings/Exhaust Removal
#1
 10-14-2011, 11:03 PM

Join Date: Aug 2009
Location: Columbus, Ohio, USA
Posts: 3,212
Likes: 0
Received 207 Likes
on
169 Posts
So here is a tutorial of how to get at those pesky swing arm bearings (and remove the exhaust in the process). Important if you ride in the rain (I do a lot here in Ohio) or just haven't done it in a while. This is for my 2002 model. Yours may vary, but are likely very similar.
Step 1: Remove Heat Shields
Materials needed:
Flathead screwdriver
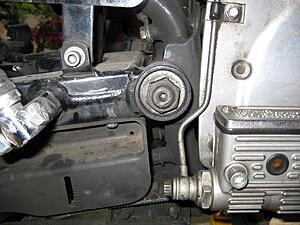
To do this you unscrew the hose clamps that hold the shields onto the pipes. A standard flathead screwdriver works for this. I suggest using one that is short in length so you can get around the air cleaner and other stuff. You can see one here in the picture. There are a total of six (6), two (2) for each section of the exhaust, front, rear, and crossover.
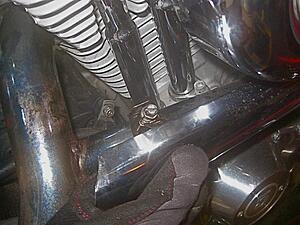
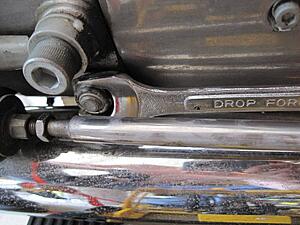
Step 2: Remove exhaust flange nuts.
Materials needed:
��� 6-point socket
6�� extension
ratchet (3/8�� typical)
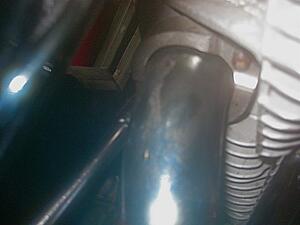
These are pretty easy as well since they are not torqued very tight. To make it easier, the night before you plan to do this (or at least 15-20 minutes), spray the nuts/stud with a little WD-40 and let it soak in. This will help you free rusted on nuts. There are four nuts, and they use ��� 6-point sockets. You will also need an extension for the socket. A 6�� extension worked on mine. Here you can see my extension on one nut, and the other one open. (Sorry for the low quality, it was dark.)
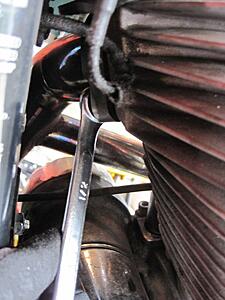
To get to the front cylinder, one nut can be taken off using the ratchet, but the other is hard to get at. My solution was to just use a standard ��� combination wrench and reaching up in there. Problem solved!
Step 3: Remove muffler bolts and exhaust.
Materials needed:
��� combo wrench
��� allen wrench
5/16�� combo wrench
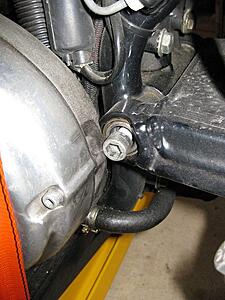
Now you need to remove the muffler bolts. The rear one is just 5/16�� and the front is ��� and is a little harder to get off. To get the front one you need to loosen the rear master cylinder from its mounts by loosening the two mounting nuts.
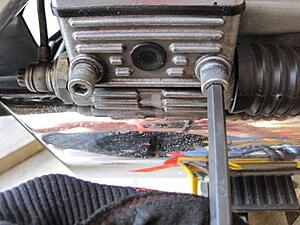
Once you do this you can lift the brake/forward control bar (mine has forwards) out of the way. If you have mids, you can just stick a ratchet on there and take off the nut. With the forwards you need to get in between the lever with your ��� combo wrench and loosen the nut. It takes a little bit of time but is easier than taking off the brake controls.
Now you can pull off the entire exhaust system and set it out of the way.
Step 4: Pull the exhaust gaskets out of the ports.
Materials needed:
Toothpicks
Needle nose pliers
Replacement gaskets
Once you have the exhaust off, the ports will look like this:
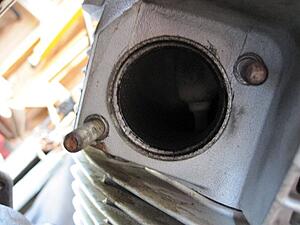
You need to pull out the crush gaskets that fit inside. Use a toothpick (so you don�t gouge the metal) to scrap/pull up the gasket so that you can get your pliers on it. It will then look like this:
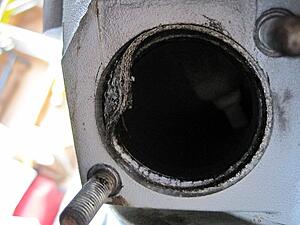
You can now grab a hold of it with your pliers and pull the whole thing out as a unit and throw it away. Do the same for the other cylinder as well as the one in the crossover pipe.
Step 5: Remove swingarm pivot shaft.
Materials needed:
3/8�� allen wrench
heat gun
1�� 6-point socket
ratchet
I already had the rear wheel removed for another project, but I believe it can be done with the wheel on the bike as long as you are careful about the height you put the bike up. Once you remove the pivot shaft the arm will swing freely. Jack up the bike just enough to unload the shocks, no more.
The first thing is to remove the hex bolt from the left side of the bike that holds the pivot shaft in. I used a heat gun applied directly to the bolt to help loosen the threadlock that is factory applied. Then take your 3/8�� allen wrench and unbolt it. If you have trouble, you can use the ratchet to hold/turn the opposite side of the 1�� 6-point pivot shaft.
Now you can just slide the pivot shaft out of the swingarm. Make sure not to lose anything if it falls out. This will give you access to the dust covers and tapered Timken bearings on the right-hand side of the swingarm that we are looking to grease.
If you leave the wheel on, and even if you don�t, make sure to not let the swingarm swing out too far now that it will be hinging on the rear suspension. You could damage something or lose a piece. You only need the suspension to be unsprung, no more.
Step 6: Clean and repack bearings/races.
Materials needed:
WD-40 (non-spray can is easier)
Waterproof bearing grease
Nylon bristled toothbrush
Loctite 242 (blue)
During this whole process, make sure to keep track of the bearings and don�t switch them up. They need to go back in the same side they came out of.
Now you need to get the bearings out. They are protected by the dust cover on both sides. You can see that in the picture below.
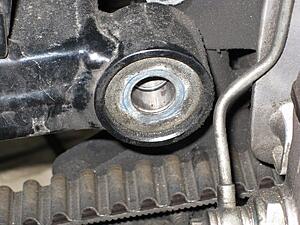
I removed the lower belt guard before doing all this to allow me to drop the swingarm enough to get the inside bearing out. It�s three (3) bolts and I believe they are 5/16��. Make sure to put it back on before you put the exhaust on or it will be challenging if not impossible.
You need to remove the dust cover to access the bearing. Mine were stuck in there a bit, and I used a dental pick to pry one side out. For the other side I used a socket and punched out the bearing/dust cover in one unit. If you do that, be careful to use a good fitting socket so you don�t damage the bearing or race.
Once you do this you can pull out the bearings. There will be a spacer in between them that looks something like a snap-ring. Just hold on to that until you reinstall the bearings. Wipe off the bearings with a clean rag, and wipe out the races as well.
Inspect both the bearing and the races for deep grooves, wear, or gouging. These are low-speed bearings so a minor blemish is not a big deal, but if there is a lot of damage you should figure out why it is damage and replace the bearing/race as a unit.
Clean the bearing in WD-40 and get all the old grease out. Use the toothbrush to help get them clean. Once they are clean, wipe them down and allow them to dry. You can blow on them to speed up the process.
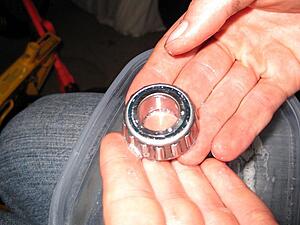
Once the bearings and races are clean you need to repack them with bearing grease. I use waterproof marine axel grease from the marine store that we also use on our trailer tires (they get submerged) and propeller shaft for our boat. Any quality waterproof bearing grease will do, however.
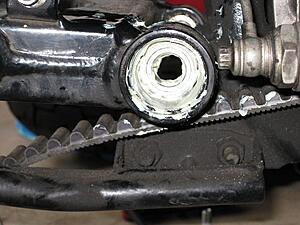
Take a big glob of it in your hand and start smearing it all over and into the bearing. Turn it and squish more into the rollers. You want that thing to be packed and covered. There is no such thing as too much grease. Also smear a good amount into the races and cover them thoroughly. Here is what a packed bearing looks like:

Now you need to reinstall the bearings. Simply put them back into the swingarm the same way they came out, like so:
Put the dust covers back on and you are done with the disassembly for this project. Now you just reverse the process and put everything back on.
When you reinstall the pivot shaft, you want to apply Loctite 242 (blue) to the hex bolt threads. Clean out the threads for the best results. All the crud can be cleared out easily using a dental pick.
When putting the exhaust back on, put in the crush gaskets and then put on the exhaust. Tighten the nuts starting with the flange nuts, then the muffler mount nuts. Don�t over tighten the flange nuts. It is not much and it feels like you should tighten them more. I accidentally did this, but it�s not too big of a deal.
If you use the OEM gaskets, you can get spill over blocking your ports. The SE gaskets (better in my opinion) aren�t as susceptible to this. Just loosen and torque back to the proper values. Wipe the pipes down and check for leaks.
That�s all! Good luck on your project, and thanks for reading.
Torque values
Pivot shaft bolt 50 ft-lbs
Rear master cylinder
mounting bolts 155-190 in-lbs
Muffler mounts 10-15 ft-lbs
Exhaust Flange nuts 6-8 ft-lbs (72-96 in-lbs)
Step 1: Remove Heat Shields
Materials needed:
Flathead screwdriver
To do this you unscrew the hose clamps that hold the shields onto the pipes. A standard flathead screwdriver works for this. I suggest using one that is short in length so you can get around the air cleaner and other stuff. You can see one here in the picture. There are a total of six (6), two (2) for each section of the exhaust, front, rear, and crossover.

Step 2: Remove exhaust flange nuts.
Materials needed:
��� 6-point socket
6�� extension
ratchet (3/8�� typical)
These are pretty easy as well since they are not torqued very tight. To make it easier, the night before you plan to do this (or at least 15-20 minutes), spray the nuts/stud with a little WD-40 and let it soak in. This will help you free rusted on nuts. There are four nuts, and they use ��� 6-point sockets. You will also need an extension for the socket. A 6�� extension worked on mine. Here you can see my extension on one nut, and the other one open. (Sorry for the low quality, it was dark.)

To get to the front cylinder, one nut can be taken off using the ratchet, but the other is hard to get at. My solution was to just use a standard ��� combination wrench and reaching up in there. Problem solved!

Step 3: Remove muffler bolts and exhaust.
Materials needed:
��� combo wrench
��� allen wrench
5/16�� combo wrench
Now you need to remove the muffler bolts. The rear one is just 5/16�� and the front is ��� and is a little harder to get off. To get the front one you need to loosen the rear master cylinder from its mounts by loosening the two mounting nuts.

Once you do this you can lift the brake/forward control bar (mine has forwards) out of the way. If you have mids, you can just stick a ratchet on there and take off the nut. With the forwards you need to get in between the lever with your ��� combo wrench and loosen the nut. It takes a little bit of time but is easier than taking off the brake controls.

Now you can pull off the entire exhaust system and set it out of the way.
Step 4: Pull the exhaust gaskets out of the ports.
Materials needed:
Toothpicks
Needle nose pliers
Replacement gaskets
Once you have the exhaust off, the ports will look like this:

You need to pull out the crush gaskets that fit inside. Use a toothpick (so you don�t gouge the metal) to scrap/pull up the gasket so that you can get your pliers on it. It will then look like this:

You can now grab a hold of it with your pliers and pull the whole thing out as a unit and throw it away. Do the same for the other cylinder as well as the one in the crossover pipe.
Step 5: Remove swingarm pivot shaft.
Materials needed:
3/8�� allen wrench
heat gun
1�� 6-point socket
ratchet
I already had the rear wheel removed for another project, but I believe it can be done with the wheel on the bike as long as you are careful about the height you put the bike up. Once you remove the pivot shaft the arm will swing freely. Jack up the bike just enough to unload the shocks, no more.
The first thing is to remove the hex bolt from the left side of the bike that holds the pivot shaft in. I used a heat gun applied directly to the bolt to help loosen the threadlock that is factory applied. Then take your 3/8�� allen wrench and unbolt it. If you have trouble, you can use the ratchet to hold/turn the opposite side of the 1�� 6-point pivot shaft.


Now you can just slide the pivot shaft out of the swingarm. Make sure not to lose anything if it falls out. This will give you access to the dust covers and tapered Timken bearings on the right-hand side of the swingarm that we are looking to grease.
If you leave the wheel on, and even if you don�t, make sure to not let the swingarm swing out too far now that it will be hinging on the rear suspension. You could damage something or lose a piece. You only need the suspension to be unsprung, no more.
Step 6: Clean and repack bearings/races.
Materials needed:
WD-40 (non-spray can is easier)
Waterproof bearing grease
Nylon bristled toothbrush
Loctite 242 (blue)
During this whole process, make sure to keep track of the bearings and don�t switch them up. They need to go back in the same side they came out of.
Now you need to get the bearings out. They are protected by the dust cover on both sides. You can see that in the picture below.

I removed the lower belt guard before doing all this to allow me to drop the swingarm enough to get the inside bearing out. It�s three (3) bolts and I believe they are 5/16��. Make sure to put it back on before you put the exhaust on or it will be challenging if not impossible.
You need to remove the dust cover to access the bearing. Mine were stuck in there a bit, and I used a dental pick to pry one side out. For the other side I used a socket and punched out the bearing/dust cover in one unit. If you do that, be careful to use a good fitting socket so you don�t damage the bearing or race.
Once you do this you can pull out the bearings. There will be a spacer in between them that looks something like a snap-ring. Just hold on to that until you reinstall the bearings. Wipe off the bearings with a clean rag, and wipe out the races as well.
Inspect both the bearing and the races for deep grooves, wear, or gouging. These are low-speed bearings so a minor blemish is not a big deal, but if there is a lot of damage you should figure out why it is damage and replace the bearing/race as a unit.
Clean the bearing in WD-40 and get all the old grease out. Use the toothbrush to help get them clean. Once they are clean, wipe them down and allow them to dry. You can blow on them to speed up the process.

Once the bearings and races are clean you need to repack them with bearing grease. I use waterproof marine axel grease from the marine store that we also use on our trailer tires (they get submerged) and propeller shaft for our boat. Any quality waterproof bearing grease will do, however.
Take a big glob of it in your hand and start smearing it all over and into the bearing. Turn it and squish more into the rollers. You want that thing to be packed and covered. There is no such thing as too much grease. Also smear a good amount into the races and cover them thoroughly. Here is what a packed bearing looks like:

Now you need to reinstall the bearings. Simply put them back into the swingarm the same way they came out, like so:

Put the dust covers back on and you are done with the disassembly for this project. Now you just reverse the process and put everything back on.
When you reinstall the pivot shaft, you want to apply Loctite 242 (blue) to the hex bolt threads. Clean out the threads for the best results. All the crud can be cleared out easily using a dental pick.
When putting the exhaust back on, put in the crush gaskets and then put on the exhaust. Tighten the nuts starting with the flange nuts, then the muffler mount nuts. Don�t over tighten the flange nuts. It is not much and it feels like you should tighten them more. I accidentally did this, but it�s not too big of a deal.
If you use the OEM gaskets, you can get spill over blocking your ports. The SE gaskets (better in my opinion) aren�t as susceptible to this. Just loosen and torque back to the proper values. Wipe the pipes down and check for leaks.
That�s all! Good luck on your project, and thanks for reading.
Torque values
Pivot shaft bolt 50 ft-lbs
Rear master cylinder
mounting bolts 155-190 in-lbs
Muffler mounts 10-15 ft-lbs
Exhaust Flange nuts 6-8 ft-lbs (72-96 in-lbs)
#2
04-18-2016, 09:50 PM

Stage I
Join Date: Apr 2016
Location: CO
Posts: 1
Likes: 0
Received 0 Likes
on
0 Posts
pulled my 03 Sporty swingarm and wanna replace bearings before I trike it
Is it as easy as your tutorial? Harley said they needed pressed out and pressed
in! If I can do it at home by all means that's money in my pocket. I guess my
question would be is it easy as you make it look to pop them out? Thanks for info
before o tackle this matter
Is it as easy as your tutorial? Harley said they needed pressed out and pressed
in! If I can do it at home by all means that's money in my pocket. I guess my
question would be is it easy as you make it look to pop them out? Thanks for info
before o tackle this matter
#3
04-19-2016, 08:23 AM
Join Date: Aug 2009
Location: Columbus, Ohio, USA
Posts: 3,212
Likes: 0
Received 207 Likes
on
169 Posts
pulled my 03 Sporty swingarm and wanna replace bearings before I trike it
Is it as easy as your tutorial? Harley said they needed pressed out and pressed
in! If I can do it at home by all means that's money in my pocket. I guess my
question would be is it easy as you make it look to pop them out? Thanks for info
before o tackle this matter
Is it as easy as your tutorial? Harley said they needed pressed out and pressed
in! If I can do it at home by all means that's money in my pocket. I guess my
question would be is it easy as you make it look to pop them out? Thanks for info
before o tackle this matter

Thread
Thread Starter
Forum
Replies
Last Post