Sportster Models 883, 883 Custom, 1200 Custom, 883L, 1200L, 1200S, 1200 Roadster, XR1200, and the Nightster.
Sponsored by:
Sponsored by:

sportster extra plate clutch kit writeup

Thread Tools
 
Search this Thread
 
  #11  
Old 11-03-2013, 11:37 AM
wachuko's Avatar
wachuko
wachuko is offline
Outstanding HDF Member
Join Date: Jan 2011
Location: Orlando, FL
Posts: 2,333
Received 72 Likes on 58 Posts
Thumbs up

Originally Posted by slyedog
I pulled the whole cable as I had new o ring already. This really isn't a writeup yet. Was looking for feedback as to make it one or not. For some reason the ? Mark didn't show up in thread title. I will take time to go detailed and make this a writeup when I can. Right now I was just showing pics of the job.
Please do make it as a write up!! It seems that this is one of those projects that it is best done as early as possible just as preventive measure. Knowing that the stock units can go wrong due to the rivets in the plates...makes me wonder if I should just say the hell with waiting for it to go ballistic and deal with this via warranty or to just replace it and have that extra peace of mind.

So yes, please make it into a write up. A lot of folks here will appreciate having this documented.
 
The following users liked this post:
skypeace (10-14-2018)
  #12  
Old 11-03-2013, 12:17 PM
DavidStiebel's Avatar
DavidStiebel
DavidStiebel is offline
Road Warrior
Join Date: May 2010
Location: Kafar Hanusi
Posts: 1,377
Received 20 Likes on 19 Posts
Default

Originally Posted by Imold
Got a little help from the grandson...

This shows how easy this job is, anybody can do work on a Harley. Teach'em good pop.

Smile, look this way and wait for the flash . . . .

.
 
The following users liked this post:
TashaLuv (06-13-2021)
  #13  
Old 11-03-2013, 01:08 PM
DK Custom's Avatar
DK Custom
DK Custom is online now
Platinum Sponsor
Join Date: Nov 2010
Location: Red Banks, Mississippi
Posts: 17,456
Received 3,930 Likes on 2,288 Posts
Default

Great start to a write up!

The only two things that were not completely clear to me in the manual was the retaining clip and the tiny little part the clutch cable goes into. I was really careful not to drop that into the primary when putting it back together.

Looking forward to your full write up!

Edited to add- I did not trust the new primary cover gasket not to leak, so I used some gasket sealer...interested to know if you did also, or if you trusted the gasket.
 
__________________
Kevin

DKCustomProducts.com
Call/Text: 662-252-8828
Email: Support@DKCustomProducts.com


Last edited by DK Custom; 11-03-2013 at 01:10 PM.
  #14  
Old 11-03-2013, 05:59 PM
slyedog's Avatar
slyedog
slyedog is offline
Elite HDF Member
Thread Starter
Join Date: Aug 2013
Location: Hawkeye state
Posts: 3,789
Received 272 Likes on 185 Posts
Default

Originally Posted by Imold
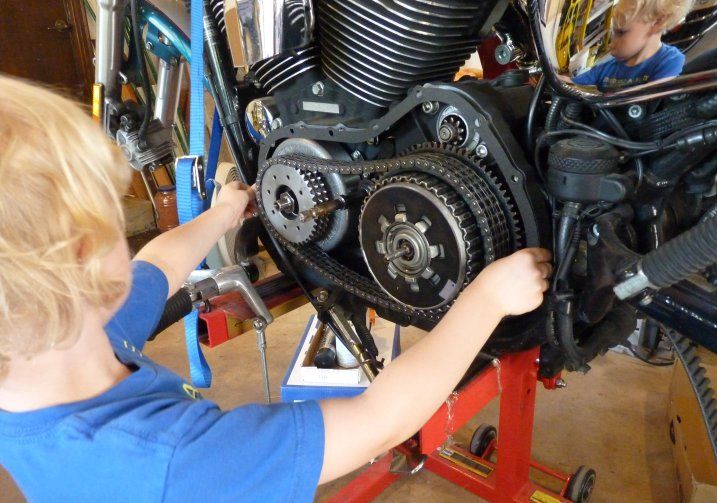
Put a Barnett plate set in mine this summer, at 30,000+ was worried about the rivets. They were a little loose, don't know how long they'd last in that condition. The Barnett pack has a better feel, too. Not hard to do, but you sure need a spring compressor.

Got a little help from the grandson...

I wanted my boy to help me. He is 5. Started on it late and didn't have time for him to help. Good to teach them young so they understand how things work. My GPA did this stuff with me all the time. That is why I do my own wrenching on everything. Awesome that you took time to show him.
 
The following 3 users liked this post by slyedog:
Bladesmith24 (10-27-2021), Joe Kneuss (04-02-2020), skypeace (10-14-2018)
  #15  
Old 11-03-2013, 06:07 PM
slyedog's Avatar
slyedog
slyedog is offline
Elite HDF Member
Thread Starter
Join Date: Aug 2013
Location: Hawkeye state
Posts: 3,789
Received 272 Likes on 185 Posts
Default

Originally Posted by DK Custom
Great start to a write up!

The only two things that were not completely clear to me in the manual was the retaining clip and the tiny little part the clutch cable goes into. I was really careful not to drop that into the primary when putting it back together.

Looking forward to your full write up!

Edited to add- I did not trust the new primary cover gasket not to leak, so I used some gasket sealer...interested to know if you did also, or if you trusted the gasket.
No. I put it on dry. If I was to do it again I would use a very little bit of gasket tack to hold it as it kept wanting to fall when holding chain up to install primary cover. I do use a little black rtv on the quad ring to hold it. A smidge on top, bottom, left and right. Like a bb size. I wipe the excess off outside and inside of groove and then quad ring stays put without any excess rtv getting all over.
 
  #16  
Old 11-03-2013, 06:09 PM
slyedog's Avatar
slyedog
slyedog is offline
Elite HDF Member
Thread Starter
Join Date: Aug 2013
Location: Hawkeye state
Posts: 3,789
Received 272 Likes on 185 Posts
Default

I will answer all your questions about install when I get writeup finished. Will also add some hints that helped me and what I had a hard time with and what I would do again to ease the install. Thanks for looking so far.
 
  #17  
Old 11-03-2013, 10:29 PM
slyedog's Avatar
slyedog
slyedog is offline
Elite HDF Member
Thread Starter
Join Date: Aug 2013
Location: Hawkeye state
Posts: 3,789
Received 272 Likes on 185 Posts
Default

Writeup Is completed. Hope it helps. I am not the best at this so please any feedback to improve would be great. Asked to see if title can be changed and possibly sticky if good enough.
 
  #18  
Old 11-04-2013, 09:08 AM
rhythm1978's Avatar
rhythm1978
rhythm1978 is offline
Tourer
Join Date: Sep 2013
Location: Memphis, TN
Posts: 419
Received 24 Likes on 20 Posts
Default

Thanks for taking the time to do this. I have just over 20K on what I assume is the stock clutch. I really don't know if the original owner changed it or not. I have been kicking around the idea of going ahead and replacing over the winter.
 
  #19  
Old 11-04-2013, 12:03 PM
Imold's Avatar
Imold
Imold is offline
another old guy

Join Date: Jul 2011
Location: Frozelandia, Minnysota
Posts: 27,066
Received 4,614 Likes on 2,726 Posts
Default

Originally Posted by DavidStiebel
This shows how easy this job is, anybody can do work on a Harley. Teach'em good pop.

Smile, look this way and wait for the flash . . . .
.
I was 62 when he was born, make that grandpop!
Name:  wheelchair-smiley-face.gif
Views: 13149
Size:  941 Bytes

Originally Posted by DK Custom
...
Edited to add- I did not trust the new primary cover gasket not to leak, so I used some gasket sealer...interested to know if you did also, or if you trusted the gasket.
I didn't use any, no leaks. Occasionally I've put a dab of tacky red grease here and there to help hold a gasket in position, doesn't make a spot where you have to scrape it off next time, and I've never had that leak, either.

Originally Posted by slyedog
I wanted my boy to help me. He is 5. Started on it late and didn't have time for him to help. Good to teach them young so they understand how things work. My GPA did this stuff with me all the time. That is why I do my own wrenching on everything. Awesome that you took time to show him.
My grandson is 4 1/2, sometimes he likes doing this, other times won't go in the garage. But I'd bet he'll know a lot more about how things work mechanically than most kids when he goes to school. Maybe the teachers, too. I started with my Dad; he did most of his car repair himself, and tried to teach me what he knew, which actually wasn't much, but it got me interested. Was fun, in later years, to help him with his cars and show him new tricks.

Originally Posted by rhythm1978
Thanks for taking the time to do this. I have just over 20K on what I assume is the stock clutch. I really don't know if the original owner changed it or not. I have been kicking around the idea of going ahead and replacing over the winter.
It's not real difficult, only tool you might need to buy is the clutch spring compressor (don't try to mickey mouse this, you'd probably end up getting a compressor anyway) - my Barnett was $50 on line. Still far less than shop labor. I'd never get another stock clutch with those brass rivets, plenty of aftermarket with good reports. I pulled the wheels and swing arms on my 1200 (36,000 miles) while I had it on the lift, needed tires and brake pads anyway, and replaced the wheel and swingarm bearings. The wheel bearings were smooth, but had barely any grease in them, figured with that mileage and the wheels already off, go for it. I didn't intend to pull the swingarm, but with the shocks disconnected and the wheel off, they were tight enough to hold the arm up, didn't like that at all. They weren't really worn much, but were packed with crud (they're spherical ball bearings, just a big round ball with a hole in it, no grease) and hard to move. Cleaned up real nice, but had a little side play, so figured go new and probably never worry about them again. Just used a threaded rod and some sockets that fit right to pull and install the bearings - I don't use hammers on bearings, in or out. The wheel bearings need something like a Pit Posse Harley bearing kit (around $100), doubt you'd get them out with any slide hammer puller, they're really tight.

Another benefit to a fairly early teardown is cleaning the hardware (polish those axles till they slide in by hand) and coating unthreaded portions with grease or anti seize so they'll come out without a hammer next time. I've had to use a small sledge hammer to drive out an axle rusted to that inner spacer, not good. Those swingarm bearings have no seals (I think Harley could have sealed them somehow, design defect to me), and the circlips on the outboard side were really rusty - I coated them with tacky red grease, will see how that holds up. Here's a pic.

Name:  8c4a3e68-3ac8-4dca-902e-6ed899aeddd7.jpg
Views: 13269
Size:  161.5 KB

I pulled a bunch of bolts and screws, some had some rust on the threads, cleaned that off with a wire brush, put them back, most with some blue loctite, and used a torque wrench everywhere I could fit one. Several were getting loose, and was missing 3 or 4. Might sound like a lot of work, but none of it was really hard (bearing in mind I have the clutch tool, bearing pullers, and a tire changer) and the bike is certainly safer and in way better condition now; I wouldn't be worried about riding it anywhere.

OP, I hope you don't think I'm trying to hijack your thread, just trying to be helpful.
 
  #20  
Old 11-04-2013, 06:27 PM
c0jones's Avatar
c0jones
c0jones is offline
Road Master
Join Date: May 2012
Location: St Louis, MO
Posts: 933
Likes: 0
Received 9 Likes on 7 Posts
Default

Originally Posted by slyedog
...Hints and Tips: Instructions from energy one didn't specify to soak only fiber or both so I threw steels in afterward to be safe...
Soaking the steel plates is pointless, they're not porous.


Quick Reply: sportster extra plate clutch kit writeup


All times are GMT -5. The time now is 04:04 AM.